611353
1
Zoom out
Zoom in
EDGE
+ Please visit our website to download our multi-language manual
www.isawcam.com/
- The LCD will ash the low battery icon when the battery is too low and almost depleted.
- The camera will save the le, if it is recording, and then turn o.
Then, you must recharge your battery.
- It will take about 150 minutes to fully charge the battery via USB.
- You can use an AC charging adapter (optional accessory) for a quicker recharge.
1. Turn o the camera.
2. Connect the camera USB port to your computer via USB cable.
3. The blue LED will be on and the battery will start recharging.
4. The LED will be o when the battery is fully charged.
- Turn on the ‘WiFi’ on your camera - WiFi signal is activated
- WiFi is ready to connect
- ‘ISAW Viewer ll’ is not connected to camera.
- Setup WiFi connection between
the camera and the smartphone.
- Enter ‘ WiFi Setup’ of smartphone.
- Select ‘iCam_YYXXXXXX’ in WiFi setting.
- The default password is ‘1234567890’
- Run ‘ISAW Viewer ll’ application on your
smartphone.
- Tap ‘Connect’ in the application to
connect your ISAW camera.
- The smartphone screen will display the
live screen of the camera.
- Control the camera through the control
panel of the smartphone application.
- Show LIVE screen display
- Start/Stop video recording
- Start/Stop photo shooting
- File viewer
- File download
- User settings
With the WiFi function of ISAW Cameras, you can control the camera with your smartphone.
- Compatible with iOS ver. 6.0 or higher, Android OS Jelly Bean or higher.
- Before you connect the camera, download the ‘ISAW Viewer ll’ application on your smartphone.
- Search for ‘ISAW VIEWER ll’ in iPhone App Store or Google Play Store
* While your smartphone is connected to the camera, camera button operation will be disabled.
*‘ISAW VIEWER’ will be upgraded with more features as further updates are released.
- Super slim 1080p 60fps Action camera
- 4K 10fps recording, 2.7K 15fps recording supported (MJPEG)
- UltraView for a wider and immersive 1080p recording
- 40m waterproof housing
- Sony Exmor 16MP CMOS sensor
- 170° wide-angle eld of view (FOV)
- 1.5” built-in LCD view nder
- Built-in WiFi with enhanced application viewer
- High speed recording (720p 120fps slow motion)
- Time lapse video, time lapse photo
- Burst shot photos (max. 5 shots in 16MP)
- Multi langage menu (Eng, Esp, Fra, Deu)
- Rechargeable Li-ion battery
- Battery running time : max. 100 minutes of continuous recording
(* recording time may vary, depends on environmental condition.)
- Recharging time : 150 minutes
- Easy graphical user interface in LCD display
- If the camera is connected to a computer or an AC adapter while it is powered o,
the camera starts to recharge the battery.
- If the camera is connected to a computer while it is powered on, the camera
changes to le-transfer mode.
- While the camera is connected to an AC adapter or a car charger for recharge,
the camera can record while it is recharging.
1. Turn on your ISAW Camera.
2. Connect the camera to a computer via a USB cable.
3. The camera LCD will display ‘USB Ready’.
4. Go to ‘my computer’ in the PC.
5. Locate ‘removable disc’.
6. Double click ‘DCIM’ folder and search video or photo les.
- You can always nd the latest rmware updates of ISAW products on the website.
www.isawcam.com
- Firmware upgrade may not possible if the battery is too low.
Recharge the battery up to two third of the gauge for a safer upgrade.
1. Format the memory card, and copy the rmware le to the root directory of the Micro SD card.
2. Insert the Micro SD into ISAW Cameras and turn the camera on.
3.
The rmware upgrade will start automatically, and the camera will turn o when upgrade is nished.
( *Do NOT turn o the device or remove the battery during the rmware upgrade. )
Power On/O
LED
LED
LED
USB
HDTV OUT
LCD
Speaker
Micro SD slot
Internal MIC
Setup button
Mode button
Recording On/O
WiFi On/O
Select menu in setup mode On/O
Press this button and hold for 2 seconds to
turn on or turn off the camera
Press this button to enter/exit the setup menu
Press this button to change camera mode
Press this button to browse the setup categorymenu
Mode changes as Video Mode Photo Mode Playback mode in turn
Press this button to take photo or
to start or stop recording
Press this button to browse the setup menu
Press this button and hold for 2 seconds to turn on or turn off the WiFi
In the setup menu, press this button to
confirm the selected menu
+ The blue LED is on when the battery is charging.
1. Name of parts
2. LCD icons
8. Recharging the battery
14. Package Includes
10. Connect your ISAW Camera to a smartphone
9. Smartphone control
13. Features and specications11. Transferring data to a computer
12. Firmware Update (www.isawcam.com)
Shows the current shooting mode (video or photo)
Shows the WiFi connection status
Shows the usable memory capacity in percentage (%)
Shows the battery capacity status option
While shooting videos or photos, it shows the current recording resolution
While shooting videos or photos, it shows the current shooting mode
While shooting videos or photos, it shows the current recording time
1
1 1
5 6 7 5 6
2 23 34 4
2
3
4
5
6
7
Mode
WiFi
Memory capacity
Battery
Resolution
Shooting mode
Recording Time
No.
Description
Description
Description Description
Function
Function
Function Function
Sub menu
Sub menu Sub menu
Resolution
Mic
Color lters
Time Stamp
Auto start
Time lapse
Loop Rec.
My Tune
Sharpness
Exposure
ISO
AE Metering
Video
Photo My Tune
Settings
1080P 1920 x 1080 60fps
1440P 1920 x 1440 30fps
2.7K 2704 x 1524 15fps MJPEG
1200P 1600 x 1200 30fps
4K 3840 x 2160 10fps MJPEG
+2, +1.7, +1.3, +1, +0.7, +0.3, 0, -0.3, -0.7, -1, -1.3, -1.7, -2
center, average, spot
NB : New settings and parameters are added via updates of the firmware. Make sure to use the latest firware for an optimal experience.
Check www.isawcam.com for the latest firmware updates.
When turned on, below settings will be restored to their last value. Turn off to set to auto.
Strong, Normal, Soft
1080P 1920 x 1080 30fps UltraView
720P 1280 x 720 60fps
720P 1280 x 720 120fps
1080P 1920 x 1080 30fps
720P 1280 x 720 30fps
Resolution
White balance
Time Stamp
Self timer
16M 4608 x 3456 4:3
12M 4032 x 3024 4:3
7.3M 3120 x 2340 4:3
8.5M 3384 x 2538 4:3
5M 2592 x 1944 4:3
2M 1608 x 1206 4:3
3M 2048 x 1536 4:3
Capture options
Burst : Take 5 (16M) photos with a single press of the button
Manual
Time lapse 2s, 3s, 5s, 10s, 15s, 30s, 60s
On / Off
Delays the photo by the selected time: 2s, 10s.
Auto, Daylight, Cloudy, Tungsten lamp, Fluorescent lamp
Loop 1m, 3m, 5m
Time lapse 0.5s, 1s, 2s, 3s, 5s, 10s, 15s, 30s
Take pictures at the selected interval to create an accelerated video.
On / Off. If ON, sound will be captured and added to the video recording.
Set the correction of the exposure
ISO 50, 100, 200, 400, 800, 1600
Set the white balance to a different type of light
Shoot in Vivid colors, Natural colors, Sepia filter, Black &White
On / Off
On / Off. If ON, starts to record after the selected time when the camera is switched on (1s, 5s, 10s)
Language
Time
Power o
Beep
LED
LCD o
Information
TV
Mirror Flip
Format
Delete all
Default
English, French, Spanish, German
Set the current time (YYMMDD:HHMM)
Off / 3m / 5m / 10m
On /Off
On /Off
Off / 1m / 5m / 10m
Shows the current S/W version
Choose frequency PAL (50Hz) or NTSC (60hz)
On /Off (Flips the image vertically)
Cancel / Confirm (Delete all files and format SD card)
Cancel / Confirm (Delete files under ‘DCIM’ folder only)
Cancel / Confirm
Open frameWaterpoof housing Hand grip
Universal Suction
Mount
Screw
Release buckle
Battery
Flat & Curved
adhesive mount
USB cable
Adhesive tapeTripod mount Pivot arm
USER’S Manual
ENGLISH / ESPAÑOL / FRANÇAIS / DEUTSCH
PORTUGUÊS / РУССКИЙ / ITALIANO
한국어 / 中国 / 日本
ENGLISH
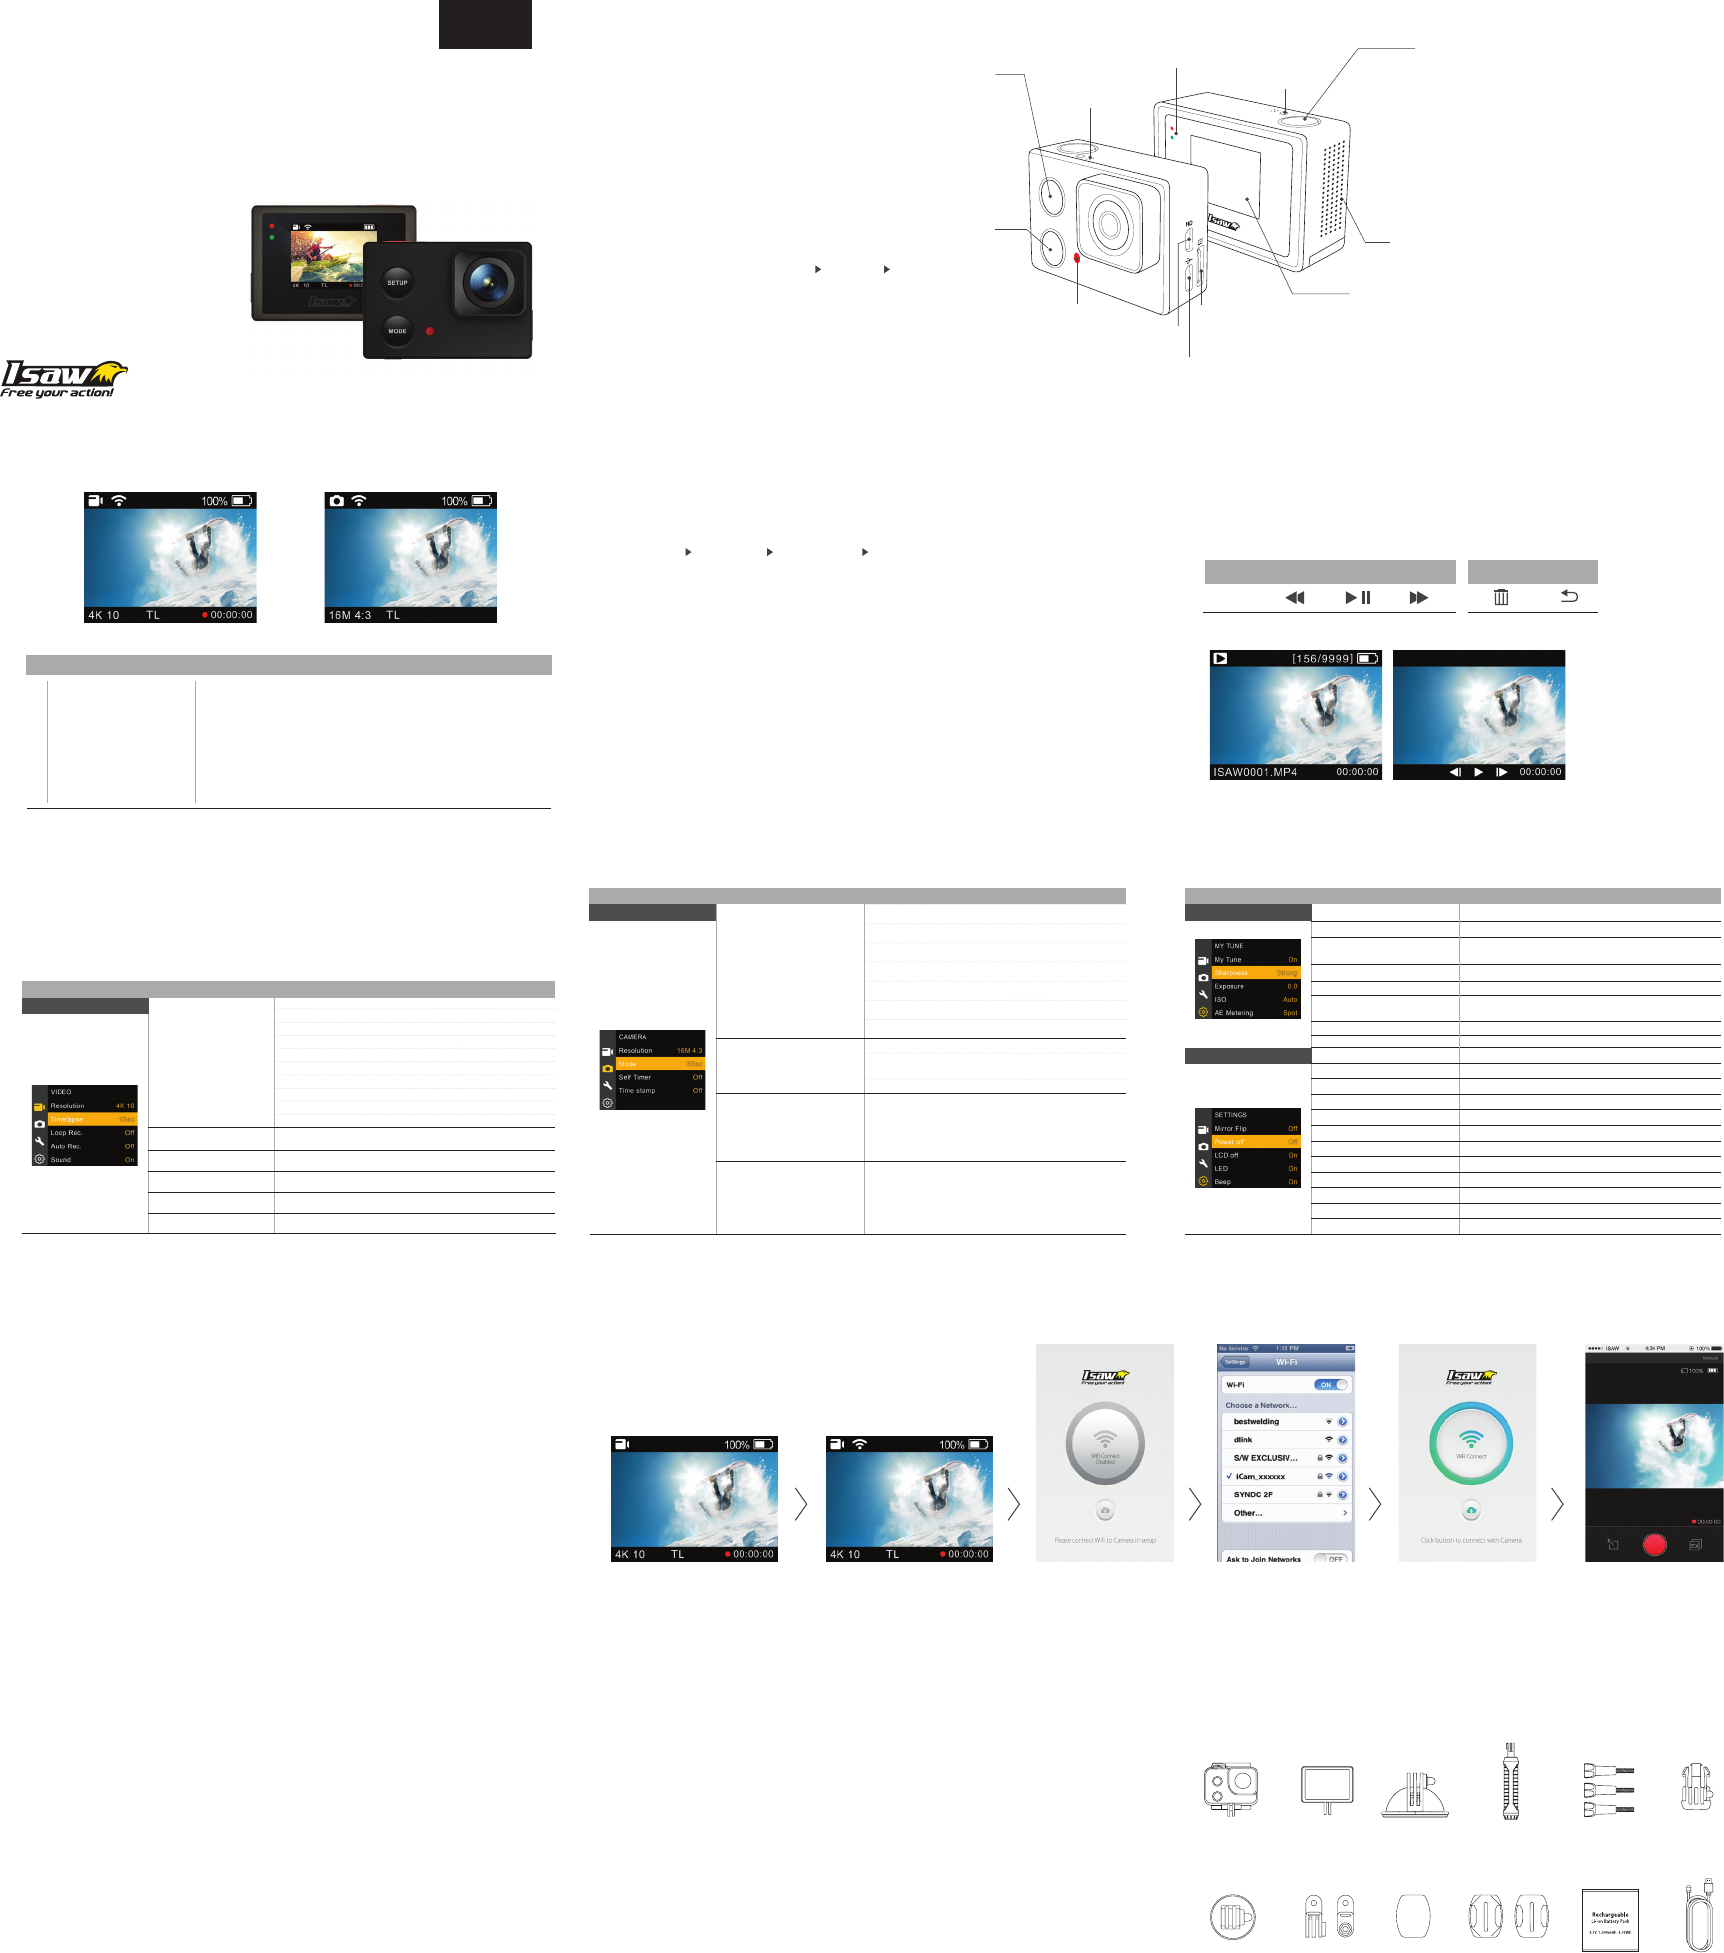
- You can select basic settings and detailed setting options through the user setup menu.
1. Press SETUP to enter the user setup menu.
2. User setup menu is divided into four categories (video, photo, My Tune, settings)
3. Press and hold MODE to move category.
4. Press SETUP and MODE to browse that category.
5. Press REC to select and conrm the setting option within the sub-menu.
7. User setup menu
- While the camera is on, press REC to start recording videos as per the established settings.
- When the camera starts to record, the LED blinks and the LCD displays the recording time.
- Press REC again to stop the recording.
- You can choose various resolutions and recording options in the Video section of the User
setting menu section (see 7. User setup menu)
- While the camera is on, press MODE to change to photo camera mode.
- Press REC to take a photo.
- You can choose various photo sizes and capture options in the Photo section of the User
setting menu section (see 7. User setup menu)
- In time-lapse mode press REC to start the time-lapse and REC again to stop it.
3. Start the camera 6. Playback mode
4. Video recording
5. Photo shoot
- Press MODE hold to change to playback mode
- You can view recorded videos or photos through the LCD screen of the camera.
1. In playback mode, press SETUP to choose a le to view.
2. Press REC to view the le.
3. While the le is playing you can use the control panel by pressing:
Button
Control
MODE(2s) SETUP SETUP (2s) MODEREC.
1) Open the battery cover and insert an ISAW Li-ion battery.
2) Insert a SD card into the SD card slot.
3) Press the power button and hold 2 seconds.
4) The camera turns on and the LCD monitor shows the camera image.
5) Mode changes as
( Video mode Photo mode Playback mode Video mode) in turn.
On /Off
WDR

Brauchen Sie Hilfe? Stellen Sie Ihre Frage.

Forenregeln

Missbrauch melden von Frage und/oder Antwort

Libble nimmt den Missbrauch seiner Dienste sehr ernst. Wir setzen uns dafür ein, derartige Missbrauchsfälle gemäß den Gesetzen Ihres Heimatlandes zu behandeln. Wenn Sie eine Meldung übermitteln, überprüfen wir Ihre Informationen und ergreifen entsprechende Maßnahmen. Wir melden uns nur dann wieder bei Ihnen, wenn wir weitere Einzelheiten wissen müssen oder weitere Informationen für Sie haben.

Art des Missbrauchs:

Zum Beispiel antisemitische Inhalte, rassistische Inhalte oder Material, das zu einer Gewalttat führen könnte.

Beispielsweise eine Kreditkartennummer, persönliche Identifikationsnummer oder unveröffentlichte Privatadresse. Beachten Sie, dass E-Mail-Adressen und der vollständige Name nicht als private Informationen angesehen werden.

Forenregeln

Um zu sinnvolle Fragen zu kommen halten Sie sich bitte an folgende Spielregeln:

Neu registrieren

Registrieren auf E - Mails für ISAW Edge Actioncam wenn:


Sie erhalten eine E-Mail, um sich für eine oder beide Optionen anzumelden.


Andere Handbücher von ISAW Edge Actioncam

ISAW Edge Actioncam Bedienungsanleitung - Deutsch - 1 seiten

ISAW Edge Actioncam Bedienungsanleitung - Französisch - 1 seiten


Das Handbuch wird per E-Mail gesendet. Überprüfen Sie ihre E-Mail.

Wenn Sie innerhalb von 15 Minuten keine E-Mail mit dem Handbuch erhalten haben, kann es sein, dass Sie eine falsche E-Mail-Adresse eingegeben haben oder dass Ihr ISP eine maximale Größe eingestellt hat, um E-Mails zu erhalten, die kleiner als die Größe des Handbuchs sind.

Ihre Frage wurde zu diesem Forum hinzugefügt

Möchten Sie eine E-Mail erhalten, wenn neue Antworten und Fragen veröffentlicht werden? Geben Sie bitte Ihre Email-Adresse ein.


Info