Enter 89 and the dialer will call the programmed numbers once. You will hear the telephone line signals from the control panel built in speaker
during the test (if the dialer is triggered by an alarm in normal operation, it will call silently). Testing can be terminated with the N key.
If two different voice messages were recorded, then use sequence 88 to test the sending of the first message and 89 to test the sending of the second
message.
Note: if you enter 89 in the user mode when there is an incoming call on the telephone line, the dialer will answer the call. This is the way to allow the
installer to dial in to your system from his computer, even if the dialer was programmed to the "never answer" mode during installation. But even with
this manual approval the installer must know the digital dialer access code (8 digits) to be able to establish connection. This access code must be
programmed during the installation (factory default setting is 00000000).
6. Real time and date setting
The control panel has a built in real time clock. All events are stored to the event memory including the time of the event.
At first open the “User mode” by the sequence: F0 + master code. The “User mode” is notified by the letter “U” on the display.
The clock can be set by the sequence: 4 hh mm dd MM YY
hh-> hours (24 hr. cycle)
mm -> minutes
dd-> day
MM-> month
YY-> year
Example: on Jun. 30 2005 at 17:15 enter: 4 17 15 30 06 05
7. Enrollment of the control panel to a UC-2xx or to a master control panel
The control panel can send wireless data to output modules UC–216, UC–222 and UC-260. It can also work as a subsystem of another
JA-65 or JA-60 control panel.
Enter the enrolling mode of the UC receiving device and then enter 299 and the control panel will generate the enrollment signal.
If you want to enroll a subsystem to your control panel, enter the enrolling mode on the MASTER control panel (see 12.1.) and then
enter sequence 299 in the programming mode of the sub control panel.
If the system is split, the sub control panel enrolls to the common shared section.
8. Automatic arming / disarming setting
The control panel can automatically arm and disarm for a requested period of a day. Up to ten instructions (time & action) can be
programmed in the period of one day.
Open the “User mode” of the control panel by the sequence: F0 + master code. The “User mode” is
notified by the letter “U” on the display.
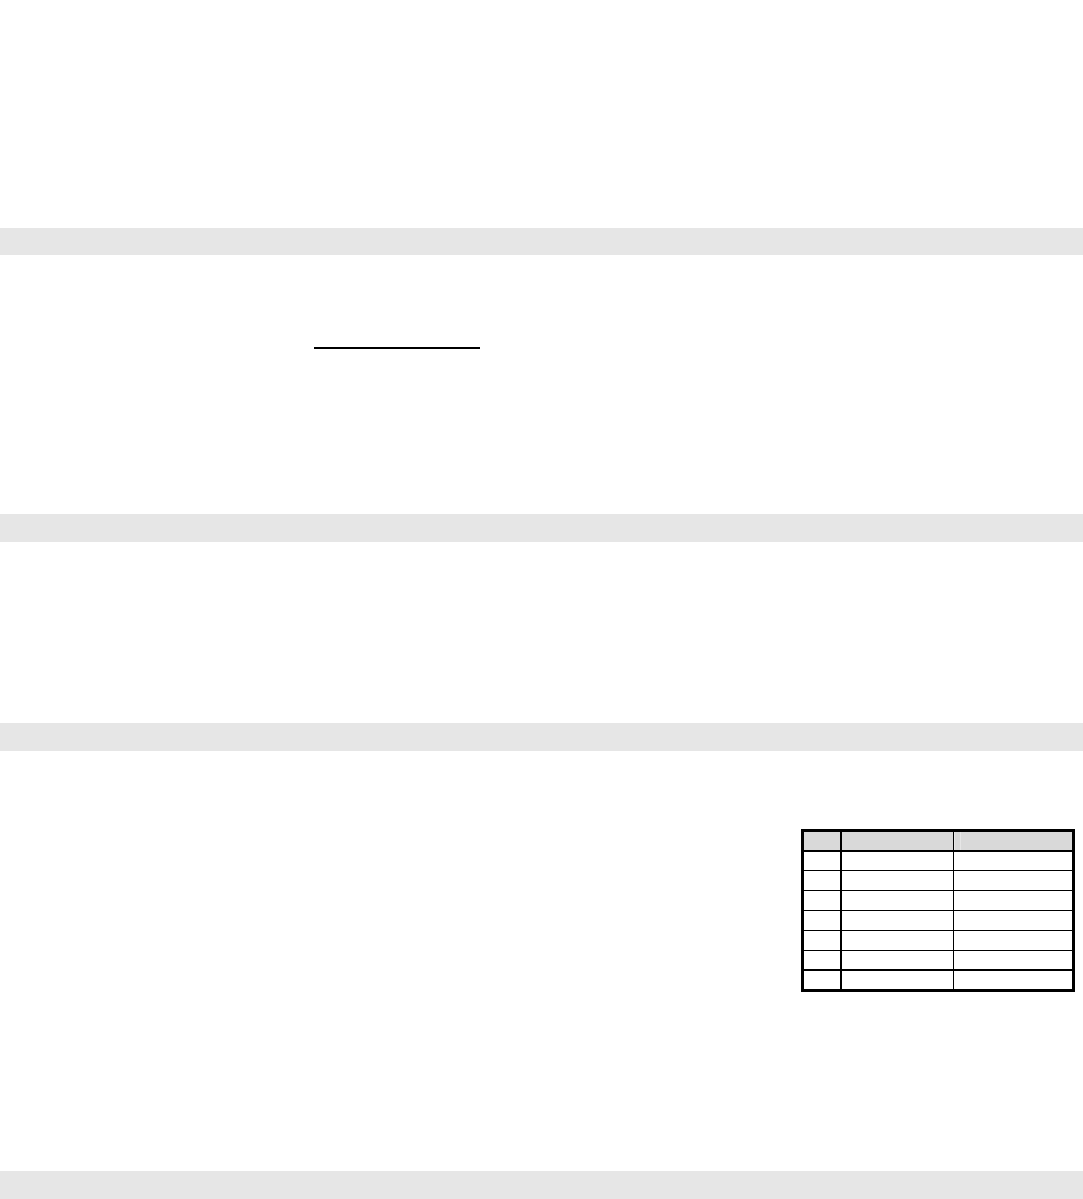
To set the action use the sequence: 64 nahhmm where:
n = instruction number from 0 to 9
a = action (see the actions' table)
hh = hours (from 00 to 23)
mm = minutes (from 00 to 59)
Notes:
• If any automatic action is selected, it will be preformed everyday in the programmed time, following the internal control panel clock (see 12.27.).
• The automatic arming and disarming can be overridden manually anytime (by an user code or a remote control)
• If the control panel is in the requested arming mode before the action time, performance of the programmed action will not change the arming
Example: to program an automatic complete arming of the system at 21:15 everyday enter: 64 0 1 21 15
Factory default setting: all instructions are set for no action
9 Battery replacement in the wireless items
All the battery powered items perform regular battery testing. If the life time of the battery is near the end, the system will indicate the
need for battery replacement (low battery indicator and address of the particular item will be shown on the LED display).
When any detector or keypad asks for new batteries, do following:
• switch the control panel to the user mode (F0 master code)
• open the cover of the detector (keypad) and replace its batteries with new ones (use only corresponding size and good quality
alkaline batteries). Wait for apr. 20 sec before inserting batteries
• close the device’s cover and test the device to confirm it is working.
• to exit User mode, press the N key on the control panel.
Recommendations:
• the system should be annually inspected (function testing, condition of back up batteries, working range of the items etc.) by a
professional
• after 5 years, the control panel and the outdoor siren back up batteries should be replaced with new ones
Libble nimmt den Missbrauch seiner Dienste sehr ernst. Wir setzen uns dafür ein, derartige Missbrauchsfälle gemäß den Gesetzen Ihres Heimatlandes zu behandeln. Wenn Sie eine Meldung übermitteln, überprüfen wir Ihre Informationen und ergreifen entsprechende Maßnahmen. Wir melden uns nur dann wieder bei Ihnen, wenn wir weitere Einzelheiten wissen müssen oder weitere Informationen für Sie haben.
Art des Missbrauchs:
Forenregeln
Um zu sinnvolle Fragen zu kommen halten Sie sich bitte an folgende Spielregeln:
Lesen Sie zuerst die Anleitung;
Schauen Sie nach, ob die Frage bereits gestellt wurde;
Stellen Sie die Frage so deutlich wie nur einigermaßen möglich;
Erwähnen Sie was Sie bereits versucht haben um das Problem zu lösen;
Ist Ihr Problem von einem Besucher gelöst dann lassen Sie ihn / sie wissen in diesem Forum;
Falls Sie reagieren möchten, so verwenden Sie bitte das Antworten- Formular;
Da ihre Frage für alle Besucher sichtbar ist, sollten Sie lieber keine persönliche Daten erwähnen.
Neu registrieren
Registrieren auf E - Mails für Jablotron JA-65 MAESTRO wenn:
neue Frage gestellt werden
neue Handbücher vorhanden sind
Sie erhalten eine E-Mail, um sich für eine oder beide Optionen anzumelden.
Das Handbuch wird per E-Mail gesendet. Überprüfen Sie ihre E-Mail.
Wenn Sie innerhalb von 15 Minuten keine E-Mail mit dem Handbuch erhalten haben, kann es sein, dass Sie eine falsche E-Mail-Adresse eingegeben haben oder dass Ihr ISP eine maximale Größe eingestellt hat, um E-Mails zu erhalten, die kleiner als die Größe des Handbuchs sind.
Ihre Frage wurde zu diesem Forum hinzugefügt
Möchten Sie eine E-Mail erhalten, wenn neue Antworten und Fragen veröffentlicht werden? Geben Sie bitte Ihre Email-Adresse ein.