The JA-81E is a component of Jablotron’s OASiS alarm system and is designed to
control and program the system. The display backlight colour can be set according
to your needs. It has a built-in proximity access card reader and allows the wiring up
of a separate door detector. The keypad should be wired to the control panel.
Installation
Installation shall only be undertaken by technicians holding a certificate issued by
an authorized distributor. The keypad is for indoor installation only, typically by a
main entrance door.
1. Open the keypad housing by pressing the tab on the bottom using a
screwdriver. The tab is also accessible from the front after opening the key
cover.
2. Install the rear housing to the desired location.
3. Connect the control panel bus cable. There are two possibilities:
o Use a twisted-pair cable
(+U and GND is one pair and data A and B is the
second, length max. 100m) for final keypad installation. The correspondingly
marked terminals in the keypad unit and in the control panel should be
connected together (GND, A, B, +U).
o Use a flat four-wire telephone cable
with RJ connectors (max. 10 metres) but
only for temporary (test) installation. There is a digital bus connector called
LINE in the control panel, and in the keypad too. See fig. 1.
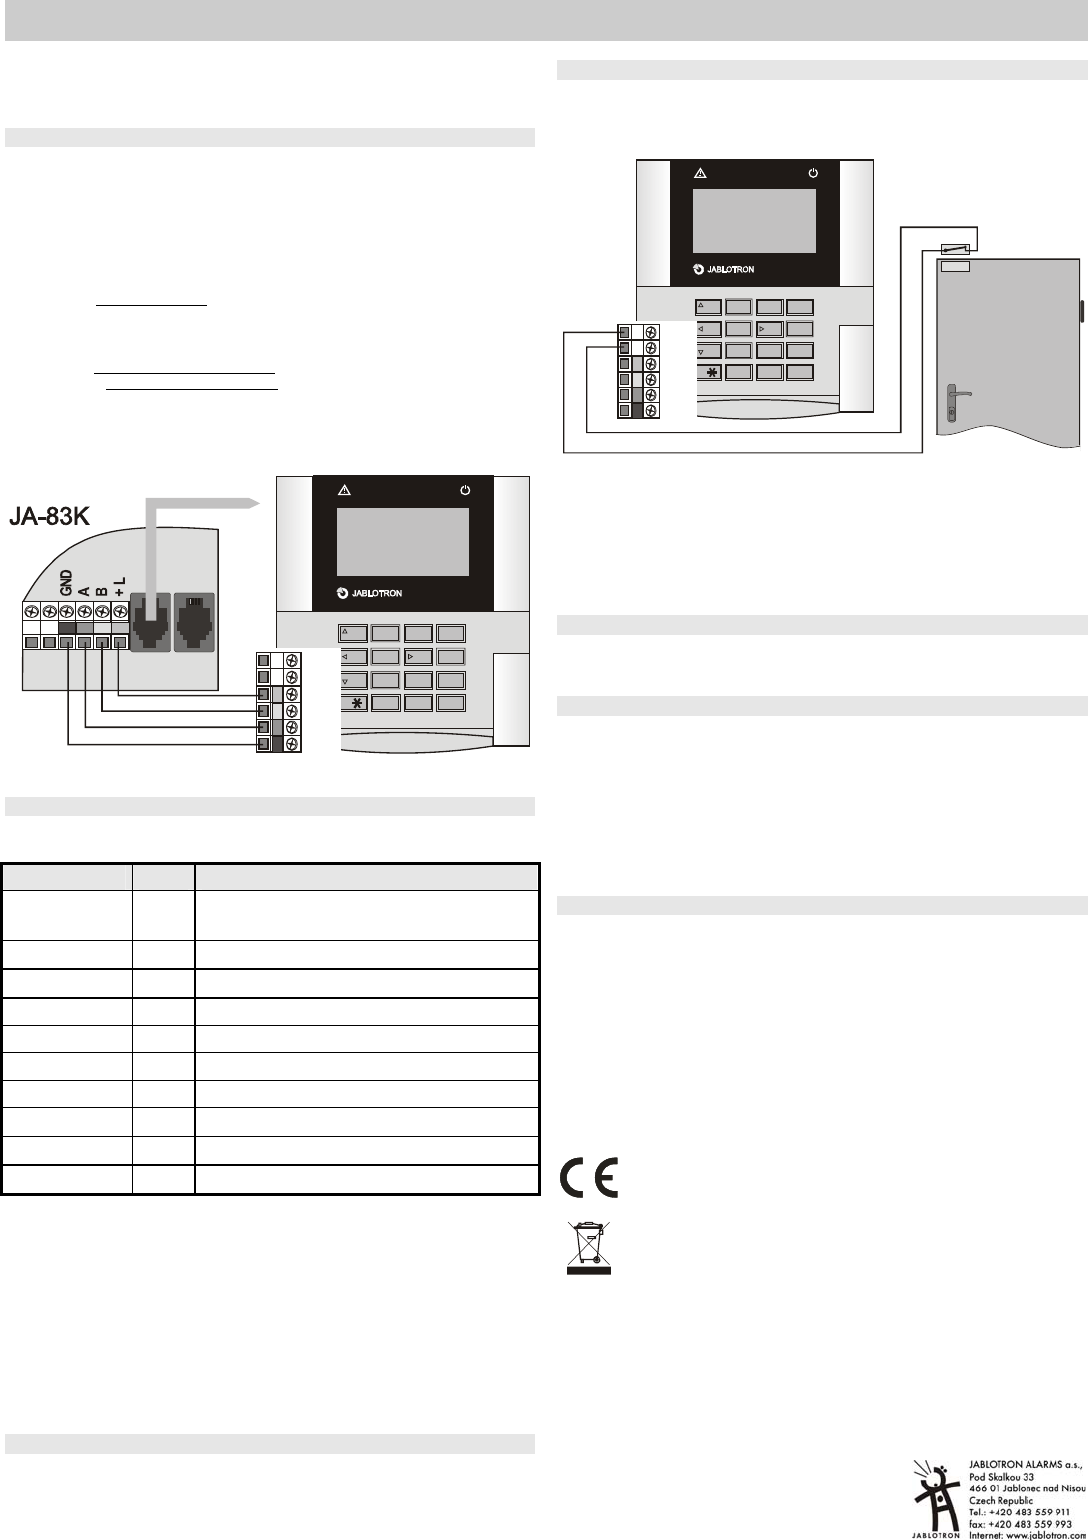
4. Install the external door detector (if required)and connect its cable to the IN
and GND terminals. See fig. 2.
5. Keypad operating instructions are found in the control panel manual.
123
ABC
456
A
789
ON
0#
B
?
OFF
ESC
ABC
OASiS
I-LINE
IN
GND
+U
B
A
GND
LINE
fig. 1 Connection with the control panel
Keypad menu
The menu can be entered in Service mode by holding the ? key. Using the arrows
on keys 1 and 7 you can scroll through the menu:
Display Key Description
Tamper ON
¾
Disable / Enable the tamper sensor
(only for service purposes)
Door chime ON
¾
Disable / Enable sound when IN triggered
Beeper ON
¾
Disable / Enable system sounds
Backlight colour
Sets the normal display backlight colour 0 - 7
Warning colour
Sets the warning display backlight colour 0 - 7
Brightness
Sets the display brightness 0 - 9
Contrast
Sets the display contrast 0 - 9
Edit text
¾
Entry to keypads text editing
English
¾
Sets English (reload default texts)
Čeština
¾
other languages ...
To exit the menu, press # (exiting also occurs after 60 seconds’ inactivity).
Notes:
• It is possible to set a different colour backlight as a warning colour for when a
fault is indicated or after an alarm state (warning colour). The user can be
visually informed of the status. If unwanted, please set both colours to the same
value.
• The keypad power can be switched on by connecting the bus cable or by
switching on the control panel power.
• Each keypad has its own menu, i.e. each keypad in the system can have its own
unique settings.
• The keypad keeps its settings even if its power is disconnected (settings can
only be altered via the keypad menu).
Three minute time-out of displaying the alarm status
To comply with EN standards the keypad does not indicate the status of the alarm
system. Indication only returns when the keypad is operated or detectoractivatedor
an entrance delay is triggered. It is however possible to program permanent
indication via the control panel, if considered appropriate.
Installing a door detector
It is possible to wire up a detector(s) to the keypad via the IN input. The IN input
terminal is triggered when disconnected from GND. The control panel’s natural
reaction to the IN input being triggered is a delayed intruder alarm (unchangeable
reaction).
123
ABC
456
A
789
ON
0#
B
?
OFF
ESC
ABC
OASiS
IN
GND
+U
B
A
GND
fig. 2 An example of door detector wiring
Notes:
If the IN input is not used, connect it to GND.
The IN input only reports to the control panel at the moment of being triggered (a
so-called pulse reaction, which means that the keypad cannot signal permanently
open doors). The input belongs to the C section (can not be changed) and if there is
more than one JA-81E in the system their IN inputs are not distinguished by the
system. The source of this event is the control panel itself.
Controlling the PgX output
The PgX output can be switched ON and OFF by pressing the ON (¾) and OFF
(#) buttons long (for 5 seconds) . The function of PgX must be set in the control
panel. A long beep confirms the change.
Keypad text editing
You can use a PC running Olink software to set up the texts (recommended). If
you change texts in the system using Olink the change is made in all keypads, which
are connected to the line at this time. If you add a new keypad to the system, you
can transfer (synchronize) all the latest texts to the keypad by reading the texts from
the control panel. (Olink reading the control panel texts triggers the keypad into
listening in to the bus and copying the texts into itself).
The names can be edited via the keypad in the “Edit Text” menu item – see the
control panel installation manual. The edited text is only stored in the keypad unit
used for editing.
The texts can only be copied into the keypad but cannot be read out of it.
Technical specifications
Power via the control panel bus
Standby consumption 100 mA
RFID cards Jablotron PC-01 or PC-02 (EM UNIQUE 125kHz)
Length of digital bus cable max. 100m
Door detector input IN = normally closed loop
Dimensions 120 x 130 x 30 mm
Environment according to EN 50131-1 II. internal
Operating temperature range -10 to +40 °C
EN 50131-1, EN 50131-3 classification class 2
Comply with ETSI 300330, EN 50130-4,
EN 55022, EN 60950-1
JABLOTRON ALARMS a.s. hereby declares that the JA-81E is in
compliance with the essential requirements and other relevant provisions
of Directive 1999/5/EC
The original of the conformity assessment can be found on the web site
www.jablotron.com, Technical Support section.
Note: Although this product does not contain any harmful materials we
suggest you return the product to the dealer or directly to the
manufacturer after use.
Brauchen Sie Hilfe? Stellen Sie Ihre Frage.
Missbrauch melden von Frage und/oder Antwort
Libble nimmt den Missbrauch seiner Dienste sehr ernst. Wir setzen uns dafür ein, derartige Missbrauchsfälle gemäß den Gesetzen Ihres Heimatlandes zu behandeln. Wenn Sie eine Meldung übermitteln, überprüfen wir Ihre Informationen und ergreifen entsprechende Maßnahmen. Wir melden uns nur dann wieder bei Ihnen, wenn wir weitere Einzelheiten wissen müssen oder weitere Informationen für Sie haben.
Art des Missbrauchs:
Forenregeln
Um zu sinnvolle Fragen zu kommen halten Sie sich bitte an folgende Spielregeln:
Lesen Sie zuerst die Anleitung;
Schauen Sie nach, ob die Frage bereits gestellt wurde;
Stellen Sie die Frage so deutlich wie nur einigermaßen möglich;
Erwähnen Sie was Sie bereits versucht haben um das Problem zu lösen;
Ist Ihr Problem von einem Besucher gelöst dann lassen Sie ihn / sie wissen in diesem Forum;
Falls Sie reagieren möchten, so verwenden Sie bitte das Antworten- Formular;
Da ihre Frage für alle Besucher sichtbar ist, sollten Sie lieber keine persönliche Daten erwähnen.
Neu registrieren
Registrieren auf E - Mails für Jablotron JA-81E RGB wenn:
neue Frage gestellt werden
neue Handbücher vorhanden sind
Sie erhalten eine E-Mail, um sich für eine oder beide Optionen anzumelden.
Das Handbuch wird per E-Mail gesendet. Überprüfen Sie ihre E-Mail.
Wenn Sie innerhalb von 15 Minuten keine E-Mail mit dem Handbuch erhalten haben, kann es sein, dass Sie eine falsche E-Mail-Adresse eingegeben haben oder dass Ihr ISP eine maximale Größe eingestellt hat, um E-Mails zu erhalten, die kleiner als die Größe des Handbuchs sind.
Ihre Frage wurde zu diesem Forum hinzugefügt
Möchten Sie eine E-Mail erhalten, wenn neue Antworten und Fragen veröffentlicht werden? Geben Sie bitte Ihre Email-Adresse ein.