ENGLISH ESP FRANCAIS DEUTSCH
FL+ White Blanco Blanc W
F White/Black Blanco/Negro Blanc/Noir W
FR+ Gray Gris Gris Grau
FR– Gray/Black Gris/Negro Gris/Noir Grau/Schwarz
RL+ Green V Ve Grün
R Green/Black V V Grün/Schwarz
RR+ Purple Púrpura Violet Lila
RR– Purple/Black Púrpura/Negr Violet/Noir Lila/Schwarz
Problem Possible C Solution
How to properly set
input sensitivity
Please refer t
input sensitivity for maximum, low-
distortion output.
Amplifier doesn
turn on
F
Remove fuse and check with continuity
meter
Poor connection
integrity
Check “+12V”
leads for pinched wires; ensur
connections.
Insufficient “Remote”
input
Make sure there is a sufficient +12V
supply at the
not a relay may be r
Intermittent output,
fluctuates when I tap
on it or hit a bump
Poor connection
integrity
Make sure insulation has been properly
stripped back at connection points for
good contact area.
Make sure input connectors are making
good contact with input jacks of the
amplifier
Distorted, attenuated,
or popping sound
F
connection (Short
Circuit / Over Current
Prot
Inspect speaker wires for possible
short-
to the vehicle
Check the nominal load impedance at
the amplifier is equal to or great
2 ohms stereo (4 ohms bridged).
Output shuts off after
a while
Overheating
condition (
Prot
Make sure amplifier mounting area has
adequate space for v
dissipation.
Limited W
JL Audio war
work
This war
from an auth
warrant
Audio will (at its discretio
or remanuf
not covered unde
negl
misreprese
conseque
the unit(s
covered under warrant
Warrant
Any applicab
expr
purchase at ret
to this produc
warrantie
you spe
st
If you n
All warrant
freight-pre
accompanie
returns f
speci
Warrant
determin
as this date is previous to pu
be retur
insurance in sen
covered under warrant
For Service Information
JL Audio
( 4 4 0
9:0
JL Aud
1
Miramar, F
(Do not se
International W
Produc
by that countr
Do not increase any
channel pair in the system bey
this procedure
speaker damage.
It will be necessary to re-
equalizer boost is activated after setting the “Input Sens.
applies to any EQ boost circuit, including source unit t
cuts will not require re-adjustment.
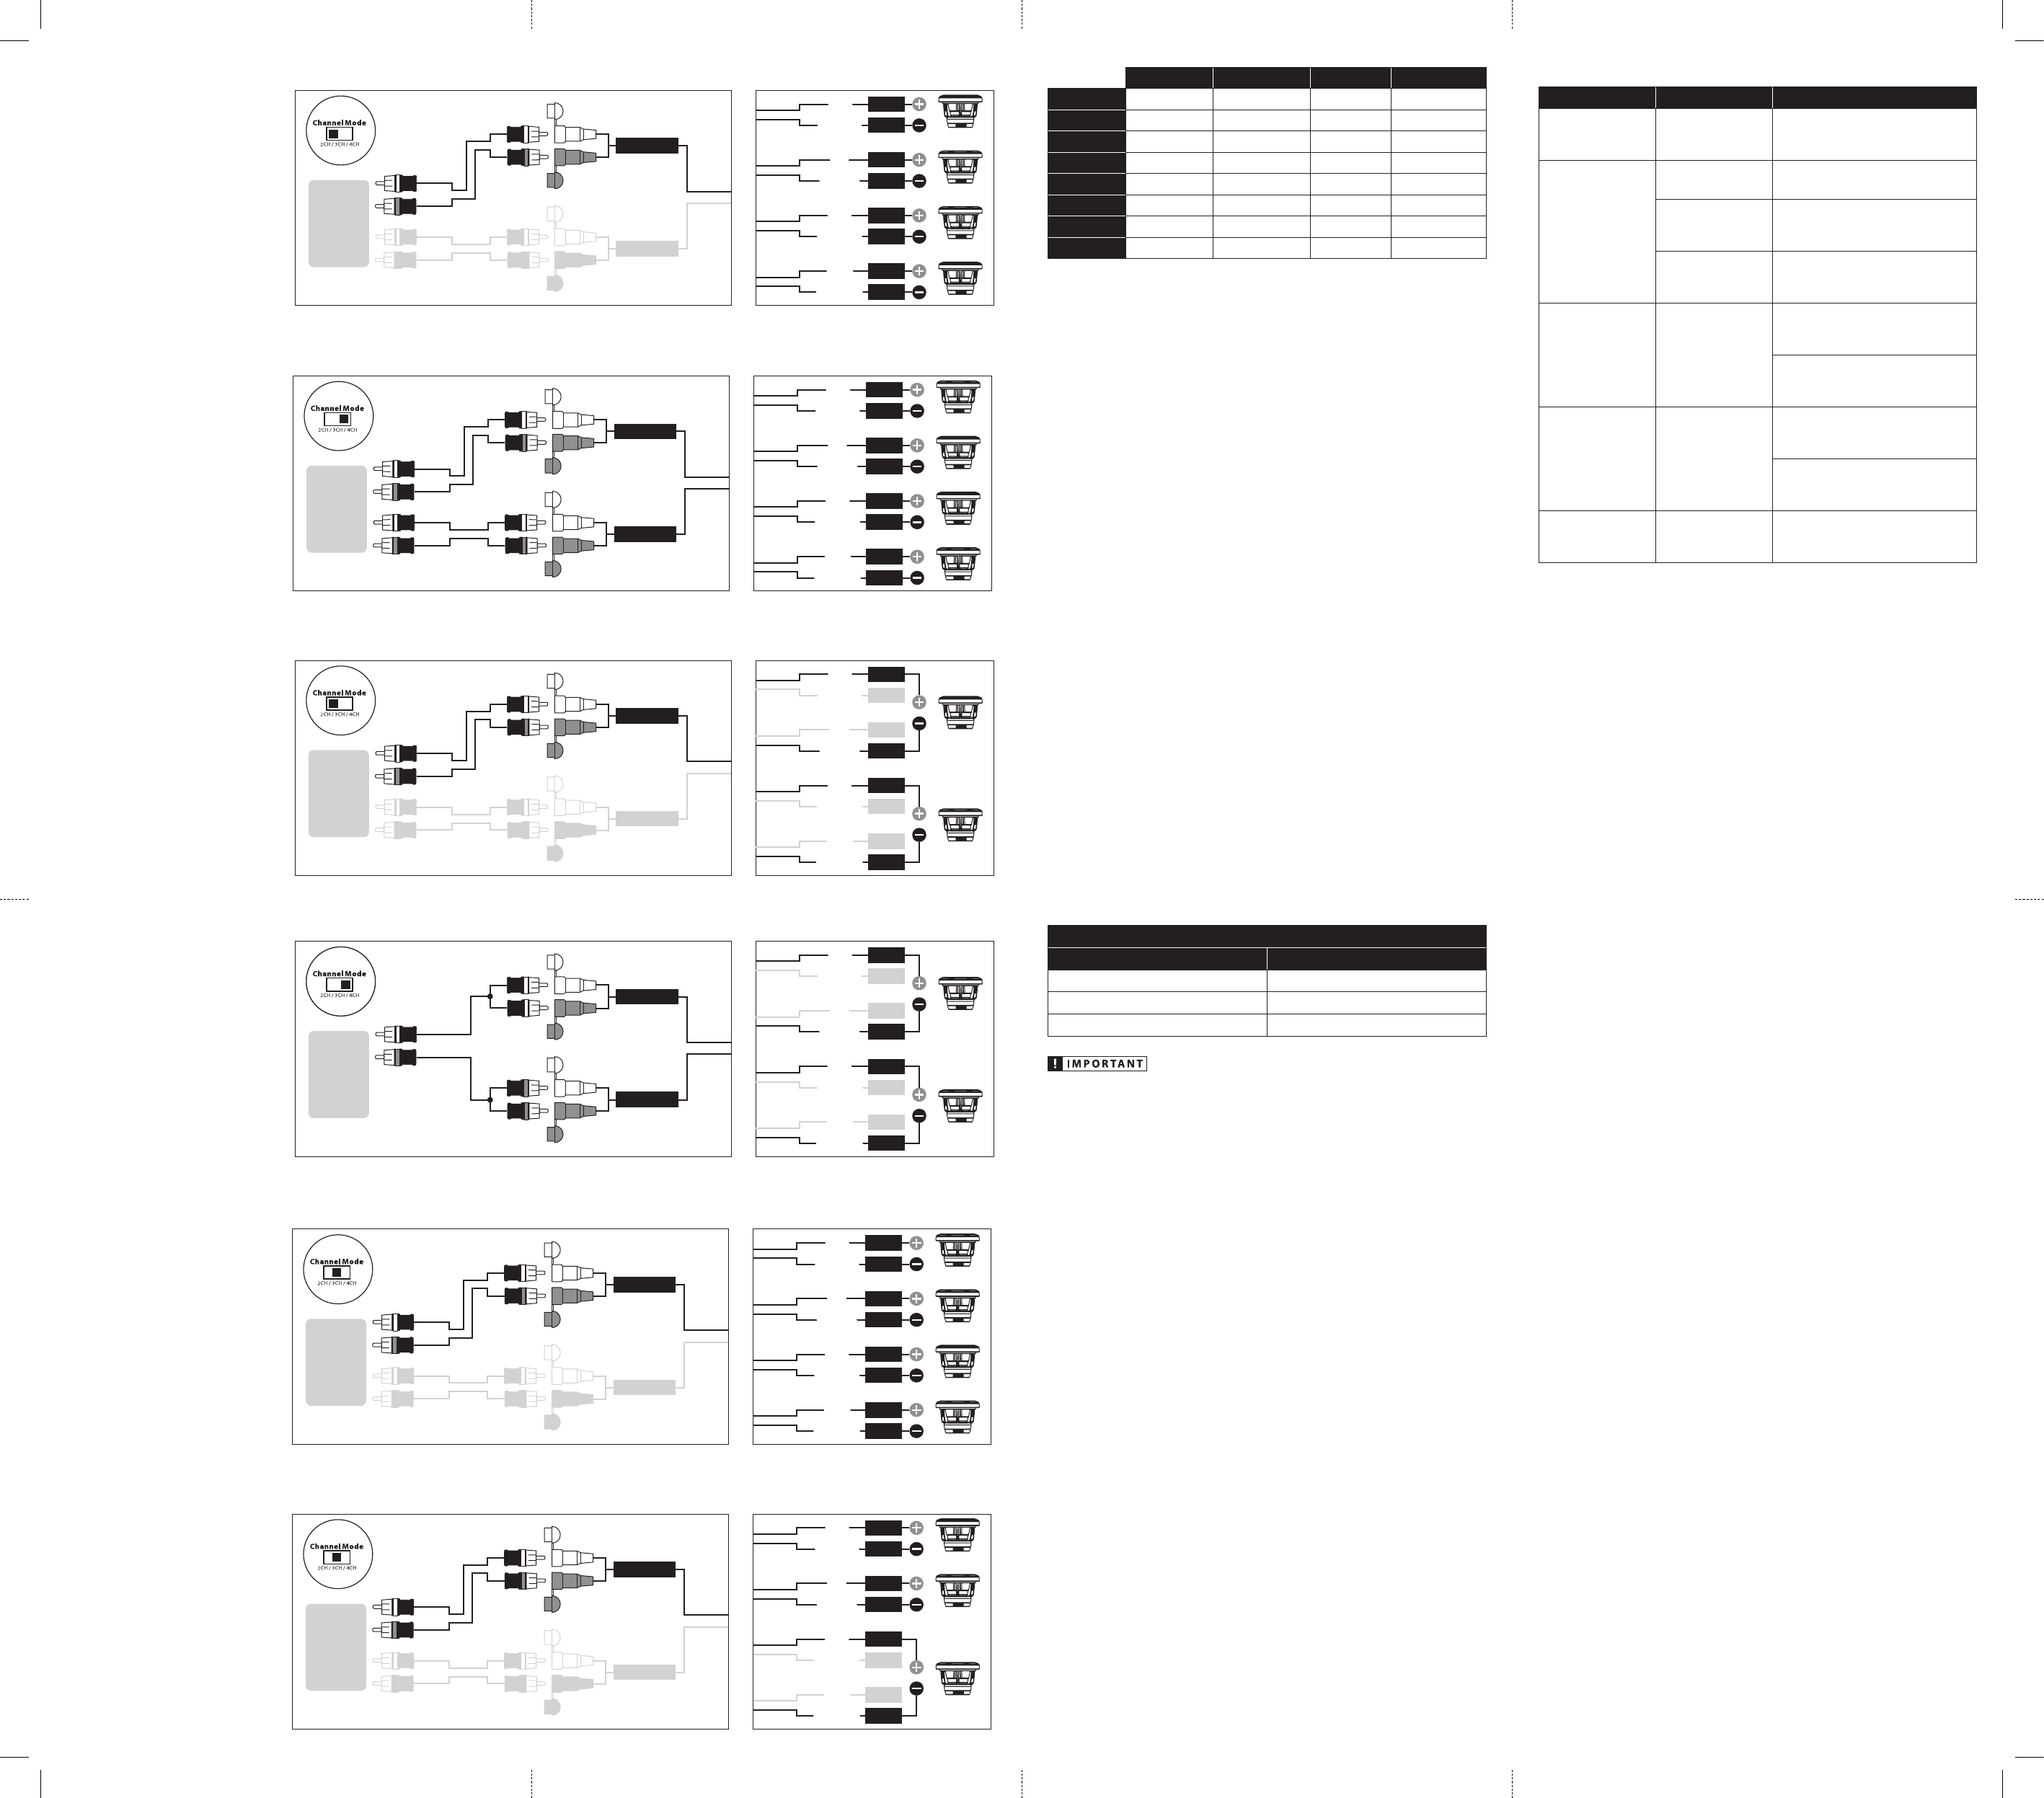
MX500/4
Nom. Impedance T
4Ω 16.7 V
2Ω 15.8 V
Bridged to 4Ω 31.6 V
Rear
[REAR IN]
[FRONT IN]
White
White/Black
Gray
Gray/Black
Green
Green/Black
Purple
Purple/Black
Sou
(Not Used)
[FR–]
[FR+]
[RL–]
[RL+]
[RR–]
[RR+]
[FL–]
[FL+]
White
White/Black
Gray
Gray/Black
Green
Green/Black
Purple
Purple/Black
Fro
Amplifier Inputs Speaker Outputs
4 Stereo Outputs (non-fading)
Channel Mode: 2CH
Inputs: Use Fr
RMS Pow 70W x 4 @ 4 Ω (125W x 4 @ 2 Ω)
Rear
[REAR IN]
[FRONT IN]
White
White/Black
Gray
Gray/Black
Green
Green/Black
Purple
Purple/Black
Sou
[FR–]
[FR+]
[RL–]
[RL+]
[RR–]
[RR+]
[FL–]
[FL+]
White
White/Black
Gray
Gray/Black
Green
Green/Black
Purple
Purple/Black
Fro
Amplifier Inputs Speaker Outputs
4 Stereo Outputs (fading)
Channel Mode: 4CH
Inputs: Use Fr
RMS Pow 70W x 4 @ 4 Ω (125W x 4 @ 2 Ω)
Rear
[REAR IN]
[FRONT IN]
White
White/Black
Gray
Gray/Black
Green
Green/Black
Purple
Purple/Black
Sou
(Not Used)
[FR–]
[FR+]
[RL–]
[RL+]
[RR–]
[RR+]
[FL–]
[FL+]
White
White/Black
Gray
Gray/Black
Green
Green/Black
Purple
Purple/Black
Fro
Amplifier Inputs Speaker Outputs
2 Bridged Mono Outputs
Channel Mode: 2CH
Inputs: Use Front Inputs Only
RMS Pow 250W x 2 @ 4 Ω
[REAR IN]
[FRONT IN]
Sou
Fro
White
White/Black
Gray
Gray/Black
Green
Green/Black
Purple
Purple/Black
[FR–]
[FR+]
[RL–]
[RL+]
[RR–]
[RR+]
[FL–]
[FL+]
White
Y
Y
White/Black
Gray
Gray/Black
Green
Green/Black
Purple
Purple/Black
Amplifier Inputs Speaker Outputs
2 Bridged Stereo Outputs
Channel Mode: 4CH
Inputs: Left Signal to Both Front Inputs / Right
Signal to Both Rear Inputs
RMS Pow 250W x 2 @ 4 Ω
Rear
[REAR IN]
[FRONT IN]
Sou
(Not Used)
Fro
White
White/Black
Gray
Gray/Black
[FR–]
[FR+]
[FL–]
[FL+]
White
White/Black
Gray
Gray/Black
Green
Green/Black
Purple
Purple/Black
[RL–]
[RL+]
[RR–]
[RR+]
Green
Green/Black
Purple
Purple/Black
2 Stereo F
Output
Channel Mode: 3CH
Inputs: Use Front Inputs Only
RMS Pow 70W x 2 @ 4 Ω (125W x 2 @ 2 Ω) +
250W x 1 @ 4 Ω
Amplifier Inputs Speaker Outputs
Amplifier Inputs Speaker Outputs
2 Stereo F
Channel Mode: 3CH
Inputs: Use Front Inputs Only
RMS Pow 70W x 4 @ 4 Ω (125W x 4 @ 2 Ω)
Rear
[REAR IN]
[FRONT IN]
Source
(Not Used)
Fro
White
White/Black
Gray
Gray/Black
Green
Green/Black
Purple
Purple/Black
White
White/Black
Gray
Gray/Black
Green
Green/Black
Purple
Purple/Black
[FR–]
[FR+]
[FL–]
[FL+]
[RL–]
[RL+]
[RR–]
[RR+]
T
Appendix A:
Input Sensitivity Level Setting
F
sensitivity of each amplifier channel pair in just a few minutes using equipment
commonly available in installation ba
Necessary Equipment
• Digital AC
• CD or file with a sine
frequency range to be amplified for that set of channels (50 Hz for sub
channels, 1 kHz for a midrange application). Do not use att
(-10 dB, -20 dB, et
The Nine-Step Procedure
1) Disconnect the speakers from the amplifier’
connectors (you need only disconnect one speaker wire).
2) T
unit, processors (if used) and amplifier
control to c
3/4 of maximum.
3) T“Input S contr
4) Set the source unit volume to 3/4 of full v
reasonable gain overlap with moder
5) Using the chart on this page, determine the target voltage for input
sensitivity adjustment according to the nominal impedanc
speaker system connected to the amplifier outputs
6) V
a track with an appropriate sine wa
be amplified) at 3/4 source unit v
7) Connect the AC voltmet
amplifier
(+ and –).
8) Increase the “Input Sens. control until the target v
with the voltmeter
9) Once you hav
output level, r
“Input Sens. controls can now be adjusted do
requires att