701357
7
Zoom out
Zoom in
Vorherige Seite
1/8
Nächste Seite
JL AUDIO XR525-CSi 7
FLUSH MOUNT INSTALLATION:
1
2
3
4
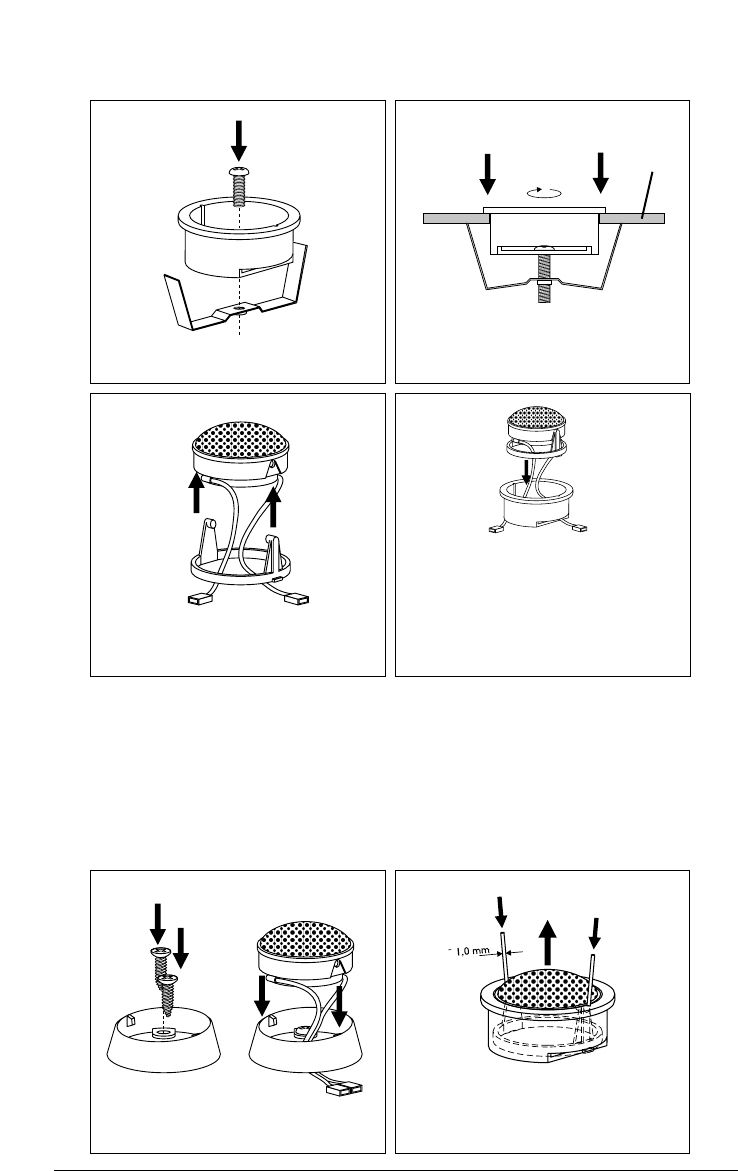
Assemble the Flush-Mount Cup
Mounting Hole Diameter: 1.75 in. (45mm)
Attach the Tweeter to the Swivel Assembly
Insert the tweeter and swivel assembly into
the mounted flush-mount cup, feeding the
wires through the slots in the rear of the
cup. Line up the arms of the swivel
assembly with the slots on the inside of the
flush mount cup.
Tighten
Screw
Vehicle
Panel
SWIVEL/ROTATION MECHANISM:
Once the tweeter has been mounted into the flush mount cup as shown above, it can be swiveled and
rotated by hand to best enhance imaging using the swivel/rotation mechanism built into the flush mount
system. Experiment with different angles until you arrive at the best solution. The swivel/rotation feature will
not operate with the surface mount system.
Use the supplied tools as shown to
release the tweeter element from the
flush-mount cup.
SURFACE MOUNT ASSEMBLY: FLUSH-MOUNT DISASSEMBLY:
7

Brauchen Sie Hilfe? Stellen Sie Ihre Frage.

Forenregeln

Missbrauch melden von Frage und/oder Antwort

Libble nimmt den Missbrauch seiner Dienste sehr ernst. Wir setzen uns dafür ein, derartige Missbrauchsfälle gemäß den Gesetzen Ihres Heimatlandes zu behandeln. Wenn Sie eine Meldung übermitteln, überprüfen wir Ihre Informationen und ergreifen entsprechende Maßnahmen. Wir melden uns nur dann wieder bei Ihnen, wenn wir weitere Einzelheiten wissen müssen oder weitere Informationen für Sie haben.

Art des Missbrauchs:

Zum Beispiel antisemitische Inhalte, rassistische Inhalte oder Material, das zu einer Gewalttat führen könnte.

Beispielsweise eine Kreditkartennummer, persönliche Identifikationsnummer oder unveröffentlichte Privatadresse. Beachten Sie, dass E-Mail-Adressen und der vollständige Name nicht als private Informationen angesehen werden.

Forenregeln

Um zu sinnvolle Fragen zu kommen halten Sie sich bitte an folgende Spielregeln:

Neu registrieren

Registrieren auf E - Mails für JL Audio XR525-CSi wenn:


Sie erhalten eine E-Mail, um sich für eine oder beide Optionen anzumelden.


Das Handbuch wird per E-Mail gesendet. Überprüfen Sie ihre E-Mail.

Wenn Sie innerhalb von 15 Minuten keine E-Mail mit dem Handbuch erhalten haben, kann es sein, dass Sie eine falsche E-Mail-Adresse eingegeben haben oder dass Ihr ISP eine maximale Größe eingestellt hat, um E-Mails zu erhalten, die kleiner als die Größe des Handbuchs sind.

Ihre Frage wurde zu diesem Forum hinzugefügt

Möchten Sie eine E-Mail erhalten, wenn neue Antworten und Fragen veröffentlicht werden? Geben Sie bitte Ihre Email-Adresse ein.


Info