S
C
N
E
A
E
L
N
X
C
E
C
T
C
O
C
E
U
N
T
L
R
T
/
R
I
S
P
E
N
E
R
N
U
T
I
T
O
N
U
[
[
[
T
I
S
M
B
P
M
E
L
R
A
P
N
A
I
G
R
U
N
N
E
I
]
K
T
T
]
]
B
S
E
L
S
R
P
O
H
F
A
E
E
R
R
E
F
Y
L
T
I
D
E
E
O
E
U
N
E
T
C
U
C
R
T
R
S
T
T
T
N
:
:
:
:
/S
P
O
D
O
E
R
N
A
F
T
I
1
T
F
N
E
[
[
[
T
/
M
B
P
T
E
L
R
I
N
A
I
M
U
N
N
E
]
K
T
]
]
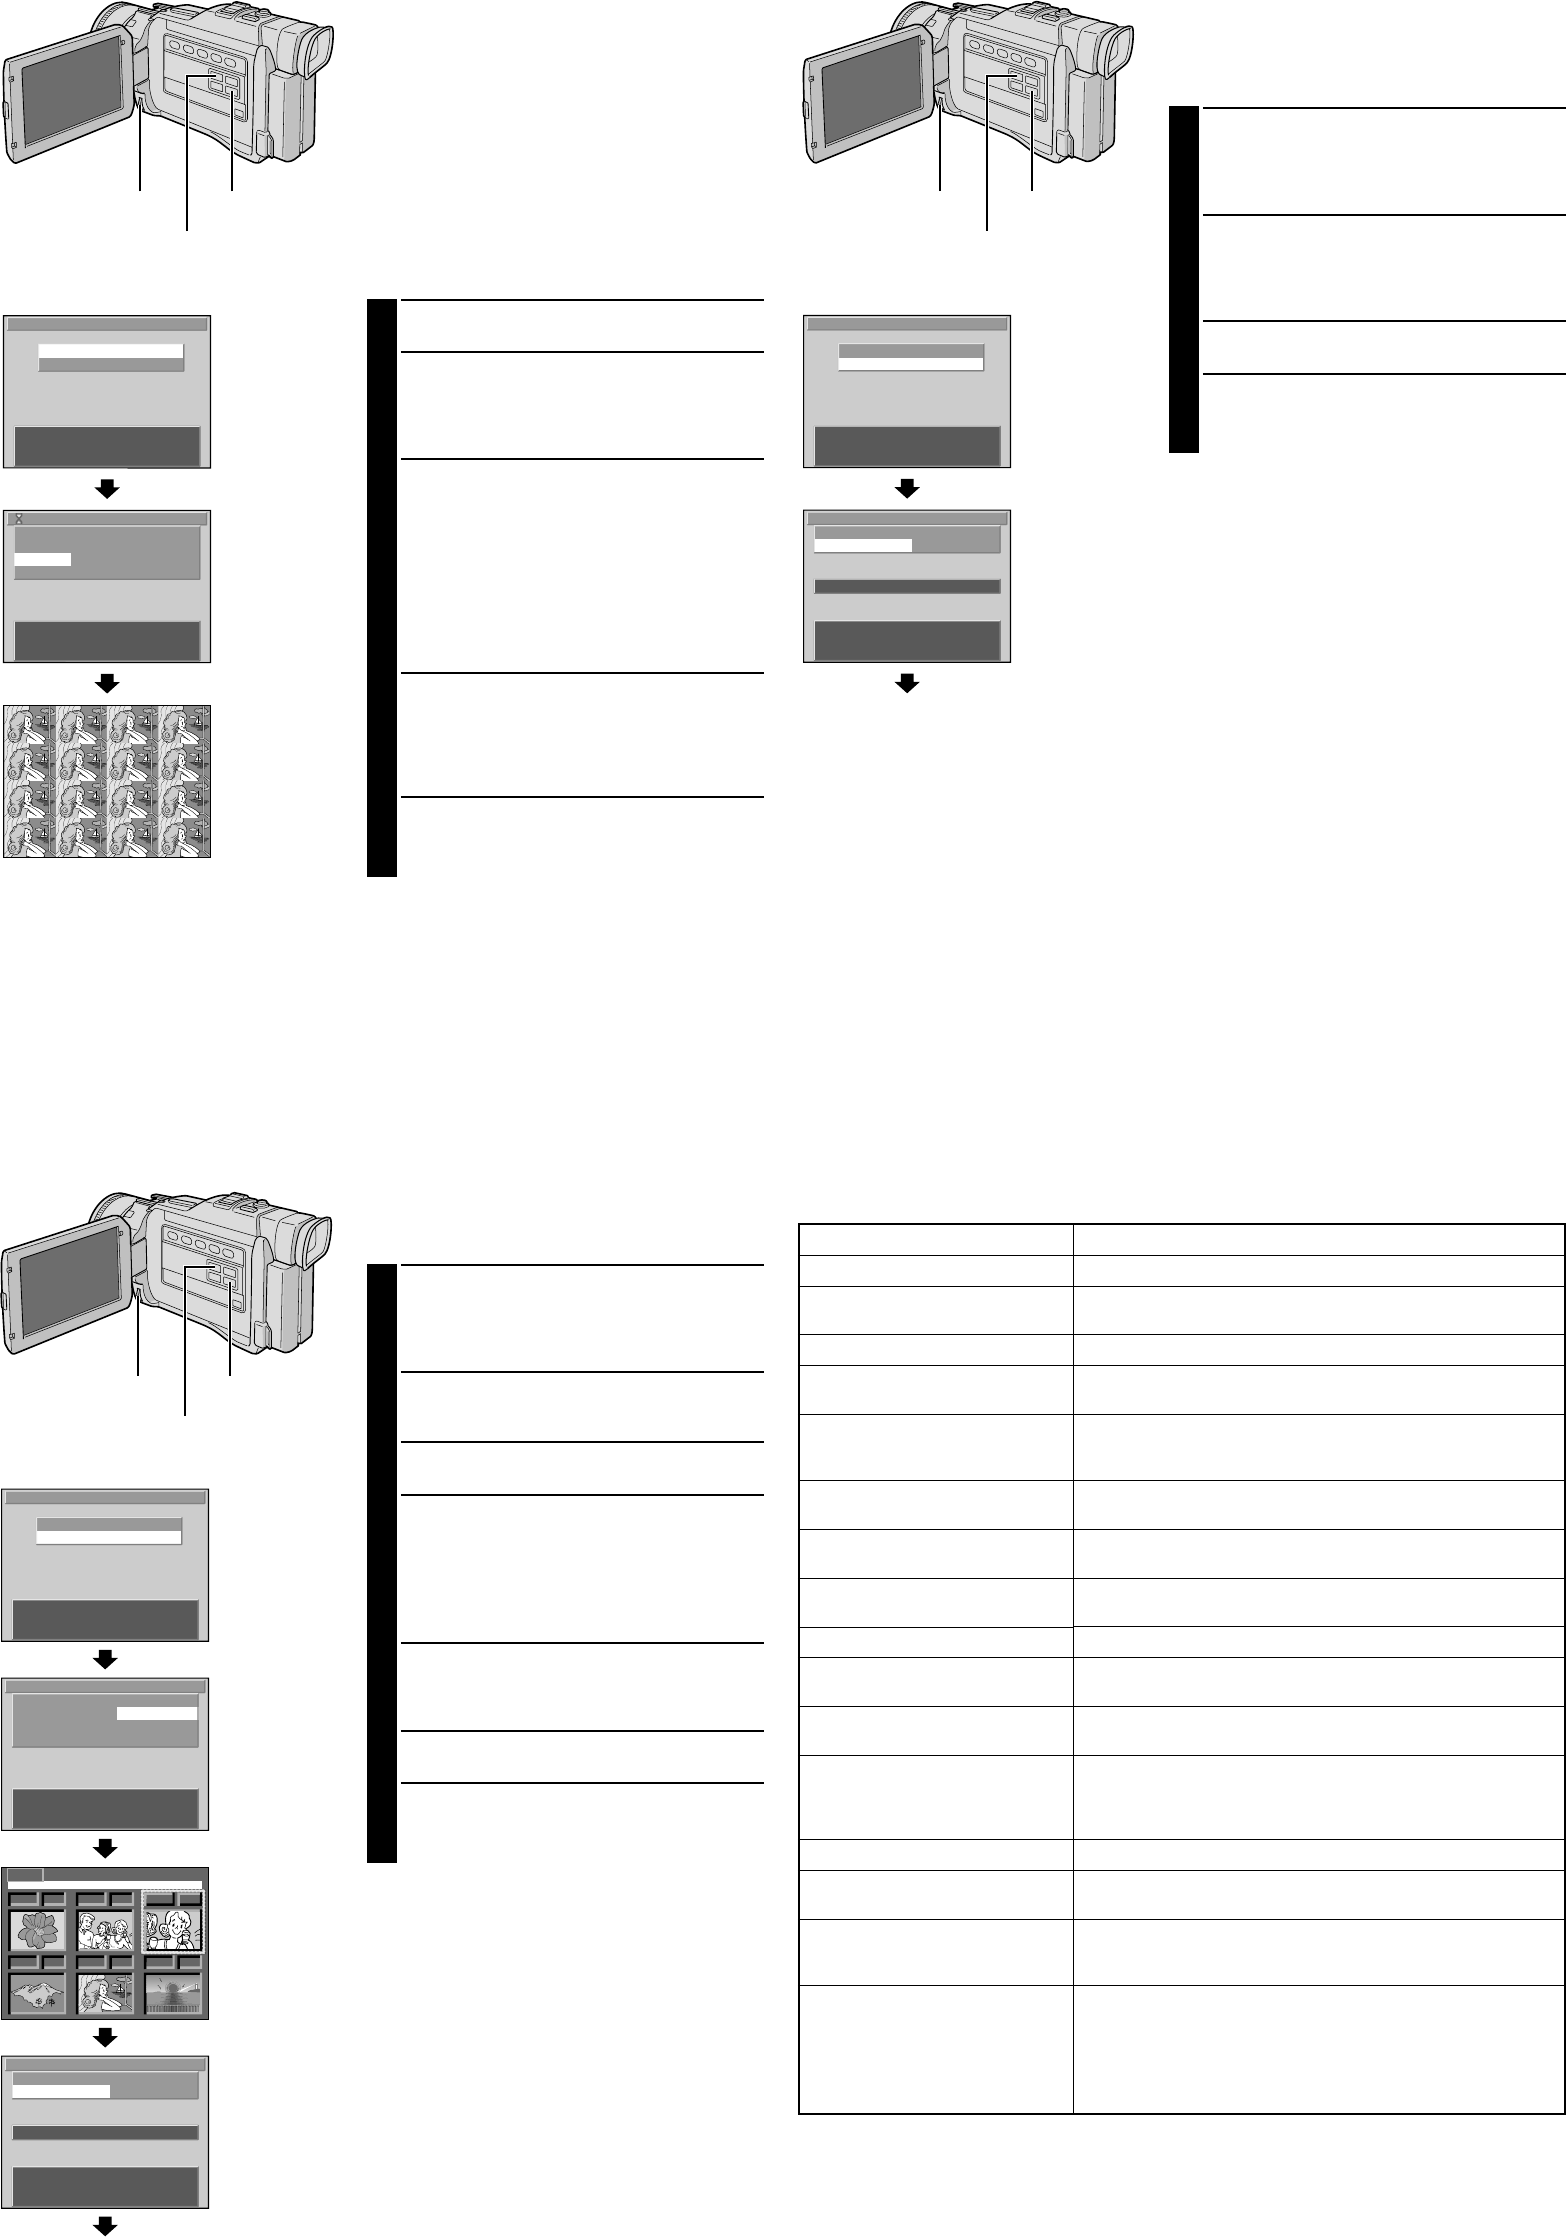
Effect/Layout Print
Y
following effects/layouts.
EFFECT
MONOTONE
SEPIA .................... Prints in sepia.
DA .................... Prints the date when the image is
recorded.
LAYOUT
MUL .............. Prints the same image 16 times on
one sheet.
CALENDAR .......... Makes an original calendar with an
image.
MESSAGE CARD .
you can write in your own message.
1
Select the still image you wish to print.
2
Press PRINT . The PRINT Menu appears. Press PRINT
or the MENU wheel to call up the PRINT Applied
Menu.
•TBLANK SEARCH
until the Menu Screen closes.
3
Rotate the MENU wheel to select “ EFFECT” or
“LA” and press it. Then, rotate it to select the
desired parameter and press it. Selection is complete
and the processed image appears.
•If you wish to use both “EFFECT ” and “ LA”,
be sure to select “ EFFECT” first, then “ LA”.
•If you select “CALENDAR ”, the year is highlighted.
Rotate the MENU wheel to select the desired year
and press it. The month is highlighted. Rotate the
MENU wheel to select the desired month and press
it.
4
If necessary“ BORDER” to “ ON” or “OFF ”
(墌 “Frame ” ).
•If “LA” is set to “ MUL” , be sure to set
“BORDER ” to “ON ”.
•If “LA” is set to “ CALENDAR” , the “BORDER”
setting cannot be changed.
5
TPRINT. The message “ NOW
PRINTING!!” appears. When printing is finished, the
message “ PRINTING COMPLETED ” appears and the
normal playback screen resumes.
T
.... set “ EFFECT” to “OFF” in step 3.
NOTE:
When a print frame is superimposed over a still image and
“EFFECT ” is set to “OFF ”, the print frame will be also
removed.
(Ex.) Printed
image when
set to
“MULTI 16”
Continuous Print
PRINTING ALL STILL IMAGES (ONE PRINT FOR EACH
IMAGE)
Y
at one time. Each still image is printed once.
1
Press PRINT . The PRINT Menu appears. Rotate the
MENU wheel to select “ CONTINUOUS PRINT” and
press it. The PRINT Applied Menu appears.
•TBLANK SEARCH
until the Menu Screen closes.
2
Rotate the MENU wheel to select “ PRINT IMAGE”
and press it. Then, rotate it to select ” ALL” and press
it. Selection is complete. The number next to
“NUMBER OF SHEETS ” indicates the number of
sheets required.
3
If necessary“ BORDER” to “ ON” or “OFF ”
(墌 “ Frame ” ).
4
TPRINT . The message “ NOW
PRINTING!!” appears. When printing is finished, the
message “ PRINTING COMPLETED ” appears and the
normal playback screen resumes.
T
.... press BLANK SEARCH. It is not possible to cancel an
image being printed, but the next one will be
canceled.
T
.... set “ PRINT IMAGE” to “ RESET” in step 2 . The setting is
reset to 0 for all still images.
NOTE:
When a print frame is superimposed over a still image and
“CONTINUOUS PRINT ” is selected in step 1, the print
frame will be canceled.
Printing
PRINTING SELECTED STILL IMAGES AND NO. OF
PRINTS
It is possible to select some still images in a memory card,
set the number of prints for each one, and print them.
1
Press PRINT . The PRINT Menu appears. Rotate the
MENU wheel to select “ CONTINUOUS PRINT” and
press it. The PRINT Applied Menu appears.
•TBLANK SEARCH
until the Menu Screen closes.
2
Rotate the MENU wheel to select “ PRINT IMAGE”
and press it. Then, rotate it to select ” SELECTED” and
press it. The PRINT Index Screen appears.
3
Rotate the MENU wheel to move the green frame to
the image you wish to print and press it.
4
Select the number of prints by rotating the MENU
wheel towards “+ ” to increase the number or towards
“– ” to decrease the number
Repeat steps 3 and 4 to select all the desired prints.
•The number of prints can be set up to 25.
•T
again and change the number
5
Rotate the MENU wheel upward to select “ EXIT” and
press it. The PRINT Applied Menu appears. The
number next to “ NUMBER OF PRINTS” indicates the
number of sheets required.
6
If necessary“ BORDER” to “ ON” or “OFF ”
(墌 “Frame ” ).
7
TPRINT. The message “ NOW
PRINTING!!” appears. When printing is finished, the
message “ PRINTING COMPLETED ” appears and the
normal playback screen resumes.
T
.... press BLANK SEARCH. It is not possible to cancel an
image being printed, but the next one will be
canceled.
T
.... set “ PRINT IMAGE” to “RESET” in step 2. The setting is
reset to 0 for all still images.
Printing
Message
NOW PRINTING!!
NUMBER OF SHEETS: 10
REMAINING SHEETS: 5
PRINTING COMPLETED
SET INK CASSETTE
PULL OUT P
AND CHECK P
REPLACE INK CASSETTE
INK ERROR
CHECK INK CASSETTE
PRINT ERROR HAS OCCURRED
PRINTING ABORTED
PRINTER READY
PLEASE W
PRINTER IS NOT CONNECTED
SELECT PICTURE WITH FRAME
TRANSMISSION ERROR
SET P
REPLACE BA
PRINTER: SYSTEM ERROR
Appears when:
Printing.
The total number of prints (ex. 10 sheets) and remaining number
of prints (ex. 5 sheets) are displayed.
Printing is finished.
No ink cassette is loaded. Refer to the printer’s instructions to load
one.
Print sheets are not loaded in the tray or the paper tray is running
out of paper during continuous printing. Refer to the printer’s
instructions to load print sheets in the tray
The ink cassette is used up. Refer to the printer’s instructions to
replace it with a new one.
There is a problem with the ink cassette. Refer to the printer’s
instructions to check it.
Printing was not successful, but print sheets were output during
printing. T
An error interrupted printing but was resolved. T
The temperature inside the printer has risen or printing was
canceled. W
Printing was attempted while the printer was disconnected. Check
the connection.
“BORDER ” is set to “OFF ” and an ink cassette incapable of
printing with no frame is loaded. Replace it with an ink cassette
capable of printing with no frame or try printing with a frame
(“ BORDER” set to “ ON” ).
An error has occurred during transmission. Check the connection.
The paper tray is not loaded at the start of printing. Refer to the
printer’ s instructions to load it.
Remaining battery power is low at the start of printing or during
printing when a battery is used as the power supply
battery with a new one or use an AC power adapter
● A problem has occurred with the printer during printing.
● There is a problem with the printer when printing is attempted.
● Paper is jammed and is not output.
If paper is jammed, refer to the printer’ s instructions to remove the
jammed sheets. If they cannot be removed or if the paper is not
jammed, consult a JVC dealer
Print Message
1
*
UN
*
YP
(GR-DV2000U)
Display
PRINT Menu
PRINT Applied
Menu
PRINT ButtonMENU Wheel
S
C
N
E
A
E
L
N
X
C
E
C
T
C
O
C
E
U
N
T
L
R
T
/
R
I
S
P
E
N
E
R
N
U
T
I
T
O
N
U
[
[
[
T
I
S
M
B
P
M
E
L
R
A
P
N
A
I
G
R
U
N
N
E
I
]
K
T
T
]
]
B
P
S
R
P
O
R
N
E
E
R
R
I
U
L
T
I
D
N
M
E
U
N
E
T
B
C
R
T
R
E
T
N
I
R
/
M
S
P
A
O
E
R
G
F
T
I
E
N
:
:
S
[
[
[
T
H
M
B
P
O
A
E
E
L
R
F
L
E
N
A
I
F
L
T
U
N
N
S
]
K
T
25
]
]
Display
PRINT Menu
PRINT Applied
Menu
PRINT ButtonMENU Wheel
001 0 002 0
00
003 0
005
004 0
EX
006 0
PRINT
100-DVC00003
V G A
S
C
N
E
A
E
L
N
X
C
E
C
T
C
O
C
E
U
N
T
L
R
T
/
R
I
S
P
E
N
E
R
N
U
T
I
T
O
N
U
[
[
[
T
I
S
M
B
P
M
E
L
R
A
P
N
A
I
G
R
U
N
N
E
I
]
K
T
T
]
]
P
S
R
E
I
L
N
E
T
CT
I
/
M
S
P
A
E
R
G
T
I
E
N
:
[
T
M
S
A
R
E
E
L
E
N
L
L
S
U
E
E
]
TEC
T
B
P
S
R
P
O
R
N
E
E
R
R
I
U
L
T
I
D
N
M
E
U
N
E
T
B
C
R
T
R
E
T
N
I
R
/
M
S
P
A
O
E
R
G
F
T
I
E
N
:
:
S
[
[
[
T
H
M
B
P
O
S
E
E
L
R
F
E
E
N
A
I
F
L
T
U
N
N
E
S
]
K
T
TE
9
C
]
]
PRINT Index
Screen
Display
PRINT Menu
PRINT Applied
Menu
PRINT Button
MENU Wheel
COPYRIGHT© 2000 VICTOR COMP
BLANK SEARCH Button BLANK SEARCH Button
BLANK SEARCH Button