Disposal of Used Electrical & Electronic Equipment
The meaning of the symbol on the product, its accessory or packaging indicates that
this product shall not be treated as household waste. Please, dispose of this equipment
at your applicable collection point for the recycling of electrical & electronic equipments
waste. By ensuring the correct disposal of this product, you will help prevent potential
hazards to the environment and to human health, which could otherwise be caused by
unsuitable waste handling of this product. The recycling of materials will help conserve
natural resources. For more detailed information about recycling of this product, please
contact waste shop where
you purchased the product.
SAFETY INFORMA
1. Read Instructions -
appliance is operated.
2. Retain Instructions - The safety and operating instructions should be retained for future
reference.
3. Heed Warnings -
adhered to.
4. Water and Moisture – Do not use the apparatus near water (e.g. bath tub, sink, swimming
pool) wet places or tropical not place objects lled such as
vases, on top of the apparatus. Do not expose the apparatus to dripping or splashing.
5. Setup – The apparatus should only be placed on a stable, at surface. Do not let the
apparatus fall down or expose it to shock.
6. Wall or Ceiling Mounting -
recommended by the manufacturer
7. V The appliance should be situated so that its location or position does not
interfere with its proper ventilation. For example, the appliance should not be situated on
a bed, sofa, rug, or similar surface that may block the ventilation openings; or
built-in installation,
ventilation openings. Ensure a
ventilation. Ensure that the ventilation is not impeded by covering the ventilation openings
with items such as newspapers, table-cloths, curtains, etc.
8. Heat - The appliance should be situated away from heat sources such as radiators, heat
registers, stoves, or other appliances (including ampliers) that produce heat.
9. Power Sources - The appliance should be connected to a power supply only of the type
described in the operating instructions or as marked on the appliance.
10. Cables and Plugs – The mains plug shall remain readily operable.
routed so that they are not likely to be walked on or pinched by items placed upon or against
them, paying particular attention to cords at plugs, convenience receptacles, and the point
where they exit from the appliance.
1 Cleaning - The appliance should be cleaned only as recommended by the manufacturer
Clean by wiping with a dry and clean cloth. Do not use chemical cleaners or detergents.
Always pull the mains plug before cleaning the unit.
12. Non-use Periods - The power cord of the appliance should be unplugged from the outlet
when left unused for a long period of time.
13. Object and Liquid Entry - Care should be taken so that objects do not fall and liquids are not
spilled into the enclosure through openings.
14. Damage Requiring Service - The appliance should be serviced by qualied service
personnel when:
a) The power-supply cord or the plug has been damaged; or
b) Objects have fallen, or liquid has been spilled into the appliance; or
c) The appliance has been exposed to rain; or
d) The appliance does not appear to operate normally or exhibits a marked change in
performance; or
e) The appliance has been dropped, or the enclosure damaged.
15. Servicing - The user should not attempt to service the appliance beyond that described in
the
16. Open Fire –
such as lighted candles on the apparatus.
17. Thunderstorms – During a thunderstorm the mains plug should be unplugged.
18. Safety Check –
ensure that the apparatus is working properly and safely
19. Batteries –
Danger of explosion if battery is incorrectly replaced. Replace only with the same or equivalent
type. Do not mix old and new batteries. T
disposal. Batteries
Remove batteries before disposing of the product.
20. Headphones (if applicable) – Excessive sound pressure from earphones and headphones
can cause hearing loss.
UR 1010
FM Alarm Clock Radio with Battery Back-Up | User Manual
Fold
Fold
Fold Fold
ENGLISH
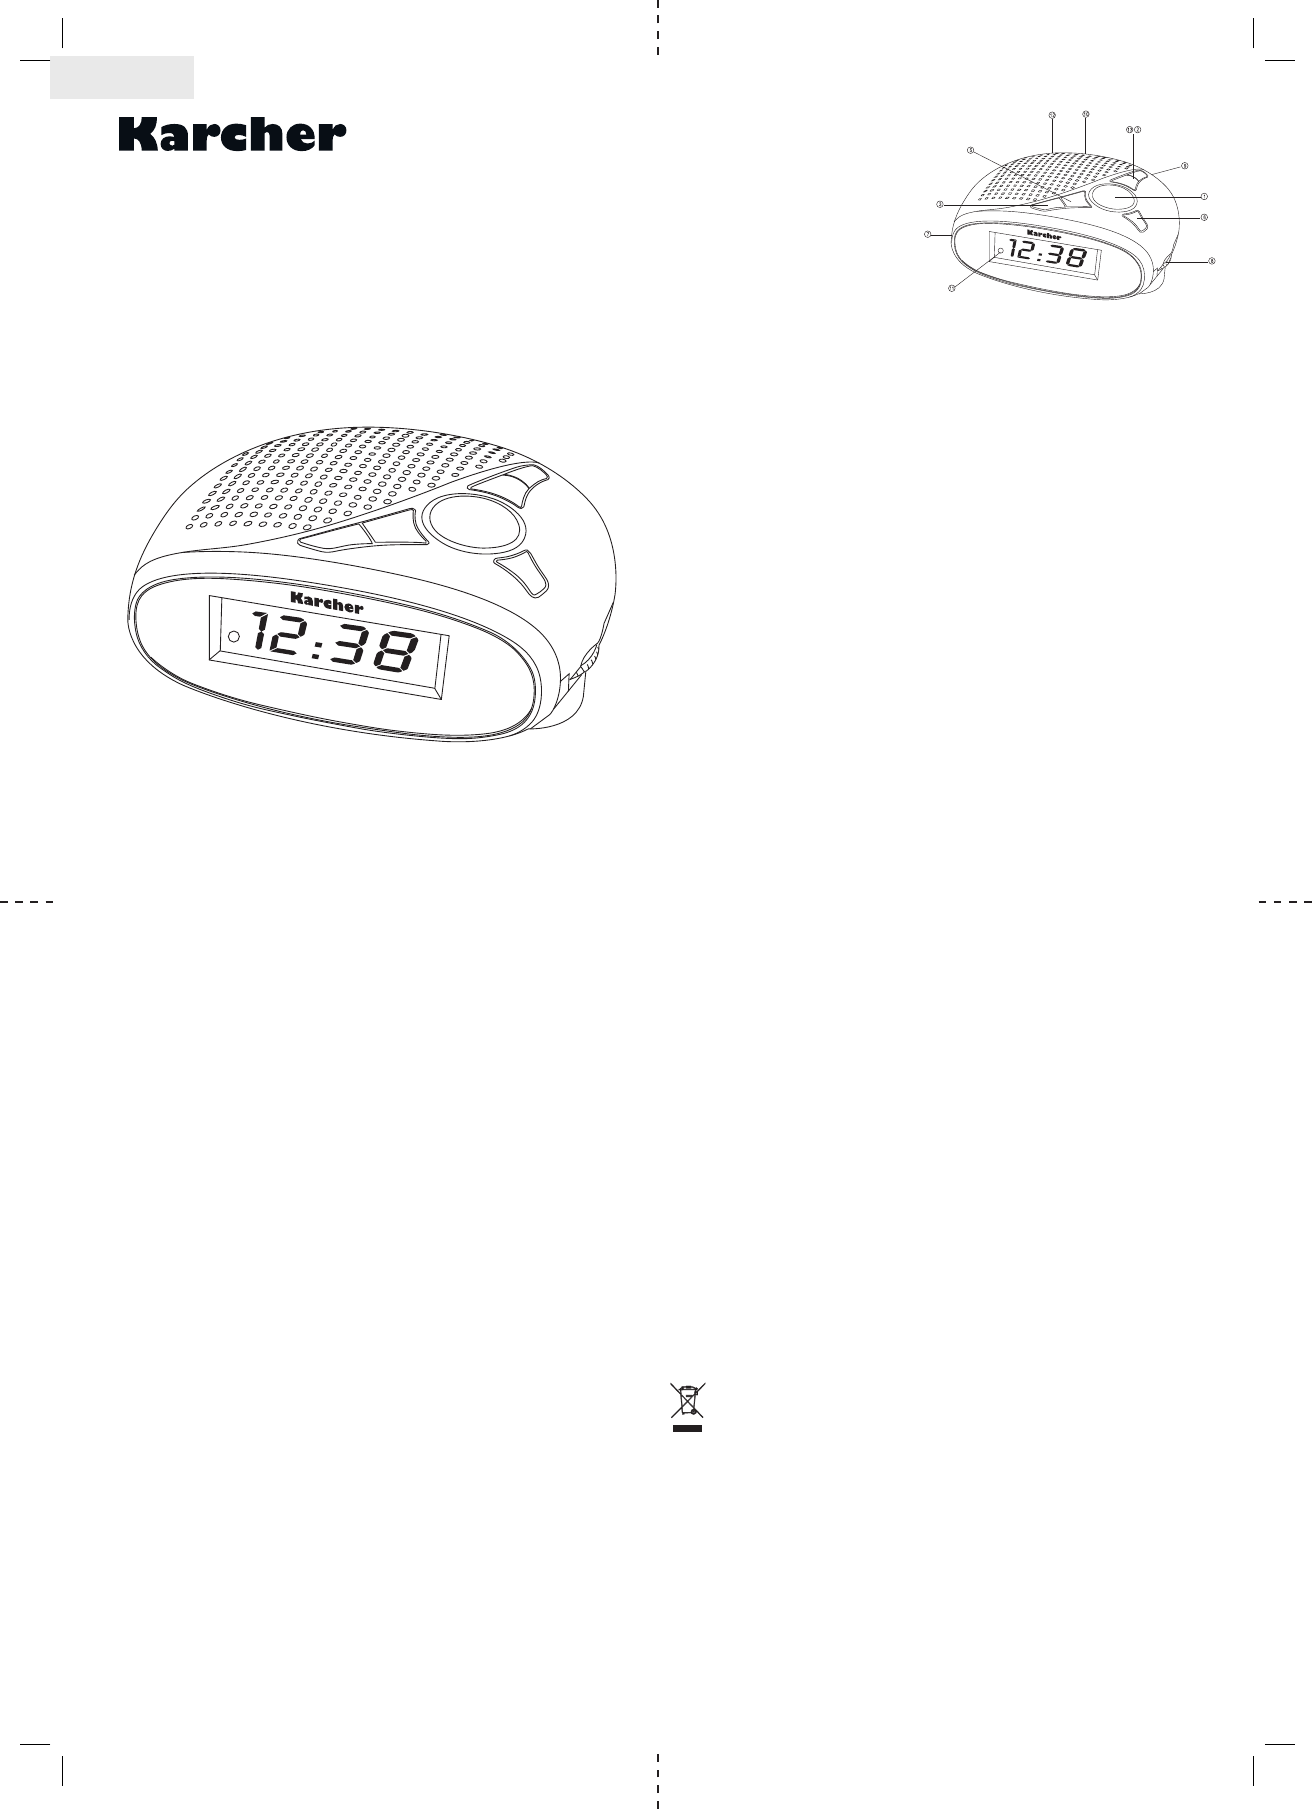
1. SNOOZE/SLEEP OFF BUTTON
2. ALARM SET BUTTON
3. TIME SET BUTTON
4. SLEEP SET BUTT
5. HOUR SET BUTTON
6. MINUTE SET BUTTON
7. ON/OFF/AUTO/ALARM SELECTOR
8. TUNING CONTROL
9. VOLUME CONTROL
10. FM
1 AUTO INDICA
12. MAIN PLUG (AC CORD)
13. ALARM OFF BUTTON
AC POWER OPERA
Before connecting to the power supply ensure that the supply corresponds to the information on
the rating label on the bottom of the apparatus.
CLOCK
1. Set the On/Off/Auto/Alarm Switch (7) to ‘OFF’. Connect the Mains Lead to the power supply
The clock display will ash on and off indicating a power interruption and that the display
time is incorrect.
2. T
Button (5), together
ALARM
1. T
Button (5), together
2. Switch the On/Off/Auto/Alarm Switch (7) to either ‘AUTO’
wake by radio or wake by buzzer respectively
alarm is now set to activate at the required time.
3. The alarm can be temporarily stopped for 9 minutes by pressing the Snooze/Sleep Off
Button (1).
4. The alarm will switch off automatically after 120 minutes, or can be cancelled be pressing
the
5. The alarm will activate again after 24 hours unless the On/Off/Auto/Alarm Switch (7) is set
to ‘OFF’.
Note: When setting alarm time always remember to release the Minute Set or Hour Set or Hour Set
Button before releasing the
SLEEP
1. Set the On/Off/Auto/Alarm Switch (7) to ‘OFF’, ‘AUTO’
2. Press the Sleep Set Button (4) and Minute Set Button (6) together
displayed and count down from 59 minutes to zero. Release the button when the required
sleep time is displayed.
3. The radio will now operate until the sleep time has elapsed or may be switched off by press-
ing the Snooze Off Button (1).
RADIO
The FM band required the use of the FM aerial wire, this should be uncoiled and positioned for
best reception. Set the On/Off/Auto/Alarm Switch (7) to ‘ON’
1. Adjust the T
2. Adjust the V
3. T
switch off this may be caused by inadvertent operation of the Sleep Set Button (4). T
this press the Snooze/Sleep Off Button (1) once.
BA
Inset a 9-volt battery (not included) in the compartment located in the cabinet bottom; use prefer-
ably a long-life battery
even if the display won’t show
Note: The effectiveness of this feature depends entirely on the freshness of your battery
will not keep the right time if the battery is old or of poor quality
CLEANING
Clean the cabinet with a soft cloth moistened with water or mild detergent. Do not use solvents
such as alcohol, benzene or thinner-
nect the mains lead from the supply before cleaning. Please retain these instructions for future
reference.
SPECIFICA
Frequency Range: FM 88 –108 MHz
Power Source: AC 230V ~ 50 Hz, 6W
DC9V (for battery back-up)
Power Output : 300 mW
T