DIGIT
USER GUIDE
This User guide cov
your r
to the follo
https://manual.ken
SUPPLIED A
Carefully unpack the tr
the follo
havfi le a claim with the carrier immediately
Item
NX NX TK-D240/
Battery charger/ AC adapter – - 1*1
Li-ion Battery pack – - 1*1
Speaker/ microphone jack – 1* 2 1
Speaker/ microphone locking br – 1* 2 1
Stopper – 1* 3 1
Belt clip 1 1 1
Screw 2 2 2
Universal connector cap 1 1*4–
User guide 1 1 1
*1:
*2:
*3:
*4:
Note:
◆For the univ
optional KENWOOD speak
◆For the speak
supplied cap.
speaker/ microphone, etc.
INST
1Match the guides of the battery pack with the grooves on the upper r
transceiverfi rmly press the batter
2Lock the saf
(NX
3T
pull the battery pack awa
1
3
2
13
NX TK-D240/
Release latch
Safety catch
Release latch
Safety catch
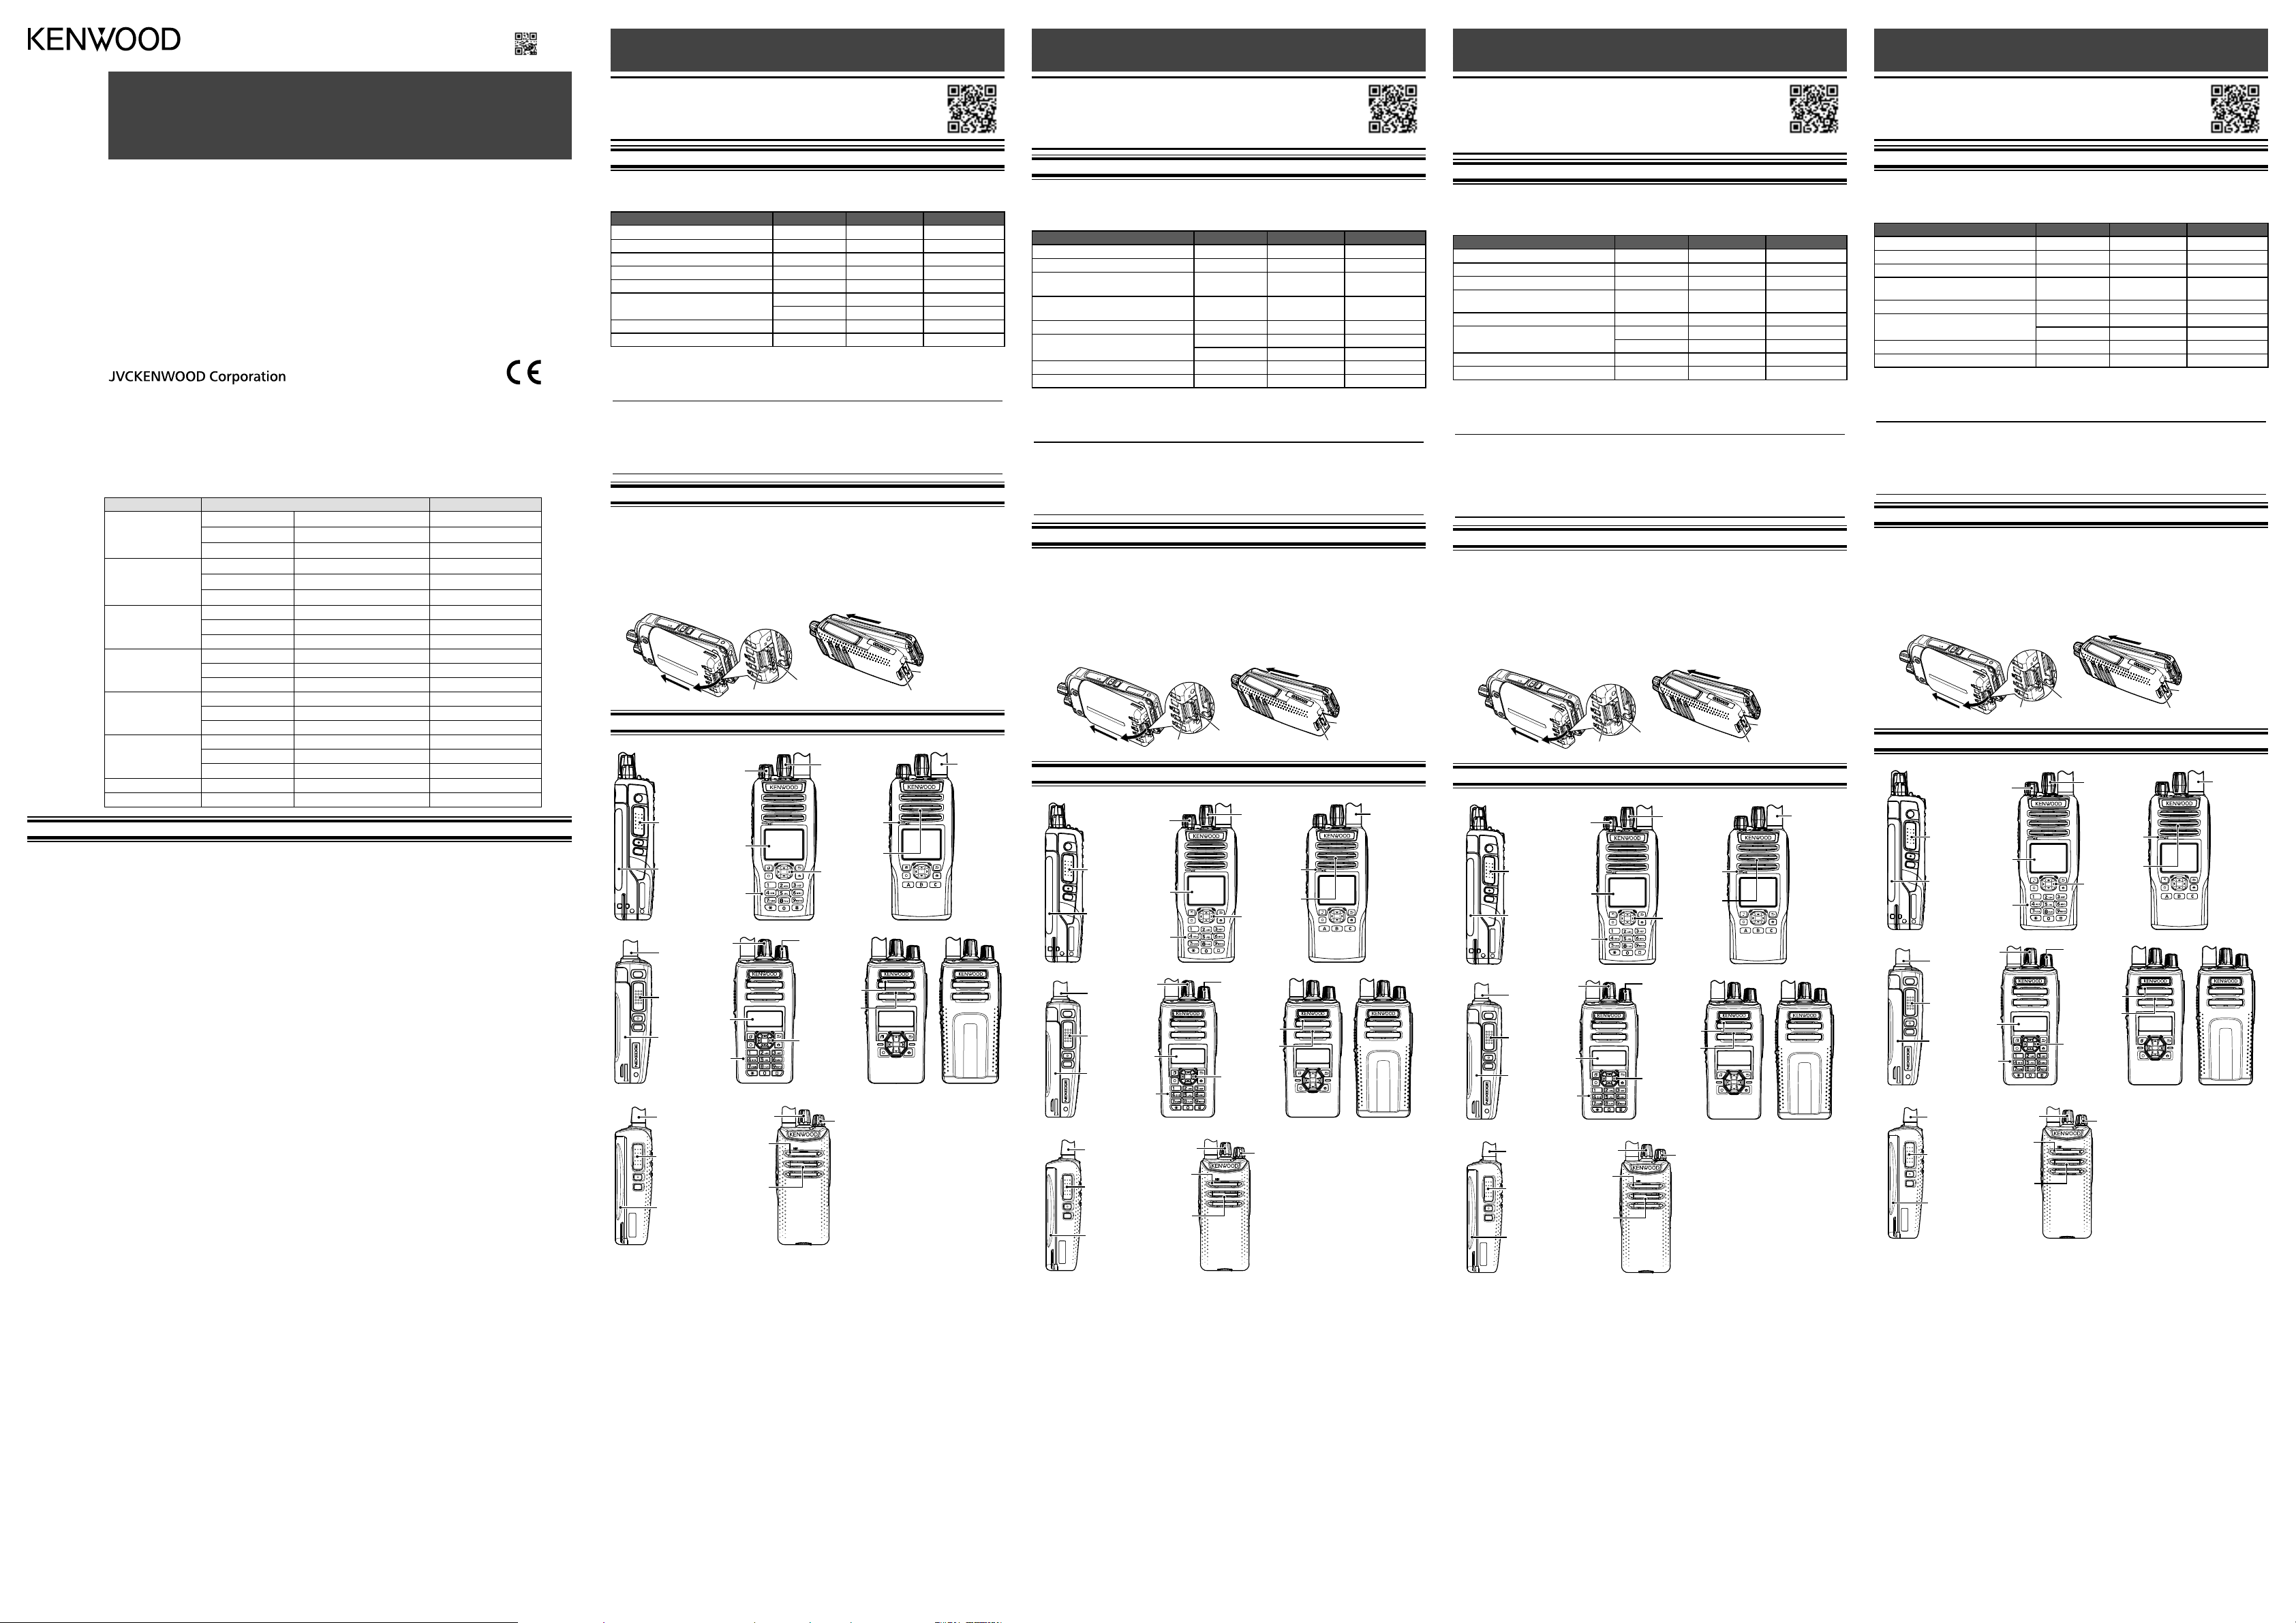
BASIC OPERA
Speaker
P
V Selector
Display
Ke
Microphone
PTT Switch
Battery Pack
Speaker
P
V
Selector
Antenna
Display
Ke
Microphone
PTT Switch
Battery Pack
Speaker
Microphone
Battery Pack
Antenna
PTT Switch
P
V
Selector
Antenna
4-wa
4-wa
NX
NX
TK-D240/ TK
Full Button Model Standard Button
Model
Full Button Model Standard Button Model
Basic Button Model
SWIT
TPo clockwise to switch the transceiv
TPo counterclockwise fully to switch the
transceiver OFF
ADJUSTING THE V
Rotate the P to adjust the v
increases the volume and counter
SELEC
Select the desired zone using the 4-w or the buttons programmed as
[Zone Up]/ [Z.
Select the desired channel using the Selector or the buttons programmed as
[Channel Up]/ [Channel Down].
transmitting and receiving.
TRANSMITTING
1 Select the desired zone and channel.
2 Press PTT switch and speak into the microphone.PTT switch to
receive
• For best sound quality
inches) from y
RECEIVING
Select the desired zone and channel.
selected channel, you will hear a call only if the r
transceiver settings
ÉMETTEUR-RÉCEPTEUR NUMÉRIQUE
GUIDE DE L
Cette Guide de l’utilisateur couvre uniquement les
opérations de base de votr
d’instruction (User Manual) en détail, reportez-vous à
l’URL suivante ou code QR.
https://manual.ken
A
Déballez soigneusement l’émetteur-récepteurfi er la présence des
articles ci-dessous avant de v
un des éléments ou si un élément est endommagé, remplissez immédiatement un
formulaire de plainte a
Article
Série NX Série NX TK-D240/
Chargeur de la batterie/ Adaptateur – - 1*1
Bloc-piles au lithium-ion – - 1*1
Capuchon de la prise microphone/
haut-parleur –1
*2 1
Support de verrouillage du microphone/
haut-parleur
–1
*2 1
Butée – 1* 3 1
Crochet de ceinture 1 1 1
Vis pour le crochet de ceinture 2 2 2
Capuchon de connecteur universel 11
*4 –
Guide de l’utilisateur 1 1 1
*1:
*2:
*3:
*4:
Remarque :
◆P
our le connecteur universel, les perf
connectant un haut-parleur/ microphone KENWOOD en option ou en fi
◆P
La performance en matière d’étanchéité ne sera pas garantie en connectant un haut-parleur/
microphone en option, etc.
POSE/ DÉPOSE DU BLOC PILES
1F
sur le haut à l’arrière de l’émetteur récepteur
bloc-piles pour le mettre en place.
2V
de blocage et de retirer le bloc-piles(Série NX
3P
blocage puis retirezle hors de l’émetteur-récepteur
Série NX TK-D240/
Loquet de blocage
Cran de sécurité
Loquet de blocage
Cran de sécurité
FONC
Haut-parleur
Affichage
Clavier
Microphone
Commutateur PTT
Bloc-piles
Haut-parleur
Sélecteur
Antenne
Affichage
Clavier
Microphone
Commutateur
PTT
Bloc-piles
Haut-parleur
Microphone
Bloc-piles
Antenne
Commutateur PTT
Commutateur
d’alimentation/
Commande de
volume
Sélecteur
Antenne
4-voies D-pad
4-voies D-pad
Série NX
Série NX
TK-D240/ TK
Commutateur
d’alimentation/
Commande de
volume
Sélecteur
Commutateur
d’alimentation/
Commande de
volume
Modèle intégral de boutons Modèle standard de
boutons
Modèle intégral de boutons Modèle standard de boutons
Modèle basique de
boutons
MISE SOUS/ HORS
Tcommutateur d’alimentation/ commande de volume dans le sens
horaire pour mettre l’émetteur-récepteur sous
Tcommutateur d’alimentation/ commande de volume dans le sens
anti-horaire pour mettre l’émetteur-récepteur hors tension.
RÉGLA
Tcommutateur d’alimentation/ commande de volume pour régler le volume
SÉLEC
Sélectionnez la zone souhaitée à l’aide de 4-voies D-pad ou des boutons
programmées en tant que [Z/ [Zone bas].
groupe de canaux.
Sélectionnez le canal souhaité à l’aide de Sélecteur ou des boutons programmés
en tant que [Canal haut] / [Canal bas] .
réglages de transmission et de réception.
TRANSMISSION
1 Sélectionnez la zone et le canal.
2 Appuyez sur le commutateur PTT et parlez dans le micr
commutateur PTT pour rece
• P
cm de votre bouche
RÉCEPTION
Sélectionnez la zone et le canal v
canal sélectionné, vous entendrez un appel uniquement si le signal r
aux réglages de votre émetteur-récepteur
B5A-2829-20 (E)
USER GUIDE
GUIDE DE L'UTILISA
GUÍA DEL USU
GUID
BENUTZERHANDBUCH
GEBRUIKERSHANDLEIDING
KULLANICI REHBERI
Ο ΧΡΗΣ
GUIA DO UTILIZADOR
NX-5000 ser
NX-3000 ser
TK-D240 TK-D340
TRANSCEPT
GUÍA DEL USU
Este Guía del Usuario sólo cubre las operaciones
básicas de su radio
instrucciones de detalles de uso , consulte el siguiente
URL código QR.
https://manual.ken
A
Desembale el transceptor con cuidadofi car
los elementos que se indican a continuación antes de deshacerse del material de
embalaje.
inmediatamente una reclamación a la empresa de transporte.
Artículo
Serie NX Serie NX TK-D240/
Cargador de la batería/ Adaptador de C
–-1
*1
Batería de iones de litio – - 1*1
T
–1
*2 1
Soporte del bloqueo del altavo
micrófono –1
*2 1
T – 1* 3 1
Gancho para cinturón 1 1 1
T 2 2 2
T 11
*4 –
Guía del usuario 1 1 1
*1:
*2:
*3:
*4:
Nota:
◆P
mediante la conexión de un alta
la tapa suministrada.
◆P
garantizado mediante la fi jación de la tapa suministrada.
no estará garantizado si conecta un altav
INST
1Alinee las guías de la batería con las ranuras correspondientes de la parte
posterior superior del transceptor y luego apriete la batería fuertemente hasta
que quede bloqueada en su sitio
2
Coloque el cierre de seguridad en posición para e
el pestillo de liberación y se salga la batería.
3P
liberación y luego separe la batería del transceptor
1
3
2
13
Serie NX TK-D240/
P
Cierre de seguridad
P
Cierre de seguridad
OPERA
Altav
P
T
Micrófono
Conmutador de PTT
Batería
Altav
Selector
Antena
P
T
Micrófono
Conmutador de
PTT
Batería
Altav
Micrófono
Batería
Antena
Conmutador de PTT
Interruptor de
encendido/ Control
de volumen
Selector
Antena
D-pad de 4
vías
D-pad de 4
vías
Serie NX
Serie NX
TK-D240/ TK
Interruptor de
encendido/ Control
de volumen
Selector
Interruptor de
encendido/
Control de
volumen
Modelo con todos los botones Modelo con botón
estándar
Modelo con todos los botones Modelo con botón estándar
Modelo con botones
básicos
ENCENDIDO Y
Gire el interruptor de encendido/ control de v hacia la derecha para
encender el transceptor
Gire el interruptor de encendido/ control de v hacia la izquierda par
apagar el transceptor
AJUSTE DEL
Gire el interruptor de encendido/ control de v para ajustar el volumen.
SELECCIÓN DE UNA Z
Seleccione la zona deseada mediante el D-pad de 4 vías o los botones progr
como [Zona arriba] / [Z.
Seleccione el canal deseado mediante el Selector o los botones programados
como [Subir canal] / [Bajar canal] .
transmisión y recepción.
TRANSMISIÓN
1 Seleccione la zona deseada mediante
2 Presione el conmutador PTT y hable al micrófonoPTT
para recibir
• P
de la boca.
RECEPCIÓN
Seleccione la zona y el canal deseados
señalización en el canal seleccionado
recibida coincida con la confi guración del transceptor
RICETRASMETTIT
GUID
Questa guida per l'utente spiega soltanto i fondamenti
d’uso del ricetrasmettitore
dettagliato è scaricabile dall’indirizzo o codice QR.
https://manual.ken
A
Disimballare con cura il ricetrasmettitor
d’imballaggiofi care la presenz
seguente.
reclamo al corriere
Articolo
Serie NX Serie NX TK-D240/
Caricabatterie/ Adattatore c.a. – - 1*1
P – - 1*1
Coperchio jack altoparlante/ microf – 1* 2 1
Staff
microfono –1
*2 1
Fermo – 1* 3 1
Clip da cintura 1 1 1
Viti per clip cintura 2 2 2
Coperchio del connettore univ 1 1*4–
Guida per l’utente 1 1 1
*1:
*2:
*3:
*4:
Nota:
◆P
un altoparlante/ microfono opzionale KENW
◆P
fi
garantite collegando un altoparlante/ microfono opzionale
INST
1F
presenti nella parte posteriore superiore del ricetrasmettitor
con decisione il pacco batteria per bloccarlo in posizione.
2Bloccare il fermo di sicur
accidentalmente.
3P
di sgancio e infi ne estrarre il pacco batteria dal ricetrasmettitore
1
3
2
13
Serie NX TK-D240/
Fermo di sgancio
Fermo di sicur
Fermo di sgancio
Fermo di sicur
FUNZIONAMENT
Altoparlante
Display
T
Microfono
Interruttore PTT
P
Altoparlante
Selettore
Antenna
Display
T
Microfono
Interruttore PTT
P
Altoparlante
Microfono
P
Antenna
Interruttore PTT
Interruttore di
accensione/
regolatore di
volume
Selettore
Antenna
D-pad a 4 vie
D-pad a 4 vie
Serie NX
Serie NX
TK-D240/ TK
Interruttore di
accensione/
regolatore di
volume
Selettore
Interruttore di
accensione/
regolatore di
volume
Modello con pulsanti completi Modello con
pulsanti standard
Modello con pulsanti completi Modello con pulsanti standard
Modello con
pulsanti di base
A
Ruotare l’interruttore di accensione/ r in senso or
accendere il ricetrasmettitore
Ruotare l’interruttore di accensione/ r in senso antior
per spegnere il ricetrasmettitore
REGOLAZIONE DEL
Ruotare l’interruttore di accensione/ r per eseguir
regolazione.
SELEZIONE DI UNA ZONA E DI UN DI C
Selezionare la zona desiderD-pad a 4 vie o i pulsanti programmati
come [Zone su] / [Z.
Selezionare il canale desiderato utilizzSelettore o i pulsanti programmati come
[Canale su]/ [Canale giù].
trasmissione e la ricezione.
TRASMISSIONE
1 Selezionare la zona e il canale desider
2 Premere PTT e parlare nel microfPTT
per la ricezione.
• P
~ 4 cm dalla bocca.
RICEZIONE
Selezionare la zona e il canale desider
programmato uno specifi co tipo di segnalazione, la ricezione da parte di un altro
corrispondente potrà avv
idonee al formato utilizz
Model F Max.
NX
NX
TX/RX 136.000 - 174.000 MHz 6
GPS 1575.42 ± 1 MHz –
Bluetooth 2402 - 2480 MHz Class2 / 2.5 mW
NX
NX
TX/RX 400.000 - 470.000 MHz 5
GPS 1575.42 ± 1 MHz –
Bluetooth 2402 - 2480 MHz Class2 / 2.5 mW
NX
NX
NX
TX/RX 136.000 - 174.000 MHz 5
GPS 1575.42 ± 1 MHz –
Bluetooth 2402 - 2480 MHz Class2 / 2.5 mW
NX
NX
NX
TX/RX 136.000 - 174.000 MHz 5
GPS 1575.42 ± 1 MHz –
Bluetooth 2402 - 2480 MHz Class2 / 2.5 mW
NX
NX
NX
TX/RX 400.000 - 520.000 MHz 5
GPS 1575.42 ± 1 MHz –
Bluetooth 2402 - 2480 MHz Class2 / 2.5 mW
NX
NX
NX
TX/RX 400.000 - 520.000 MHz 5
GPS 1575.42 ± 1 MHz –
Bluetooth 2402 - 2480 MHz Class2 / 2.5 mW
TK-D240-E TX/RX 136.000 - 174.000 MHz 5
TK-D340-E TX/RX 400.000 - 470.000 MHz 4
INFORMA
This transceiver uses a softw
libpng versions 0.5, Ma
Copyright (c) 1995, 1996 Guy Eric Schalnat, Group 42, Inc.
For the purposes of this cop
Authors”fi
Andreas
Dav
Guy Eric Schalnat
P
Tim
The PNG Ref
Authors and Group 42, Inc.
or implied, including, without limitation, the warranties of
merchantability and of fi
Authors and Group 42, Inc.
incidental, special, ex
may result fr
advised of the possibility of such damage.
P
this source code, or portions hereof
fee, subject to the f
1.
2.
not be misrepresented as being the original source
3.
any source or alter
The Contributing Authors and Group 42, Inc.fi cally
permit, without fee, and encour
code as a component to supporting the PNG fi le format in
commercial products.
acknowledgment is not required but w
A “png_get_cop
“about”
printf(“%s”,png_get_copyright(NULL));
Also
fi les
“pngbar
(98x31).
Libpng is OSI Certifi ed Open Source Softwarefi ed
Open Source is a certifi cation mark of the Open Source Initiative.
Glenn Randers-P
glennrp at users.sourcef
December 19, 2013
*Md5
Copyright (C) 1999, 2000, 2002 Aladdin Enterprises.
reserved.
This software is pr
warranty
In no ev
arising from the use of this softwar
P
purpose, including commercial applications
redistribute it freely
1.
you must not claim that y
you use this softw
the product documentation would be appreciated but is not
required.
2.
and must not be misrepresented as being the original
software
3.
distribution.
L.
ghost@aladdin.com
*zlib LICENSE
Copyright (C) 1995-2013 Jean-loup Gailly and Mark Adler
This software is pr
warranty
In no ev
arising from the use of this softwar
P
purpose, including commercial applications
redistribute it freely
1.
you must not claim that y
you use this softw
the product documentation would be appreciated but is not
required.
2.
and must not be misrepresented as being the original
software
3.
distribution.
Jean-loup Gailly (jloup@gzip.or
Mark Adler (madler@alumni.caltech.edu)
*libpng LICENSE
This copy of the libpng notices is pro
In case of any discrepancy betw
the fi
shall prev
COPYRIGHT NO
If you modify libpng y
immediately following this sentence
This code is released under the libpng license.
1.2.6, August 15, 2004, through 1.6.8, December 19, 2013, are
Copyright (c) 2004, 2006-2013 Glenn Randers-P
are distributed according to the same disclaimer and license
as libpng-1.2.5 with the following individual added to the list of
Contributing Authors
Cosmin
libpng versions 1.0.7, July 1, 2000, through 1.2.5 - October 3,
2002, are Copyright (c) 2000-2002 Glenn R
and are distributed according to the same disclaimer and
license as libpng-1.0.6 with the following individuals added to
the list of Contributing Authors
Simon-Pierre Cadieux
Eric S.
Gilles V
and with the following additions to the disclaimer:
There is no warr
the library or against infringement.
eff fi ll any of your particular purposes or
needs.
of satisfactory qualityff
the user
libpng versions 0.97, January 1998, through 1.0.6, March 20,
2000, are Copyright (c) 1998, 1999 Glenn R
and are distributed according to the same disclaimer and
license as libpng-0.96, with the following individuals added to
the list of Contributing Authors:
T
Glenn
Willem van Schaik
libpng versions 0.89, June 1996, through 0.96, Ma
Copyright (c) 1996, 1997 Andreas Dilger Distributed accor
to the same disclaimer and license as libpng-0.88, with the
following individuals added to the list of Contributing A
John
Ke
Sam
Magnus
Greg
T