Introduction
Thank you for purchasing the Korg microKEY USB Powered Keyboard .
T
manual carefully
In order to take full advantage of this product, y
se
directions as described in the owner
tion to de
P
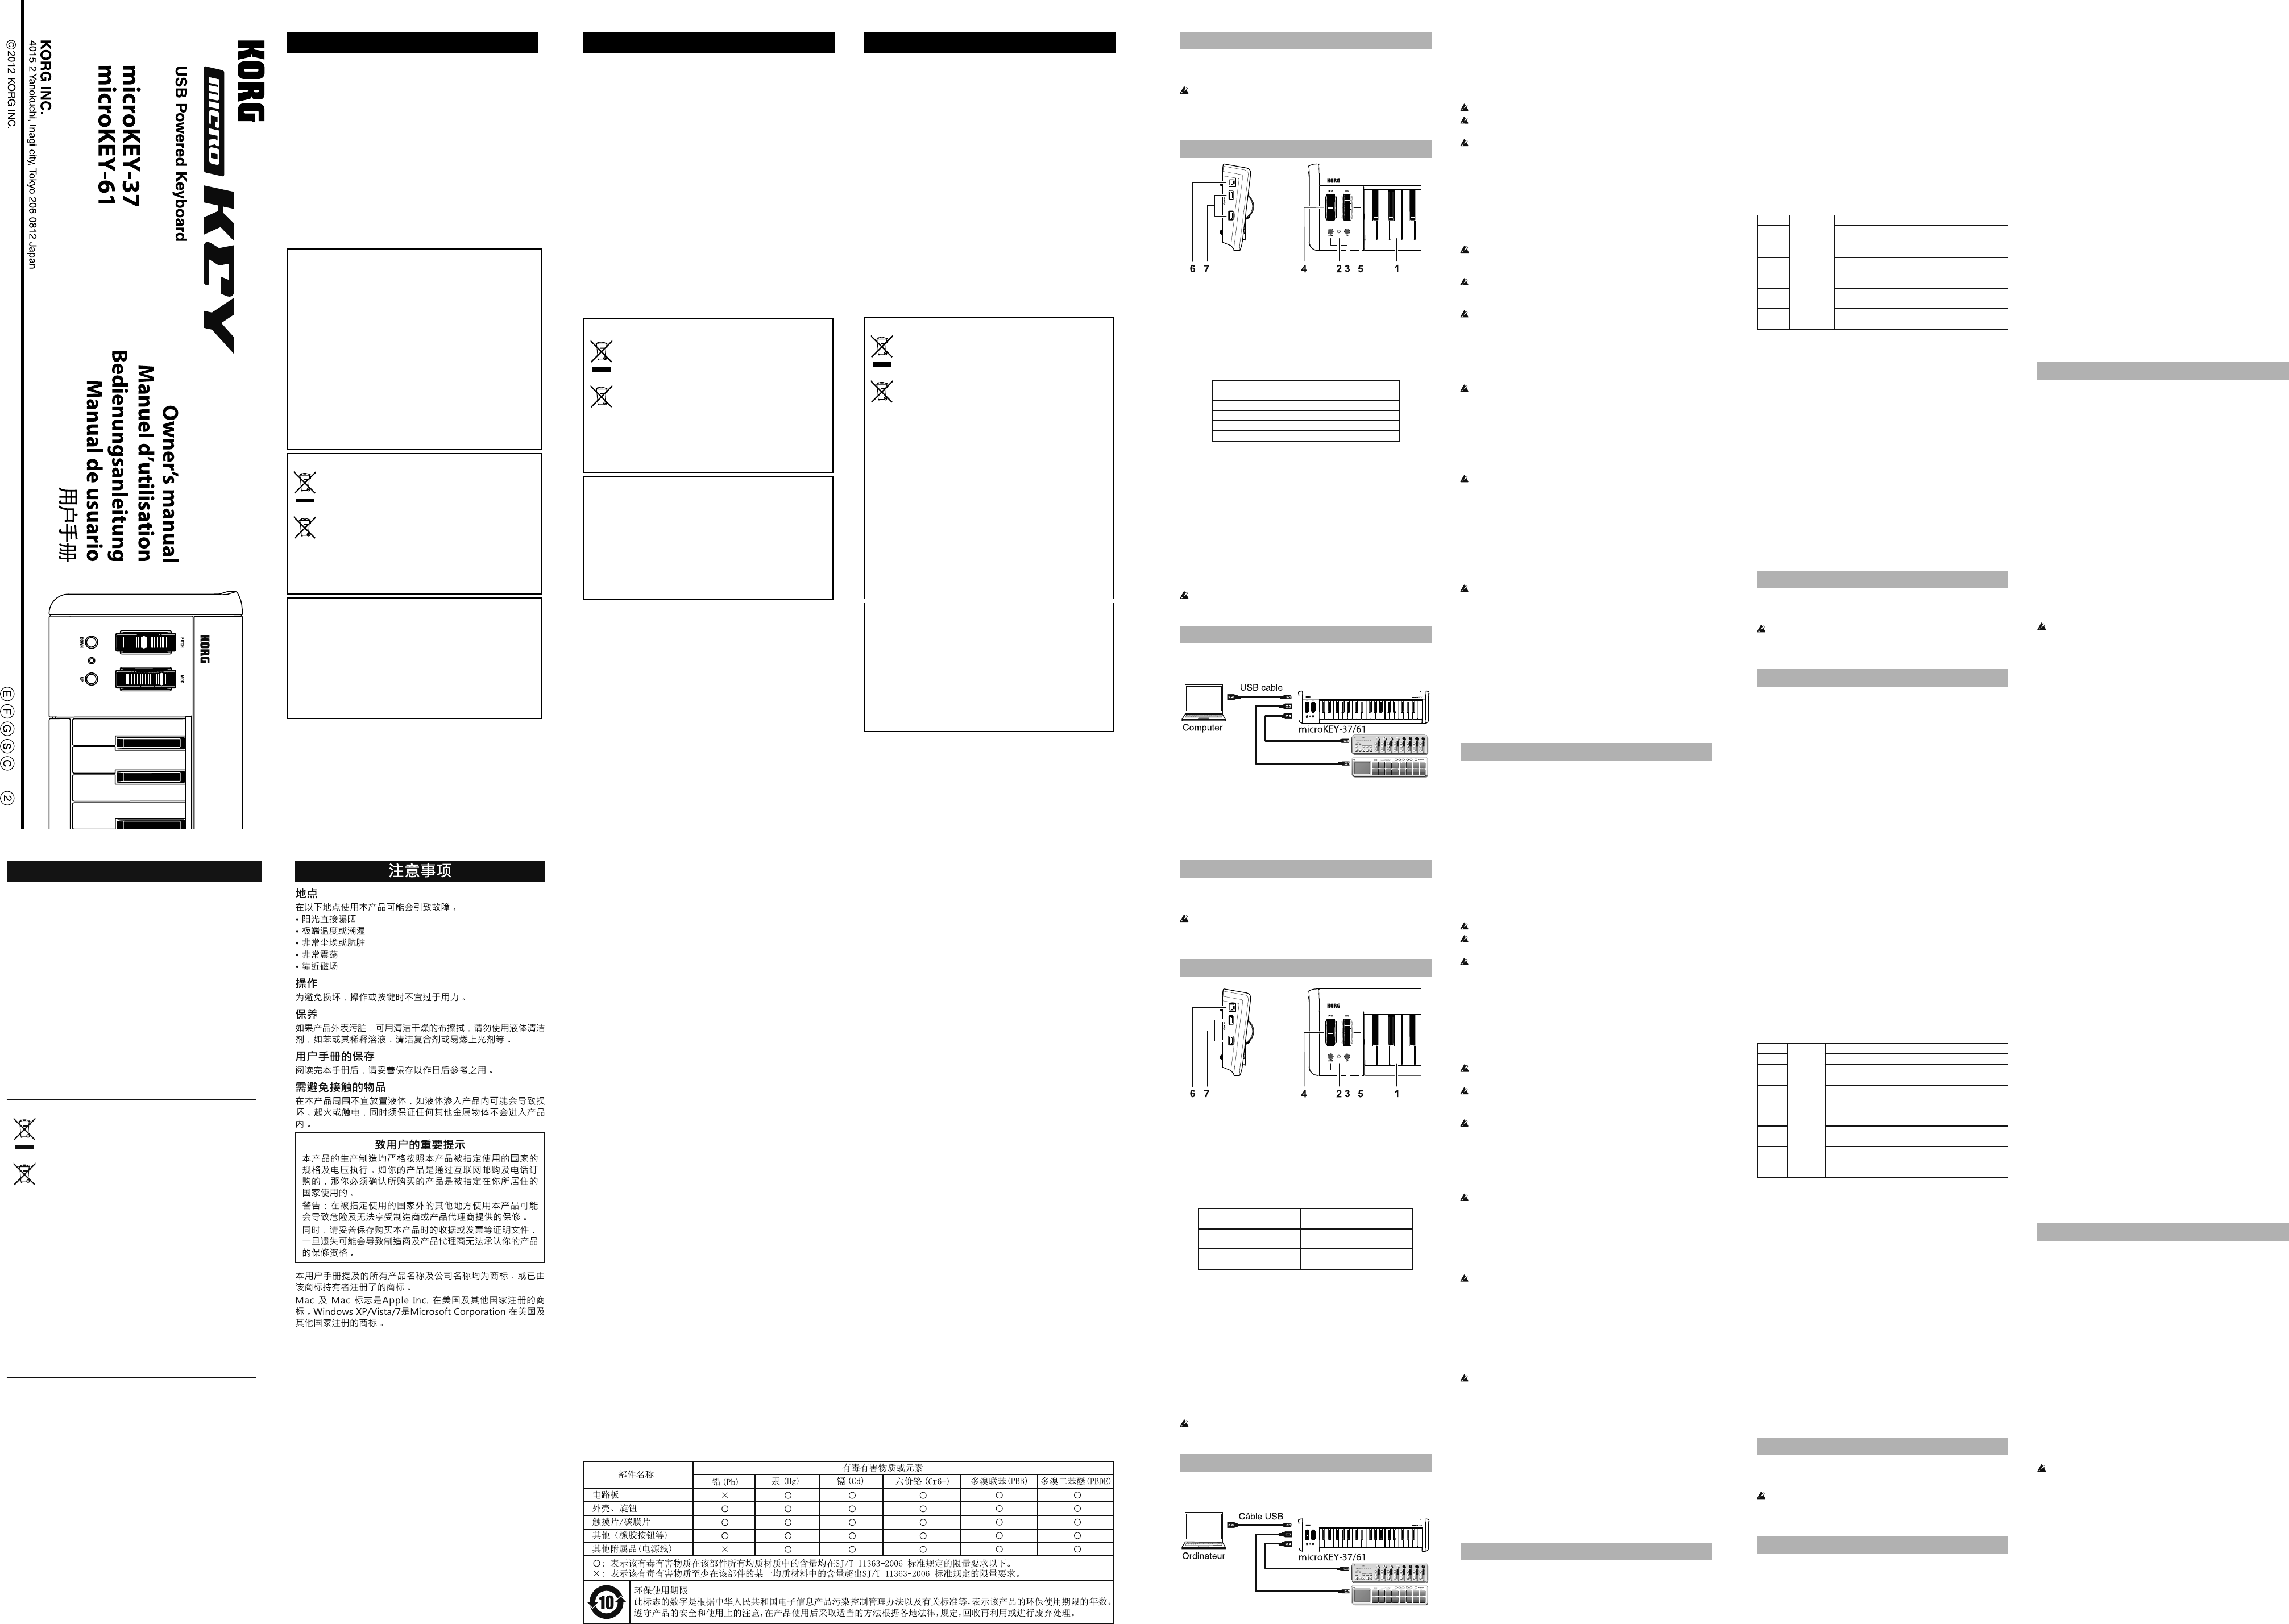
1.
This is a velocity-sensitive mini-keyboard. It transmits note messages.
2.
This indicator lights up when the power is turned on.
3.
These select the pitch of the keyboard in steps of an octave.
The pitch will shi
OCT
each time you press the OCT
Octave shi Octave LED color
±0 Unlit
+1 / -1 Green
+2 / -2 Orange
+3 / -3 Red
+4 / -4 (37 key only) Blinking red
TIP
simultaneously you can reset the octave shi
4.
This wheel transmits pitch bend messages.
5.
This wheel transmits modulation messages. With the factory se
control change number 1 (modulation) is assigned to this wheel.
6.
Connect the microKEY to y
port.
7.
These connectors function as a USB hub. Y
USB devices here.
Do not connect a bus-powered USB device that requires current
consumption of over 100mA.
Getting ready
Connections and pow
Connection example
Connecting the microKEY to your c
1. Make sure that no USB device is connected to either USB-A
connector
2. Use a USB cable to connect the microKEY to a USB port on y
computer
LED will light up.
Use only the included USB cable.
Do not connect the unit to the computer if a USB device is connected
to either of the USB-A
When you connect the microKEY
be sure to connect the USB hub to the power supply
TIP
dard USB-MIDI driver for your operating system will be installed
automatically
Connecting a USB device to one of the USB-A c
1. Make sure that the microKEY is connected to y
that the power is turned on.
2. Connect a USB device to one of the USB-A
Do not connect a USB device to either of the USB-A
before the installation of the USB hub driver and USB-MIDI driver
is complete.
If the microKEY’
used by application so
disconnect any USB devices.
Do not connect a USB hub to the microKEY’
T
1. Disconnect any USB devices connected to the USB-A
2. Disconnect the microKEY from y
microKEY will turn off and the pow
Do not turn off
nected to the USB-A
Installing the driver
Installation
When you
USB-MIDI driver for your operating system will be installed automati-
cally
If you’
that is automatically installed won’
with multiple applications simultaneously
If you w
neously
Even if you don’
tions simultaneously
MIDI driver for more stable operation. Y
USB-MIDI driver from the Korg website, and install it as described
in the included documentation.
h
If you w
Korg USB-MIDI driver
Driver ports
The microKEY’
1OUT
MIDI IN port
This is where MIDI messages from the microKEY’
are received. If you w
on your computer
application.
This is also used by the Korg Kontrol Editor to control the microKEY
MIDI OUT port
This port is used by the Korg Kontrol Editor to control the microKEY
Making detailed settings
TIP
you’ll need to use the Korg Kontrol Editor
Korg Kontrol Editor from the Korg website.
h
MIDI channel
MI
This speci
note messages, pitch bend messages, and MIDI messages that are sent
when you use the MOD wheel. This should be set to match the MIDI
channel of the MIDI application that you are controlling.
Ke
Y
T
Use this to transpose the pitch of the keyboard up or down in semitone
steps. The range is -12 to +12.
Veloci
The velocity curve determines how the force used when y
keyboard will aff
ity curves, or select a
1
Heavy
Requires strong strikes to produce an eff
2
|
A
3
A
4
Normal
A
5
|
Allows even so ff
6
A
produce an eff
7
Allows medium-strength strikes to produce a
constant but less dynamic eff
8
Light
A
Const –
The velocity v
Const Velo
This speci
set to Const. This is useful for sounds such as organ, etc.
MOD wheel
Y
control change number
you move the wheel up or down.
Whe
Enables or disables the wheel. If the wheel is disabled, using the wheel
will not transmit a MIDI message.
Contro
Speci
transmi
Upp
Speci
when you move the wheel all the w
Lower Valu
Speci
when you move the wheel all the w
Restoring the factor
If you turn on the power while holding down the OCT
ton and OCT
their factory-set default values, and the pow
The process of restoring the factory se
onds a ff
during this time.
T
P
• If y
fail to power
please connect the microKEY to a pow
computer
• If a device connected to one of the USB-A
draw a high volume of current, the power to the microKEY
turn on due to a lack of power
device.
Software does not respond
Make sure that the microKEY has been detected by the connected
computer
“Sounds, Speech, and “Sounds and Audio De-
vices,” and check the “Hardware” tab page.
If you are using W
“Hardware and Sounds” “Device Manager
Video, and Game Controllers” tab.
If you are using Mac OS X, open “ “Utilities,” then
start “
For Mac OS X 10.5 or earlier
For Mac OS X 10.6 or later
by selecting “Show MIDI Window” from the “W
• Make sure that the microKEY
the application you’
• The application y
Please check the owner
• If the microKEY
not function properly
nector
Ke
• Check the v
The USB de
connectors does not function
• Do not connect a bus-pow
sumption of over 100mA.
• The microKEY’
Specifi
Connectors: USB-B connector (for computer connection)
USB-A
Pow USB bus power mode
Current consumption: 500 mA
Dimensions(WxDxH): 22.24 × 5.47 × 2.13 inches / 565 × 139 × 54 mm
(microKEY
33.46 × 5.47 × 2.13 inches / 850 × 139 × 54 mm
(microKEY
W 2.20 lbs. / 1 kg (microKEY
3.75 lbs. / 1.7 kg (microKEY
Included items: USB cable, Owner
Operating requirements
Windows
Computer: Computer that has a USB port and satis
requirements for running Microso
XP/Vista/7.
Operating system: Microso
Microso
Windows 7 SP1 (32bit, 64bit).
Mac OS X
Computer: Apple Macintosh computer with an Intel
processor that has a USB port and satis
requirements for running Mac OS X.
Operating system: Mac OS X 10.5 or later
Keyboard functionality is not guaranteed with all computers that
satisfy these system requirements.
* Speci
improvement.
Introduction
Merci d’clavier microKEY de K. n
de pouvoir exploiter au mieux toutes les possibilités off
ment, veuillez lire a
Pour pouvff
réglages au sein du logiciel que vous utilisez. Eff
décrits dans le mode d’
Description et fonction des éléments
1.
Ce mini-clavier est sensible au toucher
note.
2.
Ce témoin s’
3.
Ces boutons perme
Chaque pression sur le bouton OCT
d’une octave. Chaque pression sur le bouton OCT
la hauteur d’une octave.
T Couleur du témoin OCT
±0 Eteint
+1 / -1 V
+2 / -2 Orange
+3 / -3 Rouge
+4 / -4 (37 clés seulement) Rouge clignotant
Astuce Une pression simultanée sur les boutons OCT
OCT
4.
Ce
5.
Ce
commande de contrôle 1 (modulation) est assignée à ce
6.
Branchez le microKEY à v
à ce
7.
Ces prises font offi
dispositifs USB.
N’y branchez pas d’
mation est supérieure à 100mA.
C
Conne
Exemple de raccordement
Branchement du microKEY à v
1. Débranchez les dispositifs USB des deux prises USB-A.
2. Reliez le microKEY à un port USB de v
USB. Le microKEY est mis sous tension et son témoin d’
s’
Utilice únicamente el cable USB incluido.
Evitez de relier ce produit à votre ordinateur tant qu’un appareil
USB est branché à l’une des prises USB-A.
Si vous préférez brancher le microKEY
choisir un hub USB disposant de sa propre alimentation.
Astuce La première fois que vous branchez le microKEY à l’
le pilote USB–MIDI standard de votre système d’
automatiquement installé.
Conne
1. Branchez le microKEY à v
tension.
2. Reliez l’
Ne branchez pas d’
du pilote du hub USB et du pilote USB–MIDI.
T
par un logiciel tournant sur votre ordinateur
cher ou de débrancher des appareils USB.
Ne branchez jamais de hub USB à un port USB-A
Mise hors tension
1. Débranchez les appareils USB reliés aux ports USB-A.
2. Déconnectez le microKEY de l’
tension et son témoin d’
Ne coupez jamais le microKEY tant qu’un appareil USB est relié à
un port USB-A.
Installation du pilote
Installation
Quand vous branchez le microKEY
standard de votre système d’
A
tomatiquement ne vous permet pas d’utiliser le microKEY
sieurs logiciels simultanément. Si vous voulez utiliser le microKEY
avec plusieurs logiciels simultanément, installez le pilote USB-MIDI
Korg. Même si vous n’
plusieurs logiciels, nous vous recommandons l’installation du pilote
USB-MIDI Korg pour béné
T
installez-le en suivant les instructions fournies.
h
Si vous voulez utiliser le Korg Kontrol Editor
pilote USBMIDI Korg.
Ports du pilote
L
nateur comme 1IN-1OUT
Port MIDI IN
Les messages MIDI provenant des diff
arrivent ici. Si vous v
sur ordinateur
logiciel.
Il est également utilisé par le logiciel Korg Kontrol Editor pour piloter le
microKEY
Port MIDI OUT
Ce port est utilisé par le Korg Kontrol Editor pour piloter le microKEY
Régler les moindres détails
Astuce Les paramètres suivants ne peuv
KEY même. Il faut donc utiliser le logiciel “Korg Kontrol Editor
V
Korg.
h
Canal MIDI
MI
Spéci
numéros de note, des messages pitch bend et les messages MIDI générés
lorsque vous actionnez la mole
canal MIDI du logiciel que vous pilotez.
Clavi
V
T
Ce paramètre permet de transposer la hauteur du clavier par demi-tons
vers le haut ou le bas. La plage de réglage est de -12 à +12.
Veloci
La courbe de toucher détermine la façon dont la force exercée sur les
touches aff
de toucher plus une réponse au toucher
1
Lourd
Il faut jouer plus fort des notes d’un niveau élevé.
2
(Heavy)
Courbe de réponse plus normale que la courbe 1.
3
|
Courbe de réponse plus normale que la courbe 2.
4
Normal
Courbe de réponse normale.
5
Les diff
faibles valeurs de toucher
6
|
Courbe produisant un eff
léger encore que pour la courbe 5.
7
Léger
Une force de frappe moyenne produit un eff
constant mais moins dynamique.
8
(Light)
Courbe de réponse plus plate que la courbe 7.
Const –
La réponse au toucher a une valeur
(constante).
Const Velo
Ce paramètre détermine la valeur de toucher transmise lorsque la courbe
de toucher est réglée sur “Const”. Ce réglage est utile pour sons d’
etc.
Molette MOD
La mole
d’usine, il transmet des messages de modulation (CC01). V
activer/couper la mole
et spéci
basse.
Whe
Active ou coupe la mole
transmet aucun message MIDI.
Contro
Détermine le numéro CC de la commande de contrôle transmise.
Upp
Détermine la valeur de la commande de contrôle transmise lorsque v
l’
Lower Valu
Détermine la valeur de la commande de contrôle transmise lorsque la
mole
Rétablir les réglages d’usine
Si vous me
OCT
leur réglage d’usine et le témoin d’
Le rétablissement des réglages d’usine dure quelques secondes
après la mise sous tension. Ne coupez jamais l’
ce
Dépannage
L
• Si v
à l’
alimentation insuffi
USB actif ou directement à l’
• Un appareil à forte consommation relié à un port USB-A
cher le microKEY de s’
question.
Le logiciel ne répond pas
• V
Windows XP
voix et périphériques audio” “Sons et périphériques audio” et
cliquez sur l’
dans le Panneau de con
“Gestionnaires de périphériques” et véri
vidéo et jeu”. Si vous utilisez Mac OS X, ouvrez “ “Uti-
litaires” et lancez “Con
ou plus ancien, cliquez sur l’
OS X 10.6 ou plus récent, ouvrez la fenêtre “Studio MIDI” en choisis-
sant [Affi
• V
MIDI du logiciel que vous utilisez.
• Le logiciel utilisé peut ne pas disposer d’une
le mode d’
• Si le microKEY
USB et ne se comporte pas de façon escomptée, branchez le microKEY
directement à un port USB-B sans passer par le hub USB.
Le cla
• V
L
fonctionne pas
• Ne branchez pas d’
supérieure à 100mA.
• Les ports USB-A
F
Prises: Prise USB-B (connexion à l’
Prise USB-A
Alimentation: Alimentation par le bus USB
Consommation électrique: 500mA
Dimensions (L 565 × 139 × 54 mm (microKEY
850 × 139 × 54 mm (microKEY
Poids: 1 kg (microKEY
1,7 kg (microKEY
Accessoires inclus: Câble USB, Manuel d’utilisation
Système requis
Windows
Ordinateur: Ordinateur doté d’une prise USB et pou-
vant tourner sous Microso
Vista/7.
Système d’ Microso
récent, Microso
bits, 64 bits) ou Windows 7 SP1 (32 bits, 64
bits).
Mac OS X
Ordinateur: Apple Macintosh avec processeur Intel doté
d’une prise USB et tournant sous Mac OS X.
Système d’ Mac OS X 10.5 voire plus récent.
Même si votre ordinateur répond aux exigences citées plus haut, il
peut arriver que le clavier ne fonctionne pas.
* Les caractéristiques et l’
modi
Pr
Location
Using the unit in the following locations can result in a malfunction.
•
•
•
•
•
Handling
T
Care
If
cle
Keep this manual
After reading this manual, please keep it for later reference.
Keeping for
Never set any container with liquid in
the
not to let metal objects get into the equipment.
THE FCC REGULA
This
Class B digital device, pursuant to
designed protection
a uses, and
radio and, installe in
the
However
installation. this does harmful
television reception,
and
of the following measures:
● Reorient or relocate the receiving antenna.
● Increase the separation between the equipment and receiver
●
which the receiver is connected.
● Consult the dealer or an experienced radio/TV technician for help.
Unauth chang modi to this
authority to operate this equipment.
Notice regarding disposal (EU only)
When
product,
when
you
manual,
Disposing in
and potential damage
of
your locality
battery contains
symbol is
tery or battery package.
IMPORT
This
voltage
that this product should be used. If you have purchased this product via the
internet, you
that this product is intended to be used in the country in which you reside.
W
is
distributor
oth ma fr or
distributor
- Mac,
and other countries.
- Windows trademar
Corporation in the U.S. and other countries.
- All p or
trademarks of their respective owners.
Précautions
Emplacement
L
le mauvais fonctionnement.
•
•
•
•
•
Maniement
Po
de cet instrument avec soin.
Entretien
Lorsqu
vous
diluant, voire des produits inflammables.
Conservez ce manuel
Après
référence ultérieure.
Evitez toute in
Ne
le
court-circuit électrocution. ne tomber
objets métalliques dans le boîtier (trombones, par ex.).
Note concernan
Quand poubelle
apparait
de
être
une poub conven
Disposer de cette manière,
l s e l d p p
l’
des lois et règlements applicables dans
contactez votre organisme administratif pour plus de détails.
Si
symbole chimique est
barrée d’une croix sur la pile ou le pack de piles.
REMARQUE IMPORT
Ce
oins
Si
dance ou/et v
est bien utilisable dans le pays où vous résidez.
A
pour
du fabricant ou du
est
ne plus être couvert par la garantie du fabricant ou du distributeur
- Mac,
Inc., déposées aux États-Unis et dans d´autres pays.
- W
de Microsoft Corporation aux Etats-Unis et dans d´autres pays.
- T
ou déposées de leur détenteur respectif.
V
Aufstellungsort
V
• es direkter Sonneneinstrahlung ausgesetzt ist;
• hohe Feuchtigkeit oder Extremtemperaturen auftreten können;
• Staub oder Schmutz in großen Mengen vorhanden sind;
• das Gerät Erschütterungen ausgesetzt sein kann.
• in der Nähe eines Magnetfeldes.
Bedienung
V
messenen Kraftaufwand.
Reinigung
Bei
kene
wie
V
Bedienungsanleitung
Bewah
einmal benötigen.
Flüssigkeit
Stellen Sie niemals
auf.
Geräts, Feuer
daß keinerlei Fremdkörper in das Gerät gelangen.
Hinweis zur En
W
auf
der
Produkt in der vorgeschriebenen Art und W
Dies be die mit
el Ko ni mi d
Hausmüll entsorgt werden
existiert ein
system. elektrisc müssen
separat entsorgt
zus Die b Sa
abg Di is
kostenfrei! Bitte erkundigen sie sich bei ihrer zuständigen Behörde,
wo sie diese Produkte
nen. Falls ihr
tet
separat entsorg oben). Die dieses Produkt
einer
entsorgt
Beitrag zum Schutz der Umwelt und der menschlichen Gesundheit
vor
von
mit
In zum sich
Bezeichnung
Pb für Blei und Hg für Quecksilber
WICHTIGER HINWEIS FÜR KUNDEN
Dieses
und
gelten. W
und/oder telefonisch Sie
bestätigen, dass dieses Produkt für Ihr W
W
als
sei hi
lassen
da
Importeurs ausgeschlossen werden kann.
- Mac,
eingetragene W
-
W
zeichen der Microsoft Corporation in den USA
- Alle
W
Pr
Ubicación
El
un mal funcionamiento:
•
•
•
•
•
Manejo
P
Cuidado
Si exterior
dores como disolvente, ni compuestos inflamables.
Guarde este manual
Después de leer este manual, guárdelo para futuras consultas.
Mantenga los elementos externos alejados del equipo
Nunca
causar un
ningún objeto metálico dentro del equipo.
Nota respecto a residuos y deshechos (solo UE)
Cuando aparezca
sobre de o
embalaje de cualquiera de éstos, significa que cuando quie-
re tire
con la norma No
verter
este producto
a
país
potencialmente tóxicos,
tacto
Si la batería
tido, habrá
del cubo de basura tachado.
NOT
Est
y
destinado.
correo,
producto está destinado al país en el cual reside.
A
stinado
fabricante
de
la garantía del fabricante o distribuidor
- Mac, Mac logo
registradas en los EE.UU. y en otros países.
- W
registradas en los EE.UU. y en otros países.
- T
o marcas registradas de sus respectivos propietarios.