462309
10
Zoom out
Zoom in
Vorherige Seite
1/21
Nächste Seite
10 Room Air Conditioner
ON
OFF
CANCEL
AUTO CLEAN
SET
1
3
5
4
9
18
10
12
14
16
7
2
8
13
15
11
6
Cooling Operation
Auto Operation or Auto Changeover
Healthy Dehumidification Operation
Flip-up door
(opened)
Heating Operation
Signal transmitter
Cooling Model( ), Heat Pump Model( )
17
19
Operation Mode
Operating Instructions
The controls will look like the following.
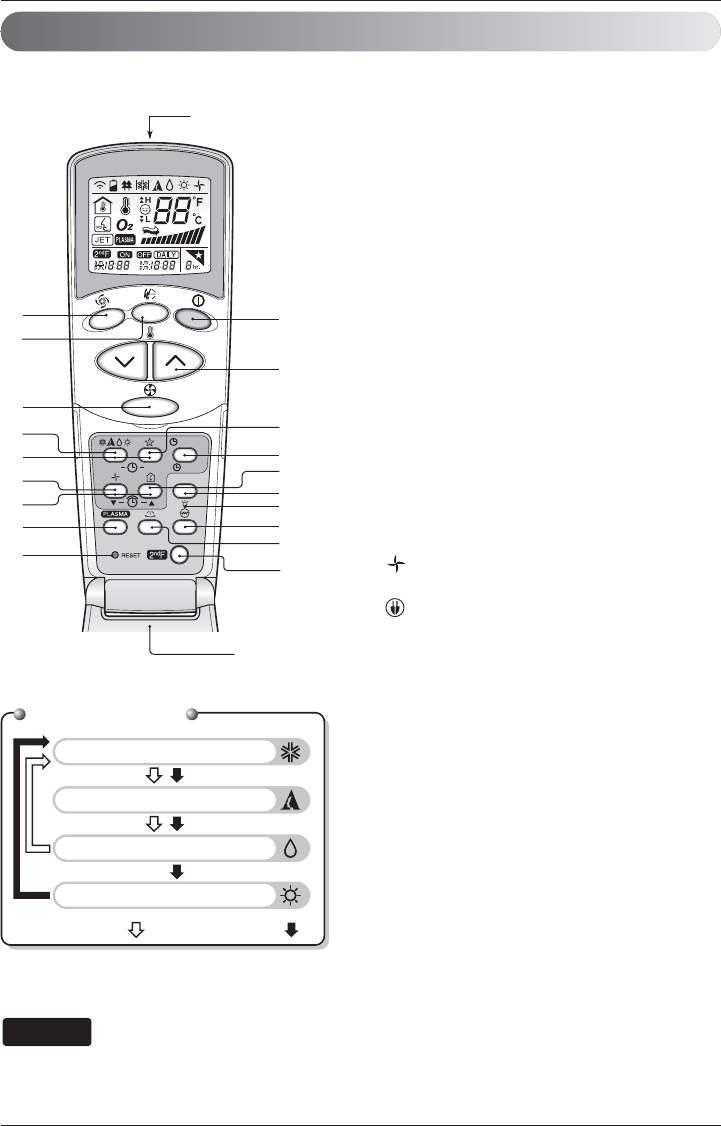
Wireless Remote Controller
1. START/STOP BUTTON
Used to turn off/on the unit.
2. OPERATION MODE SELECTION BUTTON
Used to select the operation mode.
3. ROOM TEMPERATURE SETTING BUTTONS
Used to select the room temperature.
4. INDOOR FAN SPEED SELECTOR BUTTON
Used to select fan speed in four steps
low, medium, high and CHAOS.
5. JET COOL BUTTON
Used to start or stop the speed cooling.
(It operates fan in super high speed in cooling mode)
6. CHAOS SWING BUTTON
Used to stop or start louver movement and set the
desired up/down airflow direction.
7. ON/OFF TIMER BUTTONS
Used to set the time of starting and stopping
operation.
8. TIME SETTING BUTTONS
Used to adjust the time.
9. TIMER SET/CANCEL BUTTON
Used to set and to cancel the timer operation.
10. SLEEP MODE AUTO BUTTON
Used to set sleep mode auto operation.
11. AIR CIRCULATION BUTTON(OPTIONAL)
Used to circulate the room air without cooling or heating.
ENERGY-SAVING COOLING MODE BUTTON
(OPTIONAL) For inverter type models
12. ROOM TEMPERATURE CHECKING BUTTON
Used to check the room temperature.
13. PLASMA BUTTON(OPTIONAL)
Used to start or stop the plasma-purification function.
14. HORIZONTAL AIRFLOW DIRECTION CONTROL
BUTTON (OPTIONAL)
Used to set the desired horizontal airflow direction.
15. RESET BUTTON
Used prior to resetting time.
16. 2nd F BUTTON
Used prior to using modes printed in blue at the
bottom of buttons.
17. AUTO CLEAN BUTTON(OPTIONAL)
Used to set auto clean mode.
In some models this button has a 2nd function of LED
luminosity control.
18. HEATER BUTTON(OPTIONAL)
(Not available in all models)
19. LCD LUMINOSITY BUTTON(OPTIONAL)
Used to adjust LCD luminosity.
To use the functions printed in blue at the bottom of the buttons press 2
nd
F button first and then the required function
button. Pressing the 2
nd
F button activates the blue printed function of the respective button. To cancel the function
press the 2nd F button again else it will automatically cancel if remains idle after 10 seconds.
NOTE
10

Brauchen Sie Hilfe? Stellen Sie Ihre Frage.

Forenregeln

Missbrauch melden von Frage und/oder Antwort

Libble nimmt den Missbrauch seiner Dienste sehr ernst. Wir setzen uns dafür ein, derartige Missbrauchsfälle gemäß den Gesetzen Ihres Heimatlandes zu behandeln. Wenn Sie eine Meldung übermitteln, überprüfen wir Ihre Informationen und ergreifen entsprechende Maßnahmen. Wir melden uns nur dann wieder bei Ihnen, wenn wir weitere Einzelheiten wissen müssen oder weitere Informationen für Sie haben.

Art des Missbrauchs:

Zum Beispiel antisemitische Inhalte, rassistische Inhalte oder Material, das zu einer Gewalttat führen könnte.

Beispielsweise eine Kreditkartennummer, persönliche Identifikationsnummer oder unveröffentlichte Privatadresse. Beachten Sie, dass E-Mail-Adressen und der vollständige Name nicht als private Informationen angesehen werden.

Forenregeln

Um zu sinnvolle Fragen zu kommen halten Sie sich bitte an folgende Spielregeln:

Neu registrieren

Registrieren auf E - Mails für LG S12AW wenn:


Sie erhalten eine E-Mail, um sich für eine oder beide Optionen anzumelden.


Andere Handbücher von LG S12AW

LG S12AW Bedienungsanleitung - Deutsch - 21 seiten


Das Handbuch wird per E-Mail gesendet. Überprüfen Sie ihre E-Mail.

Wenn Sie innerhalb von 15 Minuten keine E-Mail mit dem Handbuch erhalten haben, kann es sein, dass Sie eine falsche E-Mail-Adresse eingegeben haben oder dass Ihr ISP eine maximale Größe eingestellt hat, um E-Mails zu erhalten, die kleiner als die Größe des Handbuchs sind.

Ihre Frage wurde zu diesem Forum hinzugefügt

Möchten Sie eine E-Mail erhalten, wenn neue Antworten und Fragen veröffentlicht werden? Geben Sie bitte Ihre Email-Adresse ein.


Info