LOCATION OF CONTROLS
3. PRE-SCAN/AUTO-STORE BUTTON / REPEA
a) On radio mode, this button allows you to enjoy “Preset Memory Scan” function by pushing it shortly
Memory” function by pushing it more than 2 seconds.
l PS (PRESET MEMORY SCAN) - It calls the memorized station frequencies (from 1-6) automatically e
l AS (AUTO-STORE MEMORY) - It searches all station frequencies upward and memorize automatica
catching the frequency which has scan-stop level, the memorized station is shown on LCD as “Channel 1 to 6”. After
memorizing, auto-store memory function will be changed to “Preset Memory Scan” function automatically
b) Press this button to repeat the song during playback.
REM
ARK
:
AT ANY
TIME
, IF T
HE W
IRE HAS B
EEN DISC
ONNECTE
D, THE RESET
BUTT
ON MUST BE N
EED
TO RE
SET
AGAIN BE
FORE
OPERATE TH
REFER TO RESET BUTTON
FOR
DETAI
LS).
OTHERWIS
E, THE RADIO M
AY NOT
WORK PROPER
LY.
OPERATING INSTRUCTIONS
1. POWER ON/OFF CONTROL
Press the button to turn the power “ON” or “OFF”.
Note : The unit can be turn on by pressing any keys on the panel (except panel release button). It will help the user who
cannot find the power button in dark.
4. LCD DIGITAL DISPLA
The unit utilizes a digital type display which shows numerical indication of station FREQUENCY and other FUNCTIONS.
5. DISPLAY
This button serves to show available information as following:
Station Name / Band & Frequency / Clock / Programme T
2. BAND SELECTOR / P
a) On radio mode, each time this button is pressed, the radio band is changed. The indication “FM1”, “FM2”, “FM3”, “MW1” or
“MW2” will appear on the display according to your selection.
b) Press this button to pause during playback.
SETTING CLOCK TIME MANUALLY
1. Press “DISP” button to show “XX’XX” and hold it until the display flash and release.
2. Rotate “VOL/SEL” button clockwise to set HOUR and anti-clockwise to set MINUTE.
6. SCAN CONTROL
Press this button to scan the receivable FM / MW stations during radio mode. When receivable stations are tuned in, they are
monitored for approximately 5 seconds before advancing to the next receivable station. Press this button once again to stop
scanning as desired.
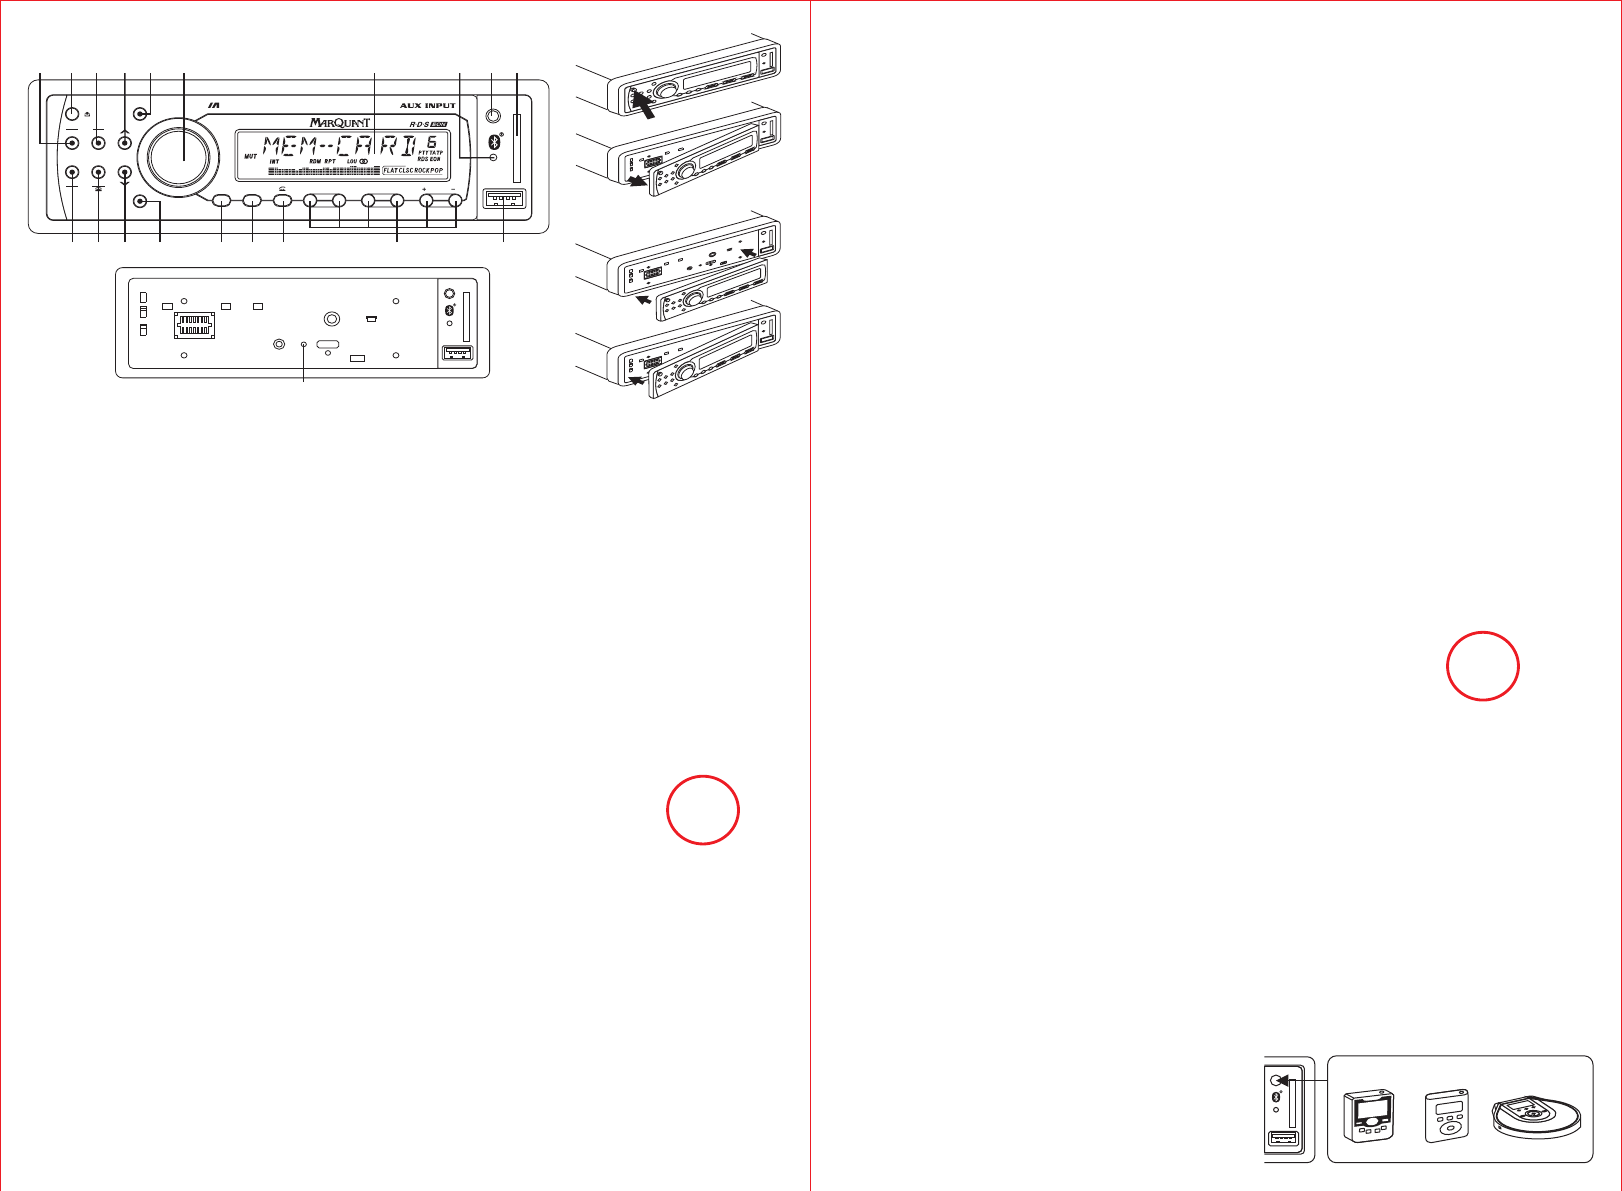
7. PANEL RELEASE BU
This button is used to release the panel from the unit.
lTo detach the front panel, p
it off of the chassis (FIGURE A : TO RE
lTo re-attach the panel, inse
chassis hold the panel firmly (FIGURE B : FOR INSTALLING).
GB-2
8. MODE SELECTION / MUTE CONTROL
a) Briefly press this button to select Radio (TUNER), USB (USB-DRIV), SD (MEM-CARD), Auxiliary Input (AUX) or
A2DP (BT
b) When pressing the button for more than 2 seconds, it will mute volume control and “MUTE ON” will appear on the display
9. RDS (RADIO DA
You can enjo
l Program Service Name (PS) : When an RDS station is received, station's name will appear on the display.
l Traffic Program (TP)
l Alternative Frequencies (AF) : The unit continuously checking the signal strength of alternative frequencies for the tuned
GB-3
14
lTA SEEK / TA ALARM
lMASK DPI / MASK ALL
lRETUNE-S / RETUNE-L
lDSP OFF / POP M / ROCK M
lLOUD OFF / LOUD ON
lSCROLL 1
lBEEP ON / BEEP OFF (not ava
lSTEREO / MONO
lDX / LOCAL
lPAIRING (for
12. VOLUME/SELECTION BUTTON (“VOL/SEL”)
Rotate the button anti-clockwise to decrease, or clockwise to increase volume level.
AUDIO LEVEL CONTROL (WHEN PUSHING ONE AFTER ANOTHER)
Press this button shortly one after another to show VOL/BAS/TRE/BAL/FAD control.
lVOLUME - Press this button once, then rotate anti-clockwise to decrease, or clockwise to increase volume level.
lBASS - Press this button once, then rotate anti-clockwise to decrease, or clockwise to increase bass level.
lTREBLE - Press this button once, then rotate anti-clockwise to decrease, or clockwise to increase treble level.
lBALANCE - Press this button once, then rotate anti-clockwise or clockwise to level balance of speaker right and left.
lFADER - Press this button once, then rotate anti-clockwise or clockwise to level fader of speaker front and rear.
AUDIO/SETTING SELECT (HOLD MORE THAN 2 SECONDS)
When pressing the button for more than 2 seconds, it activates as unit setting selection in cyclical mode as following. The
unit setting can be changed by rotating the button clockwise or anti-clockwise.
For TA Function
Briefly press the button to select TA mode on/off. When T
is able to receive traffic announcements on the same stations or stations linked via EON with Traffic Program (TP). The TA
mode can work as following.
l If the volume setting is very low, volume level will be raised temporarily during traffic announcement and back to original
volume level at the end of traffic announcement.
l Temporary switch over to an EON linked program when EON detects a traffic announcement on that other program.
l If the radio is muted, it will be de-muted for the duration of the traffic announcement.
l If the unit is USB/SD mode, it will switch temporarily to radio mode to receive Traffic Announcement.
For PTY Function
There are 2 series of programme type (PTY) available for PTY search tuning when you press the button more than 2 seconds
and then pressing any Station Preset Button (1-6) until the desired PTY code appears on the display
station transmitting the selected PTY code. Next PTY
programme type searching, PTY button can be pressed to stop searching and the radio will back to the original station. “PTY
NONE” will appear on the display if the selected PTY code is not receivable.
10. TA (TRAFFIC ANNOUNCEMENT) / PTY (PROGRAMME TYPE NAME) CONTROL
13/14. MANUAL UP/DOWN TUNING / TRACK SEEK UP/DOWN CONTROL
On radio mode, pressing the button for more than 2 seconds, it will tune one frequency step higher or lower
On USB-DRIV/MEM-CARD mode, press this button will locate the beginning of the track being played or will locate the
beginning of the next track. When pressing more than 2 seconds, it will move fast forward or fast backward to a specific position.
15. ST
The PRESET BUTTONS on th
store FM1, FM2, FM3, MW1, MW2 band station frequency
was memorized. There are 6 preset buttons, giving you capability of storing 18FM / 12MW
NOTE: When the preset button to be memorized is kept pressed for more than 2 seconds, the receiving station frequency
will be stored in the button pressed. After this, the memorized station can be recalled by pressing the button once.
On USB-DRIV / MEM-CARD Mode
lPreset 2 - press this button to scan the first 10 seconds of all the tracks on the USB drive / SD Card.
lPreset 4 - press this button to play the tracks on the USB drive / SD Card in random order
lPreset 5 - press this button to search -10 track (for USB-DRIV / MEM-CARD Mode only).
lPreset 6 - press this button to search +10 track (for USB-DRIV / MEM-CARD Mode only).
16. RESET BUTTON
The RESET button is located on the front of main panel. It is recessed in order to prevent accidental engagement,and can be
activated with the tip of a ball-point pen or any similar pointed object. This reset circuitry is provided in order to protect the
unit's microprocessor, and should only be activated under the following conditions :
a) Initial installation after all wiring is completed.
b) Abnormal operation is encountered such as numerical indication on display is erratic.
c) Whenever the reset button is activated, all preset memory content
will be erased and must be reprogrammed.
13
FIGURE B: FOR
INSTA
FIGURE A: TO
REMOVE
radio station. Every time that new alternative frequency is stronger than current station, it automatically switch over to the
new frequency and new frequency will be displayed for 1-2 second. When the button pressed short, AF switching mode
is selected and the state of AF switching mode will appear on the display as following.
-RDS indicator on : AF mode is on and RDS signal is received.
-RDS indicator off : AF mode is off.
-RDS indicator flashing : AF switching mode is selected but RDS signal is not received yet.
l Enhanced Other Networks (EON): An RDS service where the broadcaster links some stations together. When tuned to a
station which is linked to others by EON, the radio is capable of receiving Traffic A
l Regional Program (for some countries only) : When tuned to a regional program, the radio will stay tuned to that
particular regional program as long as possible. If you drive out of the coverage area and the regional program becomes
very weak, the radio may tune to another regional program from the same network. T
function, pressing the button more than 2 seconds until “REG ON” appear on the display
program function, pressing the button more than 2 seconds until “REG OFF” appear on the display.
17. AUXILIARY INPUT
Press MODE button (8) until the “AUX” mode is shown on display.
The unit is ready to play songs on an external audio device through
the auxiliary input directly on the front panel.
*AUXILIAR
Compatible with
MP3 player CD player
MP3 jukebox
MP3
INPUT
AUX SD
MIC
1
T/P
RDS
INT2
3
RDM4
16
15
MCR-1257
AUX S
MP3
INPUT
POWER
VOL/SEL
AMS
RPT
BND
PAU
SCAN
P
3
USB
SD
MOD
MUT
DISP
MIC
(15) (18)
(14) ( (10) ( (
(1) (13) (12) (4)
(17) (
(16)
RESET
AUX SD
MP3
INPUT
MIC