9111285 Iss 2
OMNISAT 66 PORTABLE SATELLITE
KIT WITH ELLIPTICAL DISH
EASY TO FIT INSTRUCTIONS
This kit contains Omnisat Portable Satellite Dish, Omnisat Tripod Stand,
Omnisat Compass, Omnisat Satellite Finder and Omnisat Holdall. Should
you have any difficulty installing your Portable Satellite Kit, please contact
our Customer Helpline on (01553) 811000.
Please retain these instructions for future reference - Read all
instructions and warnings before commencing work.
MAXVIEW LIMITED
SETCHEY, KING’S LYNN
NORFOLK, PE33 0AT, ENGLAND
TEL: (01553) 813333
FAX: (01553) 813320
e-mail: sales@maxview.ltd.uk
website: www.maxview.ltd.uk
Maxview Ltd reserve the right to alter their
specifications without prior notice.
MAXVIEW VERTRIEBS GMBH,
AUGSBURGER STRASSE 11
D-82291, MAMMENDORF, GERMANY
Tel: 8145 8840
Fax: 8145 8845
e-mail: info@maxview.de
www.maxview.de
Änderungen vorbehalten
Azimuth Alignment
Once the correct elevation angle has
been set, loosen the clamp at the top
of the mast. Refer to the Omnisat
Compass and slowly rotate the dish by
turning to the left and then back
towards the right within the coloured
segment of the desired satellite until
you hear a change in tone from the
satellite finder. As the signal level
increases the tone will increase and
the amount of signal level LED’s will
continue to light up. Rotate the system
until the highest tone is reached. As
the satellite Finder only determines the
reception level and doesn’t know from
which satellite the signal actually
comes from, you should check on the
receiver, whether desired satellite is
being received. If this is not the case,
then continue to search for the next
satellite position. If you are receiving
signals from the desired satellite, con-
tinue to finely adjust the dish. As the
tone increases and the amount of
LED’s lit up increase, turn the signal
level adjustment control anticlockwise
to turn the tone down and repeat this
fine adjustment until there is no fur-
ther increase in tone. You may also
need to fine tune the height elevation
to achieve best reception.
N.B. Ensure that you continuously turn
down the tone as if the tone is too
high you will not hear an increase in
the tone.
13
Once fine-tuning is complete, tighten
dish mounting bolts and fixing clamp
on tripod mast taking great care not to
move the dish position.
Nach dem Abschluss der
Feinabstimmung ziehen Sie die
Montageschrauben der Schüssel und
Befestigungsschrauben des Stativs an,
wobei Sie sorgfältig darauf achten
müssen, die Position der
Satellitenschüssel nicht zu verändern.
14
Remove the satellite finder. Connect
the long cable lead to the LNB by
screwing the ‘F’ connector into the
underside of the LNB. Ensure the ‘F’
connector is screwed on tightly and
that it is fully weatherproof using
amalgamating tape or similar.
Entfernen Sie den Satellitenfinder.
Verbinden Sie das lange Kabel mit dem
LNB, indem Sie den F-Stecker unter-
halb des LNB einstecken. Sie müssen
den F-Stecker fest aufschrauben und
die Verbindung mit Amalgamierband
oder ähnlichem wetterfest machen.
15
For additional stability, the tent pegs
supplied can also be used to prevent
the stand from falling over in the wind.
Zusätzliche Stabilität wird mit den
mitgelieferten Heringen erreicht, die
ein Umfallen des Stativs im Wind
verhindern.
16
For stowage of dish, unscrew cable from
LNB. Loosen the wing nut on the knuck-
le joint of the folding arm. Fold the arm
in and tighten wing nut. Loosen the wing
nuts on the tripod clamp and remove
dish. Then use the Omnisat Holdall to
store your system.
Zum Verstauen der Satellitenschüssel
schrauben Sie das Kabel vom LNB ab.
Lösen Sie die Flügelmutter am
Gabelgelenk des Faltarms. Falten Sie den
Arm ein und ziehen Sie die Flügelmutter
wieder an. Lösen Sie die Flügelmuttern
auf der Stativklemme und entfernen Sie
dieSatellitenschüssel. Bewahren Sie das
System in der Omnisat-Tragetasche auf.
17
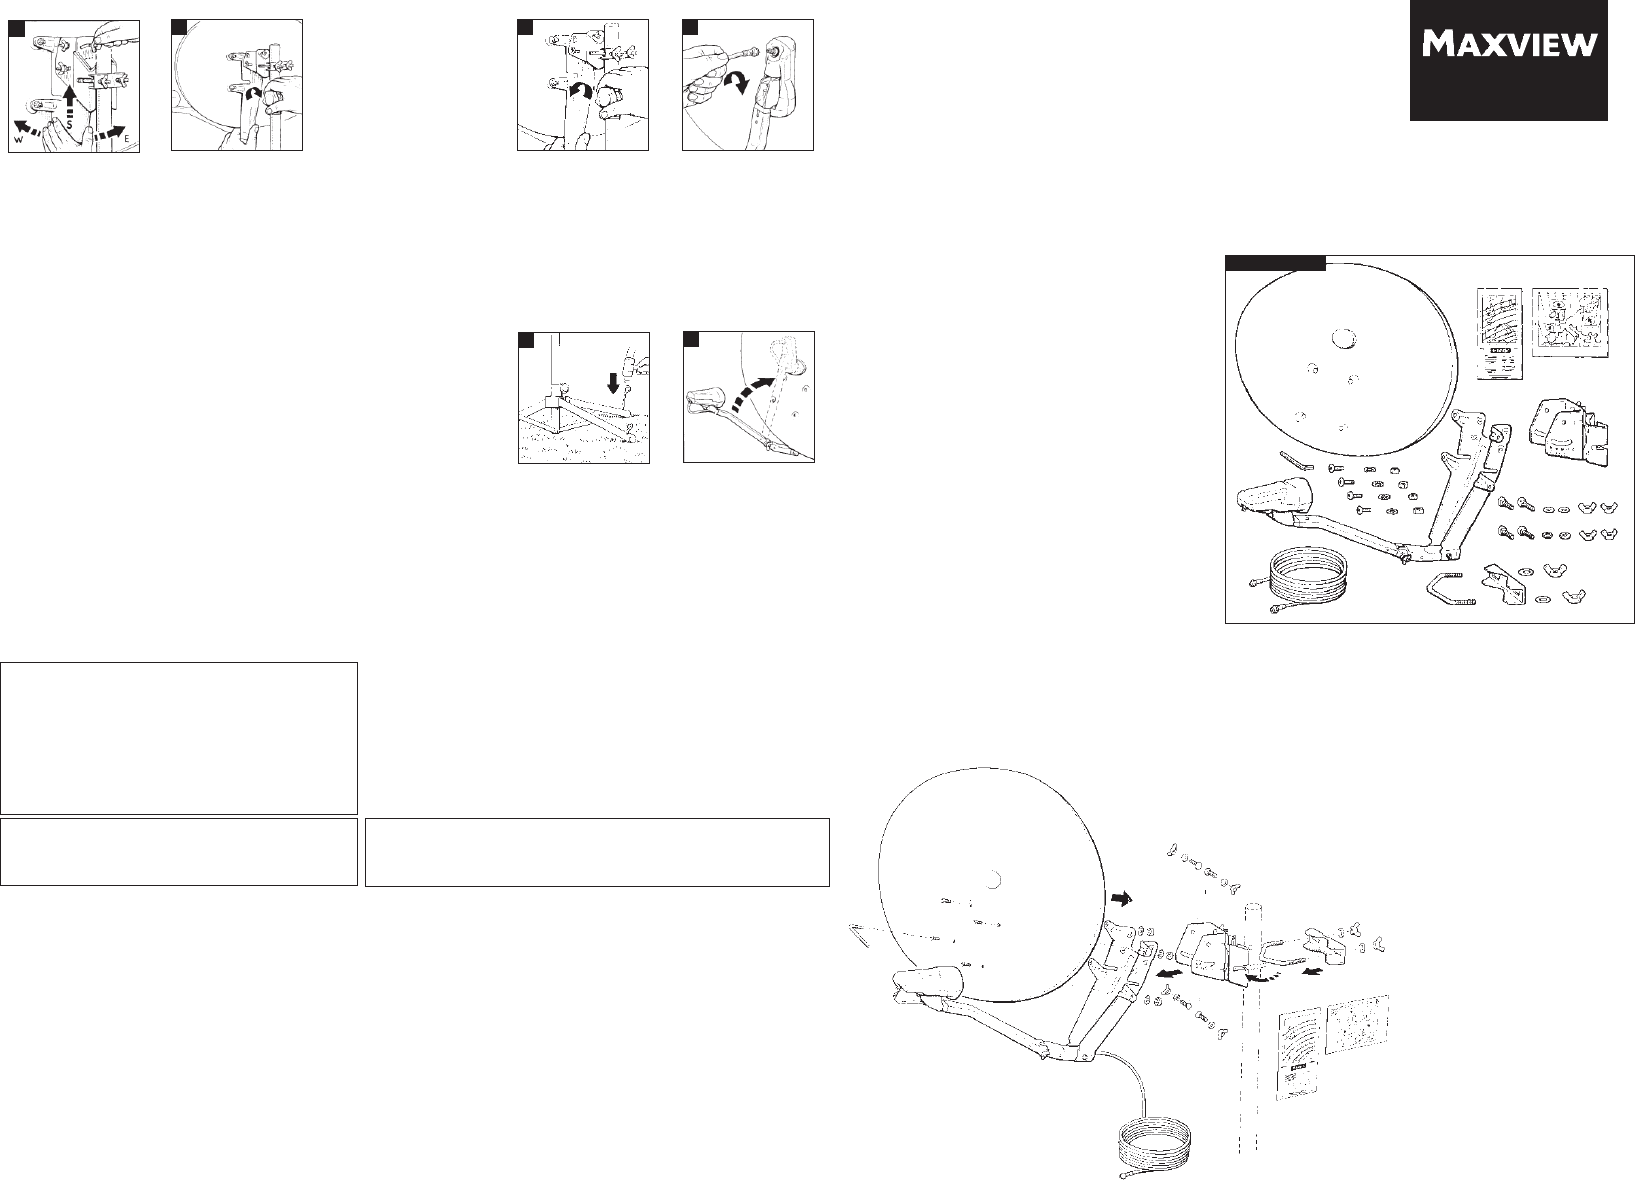
Before you use your Omnisat Portable Satellite Dish Pack for the first
time you will need to assemble the dish pack.
DISH PACK KIT CONTENTS
A : 1 x Skew Bracket Assembly
B : 4 x M6 Carriage Bolts
C : 2 x M6 Metal Flat Washers
D : 2 x M6 Plastic Flat Washers
E : 4 x M6 Wing Nuts
F : 1 x Dish Bracket Assembly
G : 4 x M6 Pozi Pan Screws
H : 4 x M6 Metal Shakeproof Washers
I : 4 x M6 Nuts
A
B
C
D E
F
G
H
I
J
K L
M
N
O
P
Q
R
DISH PACK CONTENTS
J : 1 x ‘V’ Bolt
K : 1 x Pole Clamp
L : 2 x M8 Metal Flat Washers
M: 2 x M8 Wing Nuts
N : 1 x 10m ‘F’ to ‘F’ Satellite Cable
O : 1 x Satellite Zone Map Label
P : 1 x Skew Map Label
Q : 1 x Satellite Dish
R : 4mm Allen Key
GUIDELINES FOR SKY DIGITAL SATELLITE RECEPTION
To align the satellite dish to the Astra 2 satellite for digital satellite reception, use the SIGNAL TEST menu built into
the SKY digibox. To access this menu you will first have to press the SERVICES button on the remote control. In the
SERVICES menu you will then need to access the SYSTEM SET UP (number 4) and the SIGNAL TEST (number 6).
The display will then show, from top to bottom:
SIGNAL STRENGTH - SIGNAL QUALITY - LOCK INDICATOR - NETWORK ID - TRANSPORT STREAM
You will need to adjust the dish until there is at least a quarter of the SIGNAL QUALITY bar display, the LOCK
INDICATOR shows OK and the NETWORK ID is displaying 0002. If the NETWORK ID is showing any other details,
you have locked onto the wrong satellite and will need to re-align the dish. When Astra 2 North Beam is being
received the TRANSPORT STREAM will display 07d4. This is not the case if receiving South Beam only.
Press BACK UP.
INSTALLING SATELLITE SYSTEMS SAFELY
Good planning can be significantly reduce the risks involved when installing this system. Make sure you read the
instructions, have all the tools required and have carried out the necessary checks before attempting this
installation including the location of wiring and other obstacles inside the vehicle. If in any doubt, we recommend
you seek professional advice.
Dieses Montage-Kit enthält die folgenden Omnisat-Komponenten: tragbare
Satellitenschüssel, Stativ, Kompass, Satellitenfinder und Tragetasche. Sollten
bei der Installierung dieses Montage-Kits Probleme auftreten, wenden Sie
sich an den Kundendienst unter der Nummer 01553-811000.
Bewahren Sie diese Anweisungen zu Ihrer Information auf. Lesen Sie
vor Montagebeginn alle Anweisungen und Warnhinweise.
Vor dem ersten Gebrauch der tragbaren Omnisat-Satellitenanlage müssen
Sie zunächst den Satellitenschüssel-Bausatz zusammenbauen.
ANWEISUNGEN ZUR EINFACHEN MONTAGE
OMNISAT 66 PORTABLE SAT-SPIEGEL KIT MIT
ELLIPTISCHEN SPIEGEL
INHALT DES SATELLITENSCHÜSSEL-BAUSATZES
A: 1 x Baugruppe SKEW-Winkelhalterung
B: 4 x M6-Wagenbolzen
C: 2 x Unterlegscheibe, M6, Metall, flach
D: 2 x Unterlegscheibe, M6, Plastik, flach
E: 4 x Flügelschrauben, M6
F: 1 x Baugruppe Satellitenschüsselhalterung
G: 4 x Schrauben, M6, Pozi, Pan-Head
H: 4 x Unterlegscheibe, M6, Metall, schüttelfest
I: 4 x Muttern, M6
J: 1 x V-Bolzen
K: 1 x Polklemme
L: 2 x Unterlegscheibe, M8, Metall, flach
M: 2 x Flügelschrauben, M8
N: 1 x Satellitenkabel mit zwei F-Steckern
O: 1 x Etikett mit Satellitenzonenkarte
P: 1 x Etikett mit SKEW-Winkelkarte
Q: 1 x Satellitenschüssel
R: Inbusschlüssel, 4 mm
Skew Angle Adjustment
Using the skew map provided, identify
the skew angle required in your
location. The skew angle represents
the horizontal/vertical plane of the
LNB. When a satellite dish is facing
towards a satellite at due south, the
plane of the LNB will be vertical. As
t
he dish is moved East or West, to
receive other satellites the skew angle
of the LNB will need to be adjusted,
clockwise for West and counter
clockwise for East. Loosen the wing
nut, which is in the centre of the Skew
Bracket. Tilt the dish to the left or right
depending on your location and
secure by tightening the wing nut.
Einstellung des SKEW-Winkels
Bestimmen Sie mithilfe der beigelegten
SKEW-Winkelkarte den an Ihrem
Standort erforderlichen SKEW-Winkel.
Mit dem SKEW-Winkel wird die
horizontale bzw. vertikale Ebene des
LNB auf das Satellitensignal (durch
Drehung der Schüssel) eingestellt.
Steht eine Satellitenschüssel genau
südlich vom Satelliten, ist die Ebene
des LNB vertikal. Wird die
Satellitenschüssel von diesem
Standpunkt aus nach Osten oder nach
Westen bewegt, ändert sich die
Signalebene und die Ebene des LNB
muss entsprechend des SKEW-Winkels
nachgestellt werden: im Uhrzeigersinn
für eine mehr westliche und gegen den
Uhrzeigersinn für eine mehr östliche
Positionierung. Lösen Sie die
Flügelmutter in der Mitte der
SKEW-Winkel-Halterung. Neigen Sie
die Satellitenschüssel je nach Ihrem
Standort nach links oder rechts und
arretieren Sie die Position durch
Anziehen der Flügelmutter.
12
Einstellung des Azimuts
Nach Einstellung des korrekten
Elevationswinkels lösen Sie die
Klemme oben am Mast. Richten Sie
sich nach dem Omnisat-Kompass und
drehen Sie die Satellitenschüssel inner-
halb des farbig gekennzeichneten
Bereichs des gewünschten Satelliten
langsam nach links und wieder zurück
nach rechts, bis sich der
Satellitenfinder-Summton ändert. Mit
ansteigender Signalstärke wird ein
immer höherer Summton erzeugt und
die die mit „Level“ gekennzeichnete
LED leuchtet nicht mehr rot, sondern
grün auf. Hat der Summer den höch-
sten Ton erreicht, drehen Sie den
Drehknopf zur Einstellung der
Signalstärke gegen den Uhrzeigersinn,
bis die mit „Level“ gekennzeichnete
LED gelb aufleuchtet. Da der
Satellitenfinder lediglich die
Empfangsstärke ermittelt und nicht
feststellen kann, von welchem
Satelliten die Signale stammen, sollten
Sie auf dem Receiver überprüfen, dass
tatsächlich der gewünschte Satellit
empfangen wird. Ist dies nicht der Fall,
muss nach der nächsten
Satellitenposition gesucht werden.
Sobald Sie Signale von dem gewün-
schten Satelliten empfangen, fahren
Sie mit der Feineinstellung der
Satellitenschüssel fort. Wenn der
erzeugte Summton immer höher wird
und die LED grün aufleuchtet, drehen
Sie den Drehknopf zur Einstellung der
Signalstärke gegen den Uhrzeigersinn
und stellen Sie den Ton so wieder
tiefer. Wiederholen Sie diese
Feineinstellung bis Sie keine weitere
Erhöhung des Summtons beobachten
können. Sie müssen unter Umständen
außerdem eine Feineinstellung des
Höhenwinkels (Elevation) vornehmen,
um einen optimalen Empfang zu erre-
ichen. Hinweis: Stellen Sie sicher, dass
Sie den Ton ständig tiefer drehen. Ist
der Ton zu hoch, ist es nicht möglich,
eine weitere Tonerhöhung zu hören.
HINWEISE ZUR SICHEREN INSTALLATION DER SATELLITENANLAGE
Durch eine gute Planung können bei der Installation dieser Anlage die damit verbundenen Risiken wesentlich vermindert werden. Lesen Sie vor Beginn
die Anweisunge, legen Sie alle benötigten Werkzeuge bereit und führen Sie vor Beginn die notwendigen Überprüfungen durch, einschließlich der
Überprüfung der Kabelpositionierung und anderer Hindernisse im Fahrzeug. Haben Sie Zweifel, empfehlen wir die Hinzuziehung eines Fachmannes.
B2566/KIT