Instructions for
SpecialNeeds™
Feeder
Gebrauchsanweisung
SpecialNeeds™
Sauger
Mode d’
SpecialNeeds™
Té
Istruzioni per
SpecialNeeds™
tet
Gebruiksaanw
SpecialNeeds™
Feeder
Ná
SpecialNeeds™
Lá
Medela AG
Lätti
6340 Baar
www.medela.
International Sales
Medela AG
Lätti
6340 Baar
Pho +4
www.medela.
Medela Aust
3 Arc
He
Australia
www.medela.
© Me AG/re doc
19 0 .1 5 2 21 - 0 9/ R
Lesen Sie bitte alle Anweisungen vor dem Gebrauch.
BEWAHREN SIE DIESE GEBRAUCHSANWEISUNG SORGF
Verwendungszweck
Der SpecialNeeds Sauger ist zum Füttern von Säuglingen mit Mutter-
milch und mit anderen Flüssigkeiten ähnlicher Konsistenz bestimmt.
Der Mini SpecialNeeds Sauger (Mini SNS) hat den gleichen
Verwendungszweck wie der SpecialNeeds Sauger
für kleine Säuglinge oder Frühgeborene bestimmt.
Der Mini SNS ist nur für Krankenhäuser erhältlich.
Indikationen
Die V
bei Säuglingen mit:
I
schwachem Zustand wie z. B.
I
neurologischen, kardialen oder
die zu Schwierigkeiten bei der Koordination des Saugens,
Schluckens und Atmens führen;
I
orofazialen Fehlbildungen wie Lippen-Kiefern-Gaumenspalte
oder ausgeprägtem Zungenbändchen;
I
Pierre-Robin-Syndrom oder Down-Syndrom.
Wichtige Sicherheitshinweise
Für die Sicherheit und Gesundheit des Säuglings – ACHTUNG!
I Dieses Produkt immer unter der Aufsicht von Erwachsenen verwenden.
I Erwärmen Sie die Flüssigkeit nicht in der Mikrowelle, da sie möglicher-
weise ungleichmäßig erhitzt wird, was beim Säugling zu Verbrennungen
führen kann.
I Das Produkt ausschließlich für den in dieser Gebrauchsanweisung
beschriebenen Verwendungszweck benutzen.
I Die Benutzung durch mehrere Säuglinge ohne vorherige
ausreichende Wiederaufbereitung kann ein Gesundheitsrisiko
darstellen und eine Kreuzkontamination verursachen.
I Nur Originalzubehör von Medela verwenden.
I Vor jedem Gebrauch überprüfen. Bei ersten Anzeichen
von Schäden, Schimmel oder Schwachstellen sofort entsorgen.
I Lassen Sie Verpackungen und deren Inhalt nie unbeaufsichtigt.
Außer Reichweite von Kindern aufbewahren.
Wichtige Sicherheitshinweise
I Plastikflaschen und Bestandteile können durch Einfrieren
brüchig werden und zerbrechen, wenn sie herunterfallen.
I Auch bei unsachgemäßem Gebrauch können Flaschen und andere
Einzelteile beschädigt werden, z. B. wenn sie fallen gelassen,
zu fest zusammengeschraubt oder umgestoßen werden.
I Gehen Sie mit den Flaschen und Einzelteilen vorsichtig um.
I Füttern Sie die Flüssigkeit nicht, wenn die Flasche
oder Einzelteile beschädigt wurden.
Reinigen
Wichtig
I Verwenden Sie für die Reinigung nur Wasser in Trinkwasserqualität.
I Bereiten Sie alle Teile vor dem ersten Gebrauch auf (siehe unten).
I Reinigen Sie alle Teile sofort nach Gebrauch.
I Die nachstehenden Reinigungsanweisungen sind allgemeine
Anweisungen. Über länderspezifische Vorschriften und Richtlinien
können Sie sich bei Ihrem Medela-Gebietsleiter oder auf unserer
Website informieren (www.medela.com).
Nach jedem Gebrauch
I Zerlegen Sie den Sauger in seine Einzelteile. Achten Sie darauf,
das gelbe V
Sie außerdem die weiße Membran vom V
Hinweis:
werden. Dazu den Sauger über das Spülbecken halten.
den Deckel mit Loch aufschrauben und zusammen mit dem Sauger
und dem V
wird. Restmilch aus dem Sauger entsorgen.
I Alle T
mit viel warmem Seifenwasser (ca. 30 °C) reinigen.
Sie ein handelsübliches Reinigungsmittel, vorzugsweise ohne
künstliche Duft- und Farbstoffe (für den Krankenhausgebrauch:
5–15 % anionische T
Alle T
I Mit einem sauberen T
T
Verwendung zu Hause:
Vor Erstgebrauch und einmal täglich
I Reinigen Sie den Sauger gemäß der Beschreibung unter
«Nach jedem Gebrauch».
I
unter « Desinfektion».
Verwendung im Krankenhaus:
Vor Erstgebrauch – einmal täglich – vor
an einen anderen Säugling
I
der Beschreibung unter « Desinfektion».
I Falls gemäß nationalen, regionalen oder internen Richtlinien
erforderlich, sterilisieren Sie den Sauger gemäß der Beschreibung
unter « Sterilisation».
Desinfektion
Verwendung zu Hause:
I Alle T
I Alternativ das Produkt in der Spülmaschine reinigen. Die T
ins obere Gitter oder ins Besteckfach gelegt werden.
ein handelsübliches Geschirrspülmittel
I Mit einem sauberen T
trocknen lassen.
Verwendung im Krankenhaus:
I
und Desinfektionsgerät.
Einsätze.
für Reinigungs- und Desinfektionsgeräte (NT
chlorfrei, tensidfrei,
I
I Wählen Sie gemäß den vorigen Anweisungen ein geeignetes
Programm aus, welches das
Programm inklusive T
die gereinigten T
Sie diese auf einem sauberen T
Sterilisation
Verwendung im Krankenhaus:
I Überprüfen Sie, ob alle Produktteile sauber
I Umwickeln Sie die T
I Alle T
Schäden zu vermeiden,
darauf ausüben.
Aufbewahrung
Legen Sie die sauberen T
oder an einen sauberen Ort. Es ist wichtig,
trocknen. Bewahren Sie die
Beutel auf.
Anwendung
I
Es wird empfohlen, dass die Eltern die ersten Füttermahlzeiten
mit dem SpecialNeeds Sauger unter der Aufsicht einer Fachkraft/
geschulten Personals durchführen.
I
Überprüfen Sie vor dem Füttern immer die T
der Flüssigkeit.
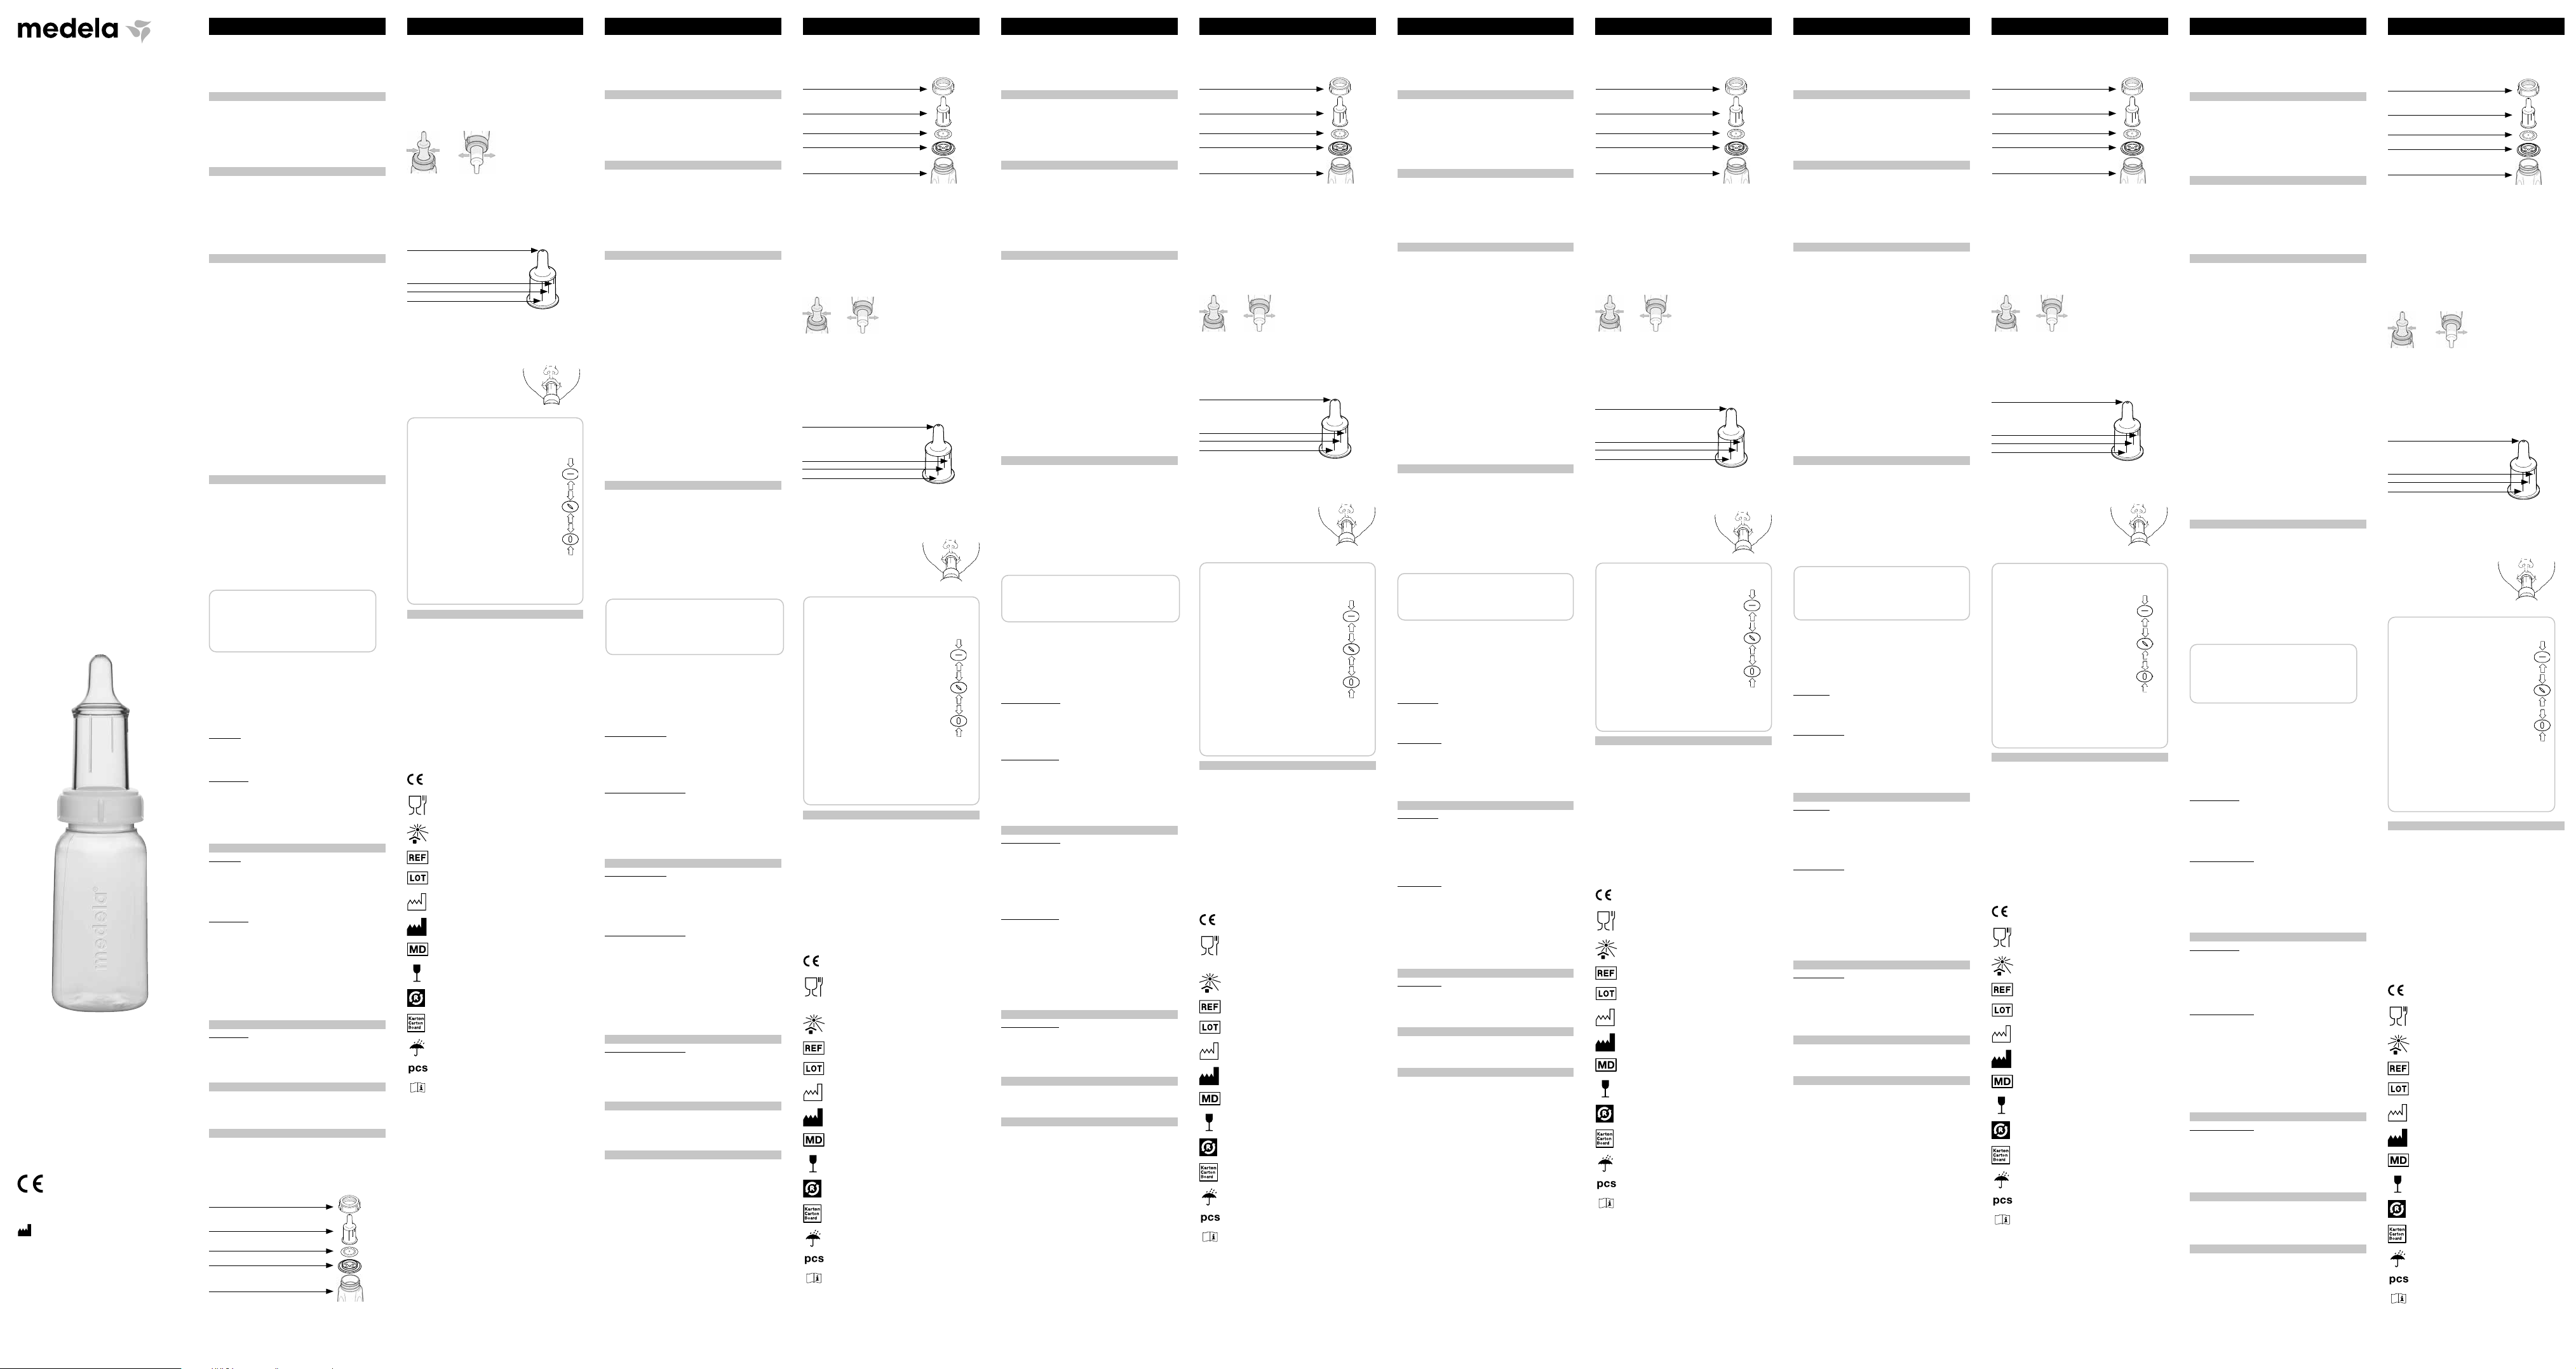
Zusammensetzen des Saugers
I Halten Sie das Ventilplättchen so, dass der erhöhte Rand nach
oben zeigt. Legen Sie die weiße Membran innerhalb des Randes
auf das Ventilplättchen. Drücken Sie die Noppe auf der Membran
vollständig durch das Mittelloch des Ventilplättchens.
I Füllen Sie die Flasche mit der benötigten Flüssigkeitsmenge.
I Setzen Sie das zusammengesetzte Ventil mit dem erhöhten Rand
nach oben auf die Flaschenöffnung.
I Setzen Sie den Sauger so auf das Ventilplättchen, dass der Rand
vom Sauger umschlossen ist.
I Stülpen Sie den Deckel mit Loch über den Sauger. Verschrauben
Sie alle Teile mit dem Deckel.
Füllen des Saugers
drücken
loslassen
I Halten Sie den Sauger aufrecht. Drücken Sie etwas Luft aus der
Saugerspitze.
I Halten Sie den Sauger gedrückt, während Sie ihn auf den Kopf drehen.
I Lassen Sie den Sauger nun los. Es tritt nun etwas Flüssigkeit in den
Sauger ein.
I Wiederholen Sie die obenstehenden Schritte, bis der Sauger vollständig
gefüllt ist.
Mit dem SpecialNeeds Sauger kann die Flüssigkeitsmenge
an die Bedürfnisse Ihres Säuglings angepasst werden. Nutzen
Sie die Linien auf dem Sauger
Linie eine mittlere und bei der langen Linie die maximale Menge.
entsprechende Linie so ausrichten,
dass sie zur Nase des Säuglings zeigt
(siehe Abbildung rechts).
Linie), wenn der Säugling sich vor Beginn des
Fütterns erst an den Sauger gewöhnen muss.
der Durchussmenge?
Die Position des Saugers/der Linie im Mund des
an der Saugerspitze:
Der Druck hält das V
Das V
Der Druck öffnet das V
Hinweis:
Hinweis:
zwischen Null- und Maximaleinstellung zu erhalten,
wählen Sie einfach die entsprechende Position zwischen
den Linien.
Produktvarianten und Ersatzteile
Artikel-Nr
008.0114 SpecialNeeds Sauger
008.0112 SpecialNeeds Sauger
008.0080 Mini SpecialNeeds Sauger
800.0452 SpecialNeeds Sauger
800.0453 SpecialNeeds Sauger
810.7066 Deckel mit Loch, 1 (Krankenhaus)
800.0852 Ventilplättchen komplett,
800.0625 Flasche, 25 (Krankenhaus)
820.0014 Ventilmembran
820.0030 SpecialNeeds Sauger mit V
Material: Sauger und V
Entsorgung: Gemäß lokalen V
Medizinprodukte an
bestimmt sind, mit Lebensmitteln in Berührung
zu kommen
(ISO 15223-1, 5.1.6)
Herstellers an (ISO 15223-1, 5.1.5)
(ISO 15223-1, 5.1.3)
(ISO 15223-1, 5.1.1)
Weist auf ein Medizinprodukt hin
Zerbrechlich (ISO 15223-1,
T
Karton
V
(ISO 15223-1, 5.4.3)
Deckel mit Loch
Sauger
Ventil
Ventilplättchen
(mit erhöhtem Rand auf der Oberseite)
Schlitzventilöffnung
Lire toutes les instructions avant utilisation.
CONSERVER CE MODE D’EMPLOI POUR UTILISA
Utilisation
La tétine SpecialNeeds est conçue pour administrer le lait maternel
et d’autres liquides de consistance similaire aux nourrissons.
La tétine Mini SpecialNeeds (Mini SN) est conçue pour le même
usage que la tétine SpecialNeeds, mais elle s’adresse aux
nourrissons de plus petite taille ou prématurés.
Indications
La tétine SpecialNeeds est recommandée aux nourrissons
I
I
des troubles neurologiques, cardiaques ou respiratoires
I
des anomalies orofaciales comme une fente labio-palatine
I
Recommandations importantes
I Ce produit doit toujours être utilisé sous la surveillance d’un adulte.
I
risque de ne pas être homogène et le nourrisson risque d’être brûlé.
I N’utiliser ce produit que pour l’usage auquel il est destiné,
I L’utilisation par plusieurs nourrissons sans nettoyage adéquat
peut entraîner un risque sanitaire et une contamination croisée.
I N’utiliser que des accessoires Medela d’origine.
I Examiner le produit avant chaque utilisation. Jeter le produit aux pre-
miers signes de dégradation, de moisissure ou de dysfonctionnement.
I Ne jamais laisser l’emballage et les composants sans surveillance.
Conserver hors de portée des enfants.
Recommandations importantes
I Les biberons en plastique ainsi que les différentes pièces peuvent être
fragilisés par la congélation et risquent de casser en cas de chute.
I De même, les biberons et les pièces peuvent être endommagés
de chute, de serrage excessif ou de renversement.
I Manipuler avec prudence les biberons et les pièces.
I Ne pas utiliser le liquide si les biberons ou les pièces sont endommagés.
Nettoyage
Important
I Utiliser uniquement de l’eau potable pour le nettoyage.
I Nettoyer toutes les pièces avant leur première utilisation (cf. ci-dessous).
I Nettoyer toutes les pièces immédiatement après utilisation.
I Les instructions de nettoyage ci-dessous sont d’ordre général.
Concernant les réglementations et les recommandations propres
ou de consulter notre site Internet (www.medela.com).
Après chaque utilisation
I Désassembler toutes les pièces du biberon-tasse. Séparer
la valve jaune de la tétine. Retirer également la membrane
blanche de la valve.
Remarque :Il est possible de réutiliser le lait restant dans le biberon.
En revanche, il est impératif de jeter le lait restant dans la tétine.
convient donc de tenir le biberon-tasse au-dessus de l’évier
et la valve, sans gaspiller de lait.
I
I Sécher avec un chif
propre.
Utilisation à domicile :
Avant la première utilisation,
I Nettoyer le biberon-tasse selon les instructions
du paragraphe « Après chaque utilisation ».
I Désinfecter le biberon-tasse selon les instructions
du paragraphe « Désinfection ».
Utilisation à l’hôpital :
Avant la première utilisation,
avant utilisation pour un autre nourrisson
I Nettoyer et désinfecter le biberon-tasse selon les instructions
du paragraphe « Désinfection ».
I Si la réglementation na
de stériliser le biberon-tasse, procéder selon les instructions
du paragraphe « Stérilisation ».
Désinfection
Utilisation à domicile :
I
pendant 5 minutes.
I Il est également possible de laver le produit au la
Dans ce cas, placer les pièces dans le panier supérieur ou dans le
dans le commerce.
I Sécher avec un chif
un chiffon propre.
Utilisation à l’hôpital :
I Nettoyer et désinfecter toutes les pièces dans un appareil
de lavage et de désinfection. Utiliser des lingettes adaptées pour
les petites pièces. Utiliser un détergent courant pour les appareils
de lavage et de désinfection (sans NT
I
I Sélectionner un programme adapté et conforme aux instructions
ci-dessus, qui comprend un séchage.
d’un linge propre ou les laisser sécher dessus.
Stérilisation
Utilisation à l’hôpital :
I
I Emballer les pièces dans un emballage stérile adéquat.
I
Pour éviter de les endommager
ni exercer de pression externe.
Conservation
endroit propre. Il est important que toute l’humidité résiduelle sèche.
Ne pas stocker de pièces dans un conteneur ou un sac hermétique.
Mode d’emploi
I
Il est recommandé que la mère procède aux premières séances
d’un professionnel de santé formé.
I
Assemblage du biberon-tasse
I Tenir la valve, rebord du corps de valve anti-retour vers le haut.
de valve anti-retour. Pousser la partie saillante de la membrane
dans l’orifice central de la valve.
I Remplir le biberon avec la quantité de liquide requise.
I Placer la valve assemblée sur l’ouverture du biberon, en prenant
soin d’orienter le rebord du corps de valve anti-retour vers le haut.
I Placer la tétine sur la valve de sorte que le rebord se trouve
I Glisser la bague filetée sur la tétine. Visser fermement toutes
Remplissage de la tétine
presser
relâcher
I
I Maintenir la pression et retourner le biberon-tasse vers le bas.
I Relâcher la tétine. Du liquide pénètre alors dans la tétine.
I
Réguler le débit du lait
La tétine SpecialNeeds permet de réguler le débit du liquide selon
les besoins du nourrisson. Utiliser les lignes sur la tétine pour régler
Pour régler le débit, aligner la ligne
de la tétine sur le nez du nourrisson
Choisir le débit faible (ligne courte)
avant l’allaitement.
Comment fonctionne le mécanisme de régulation du débit?
La position de la ligne sur la tétine dans la bouche du nourrisson
maintient la valve fermée
et la valve s’ouvre en partie permettant un
écoulement modéré
et la pression ouvre la valve permettant un
écoulement maximal
Remarque :
que le nourrisson ne reçoive trop de liquide.
Remarque :
Pour que le liquide s’écoule entre zéro
correspondante entre les lignes.
Variantes du produit et pièces détachées
Référence article Description
008.0114 T
008.0112 T
800.0452 T
800.0453 T
820.0014 Membrane de la valve
820.0030 T
Matériaux :
autres : polypropylène.
Recyclage :conformément aux prescriptions locales.
européennes applicables aux dispositifs médicaux
alimentaires conformément au règlement (CE)
(ISO 15223-1, 5.3.2)
(ISO 15223-1, 5.1.6)
par le fabricant (ISO 15223-1, 5.1.5)
(ISO 15223-1, 5.1.3)
(ISO 15223-1, 5.1.1)
Identifie un dispositif médical
Fragile (ISO 15223-1,
Peut être recyclé
Carton
Conserver au sec (ISO 15223-1,
l’emballage
(ISO 15223-1, 5.4.3)
Bague
T
Biberon de lait
Valve
Corps de valve
(rebord vers le haut)
ouverture de la fente de la valve
a – débit nul
b - débit moyen
c - débit maximum
Leggere le istruzioni prima dell’uso.
CONSERVARE LE PRESENTI ISTRUZIONI PER L
Destinazione d’uso
La tettarella SpecialNeeds è concepita per somministrare
ai neonati latte materno e altri liquidi di consistenza simile.
La tettarella Mini SpecialNeeds (Mini SNF) è stata ideata per
lo stesso uso della tettarella SpecialNeeds, ma è destinata
a neonati più piccoli o prematuri.
La tettarella Mini SpecialNeeds (Mini SNF) è disponibile soltanto
per gli ospedali.
Indicazioni
La tettarella SpecialNeeds è indicata per l’uso con neonati con
I
I
nel coordinamento di suzione, ingestione e respirazione;
I
anomalie orofacciali quali labbro leporino e palatoschisi
o anchiloglossia;
I
Sindrome di Pierre Robin o Sindrome di Down.
Importanti informazioni di sicurezza
Per la sicurezza e la salute del neonato - AVVERTENZA!
I Usare questo prodotto solo sotto la supervisione di un adulto.
I Non riscaldare il latte in un forno a microonde poiché ciò può causare
un riscaldamento non uniforme e ustionare il neonato.
I Usare il prodotto solo per l’uso a cui è destinato,
descritto nel presente manuale di istruzioni.
I L’uso da parte di più neonati senza una rigenerazione adeguata
può presentare un rischio per la salute e potrebbe provocare
una contaminazione crociata.
I Utilizzare esclusivamente accessori originali Medela.
I Controllare prima di ogni utilizzo. Gettare al primo segnale
di danneggiamento, muffa o usura.
I Non lasciare mai la confezione e i componenti incustoditi.
Tenerli fuori dalla portata dei bambini.
Importanti misure di sicurezza
I Le bottiglie e i componenti in plastica diventano fragili
se congelati e potrebbero rompersi cadendo.
I Inoltre, le bottiglie e i componenti potrebbero danneggiarsi
se non maneggiati correttamente, ad esempio se vengono
fatti cadere, se serrati eccessivamente o rovesciati.
I Prestare la dovuta attenzione quando si maneggiano le bottiglie
e i componenti.
I Non utilizzare il liquido se le bottiglie o i componenti sono danneggiati.
Pulizia
Importante
I Per la pulizia, usare esclusivamente acqua potabile.
I Rigenerare tutte le parti prima del primo utilizzo (vedere sotto).
I Lavare tutte le parti subito dopo l’uso.
I Le seguenti istruzioni di pulizia sono di carattere generale.
Per le norme e le linee guida specifiche di ogni paese, consultare
l’agente Medela o visitare il nostro sito web (www.medela.com).
Dopo ogni uso
I Smontare il biberon nei singoli componenti. Assicurarsi
che il supporto della valvola gialla sia separato dalla tettarella.
Separare anche la membrana bianca dal supporto della valvola.
Nota: È possibile riutilizzare il latte rimasto nella bottiglia, ma è
necessario smaltire quello rimasto nella tettarella.
sopra il lavello. Svitare delicatamente il coperchio e rimuoverlo
insieme alla tettarella e al supporto della valvola, per evitare che
il latte fuoriesca. Gettare il latte rimasto all’interno della tettarella.
I Risciacquare tutti i componenti con acqua fredda (20 °C circa).
Pulire tutti i componenti con abbondante acqua saponata tiepida
(30 °C circa). Utilizzare un comune detersivo per stoviglie,
5–15% tensioattivi anionici, tensioattivi non ionici,
Risciacquare tutti i componenti con acqua fredda (20 °C circa).
I Asciugare con un panno pulito o lasciare asciugare
su un panno pulito.
Uso domestico:
Prima del primo uso e una volta al giorno
I Lavare il biberon come descritto nella sezione «Dopo ogni utilizzo».
I Disinfettare il biberon come descritto nella sezione «Disinfezione».
Uso ospedaliero:
Prima del primo uso – una volta al giorno – prima di passare
a un altro neonato
I
Lavare e disinfettare il biberon come descritto nella sezione
«Disinfezione».
I Se richiesto dalle norme nazionali, regionali o interne alla struttura,
sterilizzare il biberon come descritto nella sezione «Sterilizzazione».
Disinfezione
Uso domestico:
I Coprire tutti i componenti con acqua e lasciare bollire
per cinque minuti.
I In alternativa, lavare il prodotto in lavastoviglie. Posizionare
i componenti nel cestello superiore o nello scomparto per
le posate. Utilizzare un normale detergente per lavastoviglie.
I Asciugare con un panno pulito o lasciare asciugare
su un panno pulito.
Uso ospedaliero:
I Lavare e disinfettare tutti i componenti in una disinfetta
ca. Utilizzare inserti adeguati per i componenti più piccoli.
un comune detergente per disinfettatrici (privo di NT
cloro e tensioattivi, alcalino e con pH compreso tra 11,7 e 12,7).
I
I Selezionare un programma rispondente alle indicazioni sopra riportate
e che preveda l’asciugatura. Qualora non sia disponibile alcun
programma con asciugatura, asciugare i componenti puliti
con un panno pulito o lasciarli asciugare su un panno pulito
Sterilizzazione
Uso ospedaliero:
I
I Avvolgere i componenti con un imballaggio adeguato e sterile.
I Sterilizzare tutti i componenti in autoclave a 134 °C per 5 minuti.
Per evitare danni, non impilare o applicare pressione dall’esterno.
Conservazione
Riporre i componenti detersi in una borsa di conservazione o in un
Non conservare i componenti in contenitori/borse a chiusura ermetica.
Informazioni sull’utilizzo
I
Si suggerisce che la tettarella SpecialNeeds venga utilizzata
per le prime volte sotto la supervisione di un professionista
adeguatamente formato.
I
Controllare sempre la temperatura del liquido prima
di somministrarlo al neonato.
Montaggio del biberon
I Tenere il supporto della valvola con il bordo rialzato rivolto verso l’alto.
Collocare la membrana bianca sul supporto della valvola all’interno
del bordo. Premere la manopola della membrana fino a farla entrare
completamente nel foro centrale del supporto della valvola.
I
I Collocare la valvola montata sulla bocca della bottiglia,
assicurandosi che il bordo rialzato sia rivolto verso l’alto.
I Collocare la tettarella sopra il supporto della valvola, in modo
che il bordo si trovi all’interno della tettarella.
I Far scorrere il coperchio sulla tettarella. Avvitare tutti i componenti
con il coperchio.
Riempire la tettarella
schiacciare
rilasciare
I Tenere il biberon in posizione verticale. Schiacciare fuori un po’ d’aria
dalla tettarella.
I Tenere la tettarella schiacciata e rovesciare il biberon.
I Rilasciare la tettarella.
I Ripetere i passi descritti finché la tettarella è completamente piena.
esigenze del bambino. Utilizzare le linee sulla tettarella per regolare il
corrispondente sulla tettarella in direzione del
naso del neonato (si veda il disegno a destra).
(la più corta) se il neonato deve abituarsi
alla tettarella prima di iniziare a succhiare.
Come funziona il meccanismo di controllo del usso?
La posizione della tettarella/linea nella bocca del neonato
tettarella:
la pressione mantiene chiusa la valvola
Nota:
in modo tale che non arrivi mai troppo latte
nella bocca del bambino.
Nota:
si scelga la posizione corrispondente tra le linee.
Varianti del prodotto e ricambi
N. articolo Descrizione
008.0114 T
008.0112 T
008.0080 T
800.0452 tettarelle SpecialNeeds, 3
800.0453 tettarelle SpecialNeeds, 3
810.7066 Coperchio, 1 (ospedale)
800.0852 Supporto della valvola completo, 25 (ospedale)
800.0625 Bottiglia, 25 (ospedale)
820.0014 Membrana della valvola
820.0030 T
Materiale:
resto: polipropilene.
Smaltimento: conformemente alle disposizioni locali.
i dispositivi medici
destinati a venire a contatto con alimenti ai
(ISO 15223-1, 5.3.2)
(ISO 15223-1, 5.1.6)
(ISO 15223-1, 5.1.5)
(ISO 15223-1, 5.1.3)
(ISO 15223-1, 5.1.1)
Indica un dispositivo medico
Fragile (ISO 15223-1,
Componente riciclabile
Cartone
Mantenere asciutto (ISO 15223-1,
(ISO 15223-1, 5.4.3)
Coperchio
T
Bottiglia per latte
Valvola
Supporto della valvola
(con bordo rialzato sul lato superiore)
Apertura della valvola a fessura
Lees alle instructies vóór het gebruik.
Beoogd gebruik
De SpecialNeeds Feeder is bedoeld om moedermelk en andere
Het beoogde gebruik van de Mini SpecialNeeds Feeder (Mini SNF)
is hetzelfde als van de SpecialNeeds Feeder
kleinere of premature baby’s.
De Mini SNF is alleen beschikbaar voor ziekenhuizen.
Indicaties
De SpecialNeeds Feeder is speciaal bedoeld voor baby›s met:
I
Een zwakke conditie zoals een lage spierspanning;
I
slikken en ademen.
I
lip/verhemelte of een te korte tongriem;
I
Pierre Robin syndroom of Down-syndroom.
Belangrijke veiligheidsinformatie
Voor de veiligheid en gezondheid van de baby – WAARSCHUWING!
I Gebruik dit product alleen onder toezicht van een volwassene.
I Warm de vloeistof niet op in een magnetron omdat dit ongelijkmatige
verwarming kan veroorzaken waardoor de baby zich kan branden.
I Gebruik het product alleen voor het doel waarvoor het bestemd is,
zoals beschreven in deze gebruiksaanwijzing.
I Gebruik voor meer dan één baby zonder het product vooraf
opnieuw klaar te maken voor gebruik kan een gezondheidsrisico
vormen en kruisbesmetting tot gevolg hebben.
I Gebruik alleen originele accessoires van Medela.
I Vóór elk gebruik inspecteren. Bij de eerste tekenen van beschadiging,
schimmel of verzwakking van het materiaal wegwerpen.
I De verpakking en onderdelen nooit onbeheerd achterlaten.
Buiten het bereik van kinderen houden.
Belangrijke veiligheidsaanwijzingen
I Ingevroren plastic flessen en onderdelen worden broos en daardoor
is er een verhoogde kans op breken wanneer deze vallen.
I Ook kunnen flessen en onderdelen beschadigd raken bij verkeerde
hantering, bv. als ze vallen, te vast worden dichtgedraaid of worden
omgestoten.
I Ga voorzichtig om met flessen en onderdelen.
I Gebruik de vloeistof niet als de fles of een onderdeel beschadigd is.
Reiniging
Belangrijk
I Gebruik voor het reinigen alleen water van drinkkwaliteit.
I Maak alle onderdelen klaar voor het eerste gebruik (zie verder).
I Reinig alle onderdelen onmiddellijk na het gebruik.
I Onderstaande reinigingsinstructies zijn algemene instructies. Neem
contact op met uw lokale Medela-vestiging of ga naar onze website
(www.medela.com) voor landspecifieke regelgeving en richtlijnen.
Na elk gebruik
I Haal de feeder uit elkaar tot losse onderdelen.
Haal de gele membraanhouder en de speen uit elkaar
NB:
-
gooid worden. Houd de feeder daarom boven de gootsteen.
met de speen en de membraanhouder
Giet de achtergebleven melk uit de speen.
I Spoel alle onderdelen in koud water (circa 20
afwasmiddel zonder kunstmatige geur- en kleurstoffen (voor gebruik
in ziekenhuizen: 5–15% anionisch tenside,
pH-neutraal). Spoel alle onderdelen in koud water (circa 20
I Droog de onderdelen af met een schone doek of leg
op een schone doek om te drogen.
Thuisgebruik:
Voor het eerste gebruik en eenmaal per dag
I Reinig de feeder zoals beschreven onder «Na elk gebruik».
I Desinfecteer de feeder zoals beschreven onder «Desinfectie».
Ziekenhuisgebruik:
Vóór het eerste gebruik – eenmaal per dag – en steeds
alvorens deze voor een andere baby te gebruiken
I Reinig en desinfecteer de feeder zoals beschreven
onder «Desinfectie».
I Indien nationale, regionale of interne voorschriften dit vereisen,
steriliseer de feeder zoals beschreven onder «Sterilisatie».
Desinfectie
Thuisgebruik:
I
I U kunt het product ook reinigen in de afwasmachine. Leg in dat geval
de onderdelen op het bovenste rek of in de bestekmand. Gebruik een
gangbaar afwasmiddel.
I Droog de onderdelen af met een schone doek of leg op een schone
doek om te drogen.
Ziekenhuisgebruik:
I Reinig en desinfecteer alle onderdelen in een mechanische was-
en desinfecteermachine. Gebruik geschikte inzetzakjes voor kleine
onderdelen. Gebruik een normaal reinigingsmiddel voor was-
alkalisch met pH-waarde van 11,7 - 12,7).
I
I Selecteer volgens de bovenstaande instructies een geschikt program-
ma dat drogen bevat.
bevat, droog dan de schone onderdelen met een schone doek af
of laat ze op een schone doek drogen.
Sterilisatie
Ziekenhuisgebruik:
I
I Wikkel de onderdelen in een geschikte steriele verpakking.
I
minuten op 134 °C. Om beschadiging te voorkomen,
mogen onderdelen niet worden gestapeld en mag er geen
externe druk op worden uitgeoefend.
Bewaren
Bewaar de schone onderdelen in een schone bewaarzak of in een
opdroogt. Bewaar de onderdelen niet in een luchtdichte verpakking/zak.
Gebruik
I
We raden aan dat de moeder haar eerste voedingen
met de SpecialNeeds Feeder geeft onder toezicht van
een professional/getraind personeel.
I
De feeder in elkaar zetten
I Houd de membraanhouder met de opstaande rand naar boven gericht.
Plaats het witte membraan op de membraanhouder, binnen de rand.
Druk de knop van het membraan volledig door de centrale opening
van de membraanhouder.
I Vul de fles met de gewenste hoeveelheid vloeistof.
I Plaats de gemonteerde klep met de opstaande rand naar boven
in de flesopening.
I Plaats de speen op de membraanhouder zodat de rand zich binnenin
de speen bevindt.
I Schuif de ringdeksel over de speen. Zet alle onderdelen vast door
de ringdeksel aan te draaien.
De speen vullen
loslaten
I Houd de feeder rechtop. Knijp wat lucht uit de speen.
I Blijf knijpen terwijl u de feeder ondersteboven keert.
I Laat de speen nu los. Er loopt nu wat vloeistof in.
I Herhaal bovenstaande stappen totdat de speen vol is.
De melktoevoer bepalen
aan de behoeften van uw baby aan te passen. Bepaal de toevoer aan
de hand van de streepjes op de speen. Het kortste streepje staat voor
geen vloeistoftoevoer
langste voor een maximale toevoer
Om de toevoer te kiezen richt u het
corresponderende streepje naar de neus van
de baby (zie afbeelding rechts).
Kies voor geen toevoer (het kortste streepje)
als de baby aan de speen moet wennen
voordat het voeden begint.
Hoe werkt het mechanisme om de vloeistoftoevoer te regelen?
De positie van de speen/het streepje ten opzichte van de
mond van de baby beïnvloedt de spleetvormige opening
bovenop de speen:
horizontaal, de druk houdt de klep gesloten.
verticaal, de druk opent de klep en laat een
maximale hoeveelheid door
NB:
zuigbewegingen zodat de baby geen vloeistof over zich
NB:
vloeistoftoevoer
Productvarianten en reserveonderdelen
008.0114 SpecialNeeds Feeder
008.0112 SpecialNeeds Feeder
008.0080 Mini SpecialNeeds-speen, 25 (ziekenhuis)
800.0452 SpecialNeeds spenen, 3
800.0453 SpecialNeeds spenen, 3
810.7066 Ringdeksel, 1 (ziekenhuis)
800.0852 Membraanhouder compleet, 25 (ziekenhuis)
800.0625 Fles, 25 (ziekenhuis)
820.0014 Membraan van de vacuümklep
820.0030 SpecialNeeds speen met membraanhouder
Materiaal:
rest: polypropyleen.
Afvoeren: volgens lokale voorschriften.
de EU voor medische hulpmiddelen
om in contact te komen met levensmiddelen
(ISO 15223-1, 5.3.2)
(ISO 15223-1, 5.1.6)
(ISO 15223-1, 5.1.5)
Duidt een medisch a
Breekbaar (ISO 15223-1,
Deel van recyclingproces
Karton
Droog houden (ISO 15223-1,
(ISO 15223-1, 5.4.3)
Ringdeksel
Speen
Ventiel
Membraanhouder
spleetvormige opening
a – geen toevoer
b – gemiddelde toevoer
c – maximale toevoer
Read all instructions before use.
SAVE
Intended purpose
The SpecialNeeds Feeder is intended to feed breast milk and
other liquids of similar consistency to infants.
The Mini SpecialNeeds Feeder (Mini SNF) has the same
intended purpose as the SpecialNeeds Feeder but for smaller
or premature infants.
The Mini SNF is only available for hospitals.
Indications
The SpecialNeeds Feeder is indicated for use for infants with:
I
A weak condition such as low muscle tone;
I
Neurologic, cardiac or respiratory disorders resulting
in difficulties in coordinating sucking, swallowing and
breathing;
I
Oral-facial anomalies such as cleft lip/palate or strong
tongue-tie;
I
Pierre Robin Syndrome or Down Syndrome.
Important safety information
For the infants child safety and health –
I
I
uneven heating and could scald the infant.
I
this instructions for use.
I
may present a health risk and could cause cross-
contamination.
I Use Medela original accessories only.
I
damage, mould or weakness.
I
them out of reach of children.
Important safeguards
I Plastic bottles and component parts become brittle when
frozen and may break when dropped.
I Also, bottles and component parts may become damaged if
mishandled, e.g.
I T
I Don’t use the liquid if bottles or components become dama
Cleaning
Important
I Only use drinking-quality water for cleaning.
I Reprocess all parts prior to first use (see below).
I Clean all parts immedia
I The cleaning instructions below are general instructions. For
country- specific regulations and guidelines, ask your Medela
agent or visit our website (www.medela.com).
After each use
I
sure to separate the yellow valve plate from the teat.
separate the white membrane from the valve plate.
Note:
However
Therefore, hold the feeder above the sink.
unscrew the lid and remove it together with the teat
and valve plate, so as not to spill milk.
leftover milk from the teat.
I °C).
parts with plenty of warm, soapy water (approx.°C).
Use a commercially available washing-up liquid, preferably
without artificial fragrances and colouring (for hospital use:
5–15% anionic tenside, nonionic tenside,
Rinse all parts with cold water (approx. 20 °C).
I
Home use:
Before first use and once a day
I Clean the feeder as described under “After each use”.
I Disinfect the feeder as described under “Disinfection”.
Hospital use:
Before first use – once a day – before passing on to
another infant
I
“Disinfection”.
I
sterilise the feeder as described under “Sterilisation”.
Disinfection
Home use:
I
I
the parts on the top rack or in the cutlery section. Use a
commercially available dishwashing detergent.
I
Hospital use:
I
disinfector
a common cleaning detergent for washer-disinfectors
(NT
with pH level 11.7–12.7).
I
I
instructions that includes drying. If there is no program
with drying, dry the clean parts with a clean cloth or leave
to dry on a clean cloth
Sterilisation
Hospital use:
I Check that the product parts are clean, dry and intact.
I Wrap the parts in an appropriate sterile packag
I °C for 5 minutes.
T
Storage
Put the clean parts in a clean storage bag or a clean
environment. It is important that all residual moisture
dries. Do not store parts in an airtight container/bag.
How to use
I
It is recommended that the mother performs her first
feedings with the SpecialNeeds Feeder under the
supervision of a professional/trained staff.
I
Always check the temperature of the liquid before feeding.
Assembling the feeder
Lid
Te
Milk bottle
Valve
Valve plate
(with high rim on upper side)
I
the white membrane onto the valve plate, inside the rim.
the membrane’ s knob completely through the central hole of
the valve plate.
I Fill the bottle with the required amount of liquid.
I
bottle opening.
I
teat.
I
Filling the teat
squeeze
release
I
I Keep squeezing while turning the feeder upside down.
I
I
Controlling the milk flow
slit valve opening
w
The SpecialNeeds Feeder offers the opportunity to adapt the
liquid flow to your infant
’
s needs. Use the lines on the teat to
set the liquid flow.
flow,
maximum flow.
T
corresponding line on the teat towards
the infant
’
s nose (see the picture at the
right). Choose zero flow (the shortest
line) if the infant needs to get used to
the teat before the feeding starts.
How does
The position of the teat/line in the infant
’
s mouth
influences the opening of the slit valve on top of the teat:
the pressure keeps the valve closed
the valve is partly open for a moderate flow
the pressure opens the valve for maximum
flow
Note:
baby will not be flooded.
Note:
any liquid flow in between zero and maximum,
just choose the corresponding position in
between the lines.
Product variants and spare parts
Article nr Description
008.0114 SpecialNeeds Feeder
008.0112 SpecialNeeds Feeder
008.0080 Mini SpecialNeeds teat, 25 (hospital)
800.0452 SpecialNeeds teats, 3
800.0453 SpecialNeeds teats, 3
810.7066 Lid, 1 (hospital)
800.0852 Valve plate complete,
800.0625 Bottle, 25 (hospital)
820.0014 Valve membrane
820.0030 SpecialNeeds teat with valve plate
Material:
polypropylene.
Disposal:
for medical devices
intended to come in contact with food according
(ISO 15223-1, 5.1.6)
(ISO 15223-1, 5.1.5)
(ISO 15223-1, 5.1.3)
(ISO 15223-1, 5.1.1)
Identifies a medical device
Fragile (ISO 15223-1,
Part of recycling process
Carton
Keep dry (ISO 15223-1,
package
(ISO 15223-1, 5.4.3)
TENTO
mléku.
Indikace
I
I
I
I
I
I
I
I
mohlo
I
I
I
I
I
I
I
I
I
I
I
I
Poznámka:
I
I
I
I
I
I
Dezinfekce
I
I
I
I
I
I
Steriliz
I
I
I
I
I
Vent
I
I
I
I
I
uvolnit
I
a
I
I
tekutiny.
I
J
Poznámka:
Poznámka:
mezi ryskami.
Materiál:
Likvidace:
(ISO 15223-1, 5.3.2)
(ISO 15223-1, 5.1.6)
(ISO 15223-1, 5.1.5)
(ISO 15223-1, 5.1.3)
(ISO 15223-1, 5.1.1)
Kartón
(ISO 15223-1, 5.4.3)
ENGLISH ENGLISH DEUTSCH DEUTSCH IT IT FRANÇAIS NEDERLANDS NEDERLANDS ČESKY ČESKY