1945
1-01
1976
1-01
1976
1-02
160
CM
S/S
S/S
S/S
S/S
Glue
A to
1 to
B to
C to
2 to
3 to
4 to
5 to
6 to
A
B
C
D
1
2
3
4
5
6
7
T
a 12:00
01-1 WED
0
S/S
HOLD
HOLD
0
DUAL
M
SET
0:00
01-1
0
S/S
S/S
0:03
ALMO1
0
M
WED
0:03
ALMO1
0
M
0:03
ALMO1
0
M
ALL
0:03
ALMO1
0
M
0:03
ALMO1
0
M
OFF
0:03
ALMO1
0
M
S/S
S/S
S/S
0:03
ALMO2
0
M
SET
HOLD
7
ALMO2
0
M
SET
8:00
ALMO2
0
M
SET
S/S
S/S
S/S
0:03
ALMO1
0
M
WED
0:03
ALMO1
0
M
0:03
ALMO1
0
M
ALL
0:03
ALMO1
0
M
0:03
ALMO1
0
M
OFF
0:03
ALMO1
0
M
S/S
S/S
S/S
STW
0:00:00
65
HOLD
REV
OFF
01
INTEN
1
S/S
S/S
EXERC
HIGH LOW
S/S
S/S
152 123
16:00
01-1
180
S/S
16:00
WED
45
S/S
16:00
WED
45
S/S
1
Intr
Explanation of the abbreviations used in the
instructions and on the display
SAT - Saturd kcal - Kilo
SUN - Sundays kg - Kilogram
MON - Mondays lb - Pounds (weight)
TUES - T cm - Centimetre
WED - W V - V
THUR - Thursdays kHz - Kilohertz
FRI - Fridays bpm - Beats per m
ALL - every day - Body mass index
OFF - HR - Heart rate
Almo1 - Alarm 1 MHR - Maximum hear
Almo2 - Alarm 2 UPPER - Upper limit
Sex - Sex LOWER
2
Introduction
MY - My settings M - Male
CDT - Countdown W - Female
SW - Stopwatch mode
MXRUN - Total lap time
A -
RUN1 - Lap 1
IN - Time within the limits
3
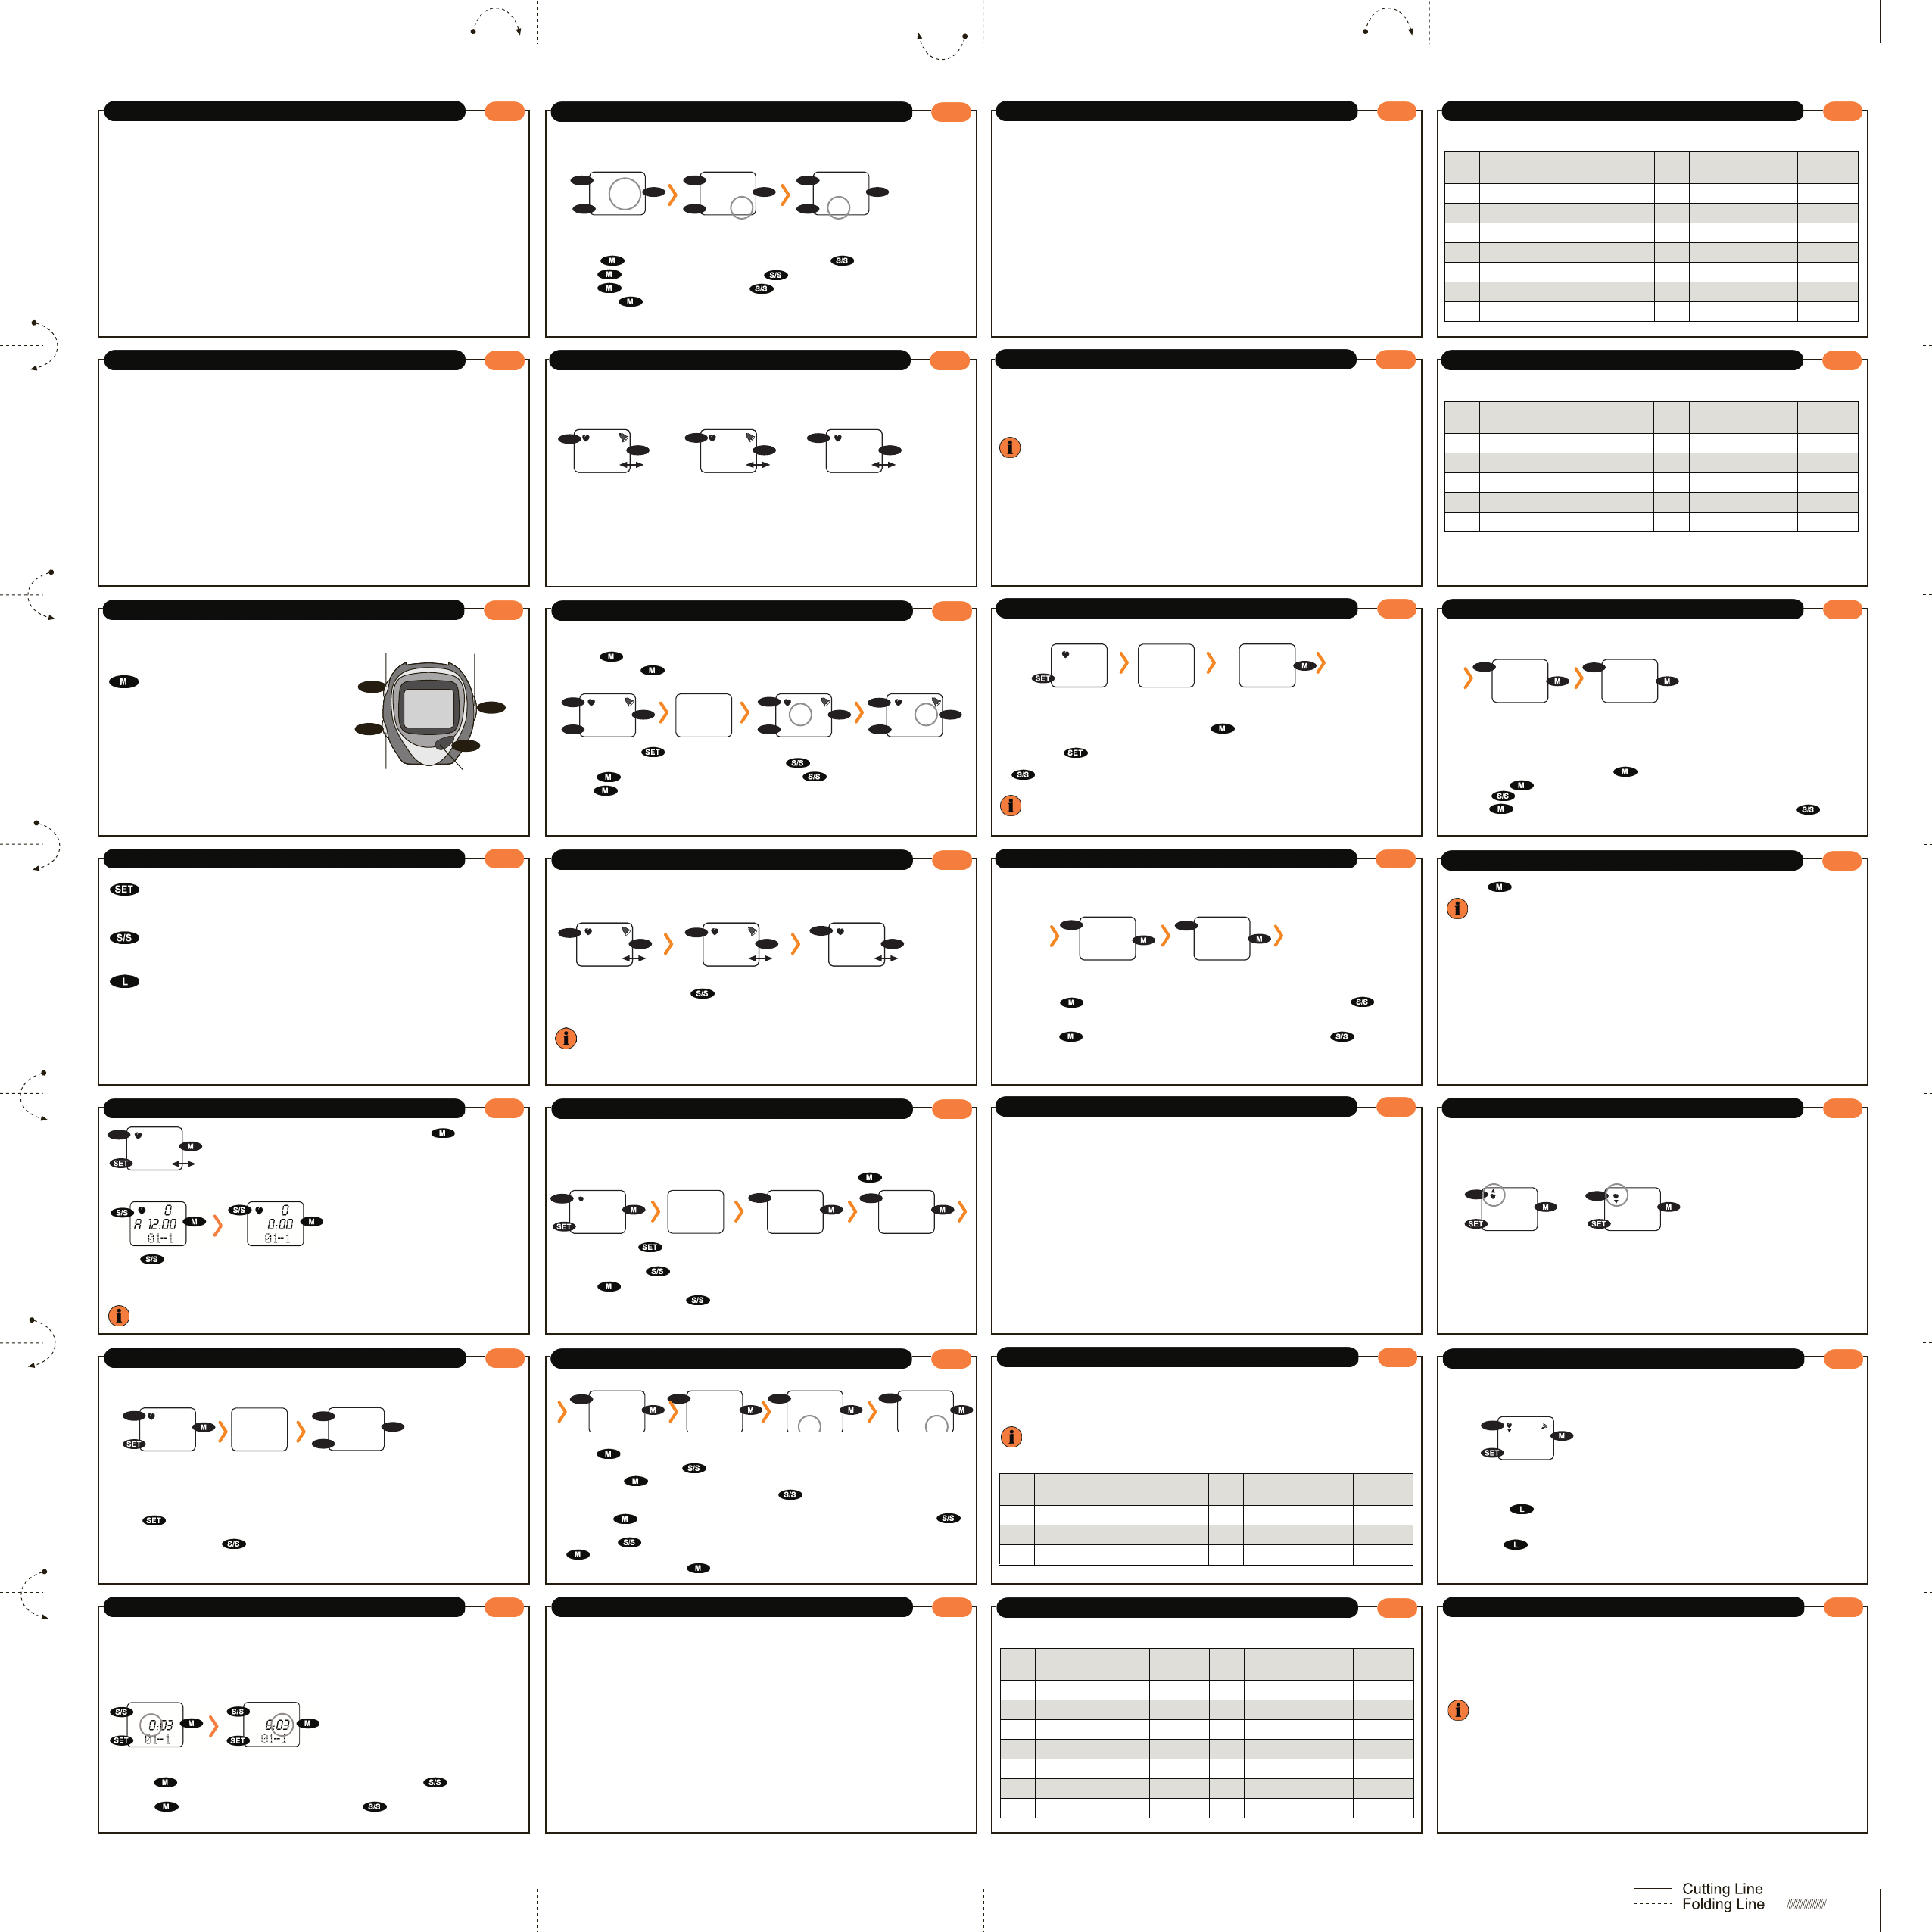
Button functions
Never press the functi
water
casing.
MODE button
The Mode button is used to swit
the various oper
Time mode >
Countdown
mode.
Y
settings you have made. Y
options from inside a mode.
4
Button functions
SET button
Yake settings within a mode.
ST
Yg the START/STOP
LIGHT/ALARM button
Press
A sound symbol will
button ving
activated.
You also press this butt
5
Setting times and date
If required button; the
screen dis
in succession.
12/24 hour display
Press
clock.
When in 12 ho
A stands
and
P for "PM" (for times between 1
When in 12 hour mode the date is displayed using the month-day format and when in 24 hour
mode using the day-month format!
6
Setting times and date
1. Setting DUAL time
Using dual time you ca
down
time setting for the second time zone flashes.
Each time you
changes to m
7
Setting times and date
2. Setting clock time
Press to set the time. The hour display flashes. Press to set the
hours.
Press . The minutes shes. Press to set the minutes.
8
Setting times and date
3. Setting the date
Press to set the date. The year flashes. Press to set the year
Press . The month flashes. Press to set the month.
Press . The day flashes. Pr t
If you press again you return to nor
The day of the week is taken from the integrated
9
Alar
Yfor each weekday and together for all
weekdays). The various
almo1 (Alaralmo8 (Alarm8).
In alarm mode the screen sh
corresponding alarm number e.g.
almo1 (Alarm1).
If
on which it is
ALL, if the
bell symbol is shown in
If an alarm
OFF.
10
Alarm mode
Setting alarms.
Press to open the ALARM mode.
Hold down the button for a few seconds to move from one ala
to the next. Select the alarm that you wish to set.
Hold down the button for a few seconds to set the alarm time. After
has been displayed the hour flashes to set the hours.
Press . The minute display flashes. Press to set the minutes.
Click to confirm the setting.
11
Alarm mode
Activating/deactivating alarms
By repeatedly pressing the button you choose whether to activate the alarm
for a weekday (
Sun- Sat) (Sunday-Saturday) or for the whole week ALL) or whether
to deactivate the alarm (
off).
If an
disappears if none of the eight alarms are activated.
Ym by pressing
13
USET - Personal Settings
Press to open the height entry
Enter your he (up to max. 255 cm)
Then press to open the age entry
year).
button.
Press the button and enter the month on which you wer
button.
Close the setting .
14
Deter
Automatic calculation
Y
the personal data you enter
In order to ensure the best possible trwith the heart rate monitor you can
also calcu
limits manually
Manual calculation
To calc
is normally calculated using the fo
Men : 220 minus age
W
To determine yo
trainer
15
Determining hear
Now
do
type of training:
Maintaining h
Lower limit: MHR x 0.50;
Upper limit: MHR x 0.65.
Endurance traini
Lower limit: MHR x 0.65;
Upper limit: MHR x 0.80.
Maximum intensity:
Lower limit: MHR x 0.80;
Upper limit: MHR x 0.95.
16
Determining hear
Example:
A 35-year old woman who wa
limit
(230 - 35 = 195
Discuss your personal training type and your personal heart rate range with a doctor or a
qualified trainer!
17
Deter
ST (for st
Hold for app th
use to
bu
test on or off
In order to make the settings the stopwatch must show
0:00:00!
18
Determining limits automatically
Press mode button to to set
the exercise
parameters, Page 29" chap
mode to
intensity
endurance t
19
Determining limits automatically
Description of the training
Fat-burning train
The limits for this type of training are calculated for ideal fat burning.
Basic endurance training:
In this type of exercise the limit calculated for tra at normal intensities.
Intensive training:
In this type of exercise the limit calculated for tra
20
Determining limits automatically
Activity/sport type parameters
The following table can help you to enter the parameters for an actty or type of
sporulate the calorie c
Please note
intensity
Exer-
cise
T Para
(Parameter)
Exer-
cise
T Para
1 Aerobics, medium 047 4 Basketball 063
2 Aerobics, intensive 061 5 Boxing 062
3 Badminton 044 6 Football 095
21
Determining limits automatically
Exer-
cise
T Para
(Parame
Exer-
cise
T Para
(Parameter)
7 Football 0 14 Climbing 0.00055
8 Golf 039 15 Weight 0.00032
9 Gymnastics 030 16 Running 0.00088
10 Handball 063 17 Walking (<4.3 min/km) 0.00104
11 Inline skating 040 18 Running (<3 min/km) 0.00131
12 Canoeing 047 19 Motocross/Enduro 0.00070
13 Canoeing - trekking 020 (slow/normal)
22
Determining limits automatically
Exer-
cise
T Para
(Parame
Exer-
cise
T Para
(Parameter)
20 Motocross/Enduro 120 26 Swi 074
(fast/competition) 27 Swimming, 071
21 Cross-country running 074 fast crawl
22 Cycling 9 km/h 029 28 Swimming, 070
23 Cycle 079 slow
24 Rowing 040 29 Skipping 074
25 Sw 077 30 Skipping (125/min) 080
23
Determining limits automatically
Exerci
se
T Para
(Parame se
T Para
(Parameter)
31 Skiing cross-country 074 36 Dancing 023
32 Skiing - downhill 064 37 Walking 036
33 Spinning 065 (normal speed)
34 Squash 0 38 Hiking 068
35 T 050 (fast hiking)
24
Determining limits automatically
Now your monitor will display the upper limit it has calculated.
You
In order
described above by pressin button when the upper limit is flashin
Press the mode button to set the upper limit of the heart rate monitor
Press to set a value for the upper limit of between 31 and 240.
set a value for the lower limit of bet
25
Determining limits automatically
Press to confirm the setting and r
Y
26
Determining limits automatically
Warnings when you leave the heart rate range
Yis displayed during training.
If
and an too low) arrow
soon as you
27
Determining limits automatically
An acoustic alarm c
Press the button for approx 2 seconds to activate/deactivate the acoustic
signal.
goes above or below the limits
Hold the button for approx 2 to sw
28
Calorie mode (KCAL)
Calculating calories consumed and fat breakdown
The achieved calorie consumpthe fat breakdown are calculated from t
measured heart rate when the training stopwatch is
Before training you can change the parameter
standard settin
The calorie consumption is measured at a heart rate of more than 100 beats/minute and only
after the training stopwatch has been started.
HOLD
HOLD
1
USET
0
HOLD
M
GENDE
050
kG
S/S
S/S
S/S
12
USET - Personal Settings
Before you ca
personal x, weigh These
to calculate
data to be entered. The lowest line of the screen dis
My (My settings)
entry. If this is no button.
Hold down the button in My mode for approx. 2 seconds until the
message disappears.
Now press t button t
M" for man or "W" for women.
Press to open the weight entry
Enter your weight using (between 20 and 227 kg).
HOLD
S/S
Button ST
STOP-"S/S"
Button
"SET"
Button
MODE-"M"
Button LIGHT/
ALARM "L"
L
M
SET
2003
YEAR
SET
S/S
M
0:03
01-1
SET
M
0:03
01-1
SET
M
S/S
S/S