After the automatic search the TV will come up with NED1 HD,
put the TV on stand-by and place the CI+ module including the
smartcard in the CI slot, if you turn on the TV again the TV will
try to validate the smartcard.
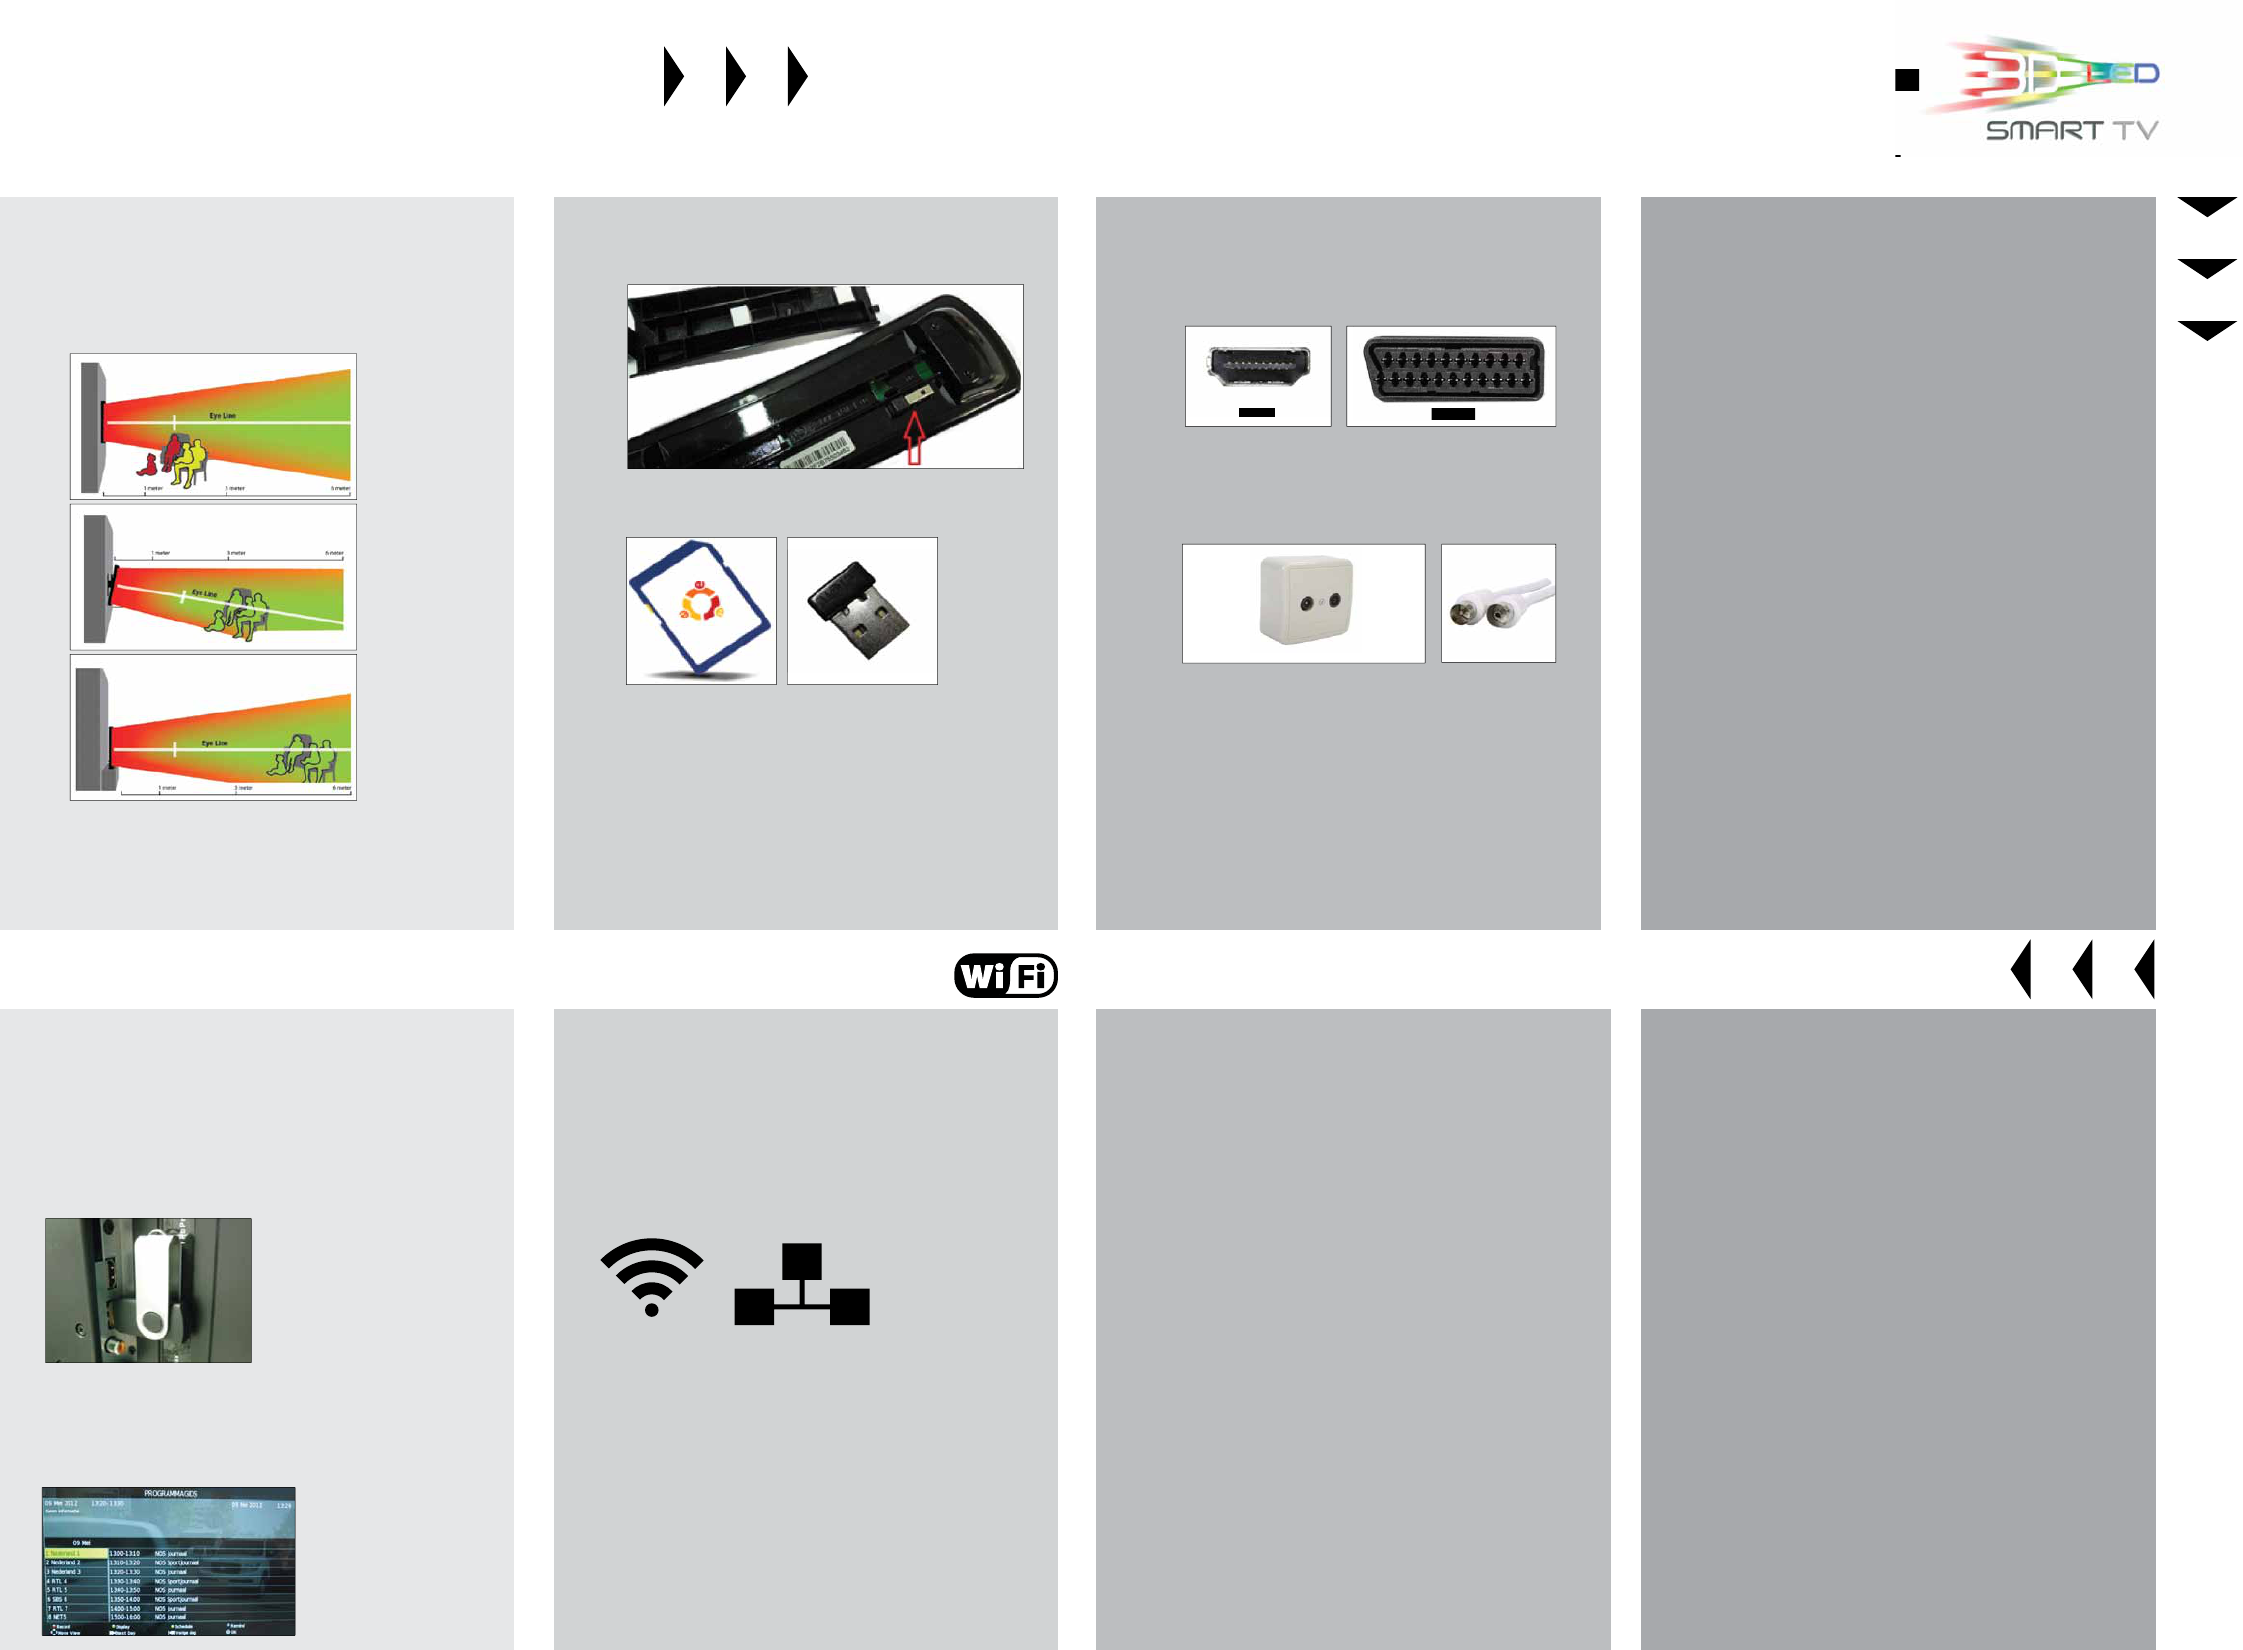
Connecting an external receiver.
•
If you use an external receiver you can connect older
models to SCART and newer models to HDMI. For view-
ing HD channels and interactive TV connection through
HDMI is mandatory.
Connecting cable TV.
•
If you use cable for your TV reception please make sure
the length of the cable between your cable entry point
and your TV is as short as possible, we recommend to
use a signal ampli er after every 10 meters of cable.
Connecting a digital antenna.
•
When you are receiving your TV signal by antenna please
make sure to use an active digital antenna, it is easy to
recognize an active antenna by the extra 230VAC adapt-
er that is used to power the antenna. (The CI module
package contains an active digital
antenna) Placing the
antenna at a window will provide the
best signal quality.
Connect the TV on a grounded net socket, and put the
switch on the back of the TV on “1” (ON/OFF).
Start up the Smart TV mode.
•
At step 2 you have read about the possibility to con-
nect the TV to your network. When you have connected
your TV with an Ethernet cable please go to the settings
menu and select the option “Ethernet settings” and
tab on “Turn on Ethernet” leave the Ethernet menu
by pressing “ESC”. After approx. 30 seconds the TV will
obtain an IP-address from the DHCP server, as soon as
an Ethernet logo appears in the top right section of the
screen your TV will be connected to your DHCP server.
•
When you are choosing to connect the TV through Wi-
Fi you can go to the settings menu and select “Wi-Fi set-
tings” and tab on “Turn on Wi-Fi” leave the Wi-Fi menu
by pressing “ESC”. After approx. 30 seconds the TV will
obtain an IP-address from the DHCP server, as soon as
an Wi-Fi logo appears in the top right section of the
screen your TV will be connected to your DHCP server.
•
Installation of applications is possible through the App
manager, with the App installer it is possible to install
saved Apps from USB stick or SD card.
•
It is also possible to connect your personal account to
open the Market App. which will give you the possibility
to download or install applications directly.
•
With PVR (Personal Video Recorder) and EPG (electronic
program guide) it is easy to record your favourite TV
programs, the only things you need are an empty USB
stick and digital TV (DTV). Place an empty USB stick in the
bottom USB port of the TV and go to the settings menu
and select PVR le system. In this menu you can check
and format the USB stick, often formatting the USB stick
is not needed because the USB stick already has a read-
able le system.
•
Watching in DTV mode will enable the function EPG with
this function you can see the programming of all digital
channels that are supporting EPG. Next to that you can
press the red button in your remote control to select a
program to record to your PVR le system.
CONNECTING
CONNECTING
PLACEMENT
QUICK START GUIDE
INSTALLING
INSTALLING
12
3+4
7
3D USAGE
SET UP
Installing the TV with an external receiver.
If you use an external receiver it is not necessary to
search for channels but we recommend that you do
start the search and then stop it by pressing the “MENU”
button on the remote control by pressing the button to
the right the search will end. After ending the search the
TV will come up with DTV by pressing “SOURCE” on the
remote control you can select SCART or HDMI. If you use
the button “EXIT” to skip the “First time installation” it will
come back the next time you turn on the TV.
Installing the TV by using analogue cable.
If you use an analogue cable connection please select
the following settings:
•
Country: Netherlands
•
Tune Type: ATV
•
After the
automatic search the TV will come up with NED1 (ATV).
Installing the TV by using a Digitenne CI module
package from KPN.
If you choose to receive digital TV by Digitenne please make
sure that the CI module and smartcard are not placed dur-
ing the channel search. Select the following settings:
•
C
ountry: Netherlands
•
Tune Type: DTV
•
Digital Type: DV
B-T
After the automatic search the TV will come up with NED1
(DTV), put the TV on stand-by and place the CI module
including the smartcard in the CI slot, if you turn on the TV
again the TV will try to validate the smartcard.
First read the safety guidelines in the manual before
using the 3D function.
•
If you connect a Blu-ray 3D player to a HDMI port of the
TV the TV will automatically switch to 3D mode when a
3D Blu-ray disc is played, sometimes the 3D mode will
not turn on automatically, in this case you can still turn
on the 3D mode by pressing the green 3D button on the
remote control and select “Frame packing”.
•
It is also possible to play 3D les from USB by download-
ing “Side by Side, Frame packing” or “Top/Bottom” media
les or by lming 3D with a 3D camera. These les can
be played with the internal media player this by pressing
the green 3D button on the remote control and selecting
the right 3D mode.
Please note that the Smart TV mode doesn’t support 3D!
•
The last option is the built-in 2D to 3D converter this
function is usable on all 2D high de nition (HD) video
signals, this option has to be turned on and o in the
picture menu. This function is available in DTV, HDMI 1,
HDMI 2 en HDMI 3 mode.
TOO CLOSE
BEST 3D
TILT MOUNTED
BEST 3D
TV ON STAND
WWW.MTLOGIC.COM/LE-427118MT
WWW.MTLOGIC.COM/LE-427118MT
KPN | ZIGGO | UPC
Brauchen Sie Hilfe? Stellen Sie Ihre Frage.
Missbrauch melden von Frage und/oder Antwort
Libble nimmt den Missbrauch seiner Dienste sehr ernst. Wir setzen uns dafür ein, derartige Missbrauchsfälle gemäß den Gesetzen Ihres Heimatlandes zu behandeln. Wenn Sie eine Meldung übermitteln, überprüfen wir Ihre Informationen und ergreifen entsprechende Maßnahmen. Wir melden uns nur dann wieder bei Ihnen, wenn wir weitere Einzelheiten wissen müssen oder weitere Informationen für Sie haben.
Art des Missbrauchs:
Forenregeln
Um zu sinnvolle Fragen zu kommen halten Sie sich bitte an folgende Spielregeln:
Lesen Sie zuerst die Anleitung;
Schauen Sie nach, ob die Frage bereits gestellt wurde;
Stellen Sie die Frage so deutlich wie nur einigermaßen möglich;
Erwähnen Sie was Sie bereits versucht haben um das Problem zu lösen;
Ist Ihr Problem von einem Besucher gelöst dann lassen Sie ihn / sie wissen in diesem Forum;
Falls Sie reagieren möchten, so verwenden Sie bitte das Antworten- Formular;
Da ihre Frage für alle Besucher sichtbar ist, sollten Sie lieber keine persönliche Daten erwähnen.
Neu registrieren
Registrieren auf E - Mails für MT Logic LE-427118MT wenn:
neue Frage gestellt werden
neue Handbücher vorhanden sind
Sie erhalten eine E-Mail, um sich für eine oder beide Optionen anzumelden.
Das Handbuch wird per E-Mail gesendet. Überprüfen Sie ihre E-Mail.
Wenn Sie innerhalb von 15 Minuten keine E-Mail mit dem Handbuch erhalten haben, kann es sein, dass Sie eine falsche E-Mail-Adresse eingegeben haben oder dass Ihr ISP eine maximale Größe eingestellt hat, um E-Mails zu erhalten, die kleiner als die Größe des Handbuchs sind.
Ihre Frage wurde zu diesem Forum hinzugefügt
Möchten Sie eine E-Mail erhalten, wenn neue Antworten und Fragen veröffentlicht werden? Geben Sie bitte Ihre Email-Adresse ein.