BA GS3x10knx Hardware HM;DE,GB -23771- 2017.11V02 ED.doc
INSTRUCTION MANUAL AIR QUALITY SENSORS GS 3X.10KNX
HUGO MÜLLER GMBH & CO KG, STURMBÜHLSTR. 145-149, 78054 VS-
SCHWENNINGEN
SAFETY INSTRUCTIONS AND BASICS
GS 30.10knx
GS 31.10 knx
Technical data
Safety instructions / Intended use
Power supply:
Bus current:
Via KNXbus voltage
< 10 mA
CAUTION!DANGER OF FIRE AND ELECTRIC SHOCK!
!!!Installation and assembly of electrical equipment must be carried out only by a skilled person!!!
Bus system:
KNX
Connect only to suitable supply voltage [KNX bus voltage (nominal voltage 29V)].
Warranty void if housing opened by unauthorized person!
The electronic circuit is protected against a wide range of external influences. Incorrect operating may occur if external influences
exceed certain limits!
Installation and assembly of electrical equipment must be in accordance with national building, electrical and safety codes!
Defective devices / sensors have to be put out of service immediately!
Observe the regulations and instructions in the ZVEI/ZVEH handbook (building system technology). Especially the professional
installation of the bus lines and the professional installation and start-up of KNX devices must be observed!
The device fits for the particular use of the following tasks: monitoring of the air quality in building systems technology (schools,
offices, hotels, conference venue etc.), data transfer and regulation via bus system.
The device is intended for use in accordance with the defined technical data.
Operate the device exclusively in a dry room!
The device is not qualified for security relevant tasks such as emergency doors, fire protection equipment, fermenting cellars etc.
Sensors:
relative humidity, temperature,
atmospheric pressure
Manual operation (GS 31.10 knx):
Manual adjustment of set-point temperature
±3° (increment 0.5°)
Measuring range relative humidity:
0–100%
Measuring range temperature:
0–50°C
Measuring range atmospheric pressure:
absolute atmospheric pressure
Permitted ambient temperature:
-0°…+50°C
Housing:
self-extinguishing thermoplastic
Mounting:
Wall
Type of connection:
Push-in connector
Type of protection:
IP 20 to DIN EN 60529
Class of protection:
III when installed according to regulations
Source of interference
Inappropriate use / disposal
Operation of GS 31.10 knx
The measurement results of the device can
be negatively influenced by external factors.
Possible sources of interference are:
■ Draught and air movement: e.g. through
windows, doors, convection, heating and
people
■ Warming and cooling: e.g. sunlight or
mounting on an outside wall
■ Heat sources: close to installed electrical
consumers e.g. dimmers
■ Vibrations or shocks, which the unites are
or were subjected to
■ Pollution due to colors, wallpaper paste,
dust e.g. at renovation work
■ Organic solvents or their vapours: e.g.
detergents
■ Plasticizers from stickers and packaging:
e.g. bubble wrap or polystyrene
The device is not intended for use of unauthorized constructional
alterations, repairs and security relevant tasks
The device is not intended for use in outdoor areas and wet rooms
The device is not qualified for security relevant tasks The controlling of
the device is only for the observation and regulation of the air quality
The inappropriate use of the device can cause damage to property and
persons
The device has to be disposed in an environmentally friendly manner
according to the current electrical codes!
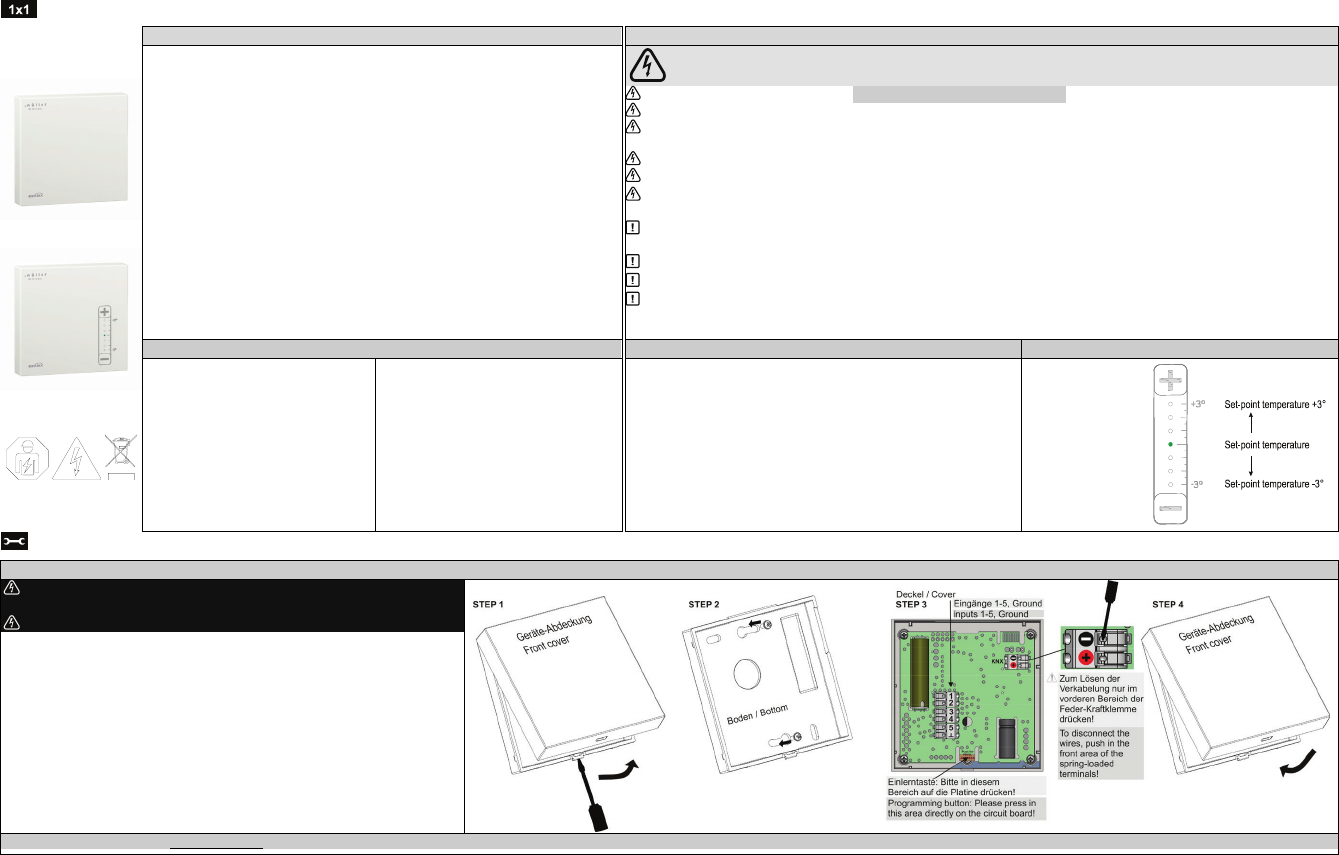
Set-point temperature
manually adjustable
via touch-area
(adjustment range
±3°; increment 0.5°).
Display with LEDs.
ASSEMBLY
Assembly
Disconnect device from power supply for wiring and installation
purposes! Check power supply is disconnected!
Attention! You have to check and consider the safety instructions above!
This device is suitablefor wall mounting or for mounting on aflush-mounting box.
The device should not be exposed to dusty environment.
Ensure that no dust gets inside of the device.
Afterinitial startup, thedevice requiresup to 5 minutesuntil the firstcorrect
measurement is possible
STEP 1:Open the device with a small screw driver by pushing in the
lever at the bottom of the housing and gently remove the front cover.
STEP 2:Fix the rear cover, either directly to the wall or on a flush-mounting box
(see installation notes)
STEP 3:After wiring, press the “learn button” to set the device into programming
mode(this can be done at a later timeas well)
STEP 4:After completing the installation, the front cover must be reattached
Installation note:Make sure that no wires are pinched or squeezed when installing the cover.The mounting of the device on a flush-mounting box is recommended for easier handlingand wiring.
Libble nimmt den Missbrauch seiner Dienste sehr ernst. Wir setzen uns dafür ein, derartige Missbrauchsfälle gemäß den Gesetzen Ihres Heimatlandes zu behandeln. Wenn Sie eine Meldung übermitteln, überprüfen wir Ihre Informationen und ergreifen entsprechende Maßnahmen. Wir melden uns nur dann wieder bei Ihnen, wenn wir weitere Einzelheiten wissen müssen oder weitere Informationen für Sie haben.
Art des Missbrauchs:
Forenregeln
Um zu sinnvolle Fragen zu kommen halten Sie sich bitte an folgende Spielregeln:
Lesen Sie zuerst die Anleitung;
Schauen Sie nach, ob die Frage bereits gestellt wurde;
Stellen Sie die Frage so deutlich wie nur einigermaßen möglich;
Erwähnen Sie was Sie bereits versucht haben um das Problem zu lösen;
Ist Ihr Problem von einem Besucher gelöst dann lassen Sie ihn / sie wissen in diesem Forum;
Falls Sie reagieren möchten, so verwenden Sie bitte das Antworten- Formular;
Da ihre Frage für alle Besucher sichtbar ist, sollten Sie lieber keine persönliche Daten erwähnen.
Neu registrieren
Registrieren auf E - Mails für Muller GS 31.10 knx wenn:
neue Frage gestellt werden
neue Handbücher vorhanden sind
Sie erhalten eine E-Mail, um sich für eine oder beide Optionen anzumelden.
Das Handbuch wird per E-Mail gesendet. Überprüfen Sie ihre E-Mail.
Wenn Sie innerhalb von 15 Minuten keine E-Mail mit dem Handbuch erhalten haben, kann es sein, dass Sie eine falsche E-Mail-Adresse eingegeben haben oder dass Ihr ISP eine maximale Größe eingestellt hat, um E-Mails zu erhalten, die kleiner als die Größe des Handbuchs sind.
Ihre Frage wurde zu diesem Forum hinzugefügt
Möchten Sie eine E-Mail erhalten, wenn neue Antworten und Fragen veröffentlicht werden? Geben Sie bitte Ihre Email-Adresse ein.