T
In OFF mode, press ALM. 1/M- (9) or ALM. (10) button.
the corresponding alarm are displayed for 5 seconds.
T
The alarm is programmed to run for 59 minutes and triggers progressively.
Once the alarm 1 or alarm 2 is activated, corresponding alarm indicator “ ” / “ ”,
“ ”/” ” or “ ” / “ ” will flash on display,
1. In wake up mode, to temporarily stop alarm, press the SNOOZE/DIM button (7).
alarm will resume to the previous playing mode after 9 minutes. “ ” / “ ”, “ ”/” ”
or “ ” / “ ” and “SNOOZE” are on display.
2. TON/OFF button (1), “ ” / “ ”, “ ”/” ”
or “ ” / “ ” remains displayed.
3. ALM. 1/M- (9) or ALM.
2/M+ (10) until “ ” / “ ”, “ ”/” ” or “ ” / “ ” disappears.
NOTE:
- YVOL+/- button on wake to iPhone/iPod or
radio modes your last setting.
- But since this is a progressive alarm, the sound will be louder and louder
decrease the volume after the alarm reaches to its max volume level (24).
In OFF mode, press ALM. 1/M- (9) or ALM. 2/M+ (10) button, alarm type will flash on
display
or radio.
accordingly.
- “ ” or “ ” (wake up by buzzer): “Beep“ sound comes when the alarm time is
reached.
- “ ” or ” ” (wake up by iPod): Follow the procedure in “PLA
iPhone/iPod”. The iPhone/iPod will start playing automatically when the alarm time is
reached and the unit is off.
- “ ” or “ ” (wake up by radio): Follow the procedure in “LISTENING TO
RADIO” to select your desired radio station.
the alarm time is reached and the unit is off.
Press ALM. 1/M- (9) or ALM. 2/M+ (10) button again, the hour digit flashes on display
Press the (1
Press ALM. 1/M- (9) or ALM. 2/M+ (10) button again, the minute digit flashes on
display
Press ALM. 1/M- (9) or ALM. 2/M+ (10) to save the setting of alarm 1 or alarm 2. The
display will resume to the current time.
This unit can be set for two dif
pendently or simultaneously ALARM1, ALARM2 h ALARM1
Alarm 1 or
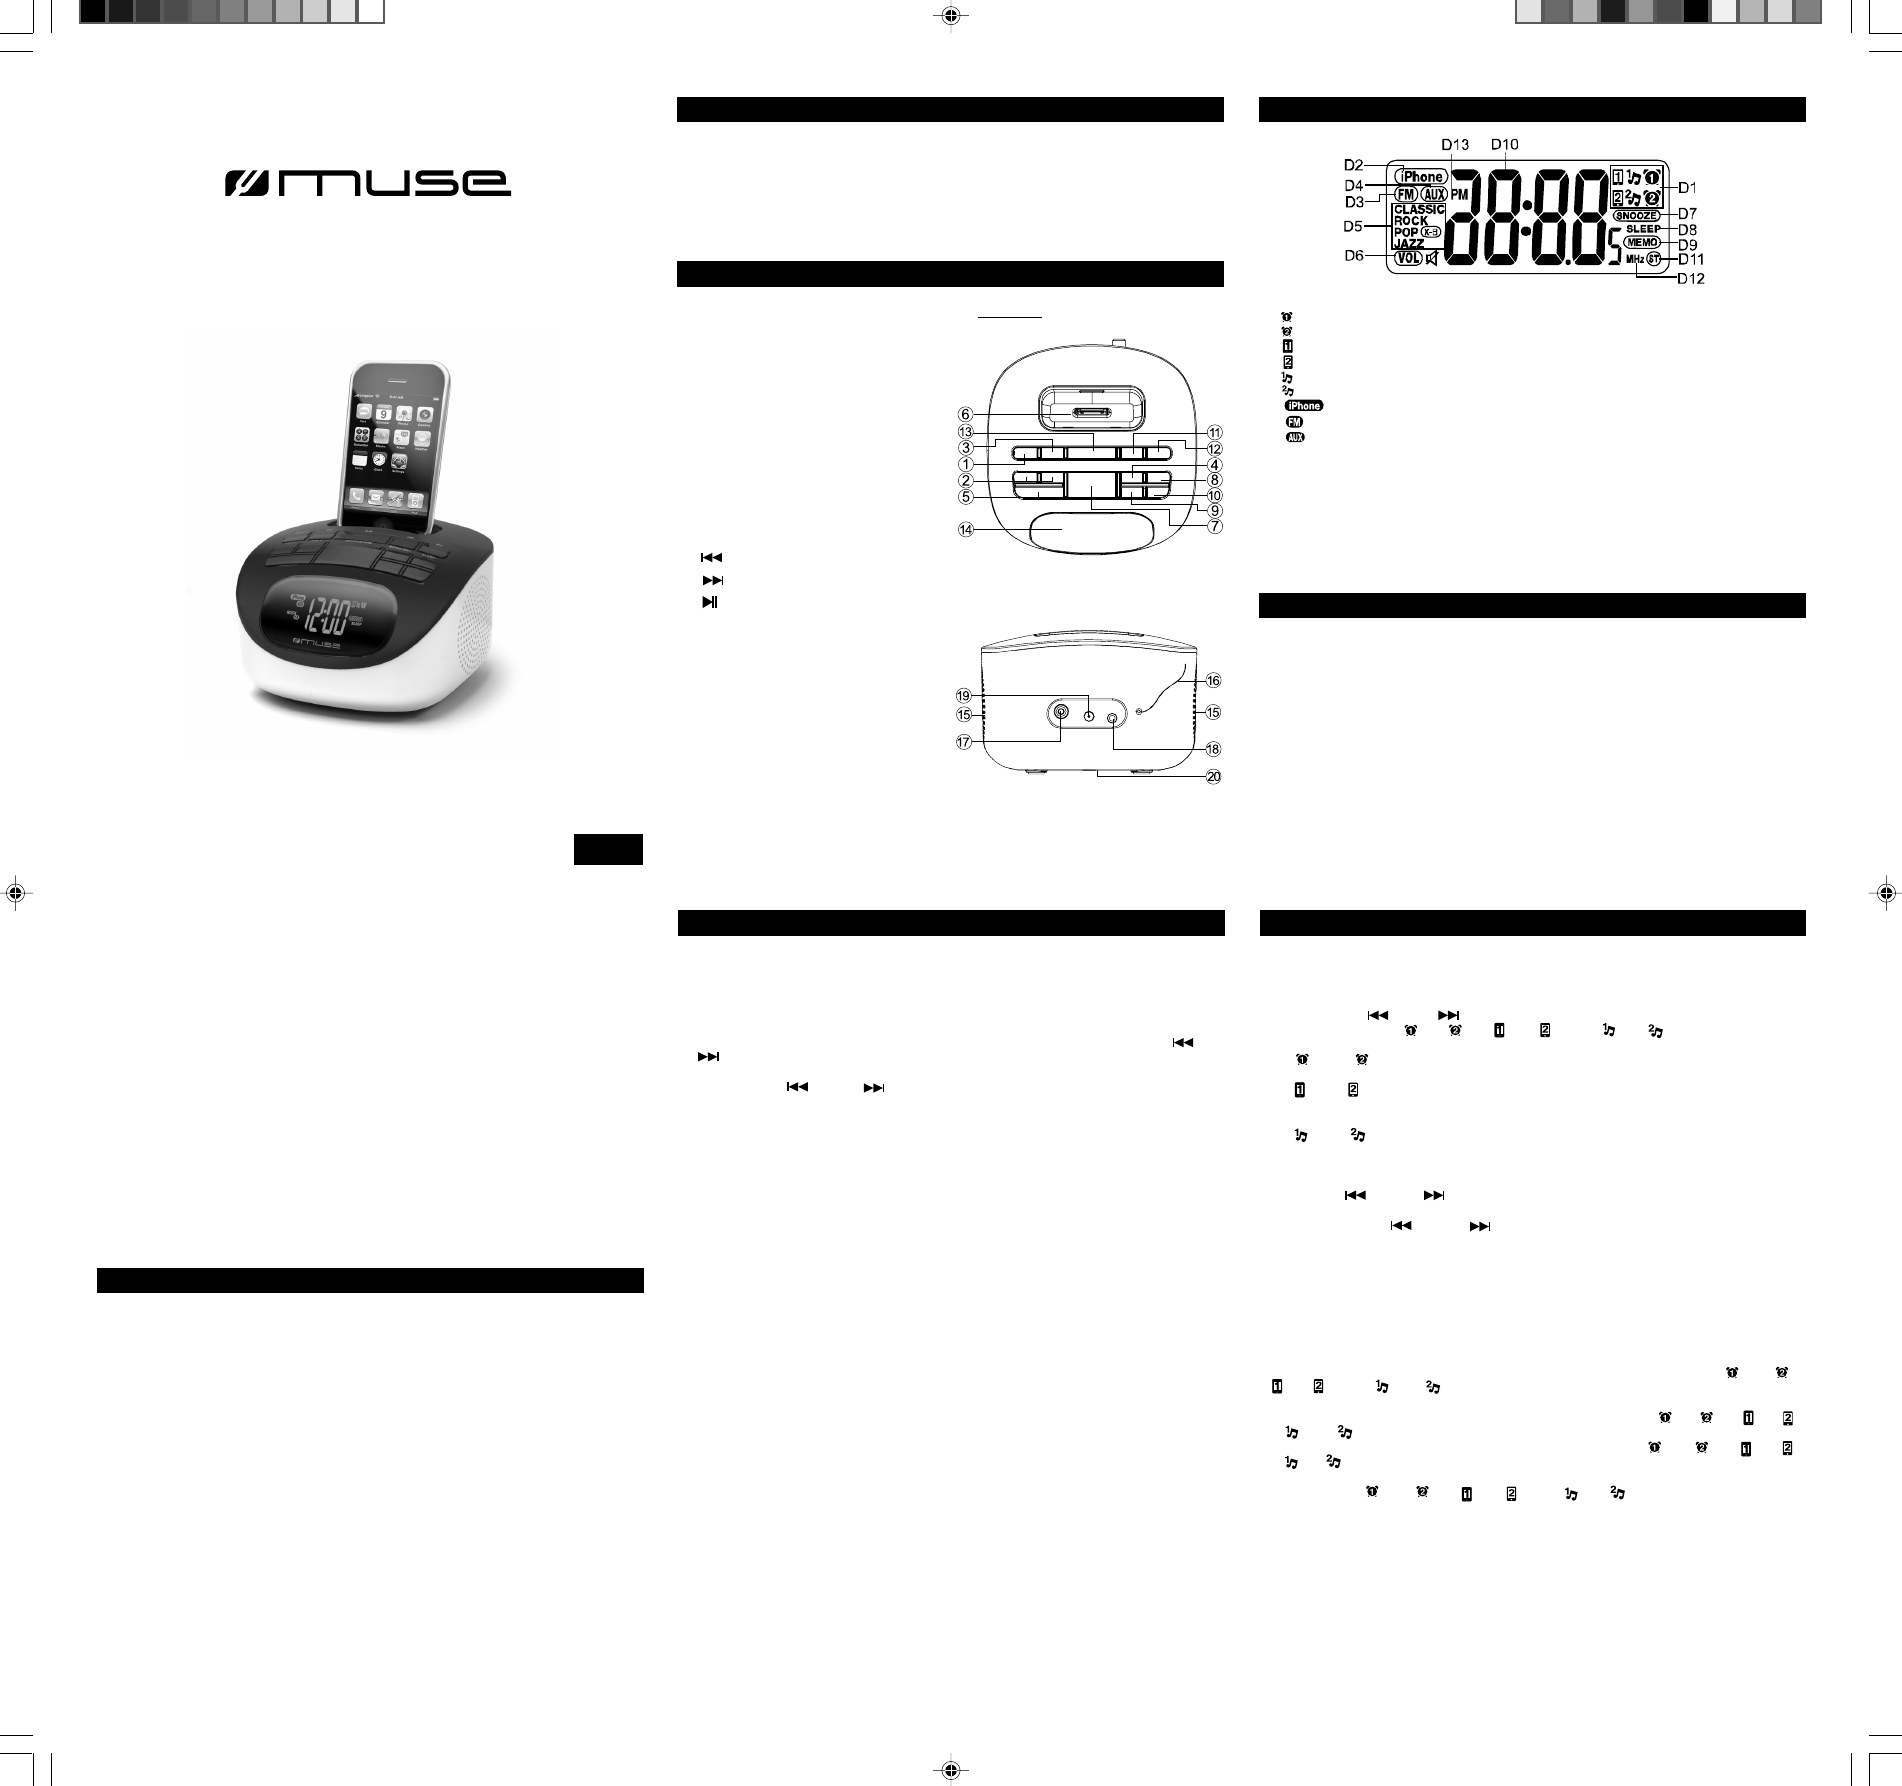
1.
2.
3.
4.
5.
6.
7.
8.
9.
10.
11.
12.
13.
14.
15.
16.
17.
18.
19.
20.
ON/OFF button
VOL + / - buttons
EQ button (equalizer)
MEMO./SET button (memory/clock
setting)
FUNCTION button
iPhone/iPod Socket
SNOOZE/DIM button
SLEEP Button
ALM. 1/M- button
ALM. 2/ M+ button
button
button
button (play/pause)
LCD display
Speakers
FM Wire
VIDEO OUT jack
AUX IN jack
DC input (AC adaptor jack)
Battery Backup Compartment
M-103 IP
GB - 1
User Manual
Docking Clock Radio PLL for iPhone/iPod
Please read the instruction carefully
before operating the unit.
English
GB - 2
GB - 4
Main Unit
T
BASIC OPERA
Back View
GB - 3 GB - 5
UNP
PRODUCT DESCRIPTION
TIME SETTING
Current time
When used for the first time, or if the mains plug has been removed with no backup
battery inside, the clock display will blink.
1. In OFF mode, Press the MEMO./SET button (4) on the unit, the clock blinks on the
display.
2. With clock display blinking, press FUNCTION button (5) to select 12 or 24 hour format.
3. Press the MEMO./SET button (4), the hour digits will flash, set the hour with (11)
or (12) button.
4. Press the MEMO./SET button (4) to save the hour setting, the minute digits flash. Set
the minutes with (1
5. Press MEMO./SET button (4) to complete time setting.
NOTE: With clock display blinking, if no button is pressed within 8 seconds, it will return
to previous clock display.
SLEEP (Automatic turn off)
In sleep mode, the unit will turn off automatically after a specified time.
Note: Sleep time can only be set when the unit is turned ON.
YSLEEP
button (8) repeatedly to select 90-80-70-60-50-40-30-20-10 or 00 minutes, then release
SLEEP button (8). “SLEEP” icon displays.
NOTES:
- TON/OFF button (1), or press
SLEEP button (8) repeatedly until value is adjusted to “00”. It will return to normal display
after 5 seconds, the sleep function will be cancelled and “SLEEP” icon will not be displayed.
- If the playing time from your iPhone or other player is shorter than the selected sleep
time, the music will stop at the end of the playing time.
ALARM SETTING
Cautions:
-
- When the unit is not going to be used for long time, disconnect the
AC outlet.
- Be sure to use it near the wall outlet. If a malfunction occurs, disconnect the plug from
the wall outlet at once.
- When the
the main power source, even when the unit is turned of
-
not be obstructed during intended use.
completely disconnect the
Battery backup system
DC power: 2x1.5V
backup system.
An alkaline type battery is recommended. For optimum performance, this battery should
be replaced every 6 months.
BACKUPSYSTEM: All clock settings will be kept in memory; however
may require adjustment for exact accuracy. If the backup battery is not installed, the
display will show the clock flashing to indicate that you have to reset the time and the
alarm.
Note: When the battery backup is functioning, the display has no backlight.
When you unpack your new iPhone/iPod clock-radio, make sure that you have removed
all the accessories and information papers:
- Docking Clock Radio PLL for iPhone/iPod
- AC adaptor
- 5 pieces iPhone/iPod interchangeable adaptors
- 1 piece Dust Cover
- User manual
LCD DISPLA
D1. -
-
-
D2. -iPhone/iPod mode playback
D3. - Radio mode
D4. -
D5. Equalizer modes
D6. V
D7. SNOOZE
D8. SLEEP
D9. Memory
D10.T
D1
D12. Radio frequency unit
D13. “PM”-12hr time mode display
T
The unit is in clock mode when it is plugged in, Press ON/OFF button (1) to turn on or
turn of
Operating mode selection (FUNCTION)
Press FUNCTION button (5) repeatedly to select iPhone/iPod,
Sound volume
Press VOL +/- button (2) to adjust sound level. There are a total of 32 volume levels.
Equalizer
When listening to the radio, iPhone/iPod or other music source from
EQ button (3) repeatedly to select different modes: CLASSIC, ROCK, POP
off.
Display dimmer
In OFF mode, press the SNOOZE/DIM button (7) repeatedly will change the backlight
brightness of the display
POWER SUPPL
Using t
This
• The supplied
60Hz and should only be connected to a mains supply within these parameters.
• Use the supplied
1.
2.
3.
4.
iPhone/iPod
not included
ICR-2486 IB MUSE 001 REV0-GB.P65 2010-7-12, 15:41