E
n
Enjo
The Home Theater means that you can enjoy surround sound with a real sense
a movie theater or concert hall.
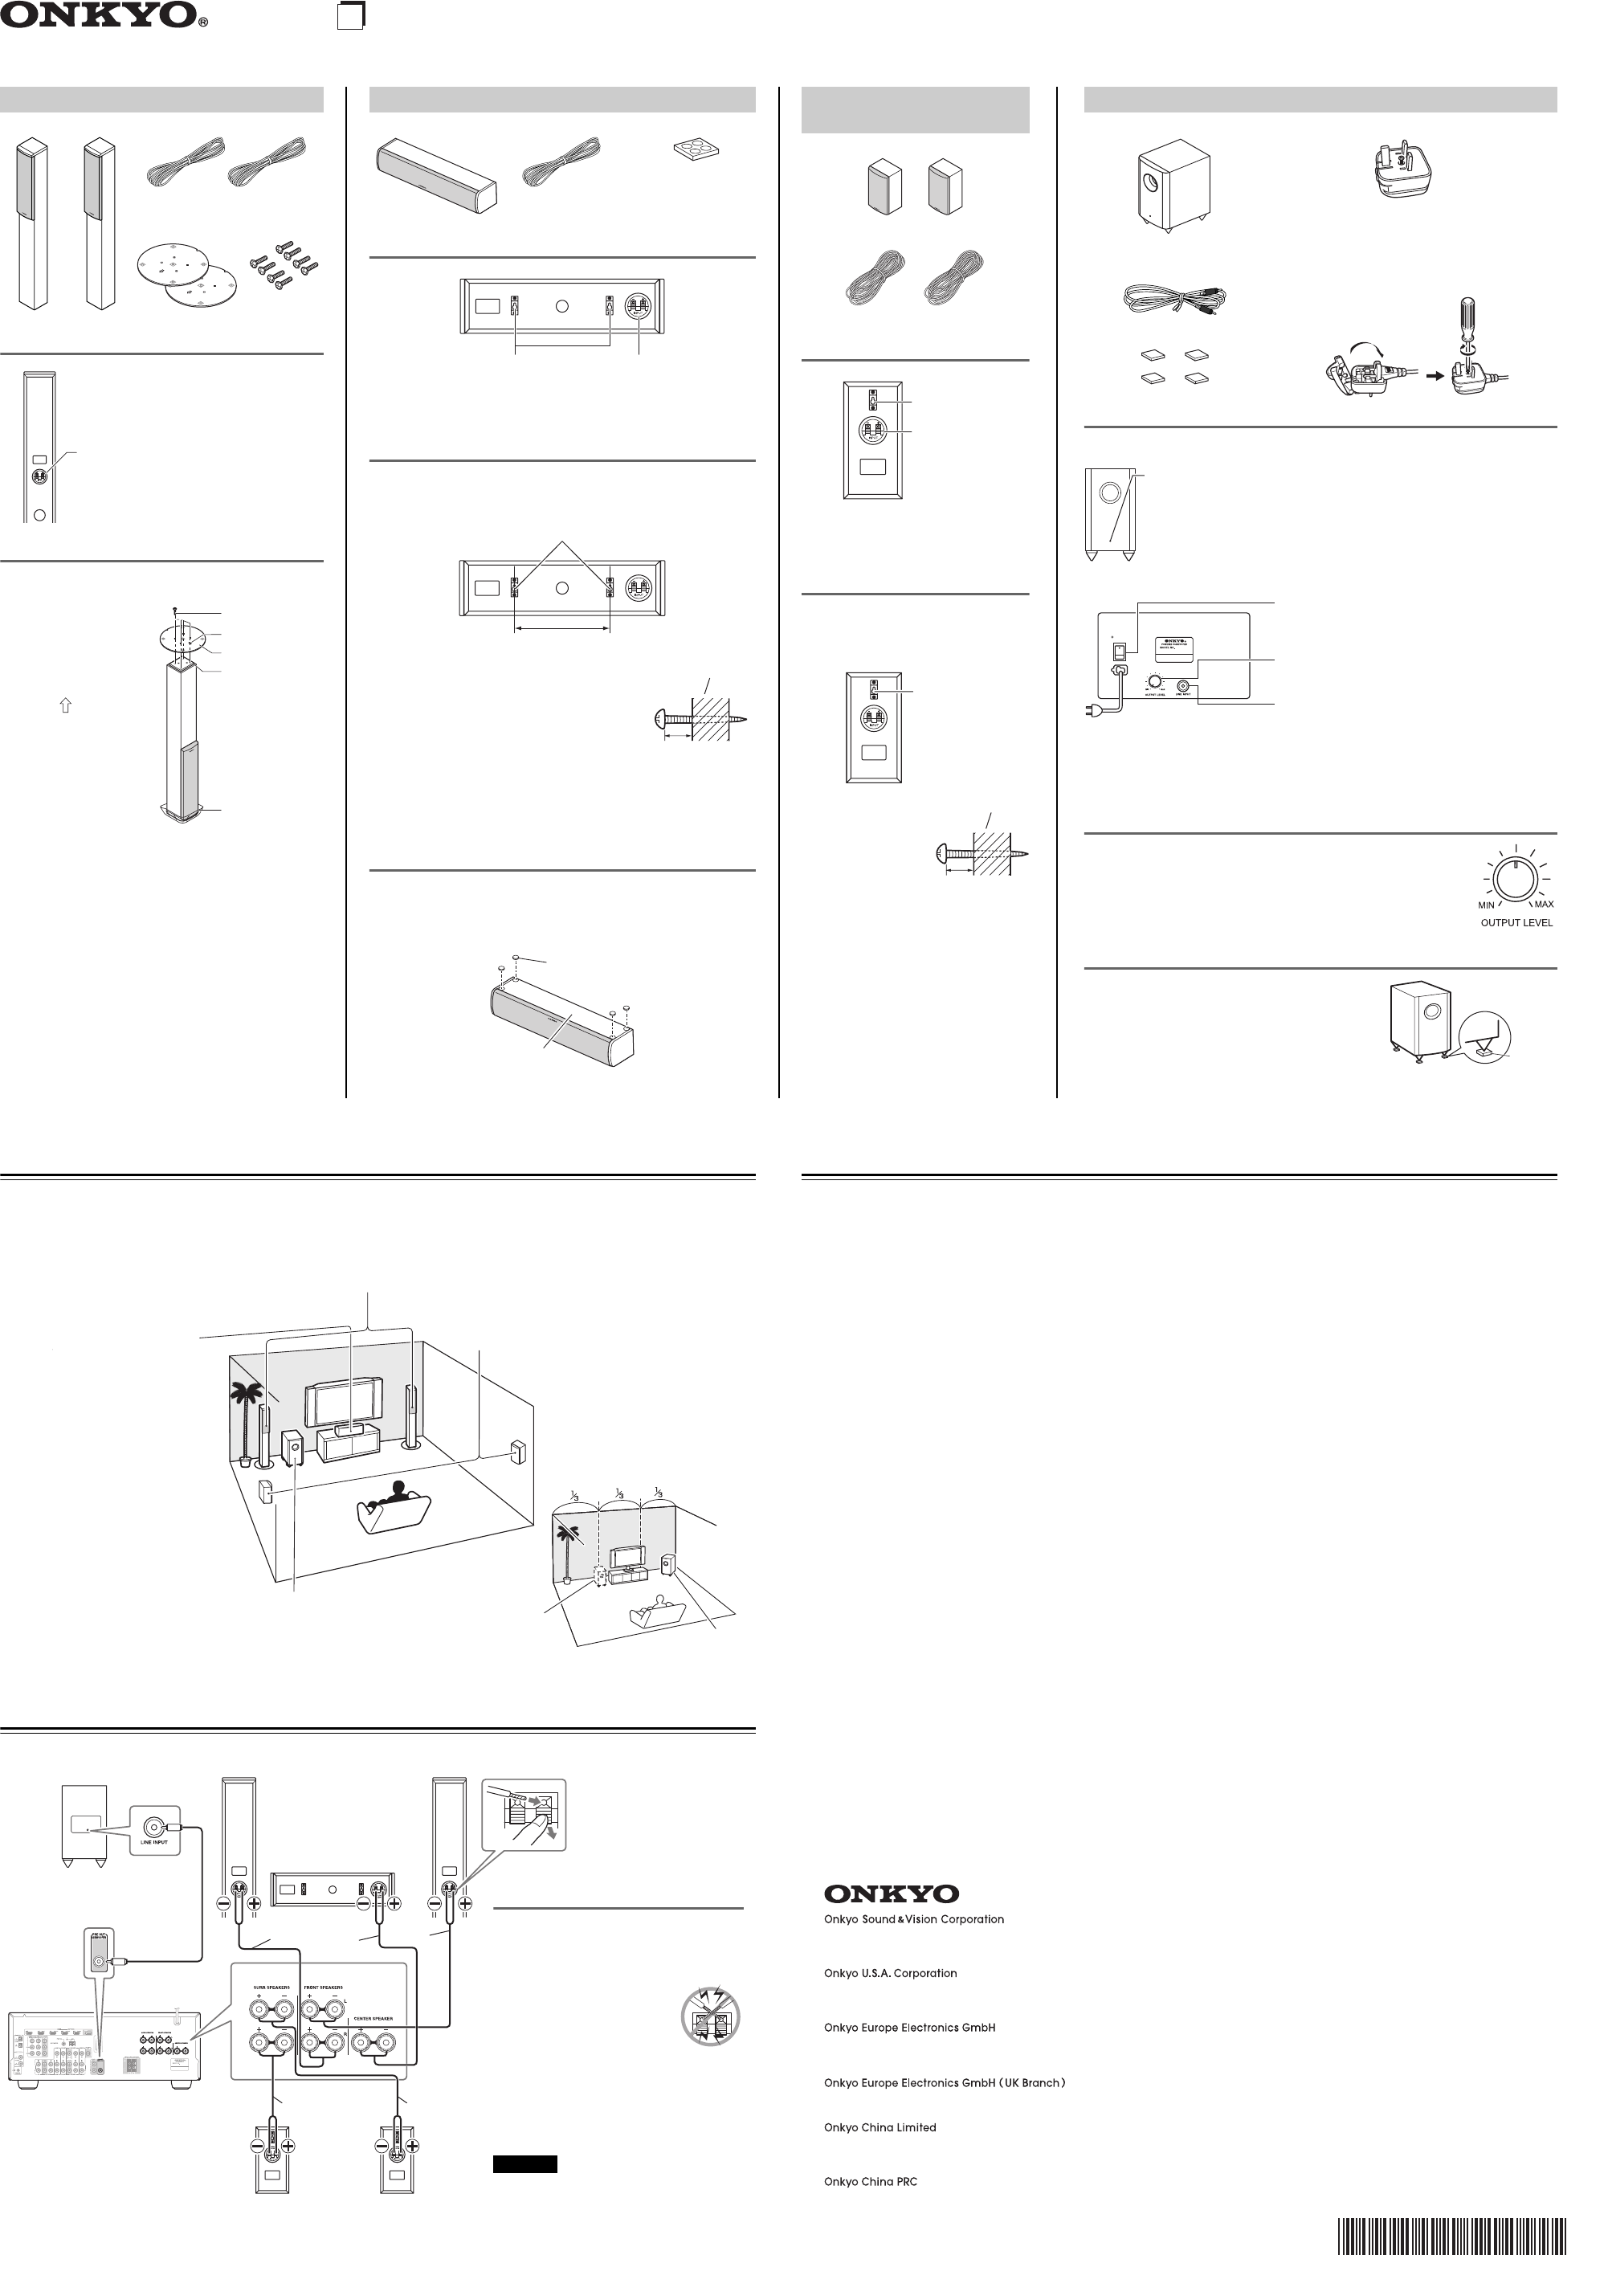
Connecting the Speaker
Corner
position
1/3 of wall
position
Center speaker (SKC-770)
P
on top) facing f
lev
front left and right speakers.
Front left and right speakers (SKF-770)
They should be positioned fhe listener at about ear lev
equally spaced from the TV
create a triangle, with the listener at the apex.
Surround left and right speakers (SKR-770)
P
slightly behind, about 2 to 3 feet (60 to 100 cm)
abov
spaced from the listener
Subwoofer (SKW
The subwoofer handles the bass sounds of the LFE (Low-F
Effects) channel. The v
subwoof
and your listening position. In general, a good bass sound can be obtained
by installing the subwoof
the front wall, as sho
Red
White
Blue
Green
F
Center speaker
Gra
F
Surround right speaker
Surround left speaker
Po
subwoof
Speaker Connecti
Read the followfore connecting your
speakers:
• T
connections.
• Pay close attenti
wiring polarity
positiv
positi
negati
negati
wired incorrectly
phase and will sound unnatural.
• Be careful not to short the positiv
negati
your amp.
Cautio
• W
the subwoofer’
pre out jack of your equipment. Ne
kind of musical instrum
Specifications
■ P
■ Front Speakers (SKF-770)
■ Center Speaker (SK
■ Surround Speaker
Specifications and appearance are subject to change without
prior notice.
T Bass-re
Input sensi 140 mV / 20 kΩ
Maximum outp 290 W (Dynamic
Frequency respo 25 Hz to 15
Cabinet cap 37 L (1.3 cu
Dimensions (W × H × D): 275 × 507 × 411 mm
(10-13/16" × 19-1 × 16-3/16")
(incl. proj
W 11.6 kg (25.6
Dri 25 cm (10") Co× 1
Power supply: AC 220 V – 240V
Power consumption: 137 W
Other: Auto Stand
T 2 W
Impedanc 6 Ω
Maximum inpu 130 W
Sensiti 79.5 dB/W/m
Frequency respo 55 Hz to 50
Crossover frequency: 4 kHz
Cabinet ca 7
Assembly× H × D):
262 × 1050 ×
(10-5/16"× 41-5/16" × 10-5/16")
(incl. proj
W 5.2 kg (11.5 lb
Drivers unit: 8 cm (3-1/× 2
2.5 cm (1") Bala
T Spring type
Grille: Fixed
T 2 W
Impedance: 6 Ω
Maximum input power: 130 W
Sensiti 79 dB/W/m
Frequency resp 60 Hz to
Crossover frequency: 4 kHz
Cabinet ca 2.8 L (0.10
Dimensions (W × H × D): 430 × 115 × 121 mm
(16-15/16" × 4-1/2" × 4-3/4"
(incl. grill
W 2.2 kg (4.9 lbs.)
Driv 8 cm (3-1/4") Cone (W× 2
2.5 cm (1") Bal
T Spring ty
Keyhole slot: 2
Grille: Fixed
T Full-range cl
Impedance: 6 Ω
Maximum input power: 130 W
Sensiti 81 dB/W/m
Frequency resp 80 Hz to
Cabinet ca 1.0 L (0.03
Dimensions (W × H × D): 115 × 230 × 96 mm
(4-1/2" × 9- × 3-3/4")
(incl. grill
W 1.0 kg (2.2 lbs.)
Driv 8 cm (3-1/4") Cone
T Spring ty
Keyhole slot: 1
Grille: Fixed
Attach
Before you connect the speak
speaker base to each SKF-770.
1. T
upside do
protection cov
attached.
2. Align the speaker
base while the arro
mark is headed in
the same direction as
the speaker’
careful not to tip o
the speaker
3. Align the screw holes
on the speak
with those on the
bottom of each
speaker
supplied screws. Re
(9 lbf·in). Be careful not to tip ov
4. T
5. Remov
SAFETY PRECA
• Attach the speak
allo
• Be sure to tighten the screws when you attach the
speaker bases.
• Attach the speaker bases on
floor
• After you attach the speaker bases, make sure that the
speakers stand upright and are stable.
Fro
Front speakers
Speaker cables 11 ft. (3.5 m)
2 speaker bases and 8 screws
(Red)(White)
Speaker terminals
Caution:
The front grilles are not designed to be
remov
forcib
Screws
Speaker base
Bottom of
SKF-770
Arrow mark
Protection cov
W
T
show
into the w
Using the Cork Stoppers f
W
possible sound from your speakers. The cork stoppers prev
speakers from moving, pro
stoppers for the center speaker
Center speaker (SKC-770)
Center speaker
Speaker cable 10 ft.
(3.0 m)
4 cork stoppers
(Green)
Speaker terminals
Caution:
The front grilles are not designed to
to remov
K
7-7/8" (200 mm)
Caution:
A mounting screw’
depends on how well it’
you ha
screw into a stud. If there are no studs, or the
walls are solid, use suitable w
screws with a head diameter of 5/16" (8 mm) or
less and a shank diameter of 5/32" (4 mm) or
less. With hollow walls
detector to check f
pipes before making an
between 7/32" (5 mm) and 3/8" (10 mm) between the wall and the
base of the screw head, as sho
consult a home installation professional.)
Wa
7/32" to 3/8"
(5 to 10mm)
Cork stopp
Bottom of SKC-770
W
T
vertically
hang each sp
securely scre
Surr
(SKR-770)
Surround speakers
Speaker cables 26 ft. (8.0 m)
(Blue)
(Gray)
Speaker
terminals
Keyhole slot
Caution:
The front grilles are not de
remov
them forcibis will damage them.
K
wall mounting
Caution:
A mounting screw’
ability to suppor
speaker depends on
how well i
anchored to the wall.
If you ha
walls, scre
mounting screw into
a stud. If there are no
studs, or the walls are solid, use
suitable wall anchors
a head diameter of 5/16" (8 mm) or less
and a shank diameter of 5/32" (4 mm) or
less. With hollow walls
detector to check f
or water pipes bef
Leav
and 3/8" (10 mm) between the wall and
the base of the screw head, as shown.
(We recommend that y
home installation professional.)
Wa
7/32" to 3/8"
(5 to 10mm)
Setting the Subw
T
Set it so that bass sounds are ev
from the other speakers. Becaus
low
subwoofer too high. As a rule of thumb, set the subwoofer le
what you think is the optimal le
Using the Floor P
If the subwoofer
vinyl, tile, etc.) and playback is v
subwoofer’
prev
the subwoofer’
stable base for the subwoofer
Subw
Subwoofer
P
Only supplied in cer
adapter if your A
plug on the subwoof
varies from countr
RCA cable 10 ft. (3.0 m)
*How to mount the AC plug:
4 floor pads
■ Front
■ Rear
Note: The Auto Standb
exceeds a certain level. If the A
slightly increasing or decreasing the subwoofer output le
*
ST
Red: Subwoofer in standb
Blue: Subwoof
With the Auto Standb
when an input signal
signal for a whileomatically enters Standby mode.
SKW-770
ON
OFF
POWER
PO
Press this switch to the ON position to turn on the
power
power
T
OUTPUT LEVEL c
This control is used to adjust the volume of the
subwoof
LINE INPUT
This RCA input should be connected to the
subwoof
supplied RCA cable.
Pa
5.1ch Home Theater Speaker P
SKS-HT728
Y1203-2
SN 29355763A
(C) Copyright 2012 Onkyo Sound &
2-1, Nisshin-cho
T
http://www
18 P
T
http://www
Liegnitzerstrasse 6, 82194 Groebenz
T
http://www
The Coach House 81A High Street, Marlow
T
Unit 1033, 10/F
T
http://www
1301, 555
China 200041,
http://www
*29355763A*