DATA LOG / DATA LOG 2
00/06.2015 A016.17.57035
ORBIS TECNOLOGÍA ELÉCTRICA S.A.
Lérida, 61 E-28020 MADRID
Tel.: + 34 91 567 22 77
E-mail: info@orbis.es
http://ww
ESP
INTERRUPTOR HORARIO
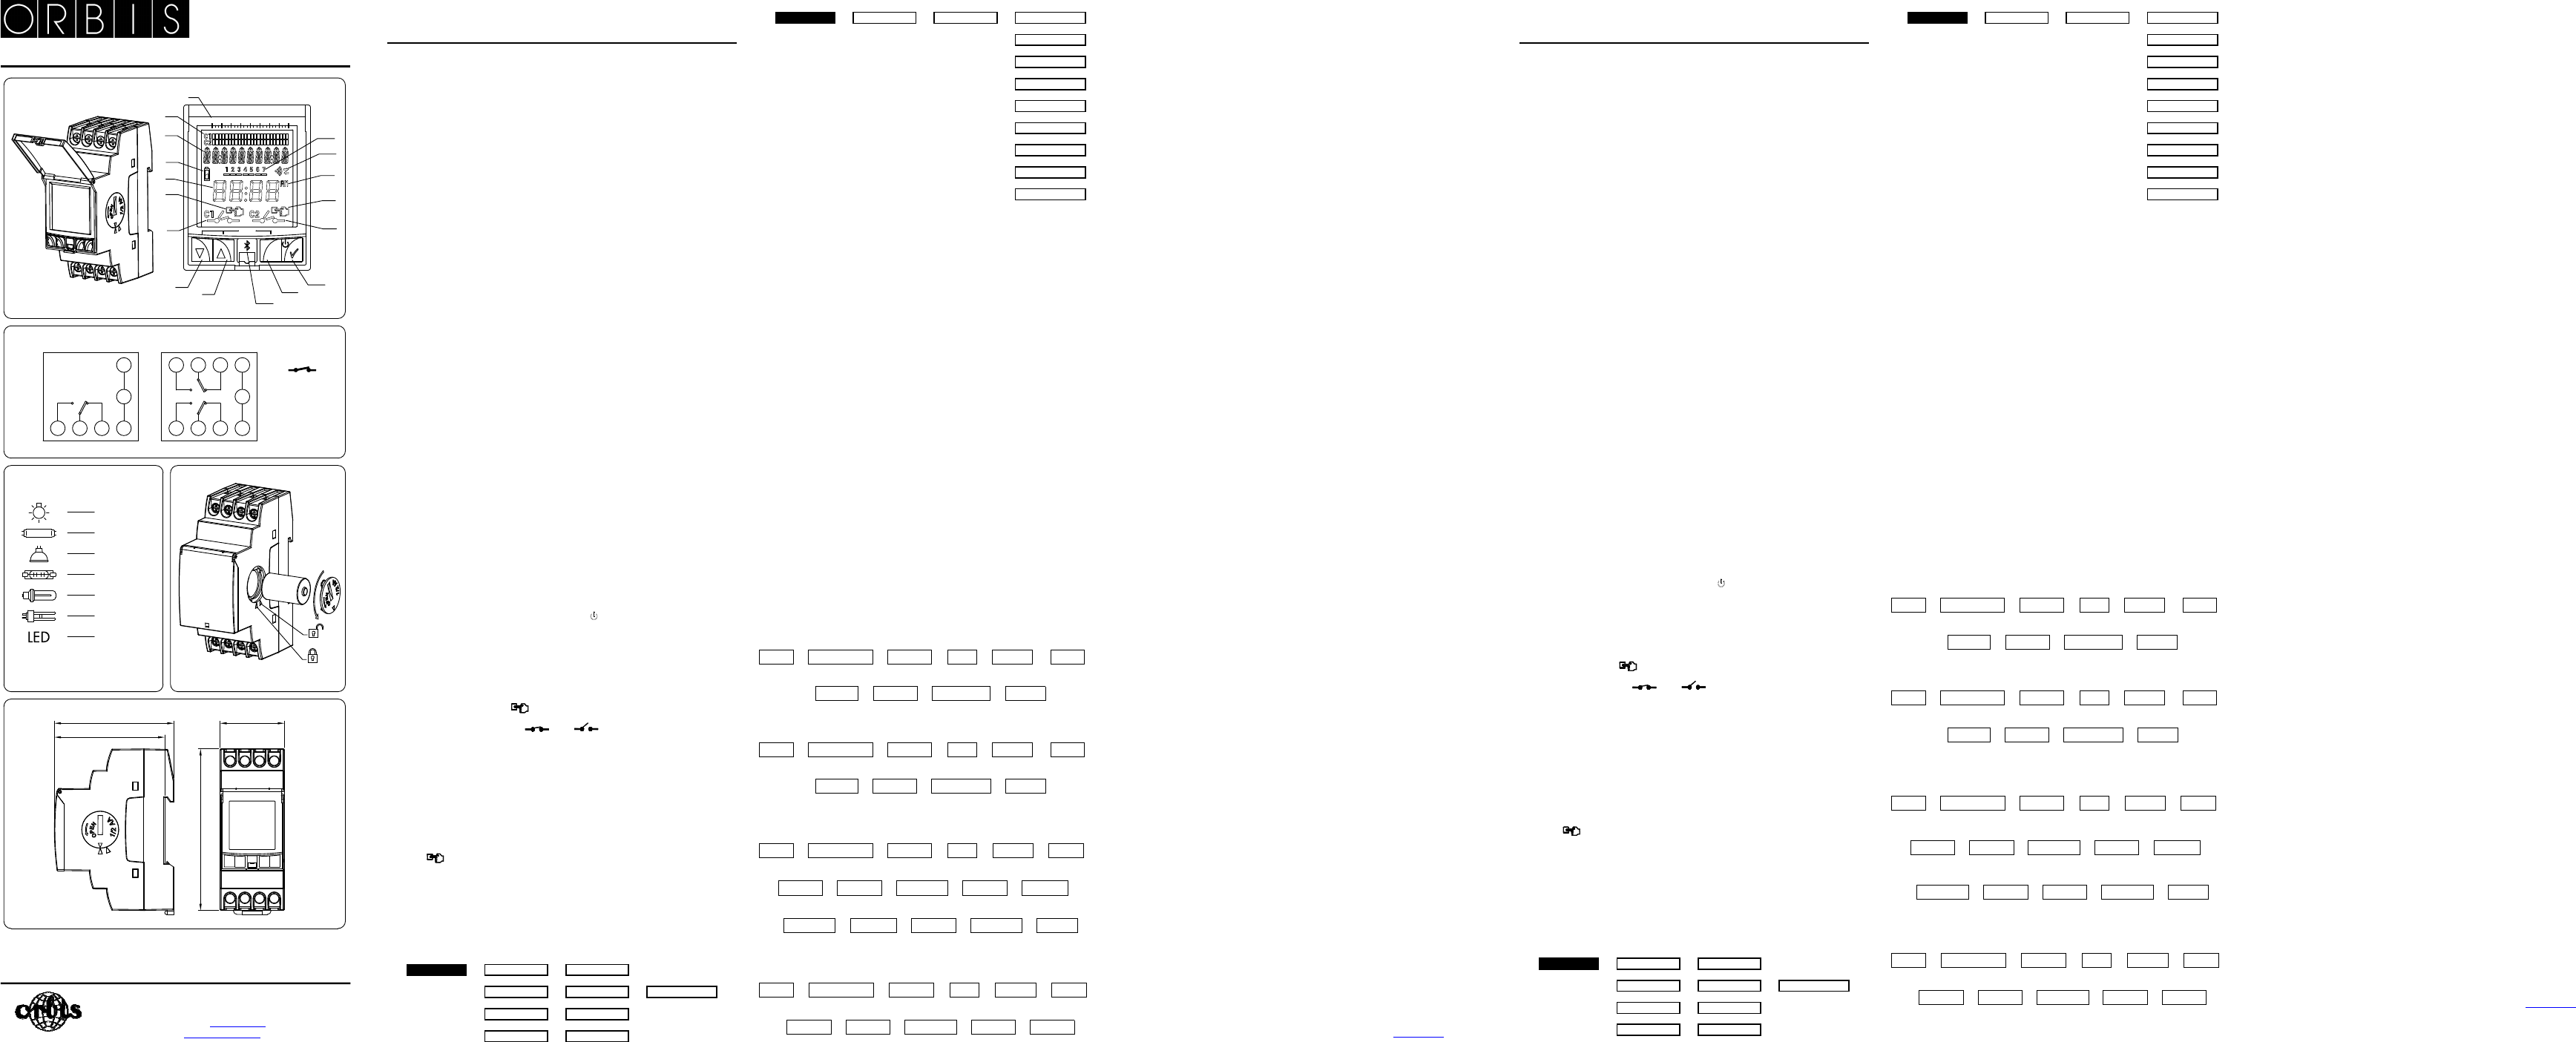
FIG.1
1. Escala de tiempo 2. Cronogramas
3. Línea de texto 4. Símbolo niv
5. Hora / Fecha
6. Accionamiento manu
Manual permanent
7. Símbolo de estado del relé del C1 8. Bajar por el menú / Accionamiento manual
9. Subir por el menú / Accionamiento manual C2 10. Conect
11. Cancelar o
12. Aceptar opci
Encender equipo sin aliment
13. Símbolo de esta
14. Accionami
Manual permanent
15. 12 H / 24 H 16. Símbolo de tr
17. Días de l
INSTRUCCIONES DE EMPLEO
El DATA LOG / DATA LOG 2 es un i
instalación eléctr
Incorpora la posibilida
maniobras de corta du
o de 1 minuto a
dispone del DATA LO
Por otro lado, cuenta
verano – invierno, 4 p
desde Smartphone /
Los menús pueden ap
la programación
Dispone de 1 (DATA LOG) o 2 (D
potencial que permit
INSTALACIÓN
ATENCIÓN: La instalación y
instalador autoriz
ANTES DE PROCED
El aparato está inter
obstante, algunos ca
interferencias pued
- El aparato no debe instala
- Conviene prever una línea separada par
- Las cargas inductivas tienen que estar provistas de supresores de interferencias (varistor, filtro RC).
Si el interruptor hora
necesario compro
RESTABLECER LA ALIMENTA
MONTAJE
Dispositivo de contr
simétrico de 35
CONEXIÓN
Conectar la alimenFIG.2 .
Es necesario respet
conexión equivocada
PUESTA EN SERVIC
Para que el dispositivES NECESARIO QU
ALIMENTADO, cuando est
Cuando el equipo está si
programación y l
de litio incor En caso de ser instal
de seguridad de 48 h
Con el equipo sin ali
, el display se enciend
para permitir su prog
apagará de nuevo.
Estos equipos dispon
En el display se mues
Cronograma con las mani
canal con 24 div
El display tiene una línea de tex
Fecha actual Æ Funcionamiento PERMANEÆ Periodo FESTIVO activo
Hora completa
Símbolo de maniobra man
. En el caso de estar activada u
aparece parpadea
Estado de los circuitos C1 / C2: ON
, OFF
CONFIGURACIÓN
Los DATA LOG / DATA LOG
del siguiente modo:
x Modo Horario: 24 h
x Cambio I-V Automático (últi
x Cambio V-I Automático (últi
x Festivos: NO (los 4 periodos des
x Programas: Ninguno
ACCIONAMIENTO MANUA
Activa o desactiv
pantalla principalź C1 o Ÿ C2.
El símbolo
aparecerá parpadeand
a pulsar la tecla ź C1 o Ÿ C2, vol
PROGRAMACIÓN
La programación está basa
programar manio
de reposo presionand✓ . Con las teclas ź y Ÿ nos moveremos por los distintos menús y
presionando la tecl✓ entraremos enC .
Los datos a progr
La estructura de los
PROGRAMAS
✓
ENTRAR
✓
PXX
Ÿ
✓
BORRAR
EDITAR
Ÿ
BORRAR
✓
✓
TODOS NO
TIPO
Ÿ
✓
TODOS SI
CANAL
3
2
1
N
L
~
600 V
3000 W
2000 V
1200 V
3000 W
90 V
400 V
1
C
C1
C2
036
9
12
15 18
21 24
RESET
MENU
3
4
5
16
15
14
13
17
7
8
9
12
11
2
10
FIG.1
FIG.3
35
88
60
65
FIG.5
FIG.4
FIG.2
6
3
2
1
N
L
~
6
5
4
DA DA
ON
C1 ON 1 - 2
C2 ON 4 - 5
AJUSTES
✓
RELOJ
Ÿ
IDIOMA
Ÿ
AVANZADO
✓
BRILLO
Ÿ
PERMANENTE
Ÿ
FESTIVOS
Ÿ
CONTADORES
Ÿ
ESTACIÓN
Ÿ
CÓDIGO PIN
Ÿ
12 H / 24 H
Ÿ
VERSIÓN
PROGRAMAS. Es el men
memoria (de P-0
ENTR Entramos presionando ✓ , y con las teclas ź y Ÿ nos movemos por los distintos
programas guardad
Si al entrar en este
display el primer progŸ podemos subir por los
programas que es
la línea de texto del di
disponibles en la
Si al entrar en es
aparecerá: “P-01 V
libres.
Si queremos modiź y Ÿ , y
presionamos ✓ . A continuź y Ÿ seleccionamos una de las siguientes
opciones:
- EDITAR. Desde aquí
Pulsando ✓ aparecerá en pantalla “TIPO ONź y Ÿ podemos cambiar
de maniobra. Las
TIPO ON. Encendido del circuito conectado a una hora fija.
TIPO OFF. Apagado del circuito conectado a una hora fija.
hasta su final. Para prog
semana en el que este
y del OFF respectivamente (
hora, minutos, y
TIPO PULSO. Encendi
día.
Una vez elegido el ti
(C1, C2 o C1 + C2).
A continuación se piden l
según la maniobra eleg
Programa de PERIODOS FESTIVOS
Si al validar el úl✓ la mantenemos pulsa
esta maniobra coź y Ÿ
seleccionamos uno de los 4 periodos festiv
- BORRAR. Al validar con ✓ se borra el prog
almacenados de
asignación del númer
BORR Permite realizar
paso.
Elegimos realizar pro
MENU
✓
PROGRAMAS
✓
ENTRAR
✓
P01
✓
EDITAR
✓
ON
✓
CANAL Hora y min Días de semana
C1 y C2
✓
22:00
✓
Lun…Dom
✓
P01 OK
Elegimos realizar programa de
MENU
✓
PROGRAMAS
✓
ENTRAR
✓
P02
✓
EDITAR
✓
OFF
✓
CANAL Hora y min Días de semana
C1 y C2
✓
00:00
✓
Lun…Dom
✓
P02 OK
Elegimos realizar programa de ciclo, con un ON de 5 segundos y un OFF de 10 segundos, que
empezará a las 6:00 y f
TIPO
MENU
✓
PROGRAMAS
✓
ENTRAR
✓
P03
✓
EDITAR
✓
CICLO
✓
CAN
DESDE
Hora y min.
Días de
semana
TIEMPO ON
Hora y min.
SEGUNDOS
C1 y C2
✓
06:00
✓
Lun…Dom
✓
00:00
✓
05
✓
TIEMPO OFF
Hora y min.
SEGUNDOS
HAST
Hora y min.
Días de
semana
00:00
✓
10
✓
08:00
✓
Lun…Dom
✓
P03 OK
Elegimos realizar programa de pulsosalizará un ON de 5 segundos
11:30 durante toda la seman
TIPO
MENU
✓
PROGRAMAS
✓
ENTRAR
✓
P04
✓
EDITAR
✓
PULSO
✓
CANAL Hora SEGUNDOS
Días de
semana
C1 y C2
✓
11:30
✓
05
✓
Lun…Dom
✓
P04 OK
AJUSTES. Es el menú don
RELOJ. Establece la hora del equipo. Las var
día, hora, y minut
IDIOMA. Es el menú donde se escog
AV Es el menú donde se pueden real
- el brillo del displ
ALTO, o MAXIMO.
visualizado.
-
OFF) del canal C1 y del canalź y Ÿ nos movemos por las d
opciones: C1: SI Æ C1: NO Æ C2: SI Æ C2: NO. Validamos con✓ la opción qu
equipo no hará caso de la pr
elegir la OPCIÓN SI.
Se puede cambiar la pACCIONAMIENTO MANUAL ).
- FESTIVOS. Tiene 4 PERIOD
en la programación d
maniobra, en dicho
minuto de finali
BORRAR. Se borra el periodo
- CONTADORES. Menú en el que se indica el tiempo de
Entrando en el contador✓ este puede s
BORRAR SI y validar.
- ESTACIÓN. Permite ajustar el
cada país. (UE el
INACTIVO. No realiza el cambio
- CODIGO PIN. Menú para la activación o desactivtecla
acceso no deseado a
INACTIVO. Bloqueo del teclado desactivado.
ACTIVO. Bloqueo del teclado activado. Y pide que progun CODIGO PIN de 4 cifras.
Esta protección se activ
al display en estado de reposo. A parti
pantalla el mensaje “
introducir el CODI
durante 10 segundos.
cualquier otra mani✓. Pasados 30 segundos sin mani
el equipo se v
- 12H – 24H. Con las tź y Ÿ selecciona
Validamos la selección con ✓ .
- VERSIÓN. Menú en el q
Si se programan maniobr
prioritarias sobre
MODO PERMANENTE Æ MANUAL Æ PROG_01 Æ PROG_02 Æ …. Æ PROG_40
RESET. PUESTA
Partiendo del modC y manteni
presionar las teclas ź y Ÿ simultáneament
borra toda la prog
También se puede realiz
simultáneamente l
CAMBIO DE PILA. FIG.4
El equipo dispone de
sustitución de la pila se reali
Cuando la pila está agotad
pantalla.
NOTA: Al cambiar l
PARA LA SUSTITUCIÓN DE LA PILA DESCONECTAR LA ALIMENTACIÓN
Para abrir la
el sentido contrario a ldo con u
de la tapa con el de
colocándola de man
después girar en el sentido d
índice de cerrado
PROGRAMACION MEDIANTE SMAR
Se requiere de la llav
insertar la llave.
Para realizar esta
superior) y descarg
instalada seguir las instrucciones indica
CARACT
Tensión y frecuencia Según indicación en
Tolerancia ± 10%
Poder de ruptura: µ 2x16 (10) A / 250
Cargas máxima FIG.3
Consumo propio Máximo 16 VA (1,
Contacto AgSnO
2
conmutado.
Visualizador De cristal líq
Precisión de march ± 1 s / día a 23 ºC
Variación de la preci ± 0,15 s / ºC / 24 h
Reserva de marcha 10 años (mediante pi
48 h (sin pila y si
Tipo de acción 1S, 1T, 1U
Clase y estructura del software Clase A
Espacios de memoria 40
Nº de canales 1 canal DATA LOG; 2
Tipos de mani ON/OFF, PULSO (de 1 a 59 seg
o de 1 min a 23h y
Precisión de l ± 1 segundo
Tª de funcionamiento -10 ºC a +45 ºC
Tª de transporte y -20 ºC a +60 ºC
Situación de contamin 2
Grado de protección IP 20 según EN60529
Clase de protección II en montaje corr
Tensión transitori 2,5 kV
Temperatura p + 80 ºC para 21.2.5
Tapa de acceso al teclado Precintable
Conexión Mediante borne de ag
máxima 4 mm²
Pila ½ AA – 3,6 V – 10
2
Dimensión de la 2 módulos DINFIG.5
ATENCIÓN:
Este interruptor
No se deshaga del producto sin t
contenedor adecuad
Sujeto a cambios técnicos –www.orbis.es
DATA LOG / DATA LOG 2
00/12.2014 A016.17.57035
ORBIS TECNOLOGÍA ELÉCTRICA S.A.
Lérida, 61 E-28020 MADRID
Tel.: + 34 91 567 22 77
E-mail: info@orbis.es
http://ww
ENG
TIME SWITCH
FIG.1
1. Time scale 2. Schedules
3. T 4. Low-battery symbol
5. Hour / Date
6. C1 manual operation (blinking) /
C1 permanent manual
7. C1 relay status symbol 8. Scroll down / C1 manual op
9. Go up / C2 manual operation 10. Bluetooth dongle connector
11. Cancel option / Go back
12. Accept option / Enter the men
Switch on the dev
13. C2 relay status symbol
14. C2 manual operation (blinking) /
C2 permanent manual
15. 12 H / 24 H 16. Transfer symbol
17. Days of the week
OPERATING INSTRUCTIONS
DATA LOG / DATA LOG 2 is a digital time swsigned to control any
It offers the possibility of performing different types of
term operations or
hours and 59 min
Furthermore, it includes a ser
periods, adjustable scr
Menus can be displayed in sev
screen.
With 1 (DATA LOG) or
the programming o
INSTALLATION
WARNING: Installation
BEFORE PROCEEDI
The device is inter
particularly strong
following installation rules are taken into accou
- The device must not be in
- It is advisable to devise a separate line for supply (provided with a network filter if necessary).
- Inductive loads must be provided with interference suppressors (varistor, RC filter).
If the time swdevices in an installation, it should be made
that the constitut
RESTORE SUPPLY ONCE THE DEVIC
MOUNTING
Electronic control dev
according to EN 60715 standar
CONNECTION
Connect powerFIG. 2.
Phase and Neutral posi
connection may destr
START-UP
THE DEVICE MUST BE PO to be able to ex
happens, the dis
When the device is not power
during the power-
without battery
With the device un
key, the display
allow programming
These devices have
The display show
Schedule with the
divisions in w
The display has a text li
Current date Æ PERMÆ Active HOLIDAY period
Complete time.
Manual operation symbol
. It blinks when a manual sw
is PERMANENT the symbol is fixed.
State of C1 / C2 circuits: ON
, OFF
SETTINGS
DATA LOG / DATA LO
follows:
x Time Mode: 24 h
x Standard to DST change: Automatic (last Sund
x DST to Standard change: Automatic (l
x Holid NO (all 4 periods disabled)
x Programs: None
MANUAL OPERATION
Activated or disabled, tem
by pressing the ź C1 or Ÿ C2 keys.
The symbol
will appear blinking on screen oź C1 or Ÿ
C2 again, returning
PROGRAMMING
Programming is
or adjust the device. The mai✓ . With
keys ź and Ÿ we will move through the diff✓ we will access them. To
go back to the previC.
The details to be pr
The structure of the menus is the followi
PROGRAMS
✓
ENTER
✓
PXX
Ÿ
✓
DELETE
EDIT
Ÿ
DELETE
✓
✓
NO TO ALL
TYPE
Ÿ
✓
YES TO ALL
CHANNEL
3
2
1
N
L
~
600 V
3000 W
2000 V
1200 V
3000 W
90 V
400 V
1
C
C1
C2
036
9
12
15 18
21 24
RESET
MENU
3
4
5
16
15
14
13
17
7
8
9
12
11
2
10
FIG.1
FIG.3
35
88
60
65
FIG.5
FIG.4
FIG.2
6
3
2
1
N
L
~
6
5
4
DA DA
ON
C1 ON 1 - 2
C2 ON 4 - 5
SETTINGS
✓
CLOCK
Ÿ
LANGUAGE
Ÿ
ADVANCED
✓
BRIGHTNESS
Ÿ
PERMANENT
Ÿ
HOLIDAYS
Ÿ
METERS
Ÿ
SEASON
Ÿ
PIN CODE
Ÿ
12 H / 24 H
Ÿ
VERSION
PROGRAMS. This
memory spaces (P-
ENTER. We enter by pressing ✓ , and wź and Ÿ keys we move through the differen
programs stored i
When entering this menu, i
stored appears iŸ key
stored programs unt
XX EMPTY” alternati
When entering this me
“P-01 EMPTY” alter
If we wish to modify or create a prź and Ÿ keys, and press ✓ . Nex
with the ź and Ÿ key
o
selected program. By pr✓ , “ON TYPE” wilź and Ÿ keys we
can choose the type
- ON
- OFF TYPE. Switch-off of the connected circuit at
- C
program the beg
week when this cy
duration (in hours, mi
days of the week w
- PULSE TYPE. Switch-on of the cir
Once the type of oper
(C1, C2 or C1 + C2).
Next, we enter the oper
selected operation.
HOLIDAY PERIODS program
If when validating✓ key w
operation as holiź and Ÿ key
of the 4 holiday
o DELETE. By pressing ✓, the selected pr
consecutively
DELETE. This option allow
We choose to perform the switch-on program at 10 pm
TYPE
MENU
✓
PROGRAMS
✓
ENTER
✓
P01
✓
EDIT
✓
ON
✓
CHANNEL
Hour and
min
Days of the
week
C1 and C2
✓
22:00
✓
Mon…Sun
✓
P01 OK
We choose to perform the switch-of
MENU
✓
PROGRAMS
✓
ENTER
✓
P02
✓
EDIT
✓
OFF
✓
CHANNEL
Hour and
min
Days of the
week
C1 and C2
✓
00:00
✓
Mon…Sun
✓
P02 OK
We choose to perform the cycle program, with a 5-second ON and a 10-second OFF period,
which will start at 6:00 and wi
MENU
✓
PROGRAMS
✓
ENTER
✓
P03
✓
EDIT
✓
CYCL
✓
CHANNEL
FROM
Hour and
min.
Days of the
week
ON TIME
Hour and
min.
SECONDS
C1 y C2
✓
06:00
✓
Mon…Sun
✓
00:00
✓
05
✓
OFF TIME
Hour and
min.
SECONDS
UNTIL
Hour and
min.
Days of the
week
00:00
✓
10
✓
08:00
✓
Mon…Sun
✓
P03 OK
We choose to perform the pulse program,
11:30 during the entire week
MENU
✓
PROGRAMS
✓
ENTER
✓
P04
✓
EDIT
✓
PULSE
✓
CHANNEL
Hour and
min.
SECONDS
Days of the
week
C1 and C2
✓
11:30
✓
05
✓
Mon…Sun
✓
P04 OK
SETTINGS. This is the
CLOCK. Sets the time of the device. The variables to configur
day, hour and mi
L This is the menu where the l
AD This is the menu where most of
o
MEDIUM, HIG
visualised level.
o PERMANEN
and channel C2. ź and Ÿ keys we move through the diÆ C1:
NO Æ C2: YES Æ C2: NO.
notice of the oper
o The contact position can be changMANUAL OPERATION )
o HOLIDAYS. It has 4 PERIODS th
the programming
channels wi
- EDIT. The month, day, hour and min
hour and minute of theprogrammed. This period w
after year.
- DELETE. The selected period is deleted.
o METERS. Menu where the sw
meter of each channel wi✓ , they can be set to zero. Sel
o SEASON. Allows for adj
versa.
- ACTIVE. Automatically makes the timom daylig
versa, in accordanc
last Sunday of October
- INACTIVE. Does not make the time change.
o PIN CODE. Menu to activate or disable the
device settings.
- INACTIVE. Keyboard lock disabled.
- ACTIVE. Keyboard lock activated. And w
This protection wi
the display in standby
“PIN CODE” w
enter the PIN CODE progr
seconds. During this ti
seconds without handling
o 12H – 24H. With the ź and Ÿkeys w
validate the selec✓
o VERSION. Menu where the softw
If simultaneous operat
over the others.
PERMANENT MODE Æ MANUAL Æ PROG_01 Æ PROG_02 Æ …. Æ PROG_40
RESET. SET TO ZERO.
Starting on standbyC key and whilź
and Ÿ keys simultaneously for more than 3 seconds. The display gets turned off, all prog
deleted. The device must be powered.
We can also perform a qui
simultaneously
BATTERY CHANGE. FIG. 4
The device has a po
replacement is made
battery is dead and
NOTE: When changin
current time.
TURN OFF THE POWER SUPPLY TO REPLACE THE
To open the battery
that fits in its slot, until Once the battery
is replaced, insert the l
turn clockwise until the lid inde
PROGRAMMING VIA SMARTPHON
The Bluetooth dong
insert the dongle.
This type of program
the download of the “OR
the App’s instructions.
TECHNICAL FEATURES
Rated voltage and As indicated in the d
Resistance ± 10%
Breaking capacity: µ 2x16 (10) A / 250
Maximum recomm FIG.3
Own consumption 16 VA (1.3 W) max
Contact AgSnO
2
switched.
Display screen Back-lit LCD
Running accuracy ± 1 s / day at 23 ºC
Accuracy variation w ± 0.15 s / ºC / 24
Power reserv 10 years (w
48 h (no battery
Type of action 1S, 1T, 1U
Software class and structure Class A
Memory spaces 40
No. of channels 1 channel DATA LOG; 2 channels DATA LOG 2
Types ON/OFF, PULSE (1 to 59 sec.) an
or 1 min to 23h
Astronomical adjustme ± 1 second
Operating temper -10 ºC at +45 ºC
Transport and storag -20 ºC at +60 ºC
Pollution situation 2
Protection level IP 2
Protection class II under correct mounting
Transient impulse v 2.5 kV
Temperature for the + 80 ºC for 21.2.5
Keyboard access cover Sealabl
Connection With screw termin
Battery ½ AA – 3.6 V – 1000
2
Wrapping size 2 DIN moduFIG.5
WARNING:
This time switch i
rid of the prod
appropriate recycl
Subject to technical changes – for further information: www.orbis.es