DIGITAL TIME SWITCH
DATA MICRO + / DATA MICRO 2+
OPERATING INSTRUCTIONS
DESCRIPTION
DATA MICRO + is a time switch designed to contr
Includes pulse prog
spaces. Automatic winter – summer official time adjustme
INSTALLA
ATTENTION: Electrical devices must be installed and assembled by
installer.
VERY IMPORTANT: This time switch is proected intern
safety devong electromagnetic
operation. Such interference
recommendations during installation
- The device should not beors, transformers,
contactors, etc)
- (equipped with a network fil
necessary
- Induinterferen
filter)
If the time switch ion with other dev
is necessarydisturbance
MOUNTING: Electronic control dev
cabinet fitted with sy
60715 (DIN Rail EN 60715
CONNECTION:
Connect according w
STARTING UP AND PROGRAMMING
DATA MICRO + is already programmed with current date and time, and w
official automatic w time adjustment activ
March and last Sunday
Programming is based in menu
• - Programming.
• - Clock se
• - Winter / summer official time change.
• - Holidays period p
RESET
Although the clock of theready programmed, if a
(blank display, inconsis at the same
seconds. In this moment, the device losed goes to clock settin
directly to program
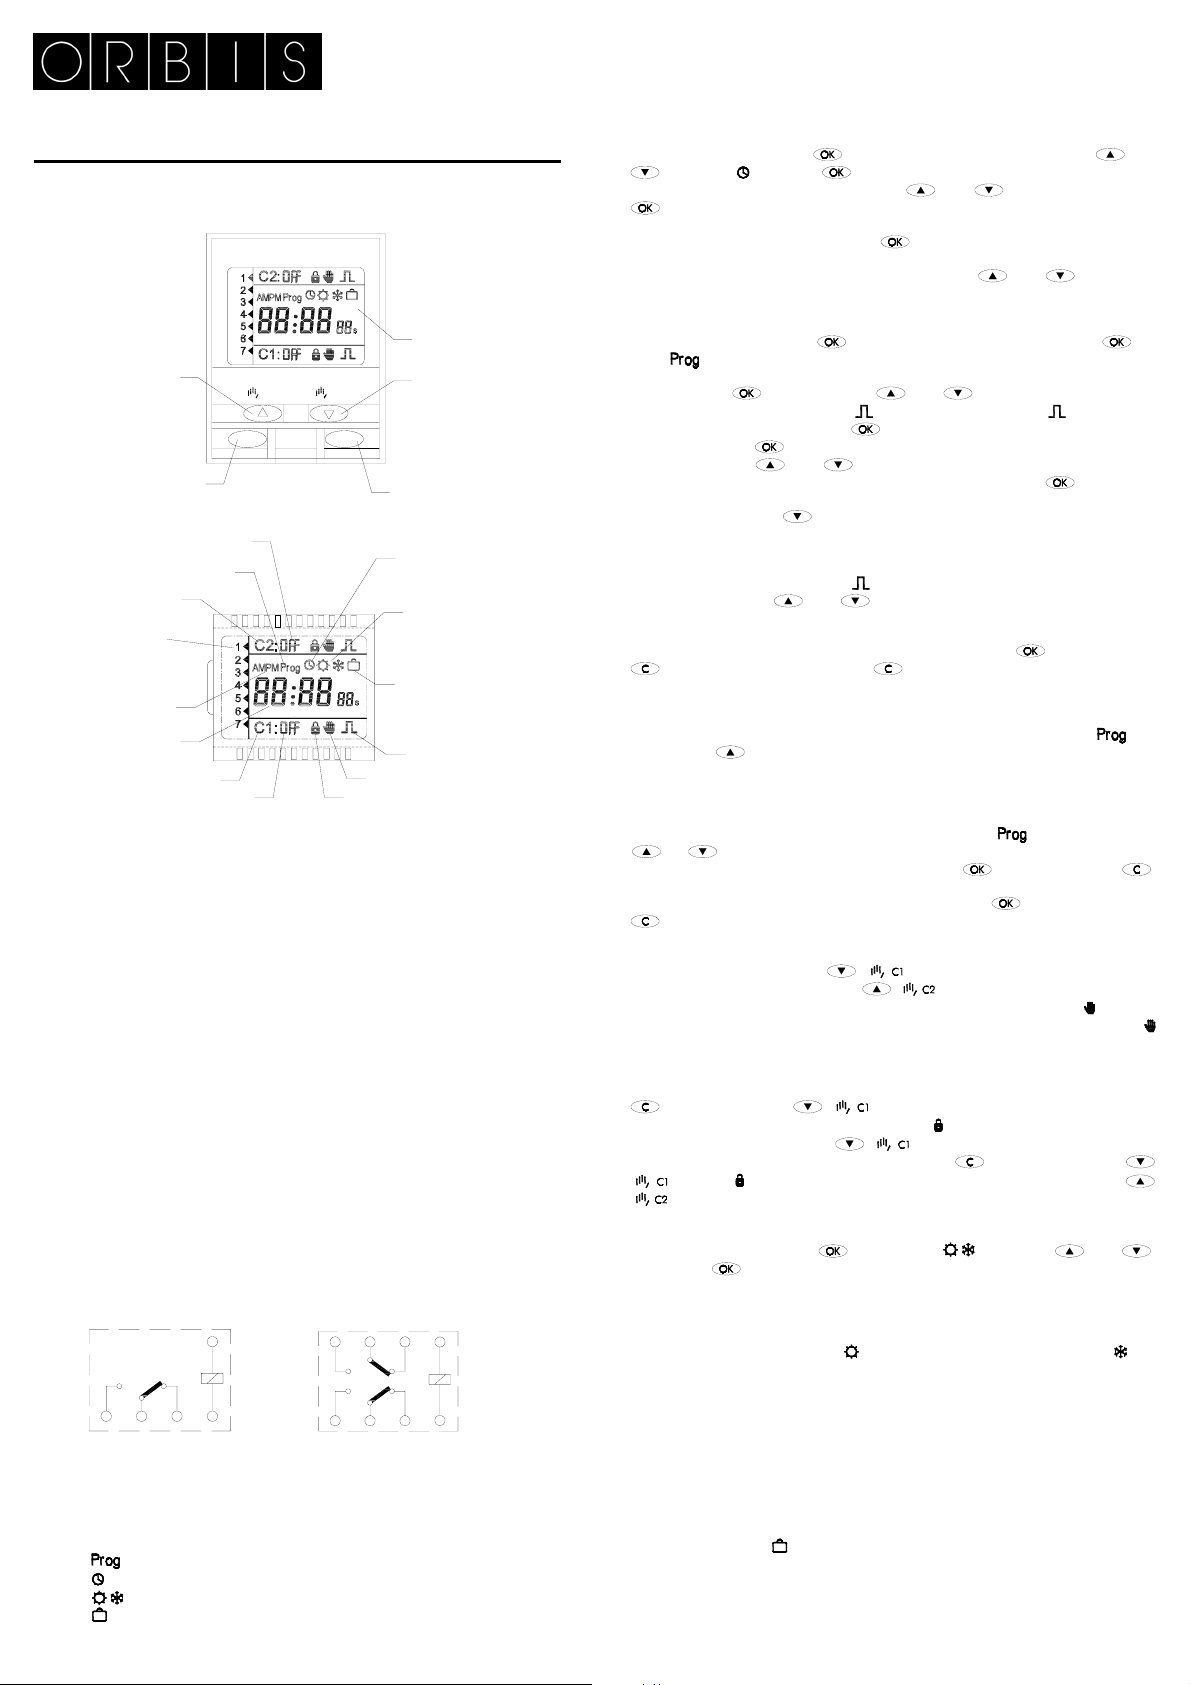
CLOCK SETTING. FIG 1.
For clock se to access to the Menu and and
select icon and press . Display shows the year w
blinking; update th and and validate it with key
.
The same operation should beate month, d of the w
and minutes. By accepting minute , it automatically goes to normal
To change the time mode (24h/12h amoceed as follows: accept y
day and day of the week; while hour is blinking, pre and at the same
time. After that, the
PROGRAMMING. FIG 2 and 3
To program the device, press to enter to the menu. By pressi the
menu is entered and the display showhe first programmed switching. If no
switching is prograshow
switching press again, with keys and select the circuit and type of
switching: C1 OFF, C1 ON, C1 ON , (C2 OFF, C2 ON, C only in model
DATA MICRO 2+). Validate with and introduce hour and minutes desired,
validating then with . Then select the days of the week that the switching has to
operate. With keys and place the blinking cursor on th
week that the swopera . Repeat this
sequence with the
days not desired, p to go down to the next day
days of the w the next sw
SHORT TIME SWITCHING (PULSE) PROGRAMMING. FIG 4.
If the selected switching is a Pul , after in
pulse starts, use key and to program the length of the pulse (from 1 to
59 seconds). Thits of seconds (situated at the right side
and smaller than the digits of hours es). Select the day
when the switching .
to come back to normal mode. is not pressed, being in any
two minutes, the de
VIEWING PROGRA
The programmed switching can be checked by entering again in menu and
pressing key all the switching are show
display shows - - : - -, if thee space and then i
spaces.
EDITING OR DELETING SWITCHING
Programmed switching can be edited or deleted in men , selecting w
or the switching to be edi
PROGRAMMING and to delete it, keep pressing key and then press key .
To delete all the swwithout using RESET, go to the poin
shows the free space and then press key
. The display
MANUAL OVERRIDE. FIG 6.
In normal mode, pressing key (), circuit C1 is activ
The same for circuit C2 ( ) (only in DATA MICRO 2+).
If any manual override is exi .
The next programmed swthe manual ov
disappear from the display.
PERMANENT OVERRIDE. FIG 7.
This option blocks all the p
and then press key () to activate the permanent positio
this situation is indi . A
can be changed by pressing key ().
To cancel permanent override keep pressing and then press key
(), symbol disappear from
() only in DATA MICRO 2+.
WINTER / SUMMER OFFICIAL TIME CHANGE. FIG 8.
Enter MENU by pressing key ; select option using keys and ,
validate with . There are the three follo
AUTO: The clock ion the last Sunday
and the last Sunda
PRO: Allows to cho
the winter – summe ) and then the summer – winter change ( ).
OFF: No time chan
HOLIDAY PROGRA
This function allows deactivuits during a
After that, the progr
If user validates 0 dayis can
normal way. If user v 0, the dev
immediately, so relayand prog
If the validated number of days is 1, the holiday
same day than validation. If ber of day
finish next d
Display show during
Perman
Override
Holidays pr
Summer /
Clock se
On / Off
Day of the we
(1) Monday
AM / PM mode
Hour : Min
On / Off
Programming
Circuit 1
Pulse
Circuit 2
(only Data
12
L
DATA MICRO +
12
N
L
456
DATA MICRO
C2
C
Confirms the selec
Starts men
C1
OK
MENU
Display
Increment or m
in menu
Circuit C2 ove
(only Data Micro 2
Decreme
down in men
Circ
Move back in me
Perman
(C+C1 ó C+C2)