Manual User
DIGIT
Read all the instructions carefully
ORBIS TECNOLOGÍA ELÉCTRICA, S.A.
Lérida, 61 E–28020 MADRID
Teléfono:+ 34 91 5672277; Fax:+34 91 5714006
E-mail: info@ orbis.es
htt
://www.orbis.es
DA
691-010
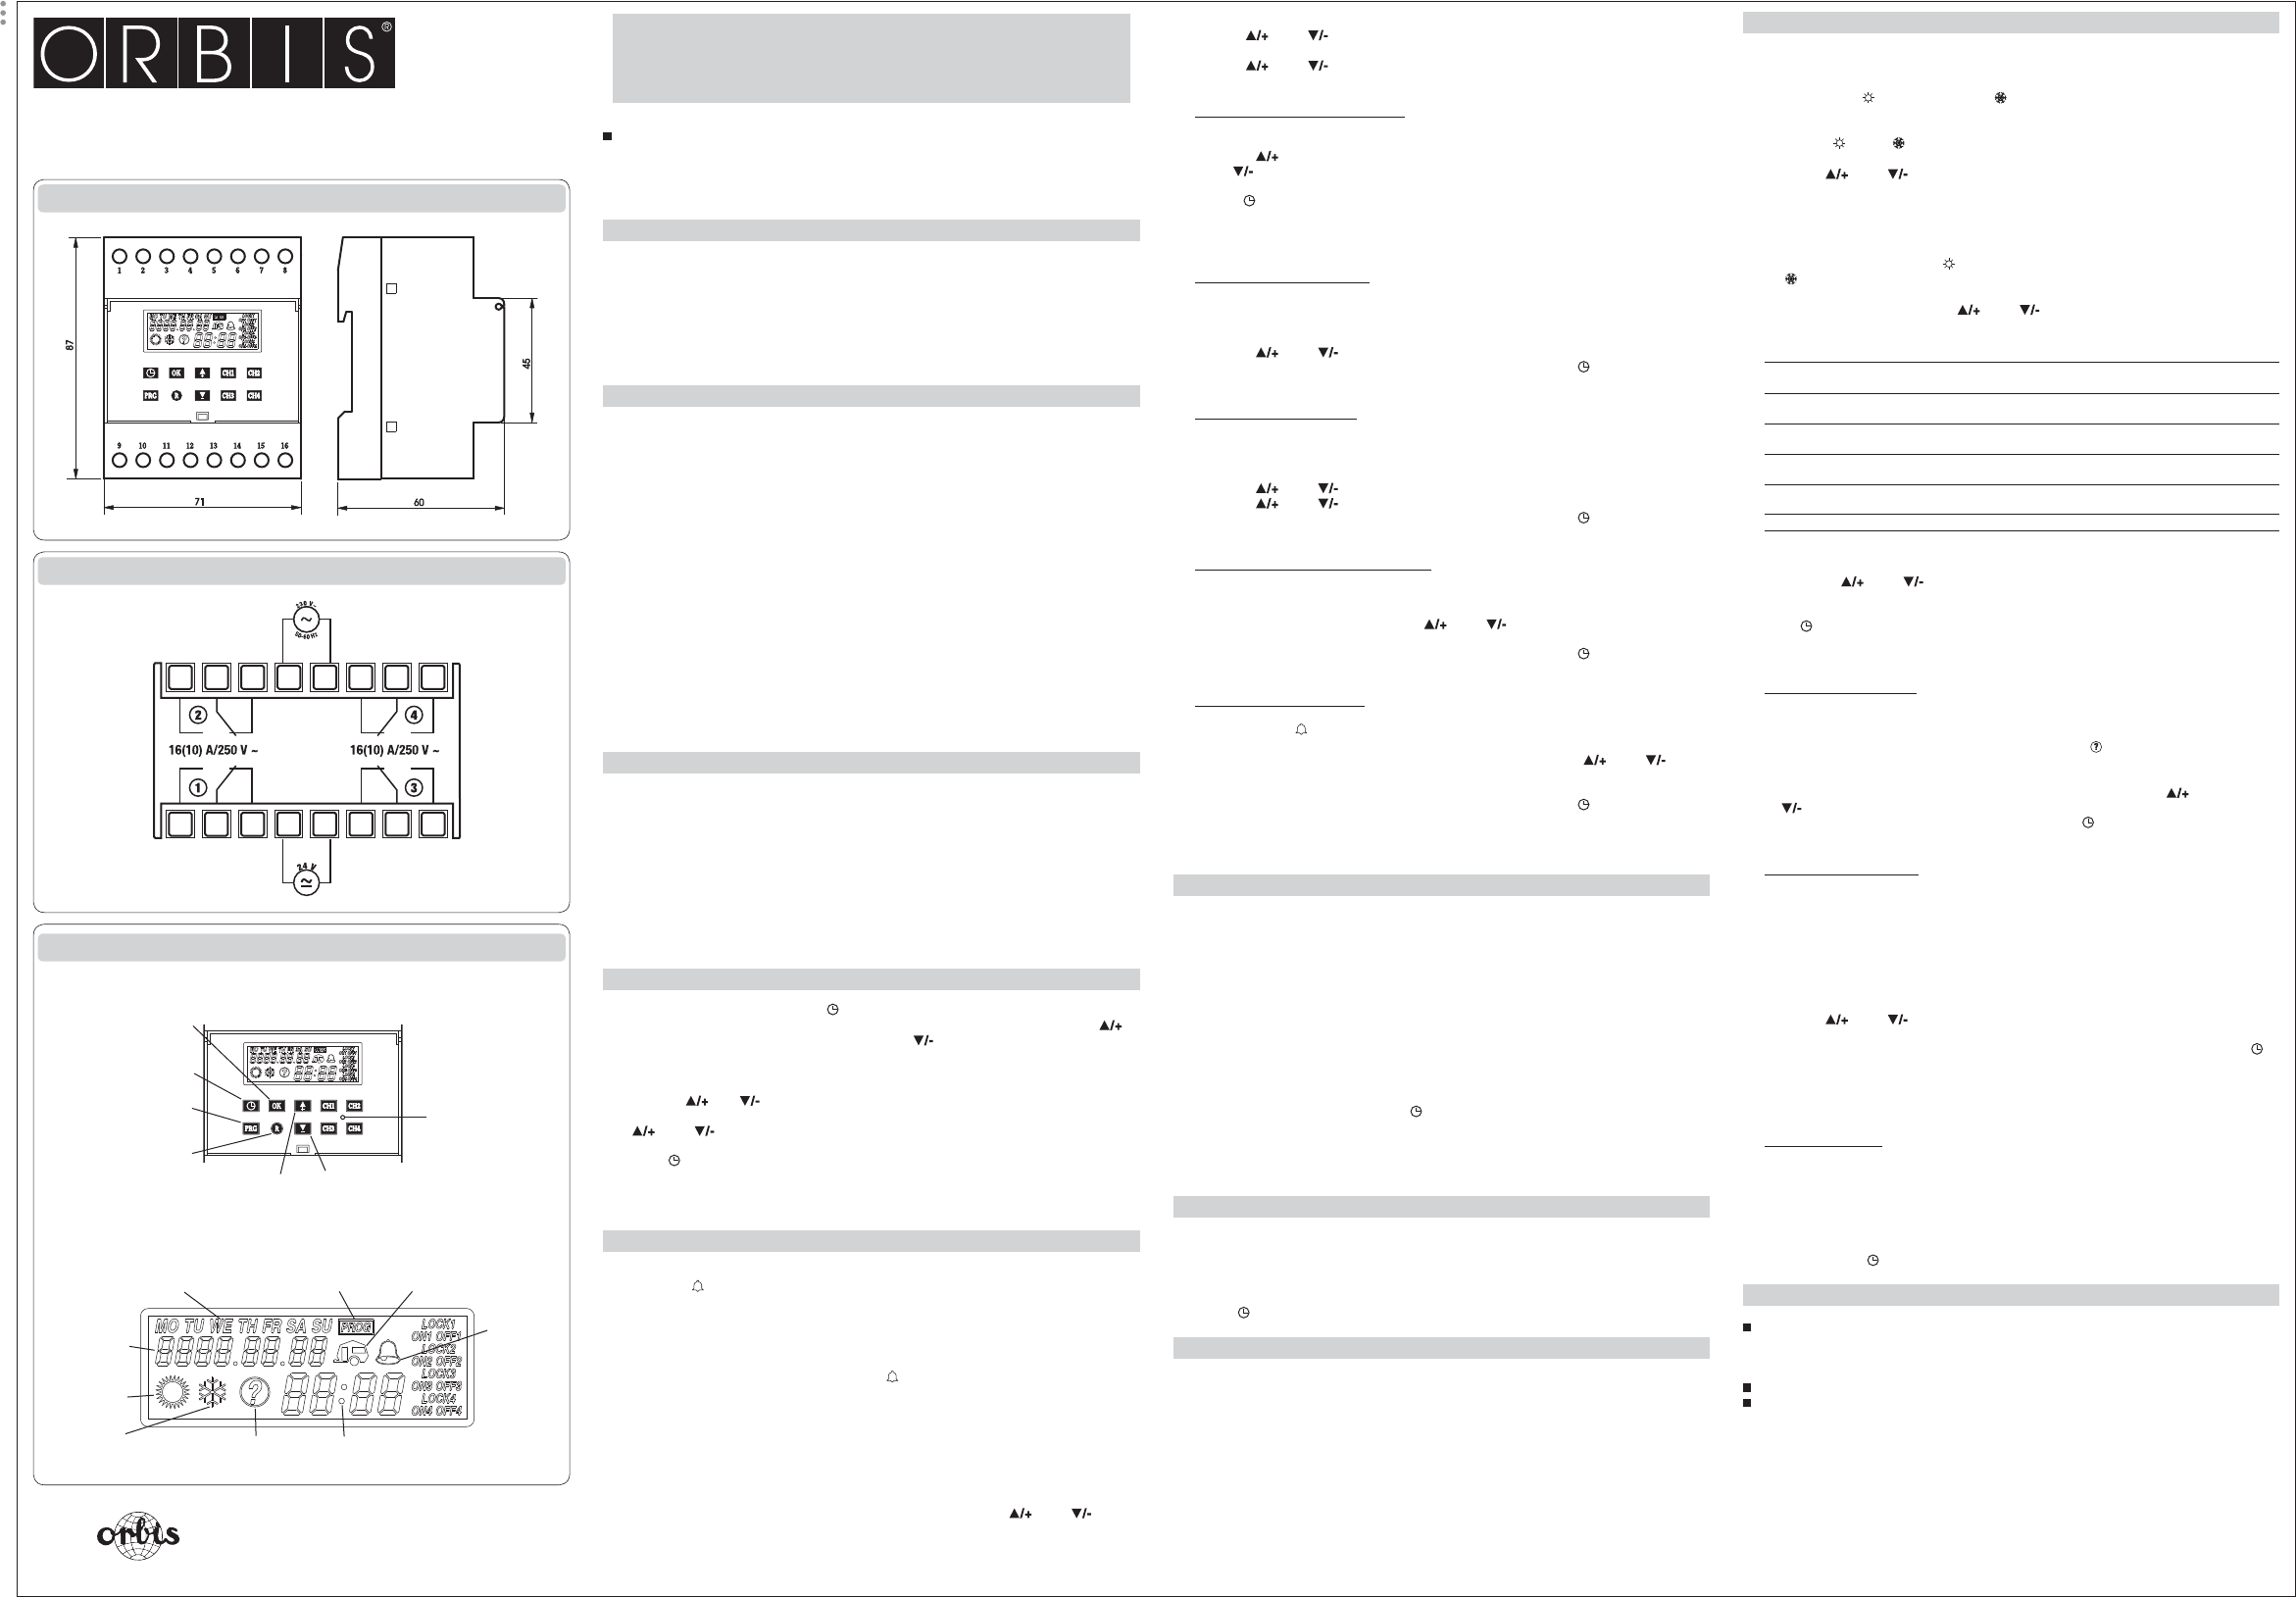
Dimensions
Wiring diagrams
Device description
8
9
4 5
10 16
14
13
6
DA
PROGRAMMING FORW
PROGRAMMING
CLOCK SETTING AND RAPID EXIT
FROM PROGRAMMING
RESET
INCREASE/MODIFY/SELECTION
OF A P
DECREASE/MODIFY/DESELECTION
OF A P
MANUAL RELA
“CH1...CH4”
PROGRAMMING
ST
DAYS
OF T
YEAR/MONTH/DA
INDICA
SUMMERTIME
SYMBOL
WINTER TIME
SYMBOL
RANDOM
PROGRAMME SYMBOL
IMPULSE
PROGRAMME
SYMBOL
HOLIDA
PROGRAMME SYMBOL
HOURS/MINUTES
INDICA
DATA MU
is a d
circu
mont
Pu
ti
SAFETY W
T
1) The appliance has to be installed by a specialist operator
2)
installation
3)
4)
are not live
5)
TECHNICAL SPECIFICA
• Power supply: 230 VAC (-15%/+10%)
24 V
• Frequency: 50/60 Hz
• Switching power: 16(10)A 250V~
• Contact
incandescent lights max 1500 W per channel
Fluorescent lights max 600 W per channel
• T 1B, 1S, 1T and 1U
• Absorption: max 22V
max 3W at 230V 50Hz
• Outputs: 4 mono-stable relays (channels) in exchange
• Annual clock
(calendar from 01.01.1999 to 31.12.2172)
• Clock precision ±1s per day (10ppm)
• Lithium battery with 5 year charge reserve 20 °C
• Number of programmes: max 100 (ON + OFF + impulse)
• Programming resolution: 1 minute
• Operating temperature: 0 °C ÷ +50 °C
• Protection level IP20 (IP41 after installation)
• Insulation class: II according to EN 60335 in conditions of correct assembly
• User conditions: normal pollution
INSTRUMENT RESET
•
P
of the instrument, press the
“R”
key
active.
The clock is zeroed and the display will show a fl ashing 00:00.
•
TOT
of the instrument, press key
“R”
followed by “PRG” three seconds
later
and the timer is zeroed.
CLEAR
message will appear followed by a fl ashing 00:00.
Note: after installation, carry out the total reset of the instrument before any other
operation.
SETTING THE TIME AND DA
• T
“ ”
key
“ ”
key to synchronise these to the next minute or the
“ ”
key to synchronise them to the
previous minute.
•
“OK”
to go to the regulation of the minutes (the seconds will disappear and the date
will be displayed).
Press
“ ”
or
“ ”
keys to increase/decrease the minutes..
•
“OK”
to go to the regulation of the hours, year
“ ”
and
“ ”
).
“OK”
is pressed after the day is set, the system returns to the setting of the seconds.
•
“ ”
key is pressed at any time, the system returns to the normal display mode, with
the exception of the modifi cations made.
display mode, with the exception of the modifi cations made.
PROGRAMMING
•
operation
“ ”
events.
Up to 100 events can be programmed in the 4 channels.
•
“PRG”
.
“PRG”
message appears and the channel indication
“CH1”
will fl
required with the
“CH1” ... “CH4”
keys and press
“OK”
.
“PROG”
, the date and time fi
the
ON
and
OFF
symbols for the channel and
“ ”
will fl ash.
•
Press
“OK”
to display all the programmes already memorised for the channel in sequence,
followed by the screen display for a new programming operation.
Note: if the maximum number of programmes that can be set has been reached, the
“FULL” message will appear
• Press
“OK”
again to leave programming mode and see the number of programmes still
available for the channel in question.
•
“ ”
and
“ ”
until
the event required begins to fl rm with
“OK”
ADV
•
“PRG”
key down for 5 seconds approximately to activate advanced programming.
In this mode, it is possible to gain access to the following functions:
SUMMERTIME “ ” / WINTER TIME “ ”
: this function is used to set the dates for the
automatic changeover from summertime to winter time and vice versa.
–
HOUR
, the
symbols
“ ”
and
“ ”
and the fl ashing
ON (OFF)
message to indicate whether the
automatic time change is enabled or (disabled).
–
“ ”
and
“ ”
keys to switch from the ON to the OFF status.
Note: the time change dates are automatically set by default to the last Sunday in March
(start of summertime) and the last Sunday in October (start of winter time).
–
winter time to summertime
“ ”
, then the time change from summertime to winter time
“ ”
.
–
the time change mode with the
“ ”
and
“ ”
keys.
The possible modes are:
LAST
if the time change takes place on a determined day in the
last week of a previously selected month
1st
if the time change takes place on a determined day in the
fi rst week of a previously selected month
2nd
if the time change takes place on a determined day in the
second week of a previously selected month
3rd
if the time change takes place on a determined day in the
third week of a previously selected month
4th
if the time change takes place on a determined day in the
fourth week of a previously selected month
DA
if the time change takes place on a determined date (month, day).
–
“OK”
to confi
For
Last
,
1st
,
2nd
,
3rd
and
4th
modes, set the month, day (MO, ..., SU), time and minutes
(using the
“ ”
and
“ ”
to select and
“OK”
to confi rm).
–
DA
mode, set the month, number of the day
–
“OK”
to go to the setting of the
RANDOM
programme
or
“ ”
to return to normal operating mode.
If the time change is not active, when
“OK”
is pressed the system goes automatically to the
setting of the random programme.
RAN
minutes. The programme operates with independent switching operations in all the channels
in
ON
operation, with the exception of the channels which are manually locked (LOCK).
If the programme is active, the display shows the symbol
“ ”
.
–
“OK”
until the display shows the
message
“rnd= ON/OFF”
.
T
“ ”
and
“ ”
keys and
“OK”
to confi rm.
–
“OK”
again to go to the holiday programme, or
“ ”
to return to normal operating
mode.
H
the relays that are not in LOCK status are set to OFF
programming.
–
“OK”
until the display shows the
message
“Holiday1 Str”
.
–
“OK”
repeatedly to display the parameters for the start and end of the fi
the start and end of the second.
–
“PRG”
key in the relevant screen display
Use the
“ ”
and
“ ”
keys to select the value of the parameter required and
“OK”
to
confi rm.
–
“OK”
to go to the timer function or
“ ”
to return to normal operating mode.
Note: if the holiday programme has not yet been set, dashes “--” will appear in the year
month, day elds.
TIMER F
this displays the number of hours (max. 99999) for which the relay will remain in ON status.
–
“OK”
until the display shows the
number of hours (
“-----H”
) and the message
“CH1”
.
–
“OK”
key to display the relay operating hours in ON status.
Note: to zero the timer
–
“OK”
or
“ ”
to return to normal operating mode.
REFERENCE ST
Conformity with EU directives:
73/23/ECC
, modifi ed by
93/68/ECC
(low voltage)
89/336/ECC
, modifi ed by
92/31/ECC
and
93/68/ECC
(E.M.C.)
is declared with reference to the following standards:
Safety:
EN 60730-2-7
Electromagnetic
EN 55014-1
/
EN 55014-2
•
“ ”
and
“ ”
keys to set the minutes until the fi
Confi rm with
“OK”
to move on to the next fi eld.
•
“ ”
and
“ ”
keys to set the time, and confi rm with
“OK”
.
•
D
The events are repeated on every day selected every week.
–
Use the
“ ”
key to confi
the
“ ”
key to go directly to the next day
–
with
“ ”
.
Note: slow fl
has been rejected.
M
The events are repeated every month on the same day
–
“OK”
after setting the time to go directly to the selection of the date without
confi
Press
“OK”
twice to go to the day without modifying the year or month.
–
“ ”
and
“ ”
keys to set the day required and confi rm with
“OK”
.
–
“OK”
to go to the programming of another event and press
“ ”
to return to
normal operating mode.
AN
The events are repeated every year on the same day of the same month.
–
“OK”
after setting the time to go directly to the selection of the date without
confi
Press
“OK”
to go to the month without modifying the year
–
“ ”
and
“ ”
keys to set the month required and confi rm with
“OK”
.
–
“ ”
and
“ ”
keys to set the day required and confi rm with
“OK”
.
–
“OK”
to go to the programming of another event and press
“ ”
to return to
normal operating mode.
PRO
The events take place on a precise date (day
–
“OK”
after setting the time to go directly to the selection of the date without
confi
–
“ ”
and
“ ”
keys and confi
with
“OK”
.
–
“OK”
to go to the programming of another event and press
“ ”
to return to
normal operating mode.
IM
The instrument comes on for a time set between 1 and 59 seconds.
–
“ ”
is selected as the event, the fl ashing fi
“--”
will appear after
pressing
“OK”
.
–
“ ”
and
“ ”
keys
and confi rm with
“OK”
.
–
–
“OK”
to go to the programming of another event and press
“ ”
to return to
normal operating mode.
Note: impulse programming may be weekly
DISPLA
•
“PRG”
key
“CH1”
fl ashes.
Select the channel required with the
“CH1” ... “CH4”
keys and press
“OK”
.
•
memorised, the screen display for a new programming operation will be displayed).
•
“OK”
to scroll through all the programmes memorised.
possible, or the message
“FULL”
if the maximum number of programming operations has
been reached.
•
“PRG”
to modify an existing programme.
programme fi
“OK”
again to go to the next
programme (if present) or to a new programming operation.
•
“ ”
(the data set up to this time will be saved).
Note: it is possible to change the type of programming for a programme (from daily to
annual, for example), but it is not possible to change the type of associated event (for
example, it is not possible to transform an ON event to an OFF event).
CANCELLING THE PROGRAMMES
•
modifi cation.
•
“PRG”
key for approximately 3 seconds.
•
CLEAR
message will appear to confi
to the next programme or the screen display for a new programming operation.
•
“ ”
to return to normal operating mode.
FORCING THE RELA
•
the holiday programme is not active).
•
“CH ..”
key for the relay whose status is to be modifi
obtained.
•
- ON
: relay on until the next programmed operation
- ON LOCK
: relay on until the next manual operation
- OFF LOCK
: relay off until the next manual operation
- OFF
: relay off until the next programmed operation