DIGIT
The DS3886 Digital Camera makes taking filmless photos fun
and easy!
Y
photos at a more moderate resolution. Download your photos
your PC (USB cable included) and then the DS3886 is ready to
take more photos! Or capture live action using the video cam
feature and the included Windows Netmeeting software.
Use the
®
PC software (included) to modify your photos
and add special effects or create montages! Post your photo
“masterpieces” on your website, incorporate them into email
greeting cards to send to friends and relatives, or print them
out on your color printer (color printer not included). Easily create
photo albums on your PC to save all the fun and memories.
In addition, you can use the Microsoft Windows Netmeeting
software (included) to have a video conference with your friends.
Install the Batteries
1. T
by sliding the
A
battery door lock to the unlocked position.
2. Remove the battery compartment cover and insert
B
the batteries (included) into the battery compartment with
the polarity in the direction as shown inside the compartment.
3. Replace the cover back over the battery compartment
and slide the lock to the locked position.
Note: The DS3886 will not operate without battery power
When the batteries need replacing the
D
PHOTO COUNTER
will flash rapidly and the user will not be able to take photos.
Always download photos to the PC prior to replacing batteries
to avoid memory loss.
Important: Do not mix old batteries with new batteries.
Always dispose of exhausted batteries properly. Do not insert
anything except batteries into the battery compartment as
this may cause damage to the camera.
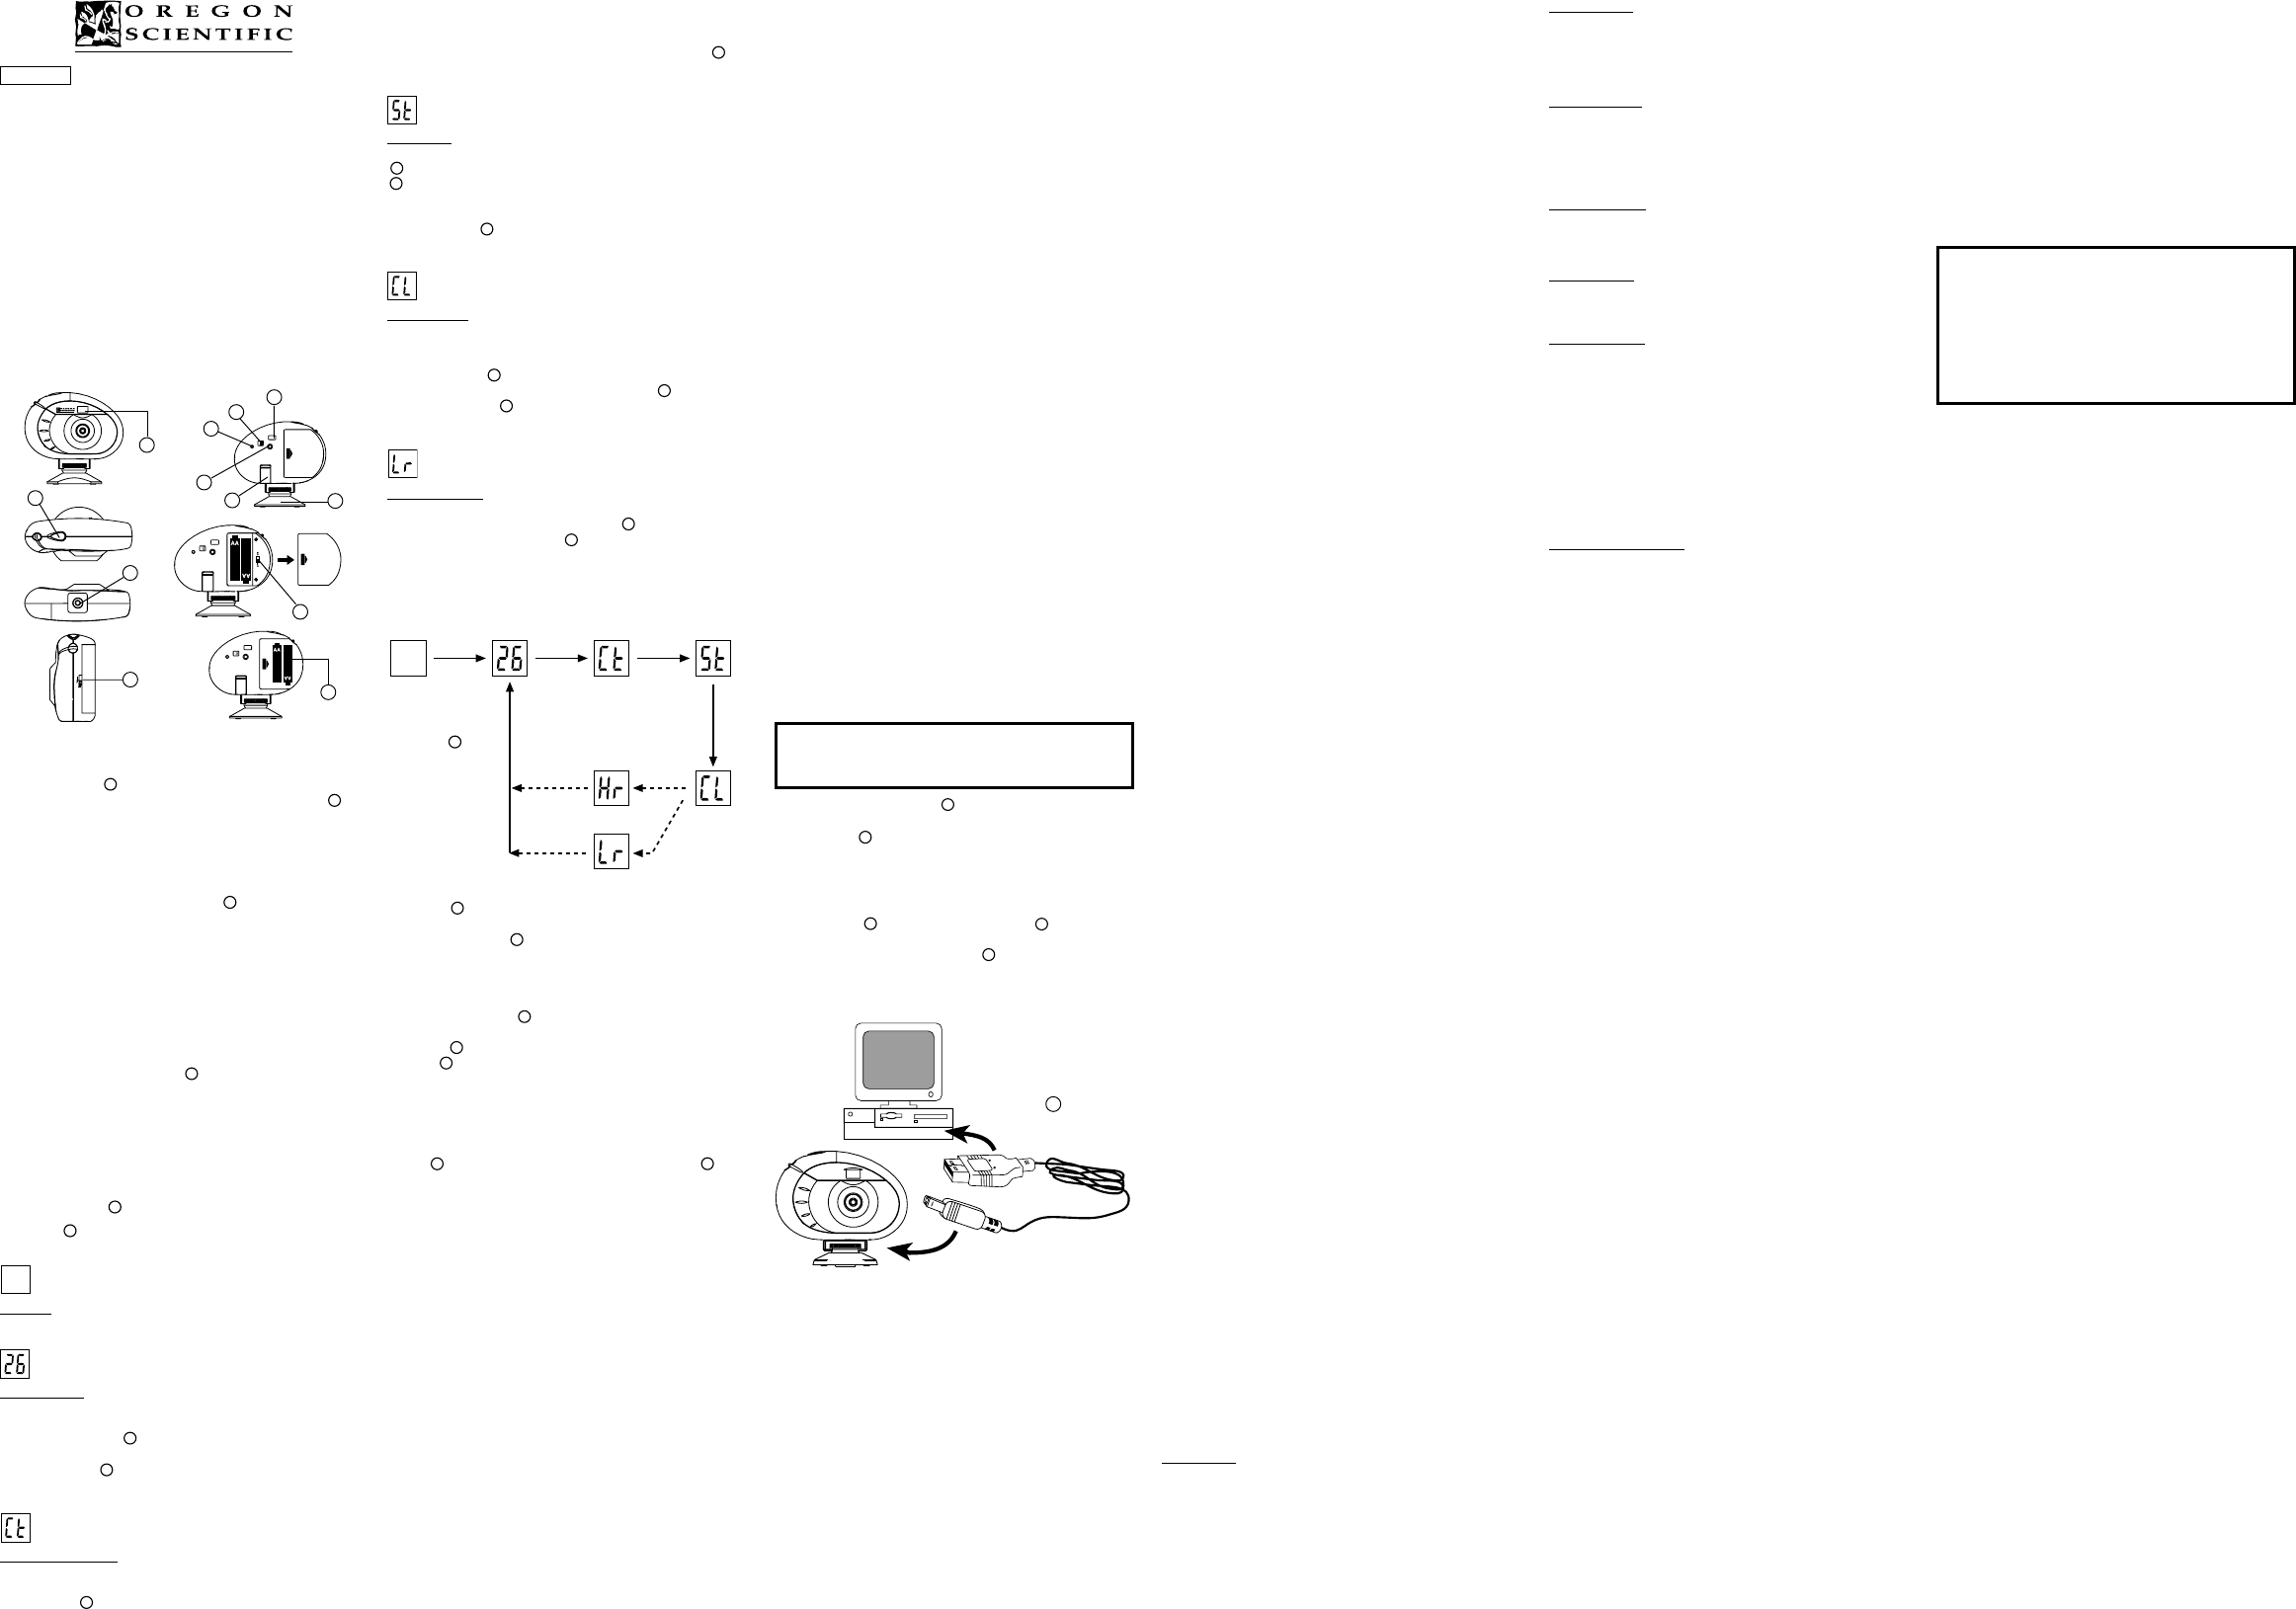
Select the Camera Mode
T
L
ON/OFF switch to the “On”
position. The ON/OFF slide switch is located under the battery
compartment door.
After the camera is turned on, select the desired camera mode.
The mode selections are: Standby, Normal, Continuous
Capture, Self T
Note: T
automatically default to Standby mode after 30 seconds of
no activity. Press
C
MODE to reactivate the DS3886.
Press the
C
MODE button to sequentially advance through
the mode selections. The different modes are:
Standby: The DS3886 automatically defaults to this mode
conserve power after 30 seconds of no activity.
Normal mode: In this mode the DS3886 has a maximum 26
photo capacity at the higher resolution of 640 x 480 pixels. In
Low Resolution the maximum number of photos is 107. With
each photo taken the
D
PHOTO COUNTER will decrease b
one. In Normal mode “Hr,” (high resolution) will be briefly
displayed in the
D
PHOTO COUNTER window and then
be replaced by “26” indicating the maximum photo capacity.
Continuous Capture: In continuous capture the DS3886 will
take photos rapidly without interruption until the maximum
number of photos has been taken. T
and hold the
E
SHUTTER button. When the maximum
1
number of photos have been taken the DS3886 will stop t
audible tone. Continuous capture photos can be converted
to video file format (.AContinuous
Counter mode the symbol “Ct” will be displayed in the
D
PHOTO COUNTER window
Self Timer: The self timer feature delays taking the photo for
10 seconds. The self time symbol “St” will be displayed in the
D
PHOTO COUNTER window
E
SHUTTER button once to activate the self time. During
the 10 second interval an audible tone will sound every second.
At the end of the 10 second delay period, the DS3886 will take
the photo. The
D
PHOTO COUNTER will decrease t
number of photos by one.
Clear Photos: Clear Photos mode will permanently delete all
photos stored in the DS3886. Before activating the Clear
Photos mode make sure that all photos have been downloaded
to the PC. In Clear Photo mode the symbol “CL” will be
displayed in the
D
PHOTO COUNTER window
feature, set the mode to “CL” and then press
E
SHUTTER
button twice. The
D
PHOTO COUNTER window will reset
and display the photo capacity for the selected resolution.
Low Resolution: In the low resolution mode the DS3886 has
an 107 photo capacity at a resolution of 320 x 240 pixels. and
the symbol “Lr” will be displayed in the
D
PHOTO
COUNTER window. Press the
E
SHUTTER button to select
this resolution.
Note:
the available pictures are more than 99, this is normal.
T
1. Press
C
MODE to activate the camera and select the
desired camera mode.
2. When activated,
J
the ST
red light.
Note:
default to Standby mode. When the camera is not
active the Status LED will not be lit.
3. Look through the
K
VIEWFINDER and make sure that
you can see the subject clearly.
4. Press
E
SHUTTER to take the photograph.
5. The
D
PHOTO COUNTER will decrease by a value of
one with each photo taken.
6. When a photograph is taken, a single short beep will be
emitted.
take another photograph.
Important: When the maximum number of photos have been
taken,
D
the PHOTO COUNTER will show “00.” If
E
SHUTTER is pressed when “00” is displayed, a series of
short beeps will sound indicating that the maximum number
of photographs have been taken.
The photographs must be downloaded or cleared from the
camera before more photographs can be taken.
(See Downloading Photographs.)
Note: The DS3886 will not take photos in low light
conditions. When the light is too low for the DS3886, a low
tone beep will be emitted when photo is attempted.
Installing the Software (PC)
1. Make sure that no programs, such as games or anti-virus
software, are running on the PC. If programs are open,
close and exit from the programs before going on to step 2.
2. Insert the
®
CD-ROM into the CD-ROM drive of
the PC.
3. After a short period, a setup menu will appear on the PC
screen.
4. From the setup menu, choose what language you want
the setup instructions to be in.
selection, click OK.
5. Follow the on-screen instructions to install the software.
6. Register the software. T
PROGRAMS/ARCSOFT/REGISTER & UPGRADE.
Follow the on-screen instructions to complete registration.
Important: If the setup menu does not automatically appear
after inserting the CD-ROM in the CD-ROM drive, follow these
instructions: In Windows, click on ST
RUN from the start menu. T
key on your keyboard where ‘d’ is the drive letter of the CD-
Rom drive. The setup portion of the software will activate.
Note:
- The DS3886 does not need to be connected to the PC
during the software installation process.
- When you finish installing the supplied software, click “Y
I want to restart my computer now” only if the message
box displays “InstallShield Wizard Complete.” For other
situations, always click “No, I will restart my computer later.”
Installing the Software (MAC)
1. The DS3886 camera driver can support
(software not included) or ‘plug and save’ function (using
built in software in MAC computer, no application software
is needed). If there is NO
installed in the MAC computer,please create a temporary
folder before camera driver installation.
Create a temporary folder:
- Double click the “Macintosh HD” icon on the desktop
screen
- Select “File”
- Select “New Folder”
- The folder name is arbitrary. For example, edit the new
folder name to “Oregon Scientific DSC”
2. Insert the DS3886 camera driver CD into the CD ROM drive
3. Double click the CD ROM icon
4. Double click the “Mac Driver” folder in the CD ROM
5. Double click the driver installation file “DS3886 Installer”
6. Select “Continue”
7. Now, the installer software is asking for a location of folder
If
- Double click the “Adobe PhotoShop” folder (in most case,
it c
- Double click the “Plug-Ins” folder
- Select the folder “Import/Export” and click “Choose”
Otherwise, select the temporary folder (say “Oregon
Scientific DSC”) as created in Step 1 and click “Choose”.
In both cases, the driver software will be installed, click
“Quit” to finish the installation.
Connecting the Camera to Y
Important Note
Do not connect the camera to your PC / MAC before
installing software.
1. Connect and install the
F
USB Cable (included) to the
USB port of your PC / MAC.
2. Open the
G
Camera Connection Cable Door and plug
the cable into the PC Interface Jack.
3. Follow the instructions for downloading photographs.
The DS3886 has video streaming capability on PC. T
the web cam feature:
1. Screw the
M
DS3886 securely to the
H
mini-stand.
The mini-stand rotates and swivels.
2. Position the camera where the
I
Front-View V
is facing the subject.
3. Follow instructions provided in the Windows Netmeeting
software for video conferencing function.
Note for Windows 2000 Users:
- After the installation, “Found New Hardware” pops up
when the camera is connected the first time.
1. Press “Next” when “Welcome to the Found New
Hardware Wizard” window is shown.
2. When “Install Hardware Device Drivers” window is
shown, choose “Search for a suitable driver for my
device (recommended)” and press “Next”.
3. When “Locate Driver Files” window is shown, check
“CD-COM drives” and press “Next”.
4. When “Driver Files Search Results” window is shown
and indicated that the driver for “Oregon Scientific
DS3886 / YC@m” found, press “Next”.
5.
press “Y
6. When “Completing the Found New Hardware Wizard”
window is shown, press “Finish”.
- The Windows 2000 Professional CD may be required
during installation. In this case, switch CDs as directed
by on-screen instructions.
Note for Windows XP
- After the installation, “Found New Hardware” balloon
message pops up at task bar when the camera is
connected the first time.
1. When “Welcome to the Found New Hardware Wizard”
window is shown, choose “Install the software
automatically (Recommended)” and press “Next”.
2. Wait until the “Completing the Found New Hardware
Wizard” window is shown, press “Finish”.
- The Windows 2000 Professional CD may be required
during installation. In this case, switch CDs as directed
by on-screen instructions.
Downloading Photos (PC)
T
®
software, from the main menu screen in
Windows, click on “Start.”
“Programs” and then on “ARCSOFT Photo Studio Suite.”
Once the
®
menu appears, click on the program that
you want to use.
Downloading Photos:
1. Connect the DS3886 to the PC. (See Connecting the
Camera to Y
2. Open the
®
software and from the main menu
select and click on “Photo Base” to open.
3. From the “Photo Base” menu, click on “Acquire” (the
camera icon).
“Oregon Scientific” and click “Select.”
4. The photos will be displayed on the screen in thumbnail
form. (The photos will be in a reduced size and shown on
the screen at the same time.)
5. T the photos to the PC, click “Select
and then click “OK”.
T
thumbnail photos and then click “OK”.
6. T
corner of the “Oregon Scientific.”
Downloading the pictures by using the “Plug
and Save” function (MAC)
1. When the camera is connected to the MAC computer, a
dialog bo
the still picture or movie files. The default folder for saving
pictures or movie is “Oregon Scientific DS3886 / YC@m”
and the default filename will be assigned according
current date and time. It is also possible to change the
default folder or filename by user input.
Note: If there is no pictures or movie captured in the
camera, the above di
camera is connected to the MAC.
2. Click the ‘Save’ button to start the file transfer. If all the
pictures stored in the camera were captured by using the
“Continuous capture” function, a QuickTime movie file
will be created. In case of normal still pictures, numerical
numbers (starting from 1 to maximum number of photos)
will be appended to the selected filename and saved in
PICT format.
3. After finishing the file transfer, a dialog box will display to
ask if the user want to clear the camera memory. Click
‘Y
to retain the memory.
4. For movie file, double click the file and the QuickT
application will be launched and playback will start
automatically. For still picture file, double click the file and
a list of image applications available will be displayed,
select the one which is PICT format compatible.
For example, select “Picture Viewer” or “Adobe PhotoShop”.
Downloading the pictures by using
PhotoShop Plug-ins (MAC)
Note: This function is only applicable to those users with
Adobe PhotoShop installed in the MAC computer.
1. Launch the
2. Select “File”
3. Select “Import”
4. Select “Oregon Scientific DS3886 / YC@m Import ...”
5. A dialog box with pictures displayed as thumbnail images
will appear. Select the desired pictures by clicking on the
individual thumbnail image or click “Select
all the pictures.
6. Click “Import” to transfer the selected pictures to the
PhotoShop application software.
7. Pictures can now be saved or edited by using the
PhotoShop built-in functions.
Software
T
the start button in Windows. From the ST
PROGRAMS then click on the software you wish to use.
Help screens are included with each program.
Important: Before using the software, photos must be
downloaded from the DS3886 to the PC.
Photo Base
With “Photo Base” you can create photo albums, slide shows,
video postcards, greeting cards, or send your photos by
email to friends and relatives.
Note: In the photo album drop-down menu, there are two
choices: “photos” and “new
“photo” selection have been selected and included by
®
and have not been taken with the DS3886.
Photo Studio
After photos have been arranged in a photo album, with
“Photo Studio” you can change the way they look. Use “Photo
Studio” to edit and retouch photos, change colors, cut and
paste, and add special effects.
Photo Fantasy
“Photo Fantasy” is a collection of photos, including football
and basketball players, ballerina and astronaut, to which you
can add your face or any other face from a downloaded photo.
Note: The CD must be in the CD-ROM drive to use this software.
Photo Montage
Turn your photo into a montage collage with “Photo Montage.”
Note: The CD must be in the CD-ROM drive to use this software.
Photo Printer
With a compatible color printer connected to your PC, you
can print out your photos using “Photo Printer.”
Video Creator: Pictures taken in continuous mode on your
camera can be converted to an
the Video Creator
camera and not just those created in continuous mode will
be made into an A
1. Make sure your camera is connected via the USB port
and that the driver has been installed successfully.
2. Select PROGRAMS in the Windows menu, and select
“Video Creator” in the V
3. Select CREA and input a filename for your A
4. Select OPEN and input the filename. Y
able to be played.
Windows NetMeeting
®
: T
camera for communicating live with your friends, or video
conferencing, the Windows Netmeeting (included in this
CDROM) must be installed. In addition, you must select the
Oregon Scientific DS3886 as the video camera device.
1. First be sure to download all your pictures to your PC and
save them. Using the camera as a web camera will erase
all pictures stored in the camera memory.
2. Connect the camera to your PC as described above.
3. Run the Windows Netmeeting.
4. Select T and then Options.
5. Select Video and the Video camera properties menu will
be displayed.
6. Select Oregon Scientific DS3886 and click OK .
Important: An Internet email account is required for connection
to the Internet.
Note: The DS3886 must be connected to the PC to use the
video feature and software.
Notice of FCC Compliance
This device complies with Part 15 of the FCC Rules.
Operation is subject to the following two conditions: 1) This
device may not cause harmful interference, and 2) This
device must accept any interference received, including
interference that may cause undesired operation.
Warning: Changes or modifications to this product not
expressly approved by the party responsible for compliance
could void user
Note: This product has been tested and found to comply
with the limits for a Class B digital device, pursuant to Part
15 of the FCC Rules. These limits are designed to provide
reasonable protection against harmful interference in a
residential installation. This product generates, uses and
radiate radio frequency energy and, if not installed and used
in accordance with the instructions, may cause harmful
interference to radio communications.
However, there is no guarantee that interference will not occur
in particular installation. If this product does cause harmful
interference to radio or television reception, which can be
determined by turning the product off and on, the user is
encouraged to correct the interference by one or more of the
following measures:
- Increase the separation between the product and the
affected equipment.
- Consult the dealer or an experienced radio/television
technician for assistance.
T
OFFICE USE
Important: Shielded cables must be used with this product
to ensure compliance with the Class B FCC limits.
T
With careful treatment you will have many years of fun with
your DS3886 Digital Camera!
1. Do not immerse the camera in water. W
the electronic components.
2. Do not bang or drop the camera as this may damage
the electronic components.
3. Do not clean the camera with household cleaners or
chemicals.
4. T
with a clean soft cloth that has been slightly dampened
with water.
5. T
and dirt, then wipe the lens with a camera lens cleaning
tissue.
6. T
7. When battery power is exhausted, replace the old
batteries with new batteries. Do not mix old batteries with
new batteries.
8. Only insert the batteries in the polarity direction as shown
in block 1, above.
9. Do not put anything into the battery compartment except
batteries.
10. Batteries contain dangerous chemicals and if mistreated
or improperly disposed of can cause harm, injury or damage.
1 Do not open the camera casing or tamper with the
camera’s electronic components; doing so will void the
camera’s warranty
Important Note
Pictures are stored into a volatile memory which may be
lost under the following conditions :
1. Sliding the ON/OFF switch (located under the battery
compartment door) to the “OFF” position.
2. Replacing the batteries
3. In case the battery level is too low
- Always save the pictures to PC before attempting
such operation.
Specifications
Memory : 26 Pictures at 640 X 480 pixels
107 Pictures at 320 X 240 pixels
Color Resolution : 24 bit
Focus Range : 50 cm to Infinity (focus free)
Memory T : SDRAM (8M byte)
Create Video File : 10 Seconds @ 320 X 240
PC Camera Mode : Y
Continuous Capture : 10 fps
Self Timer : 10 Seconds
PC Interface : USB
Buzzer Output : Y
T : Y
Display : LCD Status Display
Power : 2
Battery Life : Approximately 10 hours of
continuous use
Automatic Off : 30 Seconds
T : Operation: 32
o
F - 104
o
F
(0
o
C - 40
o
C)
Storage: -4
o
F - 140
o
F
(-20
o
C - 60
o
C)
Weight : 97 g.
Dimensions : 1
Accessories : USap, Mini-Stand Cardle
Customer Assistance
Should you have questions or require additional information,
please contact our Customer Service Department at 800-
853-8883 or via email at helpme@oscientific.com
W
Oregon Scientific warrants this product to be free of manufacturing
defects for 90 days from retail purchase. Defective products
are be returned to the place of retail purchase.
This warranty does not cover products subjected to tampering,
abuse, misuse or accidental damage.
ENGLISH
Self T
Clear Photos
Standby
Normal/
High Resolution
Continuous
Capture
High Resolution
Low Resolution
Press the
C
MODE
button to sequence
through the camera
modes
F
E
A
L
I
M
B
K
D
C
G
J
H