MODE
MEM
� � ��� � ��� � � �� �
�
�
1
2
3
7
6
5
4
8
IN
Thank you for selecting the Oregon Scientifictm Wireless
Thermometer
alarm
tool you can use from the convenience of your home.
In this box, you will find:
• Main unit
• Remote sensor
• 2 x UM-4 (AAA) 1.5V alkaline batteries (main unit);
2 x UM-3 (AA) 1.5V alkaline batteries (remote sensor)
Keep this manual handy as you use your new product.
It contains practical step-by-step instructions, as well as
technical specifications and warnings you should know
PRO
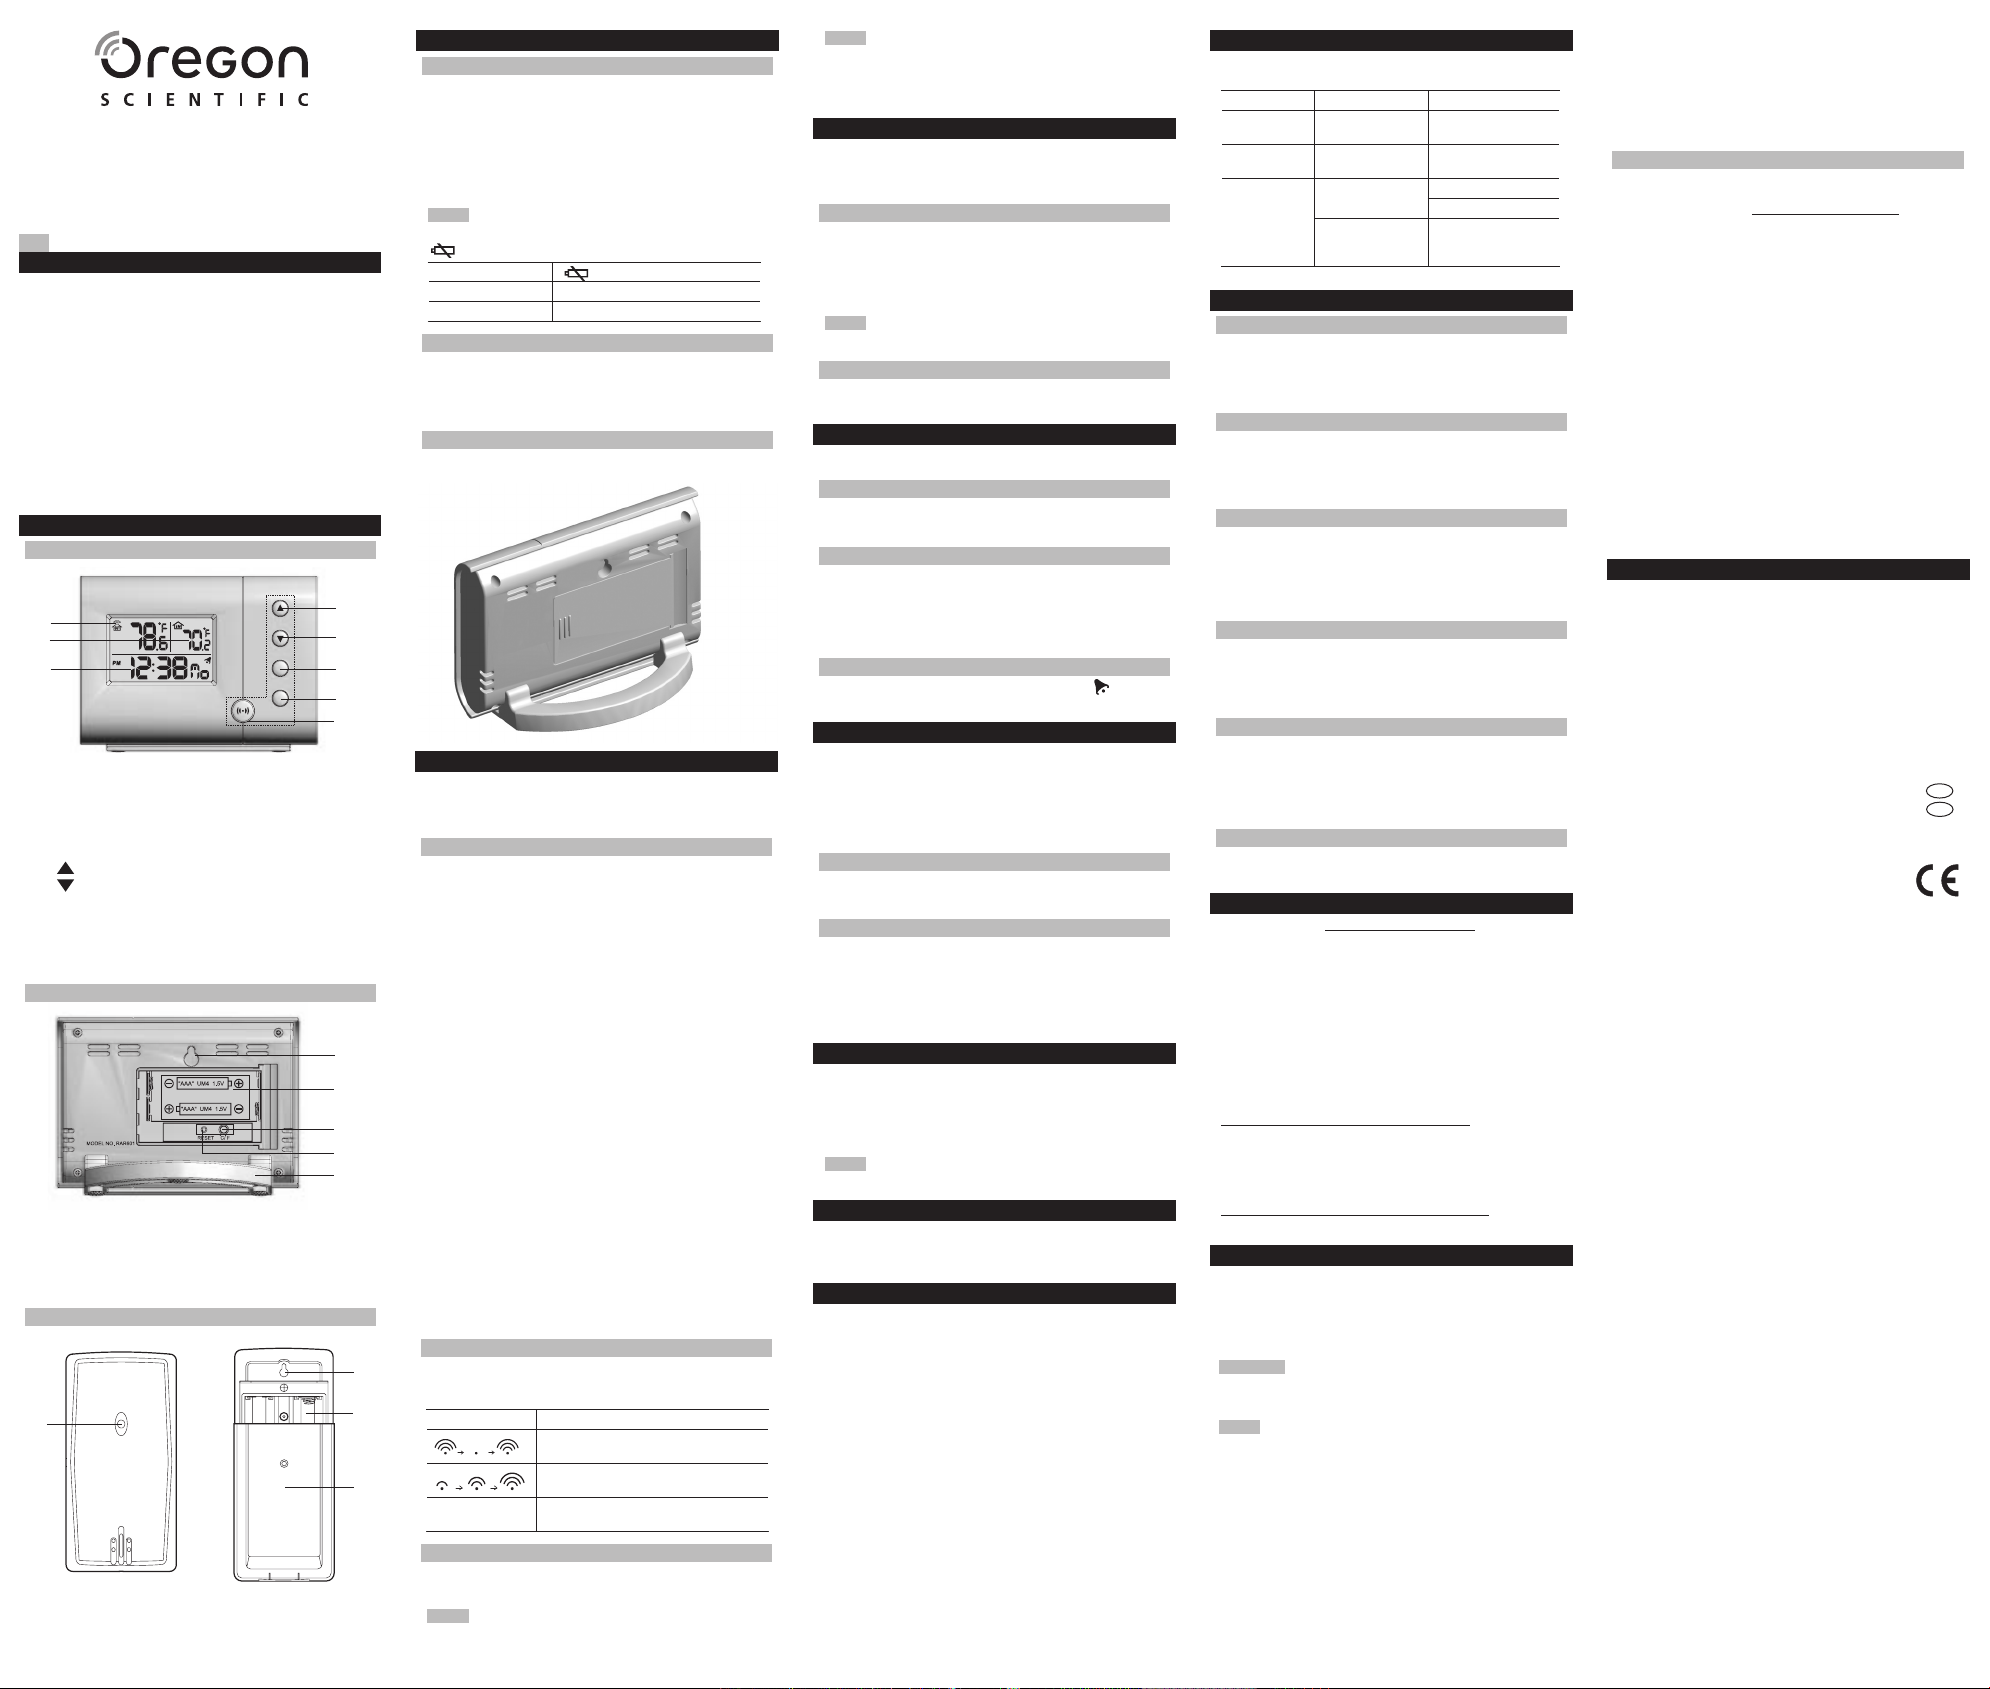
FRONT VIEW
Wireless Thermometer &
Alarm Clock
Model: RAR601
USER MANUAL
1. Outdoor Temperature : Readings, sensor
battery and reception status
2. Indoor T: Readings and main
unit battery status.
3. Clock /
date, alarm
4. : Press to increase setting
5. : Press to decrease setting
6 MODE : Press to change display / settings
7. MEM : Press to view current or max / min
temperature readings
8. ((.)) : view alarm settings, activate alarms to
increase setting, activate
BACK VIEW
1. Wall mount
2. Battery compartment
3. °C / °F switch
4. RESET hole
5. T
REMOTE SENSOR
1. LED Status indicator 1. Wall mount hole
2. Battery compartment
3 Battery compartment
cover
GE
BATTERIES
Batteries
alkaline batteries for the main unit, and 2 x UM-3 (AA) 1.5V
alkaline batteries for the remote sensor
Insert batte before first use, match th pola as
shown
batteries
RESET after each battery change.
Do not use rechargeable batteries.
shows when batteries are low
UNIT LOCA
Main Indoor T
Remote Outdoor T
CHANGE SETTINGS
1. and hold MODE for 2 seconds to enter setting
mode.
2. Press UP or DOWN to change settings.
3. Press MODE to confirm.
TABLE STAND OR WALL MOUNT
Insert
a wall with a nail.
RE
T p i s w a S t c
temperature readings. Only one sensor can be used with
this product.
SETUP SENSOR
1. Open remote sensor battery compartment with a
small Phillips screwdriver
2. Insert
the battery compartment.
3. Place RESET
main
and
will
for the
section for more information.)
4. Close the remote sensor battery compartment.
5. Secure the sensor in the desired location using the
mount or table stand.
For best results:
• Insert the batteries before you mount the sensor
• Place the sensor out of direct sunlight and
moisture.
• Do
from the main (indoor) unit.
• Position
unit, as doors,
and furniture.
• Place
sky
• Position
winter months as below-freezing temperatures may
affect battery performance and signal transmission.
Y
the best results.
DATA TRANSMISSION
Data is sent from the sensor(s) every 78 seconds. The
reception icon shown in the Outdoor T
shows the status.
ICON DESCRIPTION
Main unit is searching for sensor
Sensor signal is steady
— shows The sensor
for the sensor or check
SEARCH FOR SENSOR
T search for the sensor press and hold UP and DOWN
for 2 seconds.
If check
obstructions, and remote unit location.
Signals from
electronic garage doors, and home security systems may
cause temporary
not reception
resume once the interference ends.
CLOC
This product has two displays: Clock with day of week in
English, Spanish, French, Italian,
display with date and month.
SET CLOCK
1. Press and hold MODE
will blink.
2. Select the hour format (12 or 24 hour), hour,
year UP or DOWN to
change the setting. Press MODE to confirm.
The language options are (D) German,
(F) French, (I) Italian, and (S) Spanish.
SWITCH CLOCK DISPLAY
Press MODE to toggle between Clock and Calendar
display
AL
This product is equipped with a 2-minute crescendo alarm.
VIEW ALARM SETTINGS
Press ((.)) .
the Clock
SET ALARM
1. Press ((.)) to switch to
2. Press and hold ((.)) again for 2 seconds. The
settings will blink.
3. Select hour and minute. Press UP o DOWN to
change settings. Press ((.)) to confirm.
ACTIVATE ALARM
Press
the
TE
This
temperature
remote sensor (outdoor).
Outdoor temperature
and displayed every 78 seconds.
SELECT TEMPERATURE UNIT
Press °C
The button is located in the battery compartment.
MINIMUM / MAXIMUM RECORDS
Press MEM
minimum (MIN) records.
T clear the press and hold MEM for 2
A beep will sound to confirm that the memory has been
cleared.
RES
The RESET
the main RESET when
and whenever performance is not behaving as expected
(for to
remote sensor).
When press RESET, all settings will return
default value, and you will lose all stored information.
SA
Clean
mild detergent. A
high-traffic location.
WAR
This product is designed to give you years of service if
handled properly
• Never
electrical shock and damage the product.
• Do
or fluctuations in temperature or humidity
• Do not tamper with the internal components.
• Do not mix new and old batteries or batteries of
different types.
• Do not use rechargeable batteries with this
product.
• Remove
period of time.
• Do not scratch the LCD display
Do
Unaut
The and contents of
this
not drawn to scale.
NOTE
NOTE
NOTE
NOTE
NOTE
TRO
Check here before contacting our customer service
department.
PROBLEM SYMPTOM REMEDY
Calendar Strange date /
month
Change language
T Shows
“HHH”
T
of-range
Remote
Sensor
C l
remote sensor
Check batteries
Check location
Data does not
match main
unit
Initiate a manual
sensor search
SPEC
MAIN UNIT DIMENSIONS
L x W x H 4.06 x 1.89 x 2.96 inches
(103 x 48 x 75 mm)
Weight 1.62 ounces (46 grams)
with battery
REMOTE SENSOR DIMENSIONS
L x W x H 3.8 x 2.0 x 2.4 inches
(96 x 50 x 62 mm)
Weight 1.62 ounces (46 grams)
without battery
TEMPERATURE
Unit °C or °F
Indoor Range 23 °F to 122 °F(-5 °C to 50 °C)
Outdoor Range -4 °F to 140 °F (-20 °C to 60 °C)
Resolution 0.1 °C (0.2° F)
Memory Min / Max
REMOTE SENSOR
RF frequency 433 MHz
Range 98 feet (30 meters)
with no obstructions
Transmission every 78 seconds
CLOCK
Clock display HH:MM
Hour format 12hr
Calendar DD/MM; weekday in 5
languages (D, E, F
Alarm 2-minute crescendo
POWER
Main unit batteries 2 x UM-4 (AAA) 1.5V alkaline
Sensor batteries 2 x UM-3 (AA) 1.5V alkaline
AB
Visit our
about such as digital
MP3 players; children’s electronic learning products and
games;
stations; and digital and conference phones. The website
also inclu c inf f ou Cus Care
dep
asked questions and customer downloads.
We you will find all the information
website, however if you’re in the US and would like to
contact the Oregon Scientific Customer Care department
directly
www2.oregonscientific.com/service/support
OR
Call 1-800-853-8883.
For international inquiries, please visit:
www2.oregonscientific.com/about/international
FCC STA
This device complies with Part 15 of the FCC Rules.
Operation is subject
device may not cause harmful interference, and (2) This
device must accept any interference received, including
interference that may cause undesired operation.
WChan
by
authority to operate the equipment.
NOTE This
with
15
reasonable protection against harmful interference in a
residential installation.
This equipment generates, uses and can radiate radio
freque
with the instructions, may cause harmful interference to
radio communications. However, is no guarantee
that
this
television
equipment
the interference by one or more of the following measures:
• Reorient or relocate the receiving antenna.
• Increase the separation between the equipment and
receiver
• Connect
from that to which the receiver is connected.
• Consu
for help.
DECLARATION OF CONFORMITY
The information is not to be used as contact for
support
(list
warranty card for this product) for all inquiries instead.
We
Name: Oregon Scientific, Inc.
Address: 19861 SW 95th A
Oregon 97062 USA
T 1-800-853-8883
declare that the product
Product No.: RAR601
Product Name: Remote Sensor
Manufacturer: IDT T
Address: Block C, 9/F
Phase 1,41 Man Y
Hung Hom, Kowloon,
Hong Kong
is in conformity
subject
not cause
any interference received, including interference that may
cause undesired operation.
EU
Hereby Oregon Scientific, declares that this Wireless
Thermometer & Clock (Model: RAR601) is in
com
provisions of Directive 1999/5/EC.
A copy of
is
Service.
COUNTRIES RTTE
All EU countries, Switzerland
and Norway N
EN
RAR601_M_E-F_R2.indd 1 2006.6.17 1:17:43 PM
P/N: 086L003348-054 REV1
1/2