FR
EN
Self-Setting
Clock with Indoor Thermometer
RM313PNF
User Manual
INTRODUCTION
Thank you for purchasing the Oregon Scientific™
Self-Setting Projection Clock with Indoor
Thermometer (model: RM313PNF This device
bundles
features into a single tool you can use from the
convenience
you
step
warnings you should know
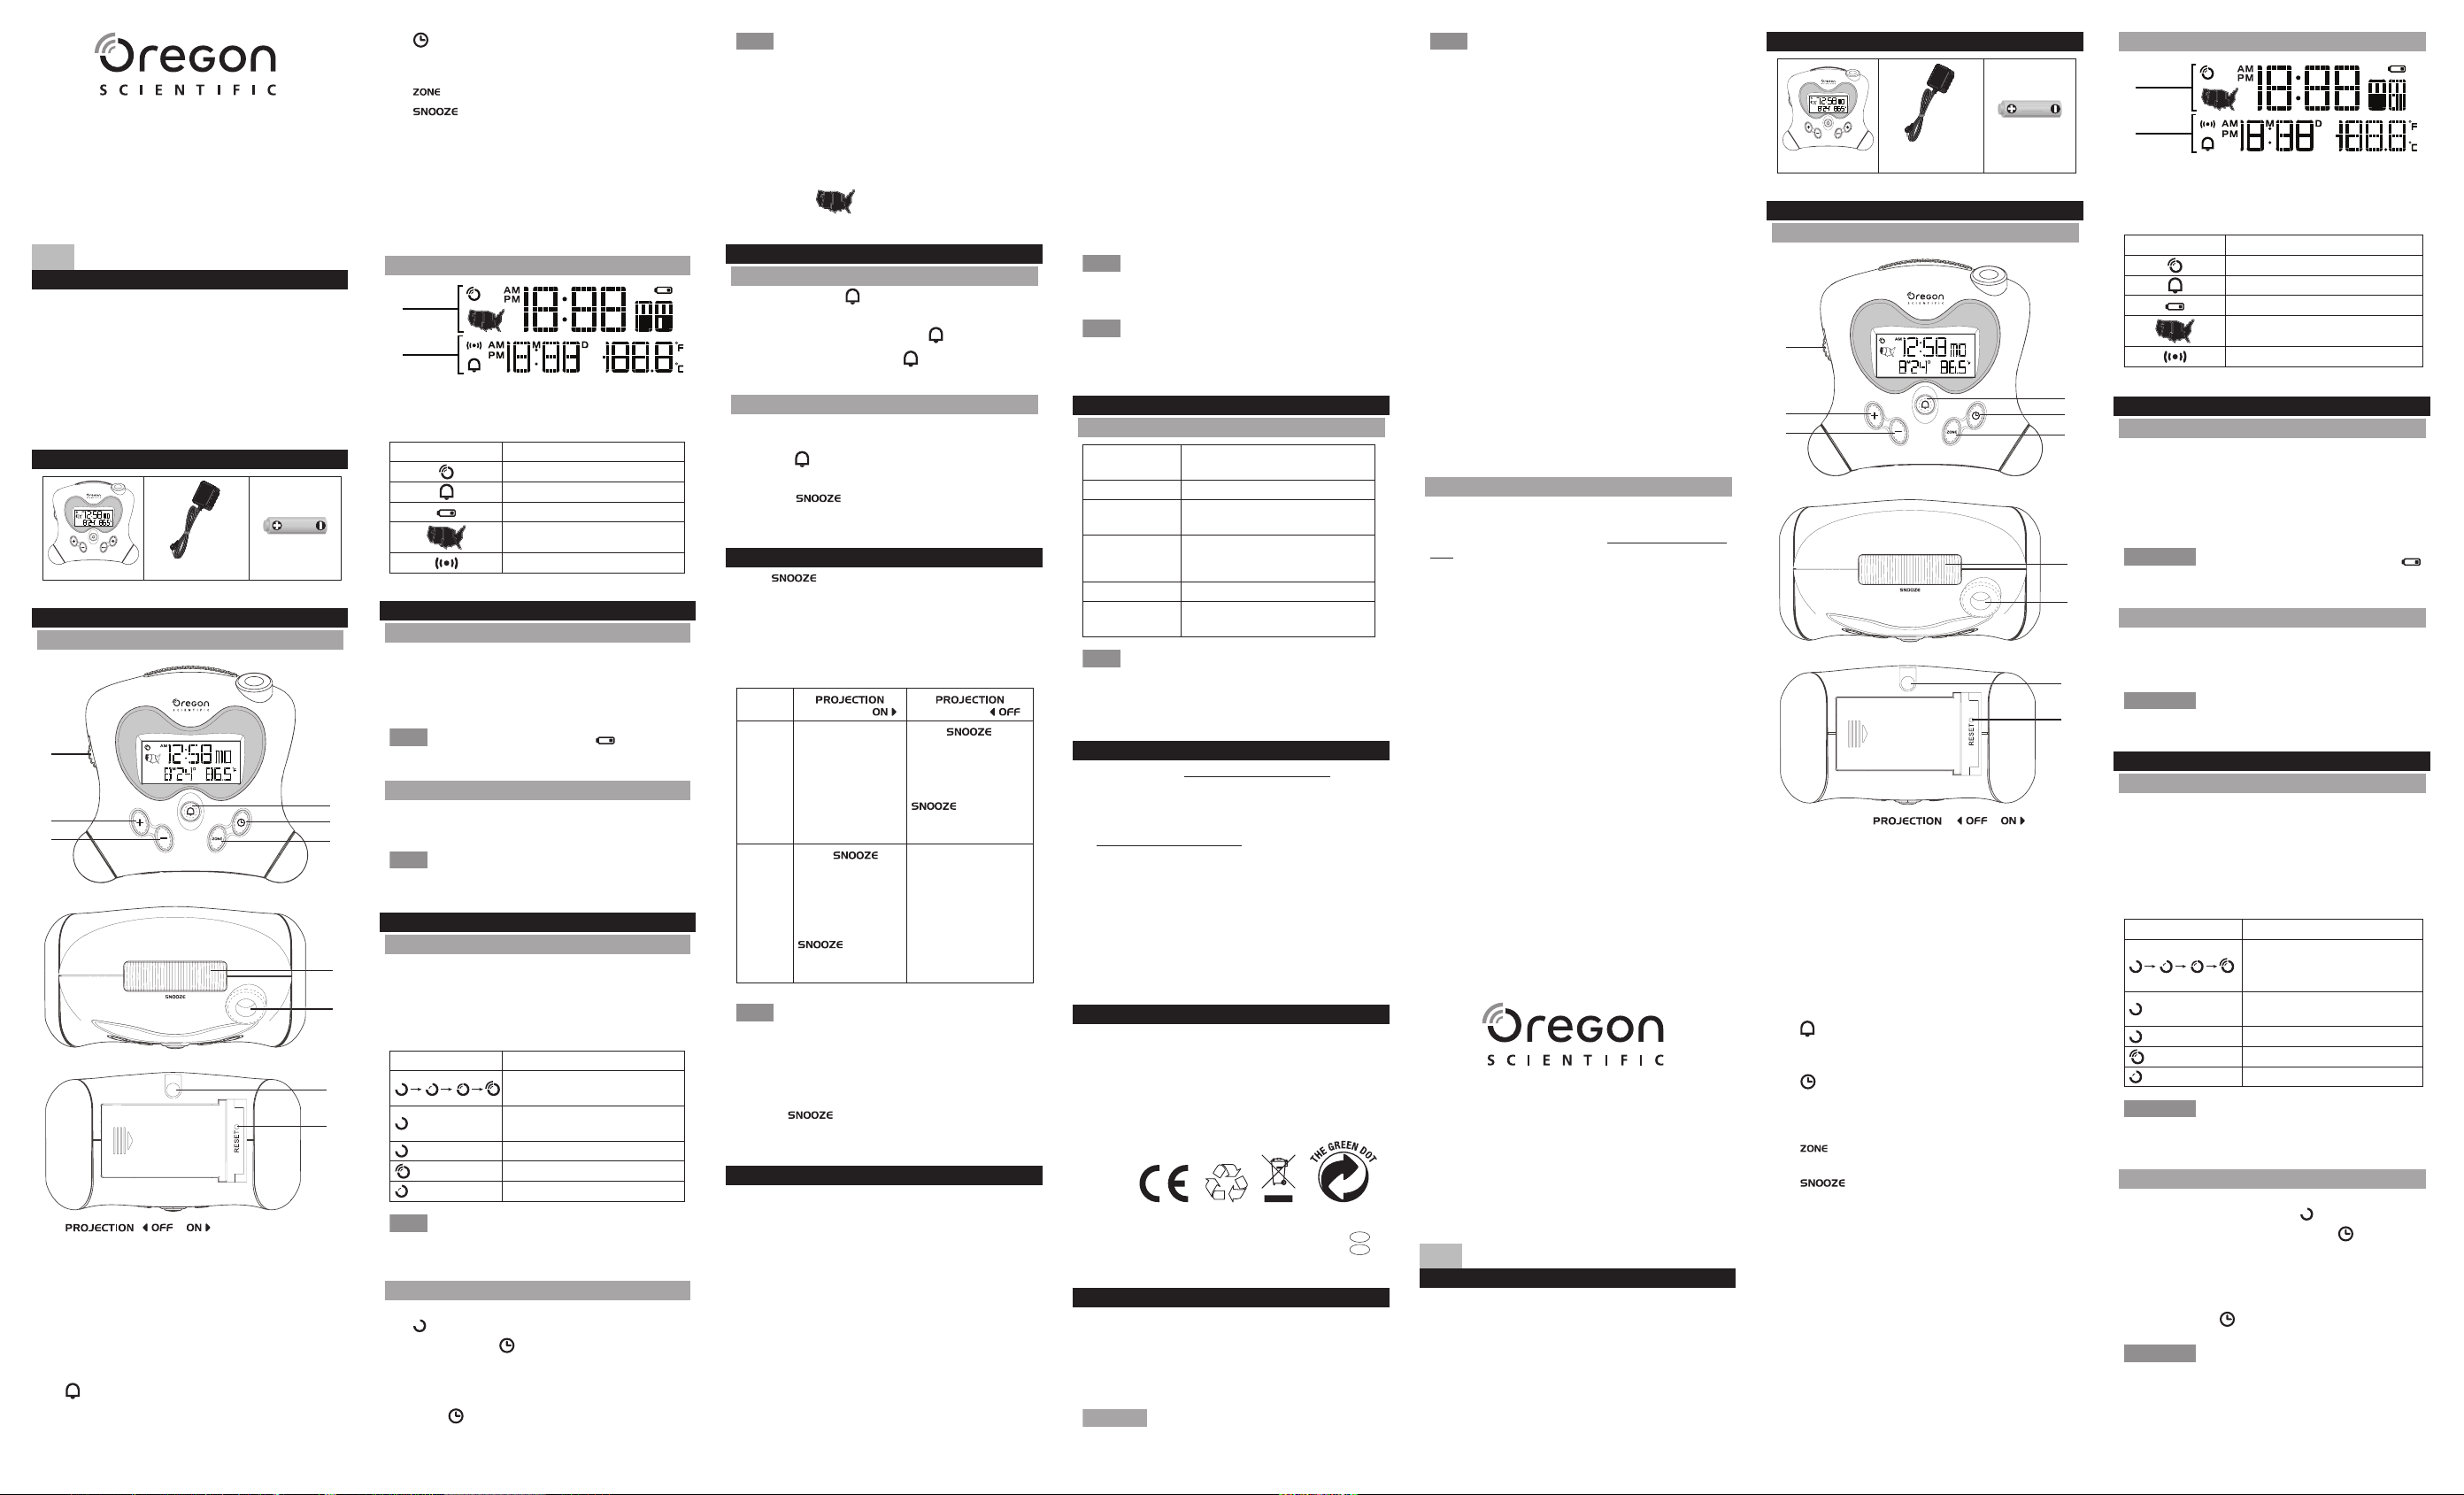
PACKAGE CONTENTS
Main unit Power adapter AA batteries for
main unit x 2
OVERVIEW
MAIN UNIT
1.
continuous projection feature on/off.
2. + -
ip
increase a value
on RF clock signal reception in idle.
3. -
ip
to
turn off RF clock signal reception in idle.
4.
off the alarm function. Press
alarm setting mode.
5. -
weekday display
and hold to enter setting mode.
6. -
7. - Press to turn on the backlight and
projection for 5 seconds (see Projection /
Backlight section), or snooze the alarm. Press
and hold until the unit beeps to turn on the
projection for 5 minutes.
8. Projection lens
9. AC power adaptor jack
10. RESET – Press to reset the unit to default.
LCD DISPLAY
A. T
B. Cale
temp
Symbol Description
RCC signal received
Alarm is on.
Low battery
T
Alarm display mode
GETTING STARTED
INSERT BATTERIES
1. Gently push the
direction as Overview
to remove it from the main unit.
2. Insert the batteries, matching the polarities (+/ -).
Replace the batteries when displ or
when the display is dim.
AC POWER
Plug to power and the
power adapter into a suitable power outlet.
It is recommended to insert the battery as a
backup power source.
CLOCK
CLOCK RECEPTION
This
signal. +
the clock signal.
The main unit receives WWVB signal as RCC signal.
Clock signal reception indicator:
Icons Description
Main unit is searching for clock
signal strength
(ash) Main unit is searching for clock
signal
No clock signal
Strong RCC signal received
Weak RCC signal received
If the signal is weak, could take up to 24 hours to
receive a valid signal.
SET THE CLOCK MANUALLY
1. Press
icon turns off.
2. Press and hold .
3 Press
setting for hour, minute, year month, date,
temperature unit (°C/°F) and language.
4. Press to conrm each setting.
• The options English EN ), Spanish
(SP ), Italian (IT ), French (FR ) and German (GE ).
• The
battery replacement.
• The
set time, year
• Press ZONE to select required US time zone
(Pacic, Mountain, Central or Eastern) time as
shown on directly
ALARM
SETTING/ADJUSTING ALARM TIME
1. Press and hold .
2. Press
and minute setting, then press to conrm.
T .
OPERATION
When the alarm rings, the backlight will flash.
Y
• Press
next day
• Press snooze. alarm rings again
after 8 minutes.
PROJECTION/BACKLIGHT
Pres to
5 se
on
resu
the
T
AC power adaptor to a suitable outlet.
switches to
switches to
With
Adapter
Continuous
projection.
Press to
turn on the projection
and backlight for
5 seconds.
Press and hold
to turn on
the projection for
5 minutes.
Without
Adapter
Press to
turn on the
projection and
backlight for
5 seconds.
Press and hold
to turn on
the projection for
5 minutes.
No projection,
backlight turns on for
5 seconds.
• When unit connects to the power outlet, the
continuous
may turn
unit is connected to the power outlet.
• When
hold again to stop 5 minutes
Y
PRECAUTIONS
• Do not
dust, temperature or humidity
• D
over
• Do not clean the unit with abrasive or
corrosive materials.
• Do
This invalidates the warranty
• Only batteries. new
old batteries.
• Images
actual display
• When disposing of this product, ensure it is
collected separately for special treatment.
• Placement of this product on certain types of
wood may result in damage to its finish for
which Oregon
Consult the furniture manufacturer's care
instructions for information.
• The
without the permission of the manufacturer
• Do
waste. Collection of such waste separately for
special treatment is necessary
• Please note that some units are equipped with
a battery strip. Remove strip from the
battery compartment before rst use.
the contents of
without notice.
Features
in
your local retailer
SPECIFICATIONS
MAIN UNIT
L x W x H 1
(4.5in x 2.5in x 4.2in)
Weight 148 g
T
range
-5°C to 50°C
(23°F to 122°F)
T
accuracy
0°C to 40°C: ±1°C (± 2.0°F)
T<0°C : ±2°C (± 4.0°F)
T>40°C : ±2°C (± 4.0°F)
Resolution 0.1°C (0.2°F)
Power 2 x UM-4 (AA) 1.5 V batteries
3.6 V adapter
When the indoor temperature is lower than
-5 °C (23.0 °F), the screen displays L . When the
temperature
displays HH.H .
ABOUT OREGON SCIENTIFIC
Visit our website www to learn
more about Oregon Scientific products.
For
at info@oregonscientific.com.
Oregon
the right
and provisions
its
the extent
English
English version shall prevail.
EU-DECLARATION OF CONFORMITY
Hereby Oregon Scientific, declares that this Self-
Setting Atomic Projection Clock with Indoor
Thermometer (model:
with the essential requirements and other
provisions
and dated Declaration of Conformity is available on
request via our Oregon Scientific Customer Service.
FCC STATEMENT
This Par 15 of the FCC Rules.
Op
de
de
in
Cha or modi not express
approved
void the user
This has been tested and found
to with for Class B device,
pursuant to Part 15 of the FCC Rules. limits
are designed to
harmful interference in a residential installation.
This equipment generates, uses and can radiate
radio frequency energy and, if not installed and
used in accordance with the instructions, may
cause
However
not
does
reception,
equipment of
to correct the interference by one or more of
following measures:
• Reorient or relocate the receiving antenna.
• Increase the separation between the equipment
and receiver
• Connect the equipment into an outlet on a
circuit
is connected.
• Consult the dealer or an experienced radio/TV
technician for help.
This Class B
ICES- 3(B)/NMB-3(B).
DECLARATION OF CONFORMITY
The
for
number (listed
com), warranty for
inquiries instead.
We
Name: Oregon Scientific, Inc.
Address: 10778 SW Manhasset Dr
Tualatin, Or 97062 USA
T 1-800-853-8883
declare that the product
Product No.: RM313PNF
Product Name: Self-Setting
Clock with Indoor Thermometer
Manufacturer: IDT
Address: Block C, 9/F
Phase 1, 41 Man Y
Hung Hom, Kowloon,
Hong Kong
COUNTRIES RTTE
All EU countries, Switzerland CH
and Norway N
CONTENU DE L’EMBALLAGE
Unité principale Adaptateur
secteur
2 piles AA pour
l’unité principale
VUE D’ENSEMBLE
UNITE PRINCIPALE
1. Interrupteur / – Faire
coulisser régler sur la
en continue.
2. + - ici pour augmenter les réglages ou
inverser la projection de 180° en mode inactif.
Maintenez appuyé pour augmenter rapidement
les valeurs en mode réglage, ou pour activer le
signal de réception de l’horloge RF
3. - - Appuyez ici pour diminuer les réglages ou
inverser la projection de 180° en mode inactif.
Maintenez appuyé pour augmenter rapidement
les valeurs en mode réglage, ou pour activer le
signal de réception de l’horloge RF
4.
activer/désactiver Maintenez ce
bouton pour entrer dans les réglages de l’alarme.
5. - Appuyez pour alterner entre l’affichage
des secondes et l’affichage des jours de la
semaine. Maintenez appuyé pour entrer dans
le mode de réglage.
6. - Appuyez ici pour commuter entre les
différents fuseaux horaires US.
7. (Mise
veille
5 secondes (voir la section Projection/Retro-
éclairage). Maintenez appuyé jusqu’à ce que
vous entendiez un bip pour activer la projection
pendant 5 minutes.
8. Lentille de projection
9. Prise adaptateur
10. RESET (Réinitialisation) – Appuyez ici pour
réinitialiser l’appareil.
AFFICHAGE LCD
A. Afchage de l’Heure/du Jour de la semaine/des
Secondes
B. Afchage
et de la température intérieure
Symbole Description
Signal RCC reçu
Alarme activée
Niveau de pile faible
Indicateur de sélection du fuseau
horaire
Mode d’afchage de l’alarme
POUR COMMENCER
INSTALLATION DES PILES
1. Poussez
à piles dans la direction indiquée par la èche
(voir la V)
l’unité principale.
2. Installez les
polarité (+/ - ).
Rempl l’ic
s’
ALIMENTATION SECTEUR
Branchez
d’alimentation de
sur une prise de courant.
tant que source d’alimentation de secours.
HORLOGE
RECEPTION DE L’HORLOGE
L est désignée pour se synchroniser
automatiquement avec un signal d’horloge.
Maintenez + activer rechercher
signal d’horloge.
L principale reçoit le signal DCF tant que
signal RCC.
Indicateur de réception du signal d’horloge:
Icônes Description
L
cherche d’un signal d’horloge
sufsamment puissant.
(ash) L
cherche d’un signal d’horloge.
Pas de signal d’horloge
Signal RCC fort reçu
Signal RCC faible reçu
Cela
pour recevoir
cela 24
un signal valide.
SET THE CLOCK MANUALLY
1. Appuyez
signal de réception. L s’éteint.
2. Appuyez sur et maintenez appuyé .
3. Appuyez une fois sur, appuyez et maintenez
appuyé +/-
minutes, de
de température (°C/°F) et la langue.
4. Appuyez sur pour conrmer chaque réglage.
• Les options de langue sont l’anglais (EN ),
l’espagnol (SP ), l’italien (IT ), le français (FR ) et
l’allemand (GE ).
• L
réin
Réveil projecteur à réglage
automatique avec thermomètre
d’intérieur
RM313PNF
Mode d’emploi
INTRODUCTION
Merci d’avoir choisi le Réveil projecteur à réglage
automatique avec thermomètre d’intérieur d’Oregon
Scientific™ (modèles: RM313PNF Cet appareil
regroupe
et un suivi
vous
Conservez ce mode d’emploi à disposition lors des
premières utilisations de ce produit. Il contient des
ins
techniques et autres avertissements que vous vous
devez de connaitre.
RM313PNFA_UM_MP_R9.indd 1 2015/8/27 11:04:05 AM