589108
1
Zoom out
Zoom in
DIGITAL TRAVEL RADIO-FREQUENCY (RF)
CONTROLLED CLOCK
MODEL: RM822 (UK VERSION RM823)
INSTRUCTION MANUAL
INTRODUCTION
Congratulations on your purchase of the Travel RF controlled Clock (RM822).
The RM822 / RM823 is a multifunction (RF) controlled clock. It can automatically
synchronize its current time and date when brought within an approximate 1500
km radius of the radio signal DCF77 generated from Frankfurt, Germany (the
UK version from MSF Rugby, England).
Other features of the RM822 include:
- Back light for easy reading in the dark
- Displays time, date and day of the week in 4 languages (E/F/G/I)
- A second time-zone display with time, date and day-of-the-week
- 2 alarm times with 8-minute snooze function
- 2-minute crescendo alarm that increase in volume & low battery indication.
DESCRIPTION OF PARTS [FIG. A]
A. [ ] Radio reception signal
Indicates the condition of radio reception
B. 2-line LCD
C. [
ON/OFF
] button
Activates or deactivates alarm
D. [ ] button
Toggles between calendar and alarm-time displays
Displays the alarm time or sets the alarm status
E. [ ] Battery-low indicator
Lights up when batteries are running dry
F. [ ] Alarm-on icon
Appears when the alarm is activated
G. [ ] Alarm icon
Appears when the alarm time is displayed
H. [
MODE
] button
Toggles between display modes and activates the calendar clock setting mode
I. [ ] button
To lock all the key of the unit
J. UP [ ] button
Increases the value of a setting
Initiates radio reception
(Press and hold for rapids settings)
K. DOWN [ ] button
Decreases the value of a setting
Stops radio reception
(Press and hold for rapids settings)
L. Battery compartment
Accommodates two UM-4 or AAAî size batteries
M. Table stand
N. [RESET] button
Resets the unit to its original factory settings
BATTERY INSTALLATION
The unit uses two (2) UM-4 or AAAî size 1.5V batteries.
To insert batteries:
1. Slide the battery door in the direction of the arrow. [FIG. D]
2. Insert the batteries strictly according to the polarities shown therein.[FIG. B]
3. Replace the battery compartment door.
If not disposed of properly batteries can be harmful. Protect the
environment by taking exhausted batteries to authorized disposal stations.
Note: Battery-low indicator  î
Replace the batteries when the battery-low indicator lights up.
Note: After replacing the batteries, the entire display will activate
for about 1 second, then LCD will show as in.
ABOUT RADIO RECEPTION
The RM822 / RM823 is a radio frequency (RF) controlled clock. When located
within a 1500km radius of radio signal (DCF77) at Frankfurt, Germany, the
clock time will automatically synchronize with DCF77 time-signal transmission.
The benefit of a RF controlled clock is that highly-accurate time is maintained
and manual adjustments to the time and date are not be required.
(UK version within a 1500km radius of radio signal (MSF) from Rugby,
England)
When the batteries are first installed, the RM822 / RM823 will automatically
search for a radio signal.
When in search mode, the antenna icon [ ] will blink. This process takes
between two (2) and ten (10) minutes. After initial search, short periodic reception-
signal scans will commence several times a day.
The antenna icon indicates the quality of reception.
DIGITAL TRAVEL RADIO-FREQUENCY (RF)
CONTROLLED CLOCK
MODEL: RM822 (UK VERSION RM823)
INSTRUCTION MANUAL
-
Strong
-
Weak
-
No signal
-
Receiving
FIG. A
FIG. C
FIG. B
Note: Adjusting the time may conflict with radio signal. In this case, the
received signal takes priority and will override the manual setting.
The day-of-the-week is displayed as an abbreviation in four languages.
Abbreviated Four Language Day-Of-The-Week Chart
ABOUT THE ALARM TIME
Two independent alarm times are available: alarm 1 and alarm 2.
1. Press [ ON / OFF ], alarm-time 1 is displayed and indicated by [
1
].
2. Press [ ON / OFF ] again, alarm-time 2 is displayed and indicated
by [
2
].
SETTING AN ALARM TIME
To set an alarm time:
1. Press [ ] to select alarm 1. Press again and hold 3-seconds.
2. Set the alarm time
Steps Setting Action
1. Minutes Adjust with or and confirm with [ ].
2. Hours Adjust with or and confirm with [ ].
3. Press [ ] to confirm. Press a final time to exit alarm set mode.
Setting Alarm Two
- Enter alarm-2 setting mode and follow instructions as for alarm 1.
ABOUT ALARM SOUND
The four-step crescendo function allows the alarm to start off gently and step up
its intensity four times every 20 seconds. Without interruption, the alarm will
activate for a total of two minutes. If a second alarm activates when the first
alarm is sounding, the first alarm will be automatically disabled.
To stop an alarm sound:
- To stop the alarm, press [ ], the alarm will stop and will activate
at the same time the following day.
- To disable the alarm, press [
ON/OFF
], the alarm will stop and it is not
active, it will not activate the following day.
HOW TO USE THE SNOOZE
The Lite Touch feature enables you to activate the 8 minute snooze by gently
rocking the RF clock backwards on its stand with the touch of your fingers.
[see FIG.D]
LITE TOUCH HiGlo
TM
BACKLIGHT
Using the Lite Touch feature, the display will activate for five seconds so you
can see the display in the dark. The light then automatically turns off.
[see FIG.D]
HOW TO RESET THE UNIT
The RESET button allows you to return all settings to its factory values, which
are, 1-1 (1st of January) for date, 00:00 for time and 0:00 for alarm, which will
be deactivated.
The button is required only when the unit is not operating in a favorable way,
such as in the rare case of a malfunction.
THE TABLE STAND
To use the cover as a stand, rotate the hinges cover over the back of the clock.
SPECIFICATION
- 24-h display : hh : mm : ss (DCF version)
- 12-h display : hh : mm : ss (MSF version)
- Power : Two (2) UM4 or AAAî size batteries
- Size : 87 X 67 X 18 mm ( H x W x D )
- Weight : 66 g (without battery)
NOTE ON COMPLIANCE
R&TTE Compliance Note
This device complies with the essential requirements of Article 3 of the R&TTE
1999/5/EC Directive, if used for its intended use and that the following standard(s)
has been applied:
Electromagnetic compatibility (Article 3.1.b of the R&TTE Directive)
Applied standards ETS 300 683 : 1997
EN 300 220-1 : 1997 (if applicable)
Efficient use of the radio frequency spectrum (Article 3.2 of the R&TTE
Directive)
Applied standards EN300 220 1 : 1997 (if applicable)
CAUTION
ó The content of this manual is subject to change without further notice.
ó Due to printing limitation, the displays shown in this manual may
differ from the actual display.
ó The contents of this manual may not be reproduced without the
permission of the manufacturer.
To disable the RF function:
Press and hold the [ ] button for 3-seconds. The radio-reception signal will
disappear.
To enable the RF funciton:
Press [ ] and hold for 3-seconds. The radio-reception signal will appear and a
signal search will automatically commence.
Interference
Reception can be affected by a number of factors. For best reception, place the
device away from metal objects and electrical appliances.
Note: Interference from sources such as TV sets can affect the signal. If,
after batteries have been inserted for ten minutes, the signal is not received,
then set the time manually (see section: How To Set The Calendar Clock
Manually).
LOCKING AND UNLOCKING THE UNIT
The RM822 / RM823 has a special locking feature that locks all keys to prevent
accidental operation of the unit. To unlock the unit, slide the [ ] switch
to the unlocked position.
The unit must be unlocked before activating any keys.
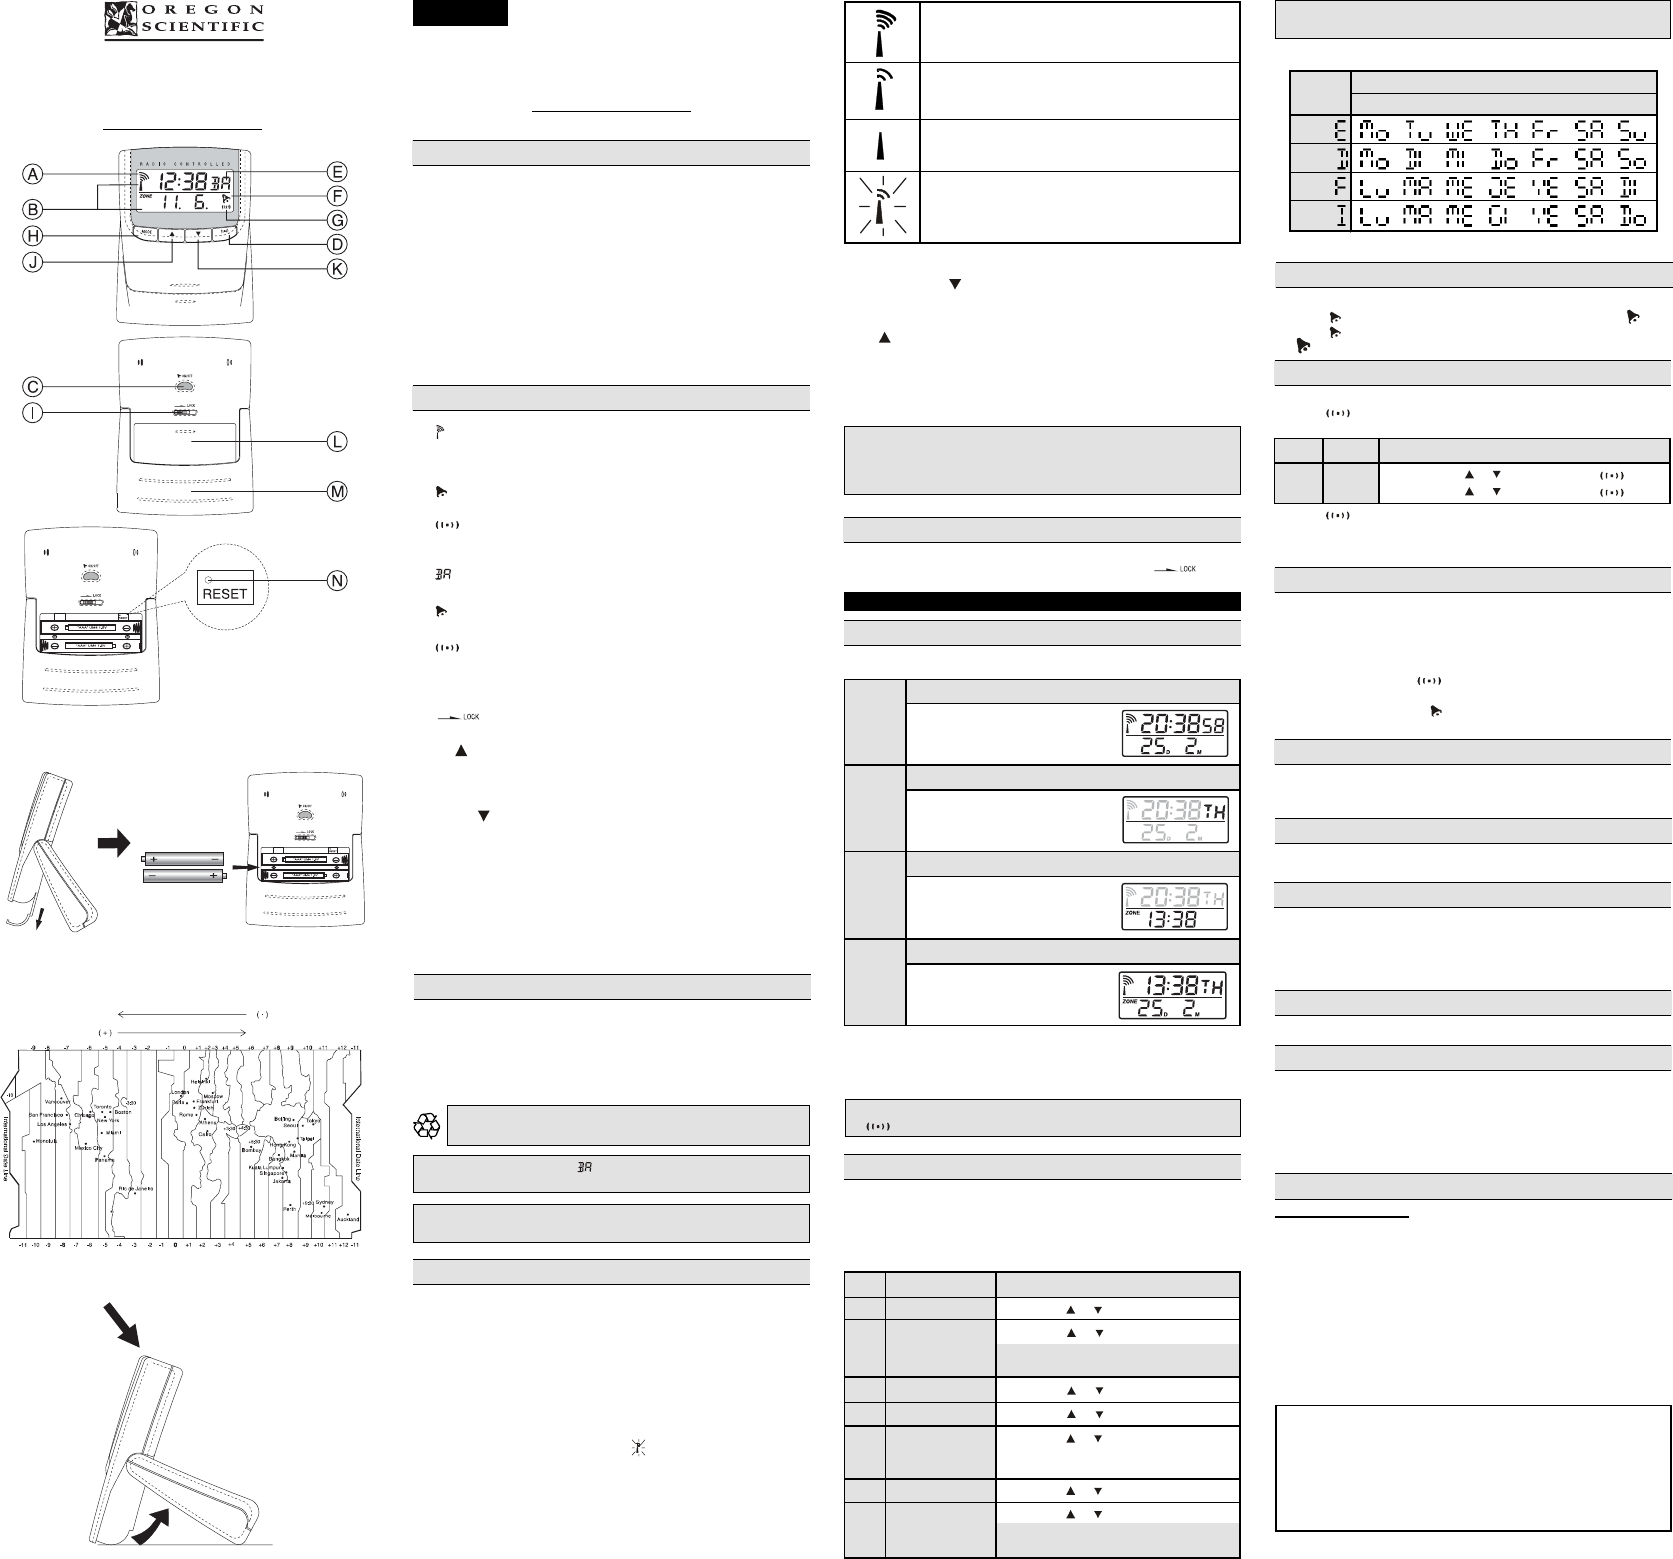
CALENDAR CLOCK DISPLAY MODES
The RM822 /RM823 supports four display modes in the sequence of:
MODE 1 Local Time
Hour, Minute, Seconds
-------------------------------------------
Day, Month
MODE 2 Local Time
Hour, Minute, Day-of-the-Week
-------------------------------------------
Day, Month
MODE 3 Local Time / Second Time-Zone Time
( localtime ) Hour, Minute, Day - of - the - Week
-------------------------------------------
( Second time - zone time ) Hour, Minute
MODE 4 Second Time-Zone
Hour, Minute, Day-of-the-Week
-------------------------------------------
Day, Month
Display description for each time / date / time-zone mode
To select a different time-display mode:
- Press [MODE]. The display will advance in the order as mentioned above.
Note: The bottom line of the display will be replaced by the alarm time if
[ ] is pressed.
HOW TO SET THE CALENDAR CLOCK MANUALLY
When the unit is outside of the 1500km radius of the radio signal generated
from DCF77 Frankfurt, Germany (UK version MSF Rugby), the unit may
require manual setting.
To manually set the clock:
Press [MODE] hold for 3 seconds.
Steps Setting Action
1. Hours Adjust with or and confirm with MODE
2. Minutes Adjust with or and confirm with MODE
Note: Once you modify the minutes, the
seconds are set to 00î.
3. Current Date Adjust with or and confirm with MODE
4. Month Adjust with or and confirm with MODE
5. Abbreviated, Adjust with or and confirm with MODE
4-language (see: abbreviated four language day-of-
day-of-the-week the-week chart)
6. Day-of-the-week Adjust with or and confirm with MODE
7. Offset for other Adjust with or and confirm with MODE
time zone Note: ZONEî is shown
(see: Time Zone Offset Table) [FIG. C]
ENGLISH
FIG. D
Day-of-the-week
Language
Monday Tuesday Wed. Thursday Friday Saturday Sunday
English
German
French
Italian
Santiago

Brauchen Sie Hilfe? Stellen Sie Ihre Frage.

Forenregeln
1

Forum

oregon-scientific-rm822

Suche zurücksetzen

  • Guten Tag, wir haben diese Uhr seit Jahren, leider ohne das Bedienhandbuch ,
    nun ist die Uhr zum 1.Mal die Uhr stehen geblieben!
    Frage: 1. ist es die alte Batteriei geht diese Uhr auf??und wie
    2. kann ich ein komplettes Handbuch bekommen, denn bisher konnten wir die
    Uhr nicht genau einstellen.
    3. Was sind die kosten? Ic h freue mich auf ihre Nachricht. H.König Eingereicht am 8-1-2022 16:17

    Antworten Frage melden
  • #jut$%10
    Has anyone used cashback services? tell me which one is better. thx! Eingereicht am 12-9-2019 08:48

    Antworten Frage melden

Missbrauch melden von Frage und/oder Antwort

Libble nimmt den Missbrauch seiner Dienste sehr ernst. Wir setzen uns dafür ein, derartige Missbrauchsfälle gemäß den Gesetzen Ihres Heimatlandes zu behandeln. Wenn Sie eine Meldung übermitteln, überprüfen wir Ihre Informationen und ergreifen entsprechende Maßnahmen. Wir melden uns nur dann wieder bei Ihnen, wenn wir weitere Einzelheiten wissen müssen oder weitere Informationen für Sie haben.

Art des Missbrauchs:

Zum Beispiel antisemitische Inhalte, rassistische Inhalte oder Material, das zu einer Gewalttat führen könnte.

Beispielsweise eine Kreditkartennummer, persönliche Identifikationsnummer oder unveröffentlichte Privatadresse. Beachten Sie, dass E-Mail-Adressen und der vollständige Name nicht als private Informationen angesehen werden.

Forenregeln

Um zu sinnvolle Fragen zu kommen halten Sie sich bitte an folgende Spielregeln:

Neu registrieren

Registrieren auf E - Mails für Oregon Scientific RM822 wenn:


Sie erhalten eine E-Mail, um sich für eine oder beide Optionen anzumelden.


Andere Handbücher von Oregon Scientific RM822

Oregon Scientific RM822 Bedienungsanleitung - Deutsch - 2 seiten

Oregon Scientific RM822 Bedienungsanleitung - Deutsch - 1 seiten

Oregon Scientific RM822 Bedienungsanleitung - Englisch - 2 seiten

Oregon Scientific RM822 Bedienungsanleitung - Holländisch - 1 seiten

Oregon Scientific RM822 Bedienungsanleitung - Holländisch, Französisch, Italienisch, Portugiesisch, Spanisch, Schwedisch - 2 seiten


Das Handbuch wird per E-Mail gesendet. Überprüfen Sie ihre E-Mail.

Wenn Sie innerhalb von 15 Minuten keine E-Mail mit dem Handbuch erhalten haben, kann es sein, dass Sie eine falsche E-Mail-Adresse eingegeben haben oder dass Ihr ISP eine maximale Größe eingestellt hat, um E-Mails zu erhalten, die kleiner als die Größe des Handbuchs sind.

Ihre Frage wurde zu diesem Forum hinzugefügt

Möchten Sie eine E-Mail erhalten, wenn neue Antworten und Fragen veröffentlicht werden? Geben Sie bitte Ihre Email-Adresse ein.


Info