Alizé Thermometer
Model: RMR262
User Manual
EN
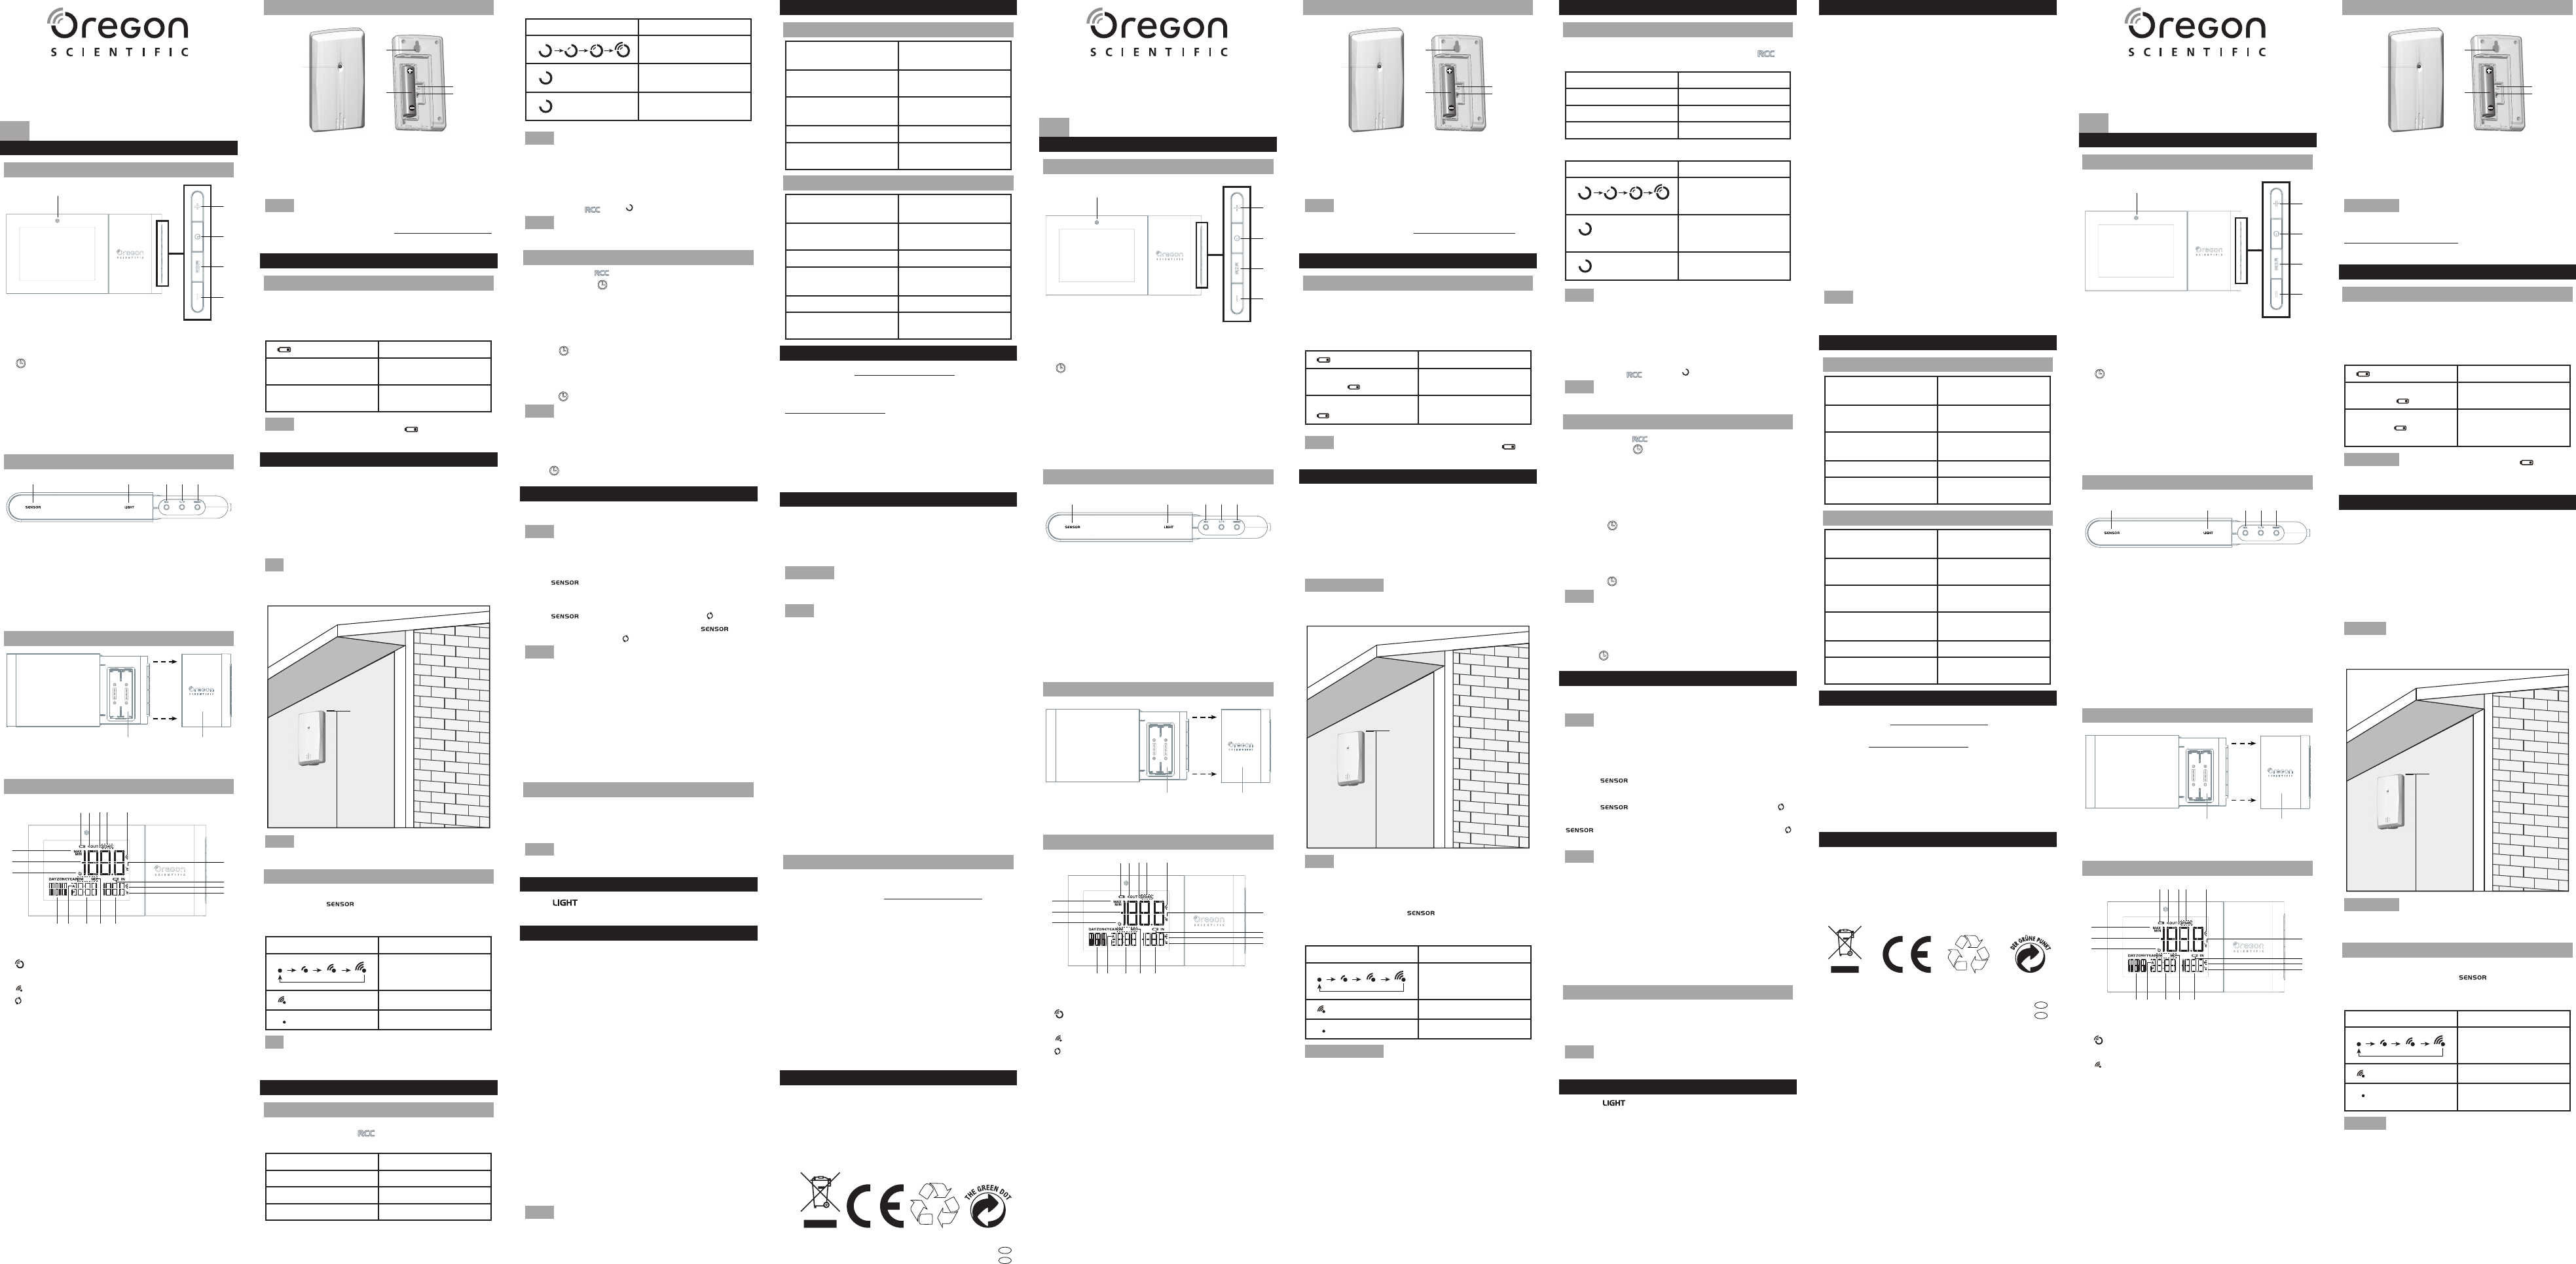
OVERVIEW
FRONT VIEW
2
3
4
1
5
1. Ice alert indicator
2. + - Press to increase settings, press and hold to increase
settings rapidly
3.
- Press to toggle between the clock and calendar
press and hold to enter the setting mode
4. MEM – Press to toggle the current/maximum/minimum
temperature records, press and hold to clear the MAX/
MIN records.
5. – - Press to decrease settings, press and hold to
decrease settings rapidly
ice alert
TOP
1. SENSOR – Press to toggle between channel 1-5, turn
on or off display in loop. Press and hold to search for the
sensor for all channels
2. LIGHT – Press to turn on the backlight
3. RCC – Press to turn on and toggle EU/UK/US RCC
function, press and hold to turn off RCC function
4. °C/°F - Press to toggle the desired temperature unit
5. RESET – Press to reset all settings to default
BACK VIEW
1 2
1. Battery compartment
2. Battery compartment cover
LCD DISPLA
1
2
3
9
10
11
12
13
1. MAX/MIN temperature indicator
2. Outdoor temperature
3.
RCC Clock reception signal indicator
4. Outdoor sensor low battery display
5.
Remote sensor reception indicator
6.
Outdoor temperature auto-loop indicator
7. Outdoor sensor channel number
8. Outdoor temperature trend indicator
9. Outdoor temperature unit display (°C/°F )
10. Main unit low battery display
1
12. Indoor temperature unit display (°C/°F )
13. Indoor temperature
14. Date/month format display (date: month/month: date)
15. Time/Calendar
16. AM/PM
17. Weekday display
T
Modello: RMR262
Manuale utente
IT
P
VIST
2
3
4
1
5
1. Indicatore allarme ghiaccio
2. + - Premete per aumentare impostazioni, tenete premuto
per aumentare rapidamente le impostazioni
3.
- Premete per passare da orologio a calendario
e viceversa, tenete premuto per entrare in modalità
impostazione
4. MEM – Premete per passare tra le registrazioni di
temperatura corrente/massima/minima, tenete premuto
per cancellare le registrazioni MAX/MIN.
5. – - Premete per diminuire le impostazioni, tenete premuto
per diminuire rapidamente le impostazioni. T
per spegnere l’allerta ghiaccio
VIST
12345
1. SENSOR (SENSORE) – Premete per passare in sequenza
i canali da 1 a 5, o per attivare disattivare l’autoscansione.
T
2. LIGHT (LUCE) – Premete per accendere la retroilluminazione
3. RCC – Premete per attivare e selezionare la funzione
RCC tra EU/UK/US, tenete premuto per disattivare la
funzione RCC
4. °C/°F - Premete per selezionare l’
temperatura
5.RESET (RIPRISTINO) – Premete per ripristinare le
impostazioni di default
VIST
1 2
1. Compartimento batterie
2. Coperchio compartimento batterie
SCHERMO
1
2
3
45 67 8
9
10
11
12
13
1. Indicatore temperatura MAX/MIN
2. T
3.
Indicatore ricezione segnale orologio
4. Visualizzazione batteria esaurita sensore esterno
5.
Indicatore ricezione sensore remoto
6.
Indicatore auto-scansione temperatura esterna
7. Numero canale sensore esterno
8. Indicatore tendenza temperatura esterna
9. Visualizzazione unità di misura (°C/°F ) temperatura esterna
10. Visualizzazione batteria scarica unità principale
1
12. Visualizzazione unità di misura (°C/°F ) temperature interna
13. T
14.
data)
15. Orario/Calendario
16. AM/PM
17. Visualizzazione giorno della settimana
Thermomètre Alizé
Modèle: RMR262
Mode d’emploi
FR
VUE D’ENSEMBLE
VUE A
2
3
4
1
5
1. Indicateur d’alerte de gel
2.
maintenez appuyé pour augmenter rapidement la valeur
des réglages.
3.
-
et du calendrier
mode de réglage
4. MEM – Appuyez pour obtenir l’af
de la température courante/maximum/minimum, maintenez
appuyé pour effacer les relevés de température MAX/MIN.
5.
maintenez appuyé pour diminuer rapidement la valeur des
réglages. Maintenez appuyé pour désactiver l’alerte de gel.
VUE DE DESSUS
12345
1. SENSOR (CAPTEUR) –
alterné des canaux 1 à 5, et pour activer/désactiver
l’affichage en boucle. Maintenez appuyé pour faire une
recherche du capteur pour tous les canaux.
2. LIGHT (LUMIERE) –
éclairage.
3. RCC –
la fonction RCC EU/UK/US, maintenez appuyé pour
désactiver la fonction RCC
4. °C/°F – Appuyez pour choisir votre unité de mesure de la
température
5. RESET (RÉINITIALISA –
tous les réglages par défaut.
VUE ARRIÈRE
1 2
1. Compartiment à piles
2. Couvercle du compartiment à piles
AFFICHAGE DE L
1
2
3
45 67 8
9
10
11
12
13
1. Indicateur de température MAX/MIN
2. T
3.
Indicateur de réception de l’horloge
4.
5.
Indicateur de réception du capteur sans fil
6. Indicateur d’auto-scan de la température extérieure
7. Numéro de canal du capteur extérieur
8. Indicateur de tendance de la température extérieure
9. Unité de l’affichage de la température extérieure (°C/°F )
10.
1
12. Unité de l’affichage de la température intérieure (°C/°F )
13. T
14.
mois: date)
15. Heure/Calendrier
16. AM/PM
17.
REMOTE SENSOR (THN132N)
1
2
3
4
5
1. LED status indicator
2. Wall mount hole
3. Battery compartment
4. RESET hole
5. CHANNEL switch
NOTE
The sensor included in this package can search
channels 1, 2 and 3. T
purchase additional sensors. Visit www
for more about accessory sensors.
GETTING ST
INSERT BA
1. Gently pull the battery compartment cover apart from the
unit.
2. Insert the batteries, matching the polarities (+/-).
3. Press RESET after each battery replacement.
LOCA
MEANING
Outdoor temperature
area
Sensor batteries are low
Indoor temperature area Main unit batteries are
low
NOTE
Replace the batteries when displays , or when
the display/backlight is dim.
REMOTE SENSOR
The main unit can collect data from up to 5 sensors.
T
1. Open the battery compartment.
2. Select a channel then press RESET .
3. Close the battery door
4. Place the sensor within 30 m (98 ft) of the main unit using
the table stand or wall mount.
TIP
Ideal placements for the sensor would be in any location
on the exterior of the home at a height of 1.5 m (5 ft) and
which can shield it from direct sunlight or wet conditions for
an accurate reading.
1.5m(5ft)
NOTE
Use alkaline batteries for longer usage and consumer
grade lithium batteries in temperatures below freezing.
SENSOR DA
T
Press and hold
.
The sensor reception icon in the remote sensor area shows
the status:
Icon Description
Searching for sensor(s).
Sensor is found.
Cannot find sensors.
TIP
The transmission range may vary depending on many
factors. Y
to get the best results.
CLOCK
CLOCK RECEPTION
This clock is designed to synchronize its clock automatically
with a clock signal. Press to turn on and select the desired
region (EU/UK/US ).
Region Signal
EU DCF
UK MSF
US WWVB
Clock signal reception indicator:
Icons Description
Main unit is searching
for clock signal strength
(flash)
Main unit is searching for
clock signal
No clock signal
NOTE
It takes 2-10 minutes to receive the clock signal. If
the signal is weak, it could take up to 24 hours to receive a
valid signal.
Y
manually
T
Press and hold
. The icon turns off.
NOTE
The signal reception is on after each reset or battery
replacement.
SET THE CLOCK MANUALL
1. Press and hold to disable signal reception.
2.
. The screen displays ZONE and the
number flashes.
3.
For EU/UK, the time-zone offset sets the clock up to
+/- 23 hours from the received clock signal time. For US,
the time-zone setting is 0 (P), 1 (M), 2 (C), 3 (E).
4. Press
to confirm.
5. Press once or press and hold +/- to adjust the setting for
12/24h hour format, hour
(month-day/day-month), month, date and language
6. Press
to conrm each setting.
NOTE
The language options are English (ENG ), Spanish
(S ), Italian (I ), French (FRE ) and German (GER ).
When the unit is in idle mode, you may choose the display
mode options.
T
Press
to select between clock and date display
TEMPERA
T
Press °C / °F inside the battery compartment.
NOTE
When the indoor temperature is lower than -5 °C
(23.0 ° F), the screen displays LL.L . When the temperature
is higher than 50 ° C (122.0 ° F), the screen displays HH.H .
T
Press
.
T
Press
repeatedly until the unit displays . The data
on each sensor displays for 3 seconds. Press
again
turn off the auto-loop, the icon turns off.
NOTE
The sensor displays in ascending order
5 sensors are present, the main unit skips the absent sensor
and advances to the next present sensor
T
selected sensor:
Press MEM repeatedly
T
Press and hold MEM .
temperature will be cleared and starts to record the current
temperature.
ICE W
If the channel 1 sensor temperature falls between 3°C to -2°C
(37°F to 28°F), LED indicator will flash, and will stop flashing
once the temperature is out of this range. Press – to turn off
the ice warning alert.
NOTE
The ice warning alert turns on again when the
temperature falls into the temperature range.
BACKLIGHT
Press to turn on the backlight. The backlight will be
on for 5 seconds.
PRECAUTIONS
• D o n o t s u b j e c t t h e t o e x c e s s i v e f o r c e , s h o c k , d u s t ,
temperature or humidity
• Do
dry it immediately with a soft, lint-free cloth.
• Do not clean the unit with abrasive or corrosive materials.
• Do not tamper with the unit’s internal components. This
invalidates the warranty
• Only use fresh batteries. Do
• Images shown in this manual may differ from the actual
display
• When disposing of this product, ensure it is collected
separately for special treatment.
• Placement
in damage to its finish for which Oregon Scientific will not
be responsible. Consult the furniture manufacturer’s care
instructions for information.
• The contents
the permission of the manufacturer
• Do
Collection of such waste separately for special treatment
is necessary
• Please note that some units are equipped with a battery
safety strip. Remove the strip from the battery compartment
before first use.
NOTE
The technical specifications for this product and the
contents of the user manual are subject to change without
notice.
SENSORE REMOTO (THN132N)
1
2
3
4
5
1. Indicatore LED di stato
2. Foro di montaggio a parete
3. Compartimento batterie
4. Foro per RESET
5. Switch per selezionare il CANALE
NOT
Il sensore incluso in questa confezione può operare
sui canali 1, 2 o 3. Per operare sui canali 4 e 5, potete comprare
sensori aggiuntivi. Visitate www per
saperne di più sui sensori accessori.
COME INIZIARE
INSERIRE LE BA
1.
dall’unità.
2. Inserite le batterie, rispettando le polarità (+/-).
3. Premete RESET (RIPRISTINO) dopo ogni sostituzione
di batterie.
LOCAZIONE
SIGNIFICA
Area temperatura
esterna
Batterie sensore
scariche
Area temperatura interna
Batterie unità principale
scariche
NOT
Sostituire le batterie quando si visualizza , o
quando l’illuminazione/controluce è bassa.
SENSORE REMOTO
L
Per impostare il sensore:
1.
2. RESET (RIPRISTINO).
3. Chiudete il coperchio delle batterie.
4. Mettete il sensore entro 30 m (98 piedi) dall’unità principale
usando il supporto da tavolo oppure il montaggio a parete.
SUGGERIMENTO
Le posizioni ideali per il sensore
sarebbero qualsiasi posizione all’esterno della casa ad
un’altezza a 1.5 m (5 piedi) ed al riparo dalla luce solare diretta
o dall’umidità per una lettura accurata.
1.5m(5ft)
NOT
Usate batterie alcaline per il normale funzionamento e
batterie al litio per temperature rigide e/o al disotto dello zero.
TRASMISSIONE DA
Come ricercare un sensore:
Premete e tenete premuto
.
L
mostra lo stato:
Icona Descrizione
Ricerca del/i sensore/i.
Sensore trovato.
Sensore non trovato.
SUGGERIMENTO
La portata di trasmissione può variare
in funzione di molti fattori. Potreste dover provare con diverse
posizioni per ottenere i risultati migliori.
C
OROLOGIO
RICEZIONE OROLOGIO
Questo orologio è progettato per sincronizzarsi automaticamente
con un segnale orario radiocontrollato. Premete per
accendere e selezionare la regione desiderata (EU/UK/US).
Regione Segnale
EU DCF
UK MSF
US WWVB
Indicatore ricezione segnale orario:
Icone Descrizione
L
rilevando l’intensità del
segnale orario
(lampeggia)
L
cercando il segnale
orario
Nessun segnale orario
NOT
Ci vogliono da 2 a 10 minuti per ricevere il segnale
orario. Se il segnale è debole, ci potrebbero volere fino a
24 ore per ricevere un segnale valido.
Potete spegnere la ricezione del segnale orario ed impostare
l’orologio manualmente.
Per disabilitare la ricezione del segnale:
T
. L si spegne.
NOT
La ricezione del segnale si accende dopo ogni RESET
o sostituzione batterie.
IMPOST
1. T per disabilitare la ricezione del segnale.
2. T
. Lo schermo mostra ZONA ed il numero
lampeggia.
3.
l’impostazione. Per EU/UK, la compensazione del fuso
orario
orario ricevuto. Per US, l’impostazione del fuso orario è
0(P), 1(M), 2(C), 3(E).
4. Premete
per confermare.
5.
l’impostazione per il formato 12/24h ore, ore, minuti, anno,
formato di calendario (mese-giorni/giorno-mese), mese,
data e lingua.
6.
per confermare ogni impostazione.
NOT
Le opzioni della lingua sono Inglese (ENG ), Spagnolo
(S ), Italiano (I ), Francese (FRA ), TGER).
Quando l’unità è in pausa, potete scegliere le opzioni di
modalità di visualizzazione.
Per selezionare la modalità di visualizzazione:
Premete
per selezionare tra visualizzazione orario e data.
TEMPERA
Per cambiare l’unità di misura della temperatura:
Premete °C / °F all’interno del comparto batterie.
NOT
Quando la temperatura interna è inferiore a -5 °C
(23.0 °F), lo schermo visualizza LL.L . Quando la temperatura
interna è inferiore a 50 °C (122.0 °F), lo schermo visualizza
HH.H.
Per cambiare la visualizzazione del sensore:
Premete
.
Per fare una scansione automatica dei sensori:
Premete
ripetutamente fino a che l’unità mostra . I
dati su ogni sensore sono visualizzati per 3 secondi. Premete
di nuovo per spegnere la auto scansione, l’icona
si spegne.
NOT
Il sensore visualizza in ordine ascendente. Se non
tutti i 5 sensori sono presenti, l’unità principale salta il sensore
assente ed avanza al prossimo sensore presente.
Per passare tra le registrazioni MAX/MIN e quelle correnti
per il sensore selezionato:
Premete MEM ripetutamente.
Per cancellare le registrazioni MAX/MIN:
TMEM . T
interna ed esterna saranno cancellati e si avvia la registrazione
della temperatura corrente.
ALLARME GELO
Se il sensore del canale 1 scende ad un valore tra 3°C e
-2°C (tra 37 °F e 28 °F), l’indicatore LED lampeggerà, e non
lampeggerà più una volta che a temperatura sia al di fuori di
questo intervallo. Premete - per spegnere l’allerta ghiaccio.
NOT
L
temperatura scende all’interno dell’intervallo di temperatura.
RETROILLUMINAZIONE
Premete per accendere la retroilluminazione. La
retroilluminazione si accenderà per 5 secondi.
CAPTEUR SANS FIL (THN132N)
1
2
3
4
5
1. Indicateur LED
2. T
3. Compartiment à pile
4. TRESET (RÉINITIALISA
5. CHANNEL (CANAL) sélecteur
REMARQUE
Le capteur inclus peut chercher les
canaux 1,2 et 3. Pour chercher les 5 canaux, vous
pouvez acheter des capteurs supplémentaires. Visitez
www pour plus d’informations
concernant les capteurs supplémentaires.
COMEINIZIARE
POUR COMMENCER
INSERTION DES PILES
1.
2. Insérez les piles, en respectant les indications de polarité
(+/-).
3. Appuyez RESET ( RÉINITIALISA) après chaque
changement de piles.
POSITION
SIGNIFICA
Zone de la température
extérieure
Le niveau de la pile du
capteur est faible
Zone de la température
intérieure
Le niveau des piles de
l’unité principale est
faible
REMARQUE
Remplacez les piles lorsque s’affiche
ou lorsque la luminosité de l’affichage ou du rétroéclairage
diminue fortement.
CAPTEUR SANS FIL
L
5 capteurs.
Pour régler le capteur:
1.
2. RESET
(RÉINITIALISER).
3.
4. Placez le capteur dans les 30m (98ft) autour de l’unité
principale en utilisant le support table ou la fixation murale.
ASTUCE
Le positionnement idéal pour le capteur se trouve
à l’extérieur de la maison à une hauteur d’ 1,5 m (5 pieds) et
protégé de la lumière directe du soleil ou de l’humidité pour
une lecture précise.
1.5m(5ft)
REMARQUE
Utilisez des piles alcalines pour une durée
d’utilisation supérieure et des piles au lithium pour la
consommation lors de températures inférieures au gel.
TRASMISSIONE DA
Pour rechercher un capteur:
Maintenez appuyée la touche
.
L
distance indique les états suivants :
Icône Description
Recherche de
capteur(s).
Capteur trouvé
Impossible de trouver un
capteur
ASTUCE
La portée de transmission peut varier en fonction
de nombreux facteurs. V
plusieurs emplacements pour obtenir les meilleurs résultats.
C
SPECIFICA
MAIN UNIT
L x W x H 145 x 74 x 19 mm
5.71 x 2.91 x 0.75 in
Weight 136 g (4.8 oz) without
batteries
T -5°C to 50°C
(23°F to 122°F)
Resolution 0.1°C (0.2°F)
Power 2 x UM-4 (AAA) 1.5 V
batteries
REMOTE UNIT (THN132N)
L x W x H 96 x 50 x 22 mm
(3.78 x 1.97 x 0.87 in)
Weight 50 g (1.76 oz) without
batteries
Transmission range 30 m (98 ft) unobstructed
T -20 °C to 60 °C
(-4 °F to 140 °F)
Signal frequency 433 MHz
Power 1 x UM-3 (AA) 1.5 V
batteries
ABOUT OREGON SCIENTIFIC
Visit our website www to learn more
about Oregon Scientific products.
For any enquiry
info@oregonscientific.com.
Oregon Scientific Global Distribution Limited reserves the right
to interpret and construe any contents, terms and provisions
in this user manual and to amend it, at its sole discretion, at
any time without prior notice. T
inconsistency between the English version and any other
language versions, the English version shall prevail.
FCC ST
This device complies with Part 15 of the FCC Rules. Operation
is subject to the following two conditions: (1) This device may
not cause harmful interference, and (2) This device must
accept any interference received, including interference that
may cause undesired operation.
WARNING
Changes or modifications not expressly
approved by the party responsible for compliance could void
the user’s authority to operate the equipment.
NOTE
This equipment has been tested and found to comply
with the limits for a Class B digital device, pursuant to Part
15 of the FCC Rules. These limits are designed to provide
reasonable protection against harmful interference in a
residential installation.
This equipment generates, uses and can radiate radio
frequency energy and, if not installed and used in accordance
with the instructions, may cause harmful interference to
radio communications. However
that interference will not occur in a particular installation. If
this equipment does cause harmful interference to radio or
television reception, which can be determined by turning the
equipment off and on, the user is encouraged to try to correct
the interference by one or more of the following measures:
• Reorient or relocate the receiving antenna.
• Increase the separation between the equipment and
receiver
• Connect the equipment into an outlet on a circuit
different from that to which the receiver is connected.
• Consult
for help.
This Class B digital apparatus complies with Canadian ICES-
3(B)/NMB-3(B)
DECLARA
The following information is not to be used as contact for
support or sales. Please call our customer service number
(listed on our website at www), or on
the warranty card for this product) for all inquiries instead.
We
Name: Oregon Scientific, Inc.
10778 SW Manhasset Dr
T
T 1-800-853-8883
declare that the product
Product No.: RMR262
Product Name:
Manufacturer: IDT
Address:
EU-DECLARA
Hereby
(model: RMR262) is in compliance with the essential
requirements and other relevant provisions of Directive
1999/5/EC.
Conformity is available on request via our Oregon Scientific
Customer Service.
COUNTRIES RTTE APPROVED COMPLIED
All EU countries, Switzerland
CH
N
and Norway
PRECAUZIONI
•
sbalzi eccessivi di temperatura o umidità.
• Non immergere l’unità in acqua. Se si versa del liquido
sul prodotto, asciugarlo immediatamente con un panno
morbido e liscio.
•
•
invalida la garanzia.
• Oregon
danni alle finiture causati dal posizionamento del prodotto su
determinati tipi di legno. Consultare le istruzioni fornite dal
fabbricante del mobile per ulteriori informazioni.
•
• Il contenuto
senza l’autorizzazione del fabbricante.
•
con batterie vecchie.
• Al momento dello
nota relativa in allegato.
•
È necessario che questo rifiuto venga smaltito mediante
raccolta differenziata per essere trattato in modo idoneo.
•
batterie. Rimuovere la striscia dal vano batterie prima del
primo utilizzo.
NOT
Le specifiche tecniche del prodotto e il contenuto
del manuale per l’utente possono essere modificati senza
preavviso.
SPECIFICHE
UNITÀ PRINCIP
Lu x La x H 145 x 74 x 19 mm
5,71 x 2,91 x 0,75 pollici
Peso 136 g (4,8 once) senza
batterie
Intervallo misurazione
temperatura
da - 5°C a 50°C
(da 23°F a 122°F)
Risoluzione 0,1°C (0,2°F)
Alimentazione 2 x batterie UM-4 (AAA)
da 1,5 V
UNITÀ REMOT
Lu x La x H 96 x 50 x 22 mm
(3,78 x 1,97 x 0,87 pollici)
Peso 50 g (1,76 once) senza
batterie
Portata di trasmissione 30 m (98 piedi) senza
ostruzioni
Intervallo misurazione
temperatura
da -20 °C a 60 °C
(da -4°F a 140°F)
Frequenza segnale 433 MHz
Alimentazione 1 x batteria UM-3 (AA)
da 1,5 V
INFORMAZIONI SU OREGON SCIENTIFIC
Per ulteriori informazioni sui prodotti Oregon Scientific, visitate
il nostro sito web www
Per richiedere informazioni, contattate il nostro Servizio Clienti
all’indirizzo info@oregonscientific.com.
Oregon Scientific Global Distribution Limited si riserva il
diritto di interpretare e definire eventuali contenuti, termini
e disposizioni contenuti in questo manuale per l’utente
e di modificarli, a sua esclusiva discrezione, in qualsiasi
momento e senza preavviso. Nella misura in cui risultassero
incongruenze tra la versione in inglese e quelle in altre lingue,
farà fede la versione in inglese.
DICHIARAZIONE DI CONFORMITA’UE
Con la presente Oregon Scientific dichiara che questo
T(Modello: RMR262) è conforme ai requisiti
essenzialied alle altre disposizioni pertinenti stabilite dalla
direttiva 1999/5/CE. Una copia firmata e datata della
Dichiarazione di Conformità è disponibile, su richiesta, tramite
il servizio clienti della Oregon Scientific.
PAESI CONFORMI ALLA DIRETTIVA R&TTE
Tutti I Paesi UE, Svizzera CH
e Norvegia N