Ihr digitaler
Beschreibung und Funktionen der
"Ein/Aufnahme"- • Einschalten des V
Schalter(On/Rec) zur
Drehradschalter • Drehen, um schnell vorwärts
oder rückwärts durch die
Nachrichten zu suchen
•
Drücken, um Nachrichten
abzuspielen
• Drücken, um während der
Aufnahme einen Index zu setzen.
• Dient im Setup-Modus dazu
Einstellungen auszuwählen und
vorzunehmen
Löschen (Del) Löschen aller oder ausgewählter
Nachrichten
Halten Ein/Aus (Hold) Aufnahmesperre für den V
Recorder
Lautstärkeregler Drehen, um die Lautstärke wie
gewünscht einzustellen
Einlegen der Batterien
Der digitale V
zwei
Batterien einlegen:
• Öffnen Sie das Batterienfach, indem Sie die
auf der Rückseite des V
aufschieben.
• Legen Sie die Batterien in das Batterienfach ein und
achten Sie auf die korrekte Polarisierung.
• Schieben Sie das Batterienfach wieder zu, bis dieses mit
einem hörbaren Klick einrastet.
Ersetzen der Batterien
Die Batteriestand-Anzeige zeigt den Batterieverbrauch
folgendermassen an:
V
W blinkt, müssen die Batterien
sofort ersetzt werden.
V
Betätigen Sie einfach den "Ein/Aufnahme"-Schalter (On/Rec)
an der V
Der V
Minuten lang keine T
Die LCD-Anzeige
OPERA
MODEL VR368
VOICE RECORDER
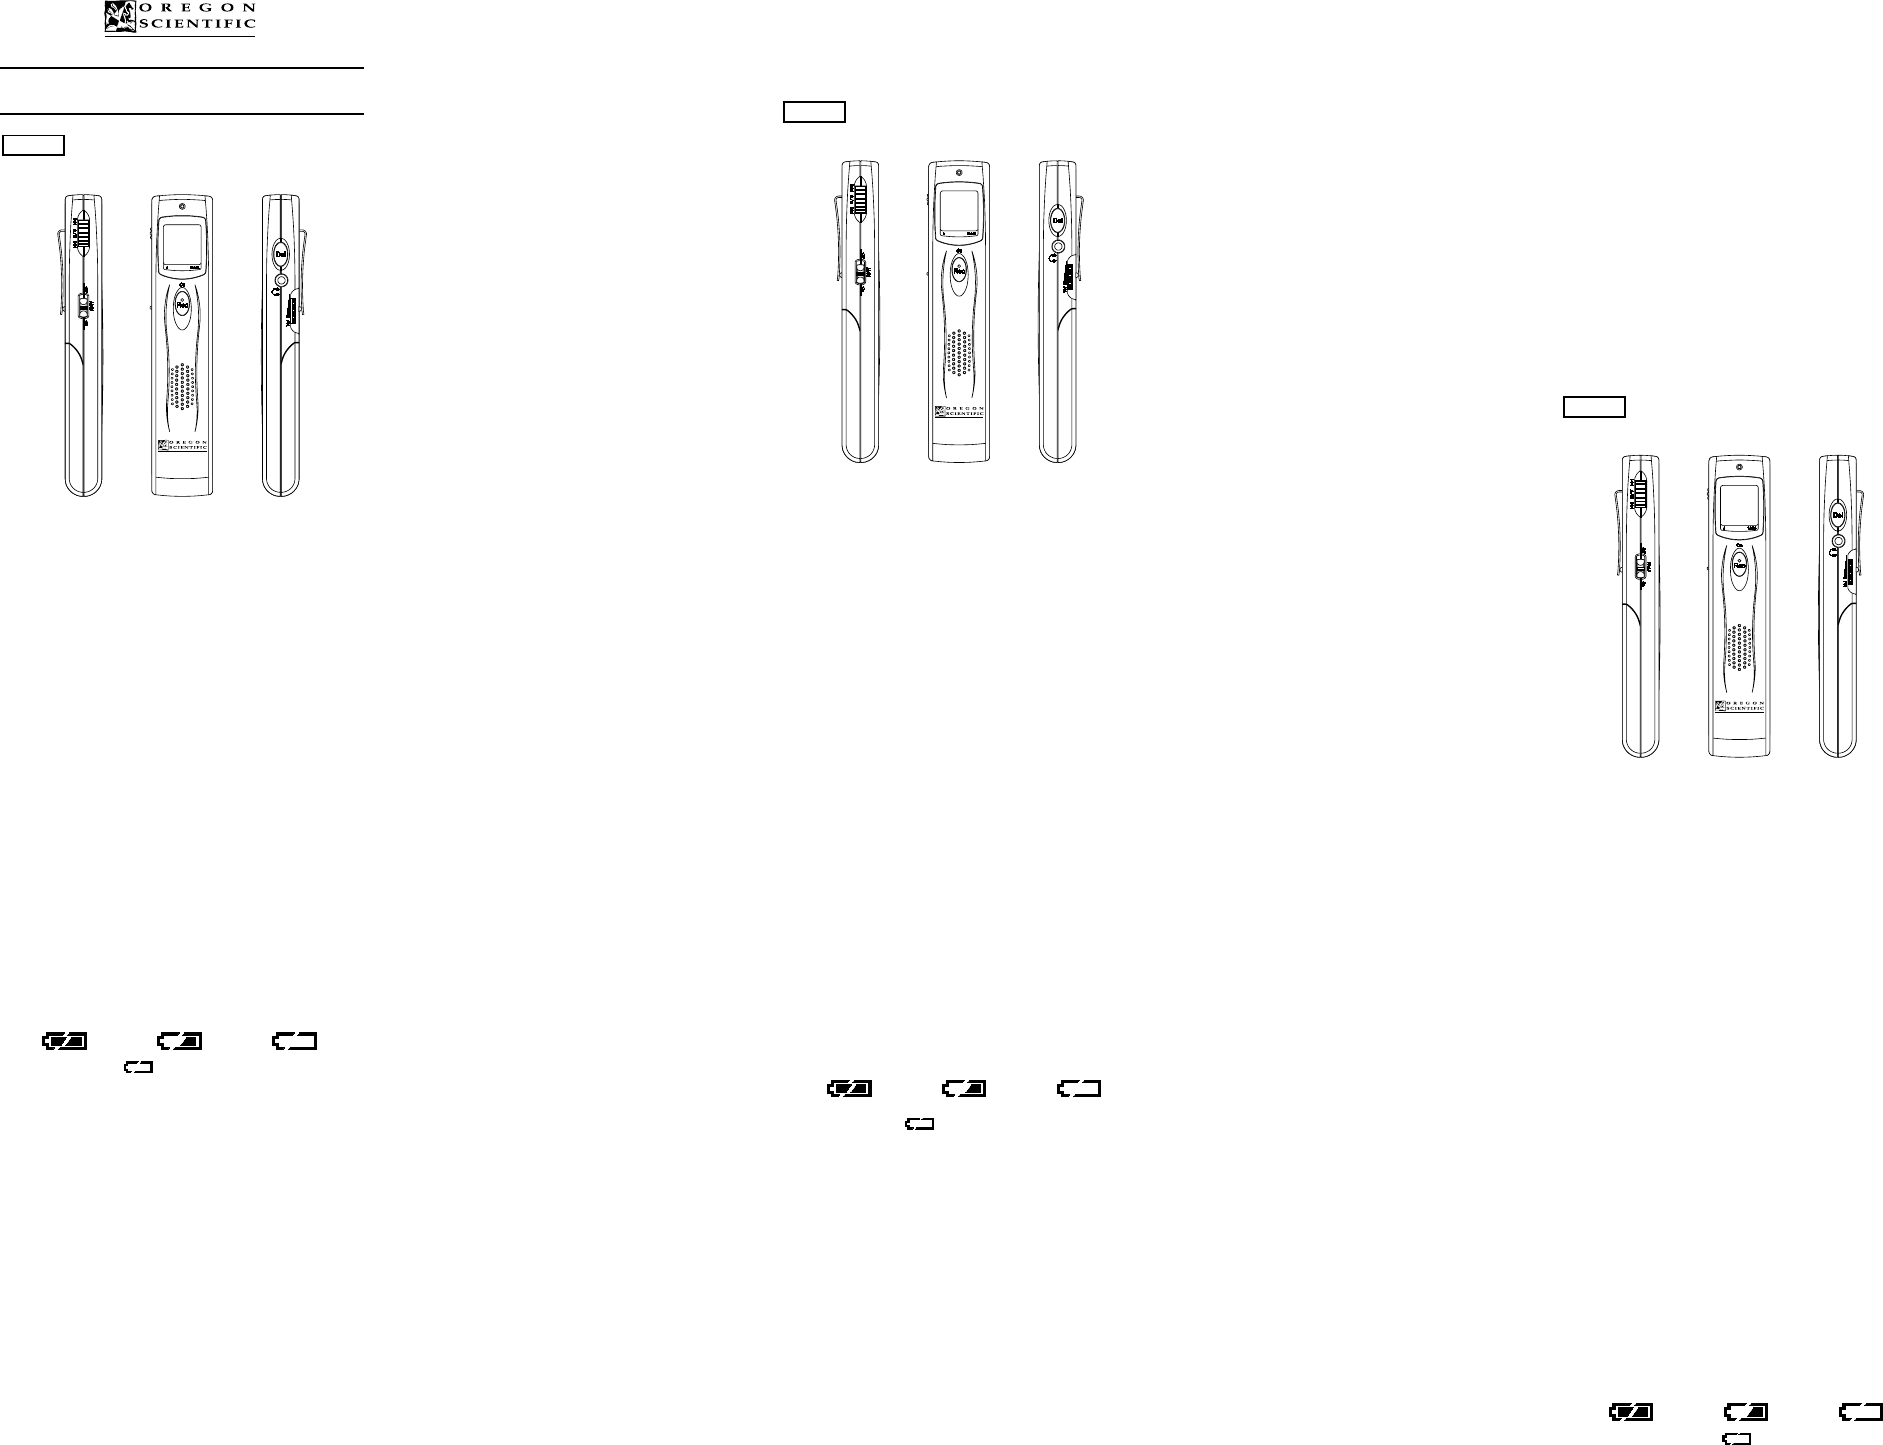
The digital recorder
Description of the function keys
On/Rec switch • Press to switch the recorder on and to
record messages
Jog dial • Rotate to scroll forward or backward
through your messages
• Press to play back or stop messages
•
Press to mark an index during recording
•
Use in Set-up mode to scroll between
and select settings
Del Use to erase selected or all messages
Hold on/off Switch to lock the recorder
V Rotate to adjust the playback volume
Installing the batteries
The VR368 digital recorder uses two 1.5
batteries.
T
• Open the battery compartment by sliding the battery
compartment cover on the back of the recorder in the
direction of the arrow.
• Place the batteries into the compartment, making sure they
are inserted according to the correct polarity.
• Slide the battery compartment cover back on until it clicks
into place.
Replacing the batteries
The remaining battery indicator shows the battery consumption
as follows:
Full -----------------------------------> Empty
If the battery mark flashes, replace the new batteries
immediately.
T
T
the front. The recorder switches itself of
is not operated for about two minutes.
The LCD
The LCD provides various information about the status of
the recorder.
When the recorder is switched on, the initial display shows
the record mode that is selected (SP - standard play, EP -
extended play or LP - long play) in the top left corner. In
the top right corner you can see the two-digit index number
of the message (00 if no messages are recorded or if you are
using the recorder for the first time). Underneath the record
mode is a display of the battery status.
display, you can see the duration of the selected message.
The bar at the very bottom of the display corresponds to the
scale marked 0 - 100% underneath the LCD and shows the
size of the available memory.
Set-up mode
In Set-up mode, you can set various functions on the recorder.
T
recording or playing back messages). Then press and hold
the Jog dial for two seconds.
The first display shows the amount of available time left
(REMAIN) for recording in the record mode that is displayed
in the top left corner
change the recording mode. By rotating the Jog dial up or
down, you can scroll to the other functions VOX and BEEP
T
Press the Jog dial while in the REMAIN screen.
scroll between the record modes SP, EP and LP by rotating the
Jog dial. T
mode is displayed in the top left corner
left for recording is displayed at the bottom. The recorder
then automatically returns to normal operation.
T
When VOX, or voice activated recording, is set to on, the
recorder will stop recording when it detects several seconds
of silence. It resumes recording automatically when a voice
is detected again.
In Set-up, rotate the Jog dial to scroll to the VOX display
and select it by pressing the Jog dial. Rotate the Jog dial to
toggle between VOX on and
confirm the setting you want. The recorder then automati-
cally returns to normal operation.
T
When BEEP is activated, a confirmation tone will be heard.
In Set-up, rotate the Jog dial to scroll to the BEEP display
and select it by pressing the Jog dial. Rotate the Jog dial to
toggle between BEEP
to confirm the setting you want. The recorder then
automatically returns to normal operation.
Recording
T
above the LCD turns red.
T
can plug an external microphone in to the Mic socket on the
top of the recorder. Use a condenser type microphone.
For best results, keep a distance of 10 cm (min.) to 30 cm
(max.) between the microphone (internal or external) and the
sound source.
T
Marking an index during recording
Y
you can play back the message from the location of the index
instead of having to start right at the beginning.
T
An index will be located at the next message number during
recording.
Playback
T
Use the Jog dial to scroll through the messages until you find
the number of the message you want to hear.
Press the Jog dial once to play back the message. The indicator
light above the LCD turns green.
T
Deleting messages
Scroll through the messages to find one you wish to delete
by rotating the Jog dial.
Press Del once. The two-digit index number will flash.
Press Del again to confirm the erasure of the single message,
press Rec to cancel the erasure, or rotate the Jog dial to toggle
from a single message to all messages. When
the display, press Del to confirm the erasure of all messages,
or press Rec to cancel the erasure.
Reset
If the recorder should malfunction, use a blunt point (e.g. the
tip of a pencil or the nib of a pen) to press the Reset key on
the back of the recorder.
If the memory has been corrupted, reset the system as follows:
• Press and hold the Del key;
• At the same time, press the Reset key as described above;
• Release the Reset key;
• W
• Release the Del key.
• The memory will be initialised after about 45 seconds.
T
Model name : VR368
A : Smin / EP 122 min / LP
200 min
Dimensions : 124 x 25 x 15.5 cm
W : 34.3 g (excluding battery) / 56.5 g
(including battery)
Power supply : 3 V DC, LR03, two
UM-4 alkaline batteries
Battery life : approx. 6.5 hours' recording
time, approx.3.5 hours' speaker
playback time (at volume 5)
Recording media : built-in flash memory
Max. no. of recordings : 99 messages
Effective maximum output
: 54 mW (8 ohm)
Frequency range : 350 - 3600 Hz
L'enregistr
Description des commandes de fonction
Interrupteur On/Rec • Appuyer dessus pour mettre
l'enregistreur sous tension et
enregistrer les messages
Cadran Jog • Le tourner pour faire défiler les
messages vers l'avant ou l'arrière
• Appuyer dessus pour écouter ou
arrêter les messages
• Appuyez pour mettre un index
pendant l'enregistrement
• L'utiliser dans le mode de
paramètrage pour circuler entre
les messages et les sélectionner
Del Sert à effacer des messages
sélectionnés ou la totalité des messages
Hold on/off Pour verrouiller l'enregistreur
Cadran de volume Le tourner pour régler le volume
d'écoute
Installation des piles
L'enregistreur numérique VR368 fonctionne avec deux
piles alcalines 1,5V
Pour installer les piles :
• Ouvrir le logement des piles en faisant coulisser la trappe
du logement des piles au dos de l'enregistreur dans le sens
de la flèche.
• Installer les piles dans le logement en respectant les polarités.
• Remettre le couvercle en place en le faisant coulisser
jusqu'au déclic.
Remplacemant des piles
L
suivantes:
Plein ------------------------------------> V
Si l’icône de la pile clignote, changer immédiatement
la pile.
Mise sous tension de l'enregistr
Pour mettre l'enregistreur sous tension, appuyer simplement
sur l'interrupteur On/Rec sur le devant. L'enregistreur s'éteint
automatiquement s'il n'est pas utilisé pendant deux minutes
environ.
Le LCD
Le LCD fournit différentes informations sur le statut de
l'enregistreur.
Quand l'enregistreur est mis sous tension, l'affichage initial
indique le mode d'enregistrement sélectionné (SP - lecture
standard, EP - lecture prolongée ou LP - lecture longue) en
haut à gauche. En haut à droite, on peut voir le numéro
d'indice à deux chiffres du message (00 si aucun message
n'est enregistré ou si l'on utilise l'enregistreur pour la
première fois). Le statut des piles est affiché sous le mode
d'enregistrement. Dans le bas de l'affichage, on peut voir la
durée du message sélectionné. La barre tout en bas de
l'affichage correspond à l'échelle marquée 0 - 100% sous le
LCD et indique la quantité de mémoire disponible.
Mode de paramètrage
Le mode de paramètrage permet de règler les différentes
fonctions de l'enregistreur. Pour entrer le paramètrage, s'assurer
que l'enregistreur est en mode d'arrêt (Pas d'enregistrement ou de
ré-écoute des messages). Puis appuyer sur le cadran Jog pendant
deux secondes.
Le premier affichage indique le temps d'enregistrement
disponible (REMAIN) dans le mode d'enregistrement qui est
affiché en haut à gauche. Cet écran REMAIN sert aussi à
changer le mode d'enregistrement.
haut ou le bas pour passer aux autres fonctions VOX et BEEP
Pour changer le mode d'enregistrement :
Appuyer sur le cadran Jog dans l'écran REMAIN. On peut
alors faire défiler les modes d'enregistrement SP, EP et LP
en tournant ce cadran. Pour règler un mode, appuyer sur le
cadran Jog quand le mode désiré s'affiche en haut à gauche.
Le temps d'enregistrement disponible s'affiche dans le bas.
L'enregistreur retourne ensuite automatiquement au mode
de fonctionnement normal.
Pour changer le mode VOX :
Quand VOX, ou enregistrement activé à la voix, est réglé,
l'enregistreur cesse d'enregistrer quand il détecte plusieurs
secondes de silence. Il reprend l'enregistrement
automatiquement quand il détecte à nouveau une voix.
Lors du paramètrage, tourner le cadran Jog pour passer à
l'affichage
cadran Jog. T
On (activé) et VOX Of
confirmer le réglage désiré. L'enregistreur retourne alors
automatiquement au mode de fonctionnement normal.
Pour changer le mode BEEP :
Quand BEEP (BIP) est activé, une tonalité de confirmation
se fait entendre.
Lors du paramètrage, tourner le cadran Jog pour passer à
l'affichage BEEP
cadran Jog. T
On (activé) et BEEP
confirmer le réglage désiré. L'enregistreur retourne alors
automatiquement au fonctionnement normal.
Enregistr
Pour enregistrer un message, appuyer une fois sur Rec.
L'indicateur lumineux au-dessus du LCD passe au rouge.
Pour enregistrer, on peut utiliser le micro interne ou
brancher un micro externe dans la prise MIC sur le dessus
de l'enregistreur. Utiliser un micro de type condensateur.
Pour de meilleurs résultats, garder une distance de 10 cm
(min) à 30 cm (max) entre le micro (interne ou externe) et
la source sonore.
Pour arrêter l'enregistrement, appuyer encore une fois sur Rec.
Marquer
Il est possible de marquer un indice lors de l'enregistrement.
Ceci permet de reproduire le message à partir de l'emplacement
de l'indice au lieu d'avoir à recommencer debut le début.
Pour marquer un indice, appuyer une fois sur le cadran Jog
durant l'enregistrement. Un index sera indiqué sur le prochain
message lors de l’enregistrement.
Ecoute
Pour reproduire un message :
Utiliser le cadran Jog pour faire défiler les messages jusqu'au
numéro du message que l'on désire écouter.
Appuyer une fois sur le cadran Jog pour reproduire le message.
L'indicateur lumineux au-dessus du LCD passe au vert.
Pour arrêter l'écoute, il suffit d'appuyer encore une fois sur
le cadran Jog.
Effacement de messages
Faire défiler les messages pour trouver celui que l'on désire
annuler en tournant le cadran Jog.
Appuyer une fois sur Del. Le numéro d'indice à deux chiffres
se met à clignoter.
Appuyer encore une fois sur Del pour confirmer l'effacement
du seul message; appuyer sur Rec pour annuler l'effacement
ou tourner le cadran Jog pour alterner entre un seul message
et tous les messages. Quand
sur DEL
appuyer sur Rec pour annuler l'effacement.
Réenclenchement
Au cas où l'enregistreur fonctionnerait mal, utiliser une
pointe émoussée (par exemple, la pointe d'un crayon ou d'un
stylo) pour appuyer sur la commande de réenclenchement
(Reset) au dos de l'appareil.
Si la mémoire a été endommagée, réenclencher le système de
la façon suivante :
• Appuyer sans lâcher sur Del;
• Simultanément, appuyer sur Reset comme décrit ci-dessus;
• Lâcher Reset;
• Attendre que l'icône "REMAIN" s'af
• Lâcher Del.
• La mémoire s'initialisera 45 secondes plus tard environ.
Spécifications techniques
Nom du modèle : VR368
T : SP 91 mn / EP 122 mn /
disponible LP 200 mn
Dimensions : 124 x 25 x 15,5 cm
Poids : 34,3 g (sans piles) / 56,5 g (avec
piles)
Alimentation : Deux piles alcalines 3V DC,
LR03, AAA
V :
Environ 6.5 heures d'enregistrement
Environ 3.5 heures de reproduction
par le haut-parleur (à volume 5)
Enregistreur : Mémoire flash incorporée
Nombre max. : 99 messages
d'enregistrements
Sortie effective max. : 54 mW (8 ohm)
Rayon de fréquence : 350 - 3600 Hz
Micro : Condensateur interne
Entrée micro : diamètre 3.5mm, mono
Ecouteur : diamètre 3.5mm, IPM 32 ohm
T : 0 - 40
o
C
foncitonnement
Accessoires : mode d'emploi, écouteur
In der LCD-Anzeige erscheinen verschiedene Informationen
über den Betriebszustand des V
Nach dem Einschalten des V
Anzeige für den jeweils eingestellten
-Standardwiedergabe; EP
- Langspielmodus) in der linken oberen Ecke. In der rechten
oberen Ecke sehen Sie eine zweistellige numerische
("00" wenn keine Nachrichten vorhanden sind, oder wenn
Sie den V
Anzeige für den eingestellten
die
Rand erscheint die
ausgewählten Nachricht. Der
Rand entspricht einer Skala von 0-100%, und die Länge des
Balkens zeigt den noch verfügbaren Speicher an.
Setup-Modus
Im Setup-Modus (Einrichten) können Sie verschiedene
Funktionen des V
sicher
(keine
Sie nun den Drehradschalter, zwei Sekunden lang gedrückt.
In der ersten
im jeweils eingestellten
Aufnahmen verbleibende Zeit (REMAIN). In der "REMAIN"-
Anzeige (VERBLEIBENDE ZEIT) kann zudem die Einstellung
für den aktiven
den Drehradschalter nach oben oder unten, um die Funktionen
"VOX" (Sprachgesteuerte
Aufnahmemodus wechseln:
Betätigen Sie den Drehradschalter während die "REMAIN"-
Anzeige (VERBLEIBENDE ZEIT) erscheint. Sie können
nun zwischen den
mittels des Drehradschalters umschalten. Betätigen Sie den
Drehradschalter sobald der eingestellte Modus in der oberen
linken Ecke angezeigt wird, um diesen Betriebsmodus
auszuwählen. Die verbleibende
anschließend unten in der
nun selbsttätig wieder in den Normalbetriebsmodus zurück.
In den VOX-Modus wechseln:
W
Recorder die
einigen Sekunden erkennt. Die
fortgesetzt, sobald erneut Geräusche festgestellt werden.
Stellen Sie mit dem Drehradschalter die VOX-
Sprachsteuerungsoption im Setup-Modus ein, und wählen
Sie den Betriebszustand durch Drücken auf den
Drehradschalter aus. Drehen Sie am Drehradschalter, um die
gewünschte Einstellung für "VOX Ein" oder "VOX
auszuwählen. Der V
wieder in den Normalbetriebsmodus zurück.
"BEEP"-Modus (T
W
ertönt ein T
Drehen Sie im Setup-Modus am Drehradschalter, um die
Anzeige für den "BEEP"-Modus (T
aufzurufen, und aktivieren Sie den Einstellmodus durch
Drücken auf den Drehradschalter. Drehen Sie nun am
Drehradschalter
auszuwählen, und Drücken Sie nochmals, um die gewünschte
Auswahl zu bestätigen. Der V
automatisch wieder in den Normalbetriebsmodus zurück.
Aufnahme
Betätigen Sie "Rec" einmal, um eine Nachricht aufzunehmen.
Der
Sie können
vornehmen, oder dazu ein externes Mikrofon an der mit "Mic"
bezeichneten Buchse an der Stirnseite des V
anschließen. V
Für eine optimale
Entfernung von 10 cm (min.) bis 30 cm (max.) in das
Mikrofon (integriert oder extern) sprechen.
Beenden Sie die
Betätigen der mit "Rec" bezeichneten
Index-Markierung während der
Sie können während der
vornehmen. Diese Funktion ermöglicht Ihnen die W
einer Nachricht direkt von dieser markierten Stelle beginnend,
ohne zuerst die ganze
müssen.
Betätigen Sie einfach den Drehradschalter einmal während
der
Während der
Nachricht.
Wiedergabe
W
V
zu suchen bis Sie die Nummer der gewünschten Nachricht
zur W
Microphone : built-in, condenser type
Mic. Input : 3.5 mm diameter, mono type
Earphone :
3.5 mm diameter, IMP 32 ohm
Operating temperature : 0 - 40
o
C
Accessories : user's manual, earphone
English
French
German