587141
3
Zoom out
Zoom in
Vorherige Seite
1/36
Nächste Seite
2
EN
2. Use the screw (Type B) to fix.
3. Assemble the wind vanes on the top of the wind
pointer.
4. Use the screw (Type B) to fix.
12
34
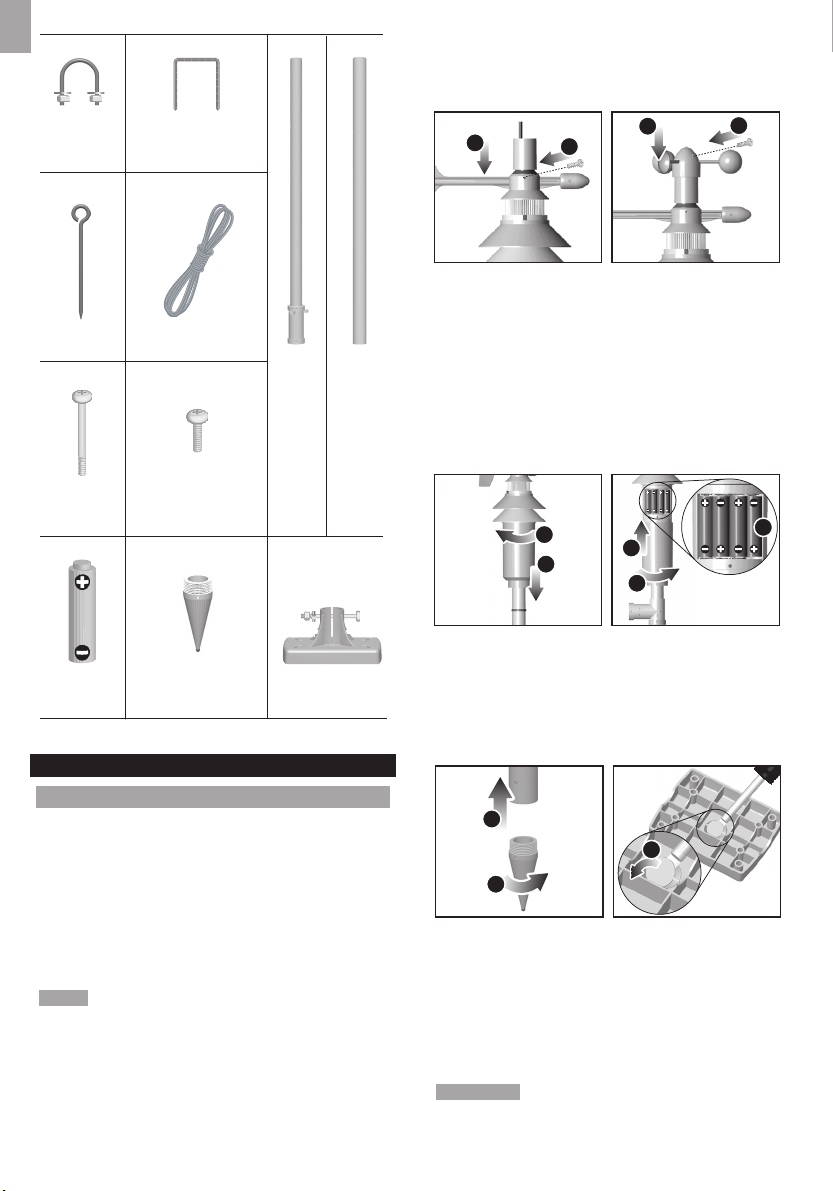
5. Hold the wind sensor upright and rotate the
protective sleeve to the left to unlock.
6. Slide the sleeve down to open the battery
compartment.
7. Insert batteries (4 x UM-3 / AA) in the compartment,
matching the polarity (+ / -) and press RESET.
8. Slide the protective sleeve up to close the
compartment.
9. Rotate the sleeve to the right to lock.
7
5
8
9
6
To set up the steel pole support:
1. Assemble the “cone shape” guiding end with the
bottom steel pole.
2. Screw the guiding end clockwise at the bottom of
the pole.
3. Remove the cover hole from the plastic base.
1
2
3
4. Insert the plastic base onto the steel pole until the
screw hole aligns with the support.
5. Use the screw that is already attached on the base,
with the washers and bolts to fix.
6. Use the guiding end to start inserting the steel pole
at a perpendicular angle into the ground.
WARNING Make sure that there are NO electric
cables / power lines, gas / water pipes in the area
where you are placing the steel pole. Do not place the
GETTING STARTED
SET UP SENSOR
The sensor can take readings for:
The wind speed and directions
The outdoor temperature
The outdoor relative humidity
Heat index, wind chill and dew point level
The sensor is battery operated and is capable of
transmitting data to the base station wirelessly within an
approximate operating range of 100 meters (328 feet).
NOTE For best results, ensure that the wind direction
indicator on the wind sensor points to the North to
enable an accurate reading. The sensor also should
be positioned in an open area away from trees or other
obstructions.
To set up the wind sensor main body on the steel pole:
1. Assemble the wind direction pointer on the top of the
wind sensor.
2 x Round
U-Shaped
Bolts
2 x Rectangular
Base Legs
3 x Pins 3 x Tension Strings
2 x Screws
(Type B)
4 x Screws
(Type A)
4 x UM-3/
AA
1 x Cone-Shaped
End
1 x Plastic
Support Base
1 x
Mid-
Pole
1 x
Bottom
Pole
WTGR800_EN_R2.indd 2 8/14/07 5:16:50 PM
3

Brauchen Sie Hilfe? Stellen Sie Ihre Frage.

Forenregeln

Missbrauch melden von Frage und/oder Antwort

Libble nimmt den Missbrauch seiner Dienste sehr ernst. Wir setzen uns dafür ein, derartige Missbrauchsfälle gemäß den Gesetzen Ihres Heimatlandes zu behandeln. Wenn Sie eine Meldung übermitteln, überprüfen wir Ihre Informationen und ergreifen entsprechende Maßnahmen. Wir melden uns nur dann wieder bei Ihnen, wenn wir weitere Einzelheiten wissen müssen oder weitere Informationen für Sie haben.

Art des Missbrauchs:

Zum Beispiel antisemitische Inhalte, rassistische Inhalte oder Material, das zu einer Gewalttat führen könnte.

Beispielsweise eine Kreditkartennummer, persönliche Identifikationsnummer oder unveröffentlichte Privatadresse. Beachten Sie, dass E-Mail-Adressen und der vollständige Name nicht als private Informationen angesehen werden.

Forenregeln

Um zu sinnvolle Fragen zu kommen halten Sie sich bitte an folgende Spielregeln:

Neu registrieren

Registrieren auf E - Mails für Oregon Scientific WTGR800 wenn:


Sie erhalten eine E-Mail, um sich für eine oder beide Optionen anzumelden.


Andere Handbücher von Oregon Scientific WTGR800

Oregon Scientific WTGR800 Bedienungsanleitung - Holländisch - 4 seiten

Oregon Scientific WTGR800 Bedienungsanleitung - Französisch - 4 seiten


Das Handbuch wird per E-Mail gesendet. Überprüfen Sie ihre E-Mail.

Wenn Sie innerhalb von 15 Minuten keine E-Mail mit dem Handbuch erhalten haben, kann es sein, dass Sie eine falsche E-Mail-Adresse eingegeben haben oder dass Ihr ISP eine maximale Größe eingestellt hat, um E-Mails zu erhalten, die kleiner als die Größe des Handbuchs sind.

Ihre Frage wurde zu diesem Forum hinzugefügt

Möchten Sie eine E-Mail erhalten, wenn neue Antworten und Fragen veröffentlicht werden? Geben Sie bitte Ihre Email-Adresse ein.


Info