The camera comegs for taking pictu
and plu to h
with the cam
1 Press [ME
2 Press 3/ 4/ 2/ 1 to
∫ Close the menu
Press [ ] laye
• When recording images, you
• There are functions that cannot be set or used depending on the
being used on the camera due to the specifications.
•
Set the dat
•
The caia
• These operating instructions refer to both smartphones and tablets as “smartphones” from
this point on unless noted otherwise.
Playback
[( ] (Pl
• Use this to play back pictures.
Curs
• 2/ 1: to select the picture
[ ] (Delete/Ca
• [ ]: to delete the displayed picture
Setting the M
Menu Description of settings
[Rec]
The menu lets
pixels, etc. of pictures you are recording.
[Motion Picture]
This menu lets you set the setting for motion pictures such as
recording quality
[Playback Mode]
This menu lets you select the playback method. The options
include slideshow playback.
[Playback]
This menu lets
example, you cfor the pi them.
[Setup]
This menu lets you perform the clock settings, beep tone
settings and other settings which make it easier for you to
operate the camera.
[Wi-Fi]
This menu let
Wi-Fi or use the Wi-Fi function.
3 Press 3/ 4 to sel
• It will switch to the next page when you reach the bottom.
(It will also switch by rotating the zoom lever)
4 Press 3/ 4 to
• Depending on the menu item, its setting may not appear or it may be displayed in a
different way
What you c
®
function
Controll
Recording images
remotely with a
smartphone
Playing back pictures
in the camera
Saving images stored
in the camera
Install the dp”
¢
on your
smartp
• OS
App for Android
TM
: Android 2.3.3 or higher
> Search the
TM
S
app.
App for iOS: iOS 6.0 or higher (Please note that the iPhone 3GS
> Search the App Store
SM
for “ ”, and install the app.
• Use the latest version.
• Supported OSs are current as of January 2015 and are subject to
• Read the [Help] in the “
• The screen differs depending on the OS.
• The screens and procedures described from this point on are tho
model first became available for purchase. The screens and proc
version updates.
• Some smartphones/tablets may not work correctly
For information on the “elow
http://panasonic.jp/support/global/cs/dsc/
¢ In this manual, the app is referred to as “
When s
Sending an image each
time a recording is
made
Sending selected
images
100-0001100-000
1
100-0001
1/1/
∫ Entering a password to set up
1 Press
• The Password will be displayed on the camera screen.
2 Te.
3 Select
camera.
4 Enter t
camera.
• If you are using an Android device
password display will allow the device to display the
password as you enter it.
5 On the ”.
Connecting to a
Using t
(If yo
1 Press
• The QR code will be displayed on the camera screen.
2 St
3 Select code],
4 Using “the
camera.
5 Install the
• A message will be displayed on the browser.
• If the smartphone is locked with a passcode, enter the passcode to unlock the
smartphone.
6 Press
7 Te.
8 Select
9 Retu ”.
• St 2 through 6 are not required from the second time on.
Using t
(If you are using an An
1 Press
• The QR code will be displayed on the camera screen.
2 On the ”.
3 Select code].
4 Using “the
camera.
Cancel
SSID:
Password:
Please set on your smartphone
Please scan the QR code using "Image App",
or enter the password into Wi-Fi settings
Cancel
SSID:
Password:
Please set on your smartphone
Please scan the QR code using "Image App",
or enter the password into Wi-Fi settings
Cancel
SSID:
Password:
Please set on your smartphone
Please scan the QR code using "Image App",
or enter the password into Wi-Fi settings
∫ Reco
1 Conn
2 Select ]
• The recorded images are saved in the camera.
• Motion pictures cannot be recorded.
∫ Playi
1 Conn
2 Select [ ]
• Y
icon (
A
) on the top left of the screen. T
stored in the camera, select [LUMIX].
3 T
• Motion pictures cannot be played back.
∫ Saving the camera’
1 Conn
2 Select [ ] on the s
3 T
Yan
motion
• Create a PC user account [account name (up to 254 characters) and password (up to
32 characters)] consisting of alphanumeric characters.
An attempt ncludes non-al
(For Window
Support
R
/Windows
R
7/Windows
R
8/Win
R
8.
Example:
1 Select a
2 Select [
• For details, refer to the operating instructions of your PC or Help on the OS.
(For M
Support
Example:
1 Select a
[File] > [
2 Enable sh
• For details, refer to the operating instructions of your PC or Help on the OS.
Yit to a PC.
The conneor det
connectie
format)”
Preparations:
• If the workgroup of
need to change the setting of this unit in [PC Connection].
1 Press [
2 Press 3/ 4/ 2/ 1 to s [New
then pr
3 Press 3/ 4 to sele
4 Press 3/ 4 to s
Controlling the
Setting up a
Creating a destination folder
Sendi
Sending an image each time you record it ([Send
Images While Recording])
Available file format: JPEG
Sending selected images ([Send Images Stored in the
Camera])
Available file format: JPEG/MP4
Cancel
Select
Set
Select a function
Remote Shooting & View
Send Images While Recording
Send Images Stored in the Camera
5 Select
6 On the
• When the PC you want to connect to is not displayed, select [Manual In
the computer name of the PC (NetBIOS name for Apple Mac computers).
• Folders sorted by the sent date are created in the specified fold
those folders.
• If the screen for a user account and password entry appears, enter the one you set o
PC.
• When the computer name (NetBIOS name for Apple Mac computers) ontains a space
(blank character), etc., it may not be recognised correctly
recommend that
only alphanumeric characters, with a maximum of 15 characters.
1 Connec
(supp
2 Press4 to sele
3 Drag and
• When the image transfer is complete, disconnect the USB connection cab
∫ Playbac
Software for image playback or editing is not supplied with this product.
• T
• T
QuickTime/iT
(Software supporting MP4 format is required.)
• If software is not installed on your PC, download it from the website of the software provider.
• For information on how to use software, contact the software provider
• This phenomenon occurs when charging in a location where the mperature is very high or
very low
> Reconnect the USB connection cable (supplied) in a location where the ambient
temperature (and the temperature of battery) is in a 10 o C to 30 o C (50 o F to 86 o F)
range, and try charging again.
• This is characteristic of MOS sensors which serve as the camera’s pickup sensors.
This is not a malfunction.
• This is characteristic of MOS sensors which serve as the camera’s pickup sensors. It
appears when the
areas, but this is not a malfunction.
It is recorded in still pictures or motion pictures.
Example: Selecting [WPS (Push-Button)] to set up a connection
1 Press [ME
2 Select [WP
3 Press an
access poi
(Example)
[Send Images While Recording]
1 Select th.
2 T
[Send Images Stored in the Camera]
1 Select th.
2 Select [SING to
T
cable (supp
T
If the problem is not resolved, it may be improved by selecting [Reset] on the [Setup]
menu.
The ch
Striping or flicnt l
LED light
Reddng.
OK
Via Network
Connect to the
network (AP)
Cancel
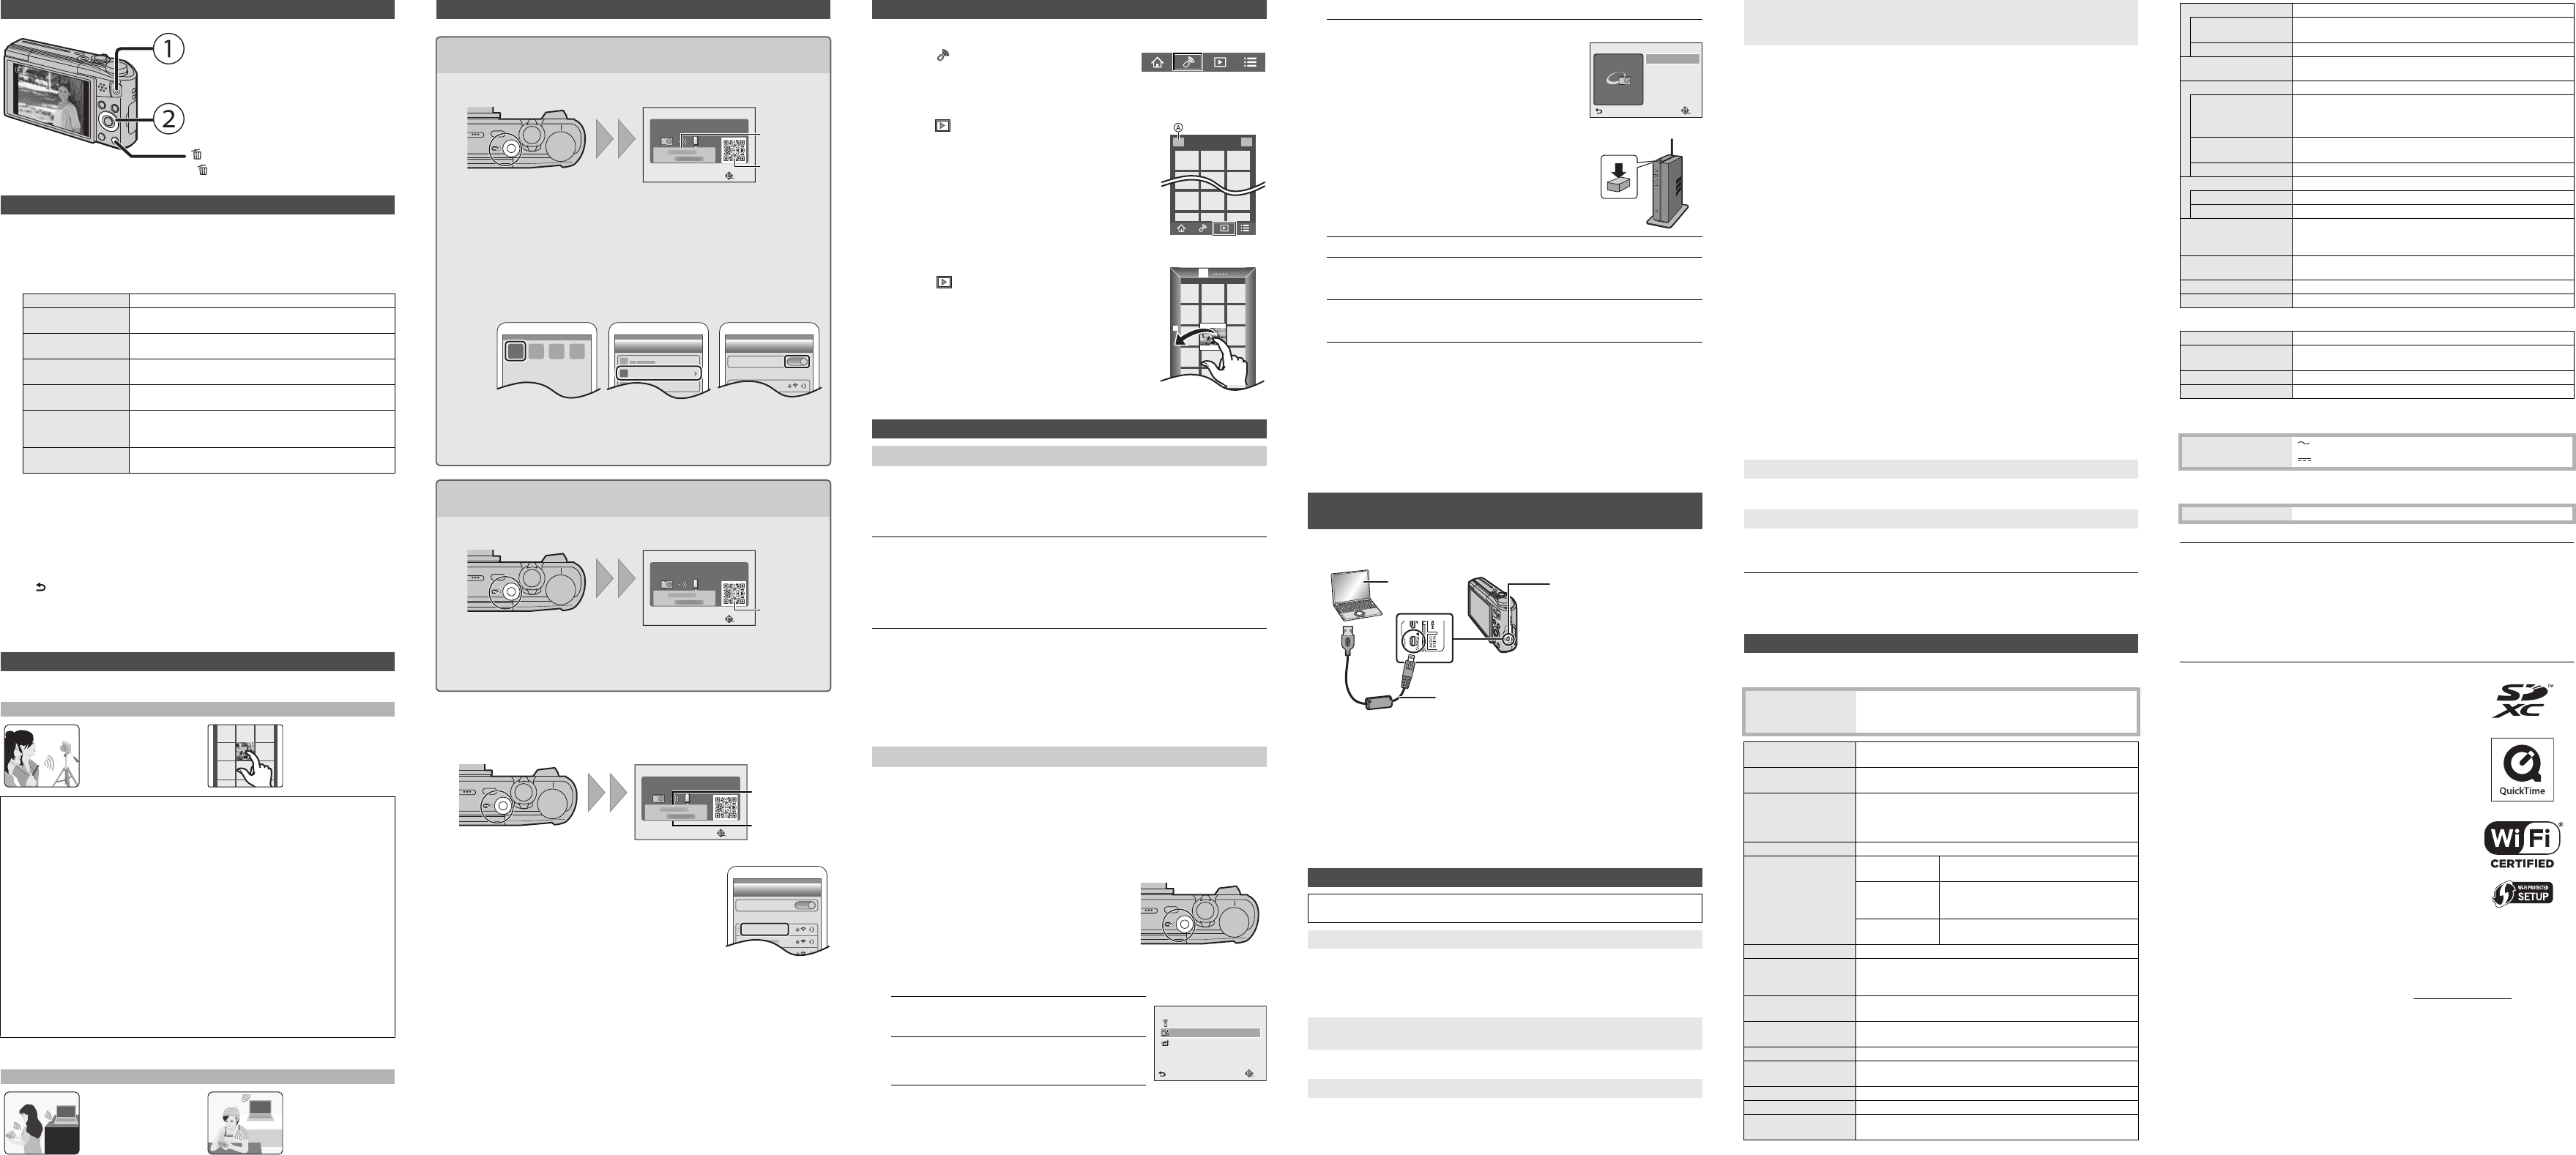
USB Connection Cable
[A
• This socket is also used
when charging the battery
PC
(Genera
• Try [Reset Wi-Fi Settings] in the [Setup] menu.
• Use within the communication range of the device to be connected.
• Is any device, such as microwave oven, cordless phone, etc., that uses 2.4 GHz freq
operated nearby?
> Radio waves may get interrupted when used simultaneously
from the device.
• When the battery indicator is
or the connection may be disrupted.
(A message such as [Communication error] is displayed.)
• If you
In such cases, you may not be able to establish a connection. Move the
the metal surface.
(About a wir
• Check if the wireless access point to connect is in operating state.
• The camera may not display or connect to a wireless access point depending on the
wave condition.
– Move this unit closer to the wireles
– Remove the obstacles between this unit and the wirelesspoint.
– Change the direction of this un
– Change the location and oriet.
– Perform the [Manual Input].
• It may not display even if the radio waves exist depending on the setting of the wireless
access point.
> Check the settings of the wireless access point.
> When the network SSID
access point may not be detected. Enter the network SSID to start the connection or
enable the SSID broadcast of the wireless access point.
• Connection types and security setting methods are different depending on the
access point. (Refer to the operating instructions of the wireless access point.)
• Is the 5 GHz/2.4 GHz switchable wireless access point connected to other equipment u
the 5 GHz band?
> The use of a wireless access point that can use 5 GHz/2.4 GHz simultaneously is
recommended. It cannot be used simultaneously with this camera if it is not compatible.
• It may take longer time to connect depending on the Wi-Fi connection setting of the
smartphone, but it is not a malfunction.
• Is the size of the image too large?
> Reduce the size of the still picture, then transmit.
> Image cannot be transmitted when the battery indicator is flashing red.
PlePDF
details.
S
Digital Camera: Infor
A Wi-Fi
Radio w
Wireless acc
It takes long tim
T
S
Power Source: DC 5 V
Power Consumption: 1.5 W (When recording)
1.0 W (When playing back)
Camera effective
pixels
16,000,000 pixels
Image sensor 1/2.33q MOS sensor, tot
Primary colour filter
Lens Optical 20k zoom, fl4.3 mm to 86.0 mm (35 mm film camera
equivalent: 24 mm to 480 mm)
Wide: F3.3 to F8.0
T
Image stabiliser Optical method
Focus range Normal 50 cm
to 
Macro/
Intelligent auto/
Motion picture
3 cm (0.098 feet) (Wide)/1.0 m (3.3 feet)
(T
[5k to 8k is 2.0 m (6.6 feet) to ¶]
Scene Mode There may be differences in the above
settings.
Shutter system Electronic shutteri Mechanical shutter
Minimum Illumination Approx. 25th
of a second)
Shutter speed 4 seconds to 1/2000th of a secon
[St
Exposure (AE) Programme AE (P)/Aperture-Priority AE (A)/
Shutter-Priority AE (S)/Manual Exposure (M)
Metering mode Multiple/Centre weighted/Spot
Monitor 3.0q TFT LCD (3:2)
(Approx. 1,040,000 dots) (field of view ratio about 100%)
Microphone Monau
Speaker Monaural
Recording media Built-in Memory (Approx. 78 MB)/SD Memory Card/SDHC
Memory Card/SDXC Memory Card
Wire
AC Ad
Informat
Battery P
Informat
This product incorporates the following software:
(1) the software developed independently by or for Panason
(2) the software owned by third party and licensed to Panasonic
(3) open source software
The software categorised as (3) is distributed in the hope that it will be useful, but WITHOUT
ANY WARRANTY
FOR A P
Please refer to the detailed terms and conditions thereof displayed by select
> [Setup] > [V> [MENU/SET].
• SDXC Logo is a trademark of SD-3C, LLC.
• HDMI, the HDMI Logo, and High-Definition Multimedia Interface
are trademarks n
the United St
• QuickTime and the QuickT
trademarks of Apple Inc., used under license therefrom.
• iPhoto, iTunes, Mac and Mac OS are trademarks of Apple Inc.,
registered in the U.S. and other countries.
• iPad, iPhone, iPod, and iPod touch are trademarks of Apple Inc.,
registered in the U.S. and other countries.
•
Windows and Windows Vradema
of Microsoft Corportries.
• App Store is a service mark of Apple Inc.
• Android and Google Play
of Google Inc.
•
Theance
R
.
• The Wi-Fi Protected Setup™ Identifier mark is a certification mark
of Wi-Fi Alliance
R
.
• “Wi-Fi
®
” is a registered trademark of Wi-Fi Alliance
®
.
• “Wi-Fi Protected Setup™”, “WP
trademarks of Wi-Fi Alliance
R
.
•
QR Code is a r
This product is licensed under the A for the personal and
non-commercial use of a consumer to (i) encode video in compliance with the A
(“Aa consumer engaged in a
personal and non-commercial activity and/or was obtained from a video provider licensed to
provide Ar any other use. Additional
information may be obtained from MPEG LA, LLC. See http://www.mpegla.com
.
Recording file format
Still Picture JPEG (based on “Design rule for Camera
“Exif 2.3” standard)/DPOF corresponding
Motion pictures MP4
Audio compression
format
AAC
Interface
Digital “USB 2.0” (High S
¢ Data from the PC can not be written to the camera using the
USB connection cable.
Analogue video NTSC/P
Audio Audio line output (monaural)
T
[A Dedicated jack (8 pin)
[HDMI] microHDMI T
Dimensions
(excluding the
projecting part
Approx. 107.9 mm (W)k59.9 mm (H) k32.1 mm (D)
[4.25q
(W)
k2.36 q
(H)
k1.26 q
(D)]
Mass Approx. 249 g /0.55 lb (with card and battery)
Approx. 223 g /0.49 lb (excluding card and battery)
Operating temperature 0 o C to 40 o C (32 o F to 104 o F)
Operating humidity 10%RH to 80%RH
Compliance standard IEEE 802.1
Frequency range used
(central frequency)
2412 MHz to 2462 MHz (1 to 1
Encryption method Wi-Fi compliant WP
TM
/WP
TM
Access method Infrastructure mode
Input: 1 Hz, 0.2 A
Output: 5 V
V 3.6 V/1250 mAh
SQT0598~EB_mst.fm 2 ペ