English
1 Y
Congratulations on your purchase,
T
product at www
2 What’
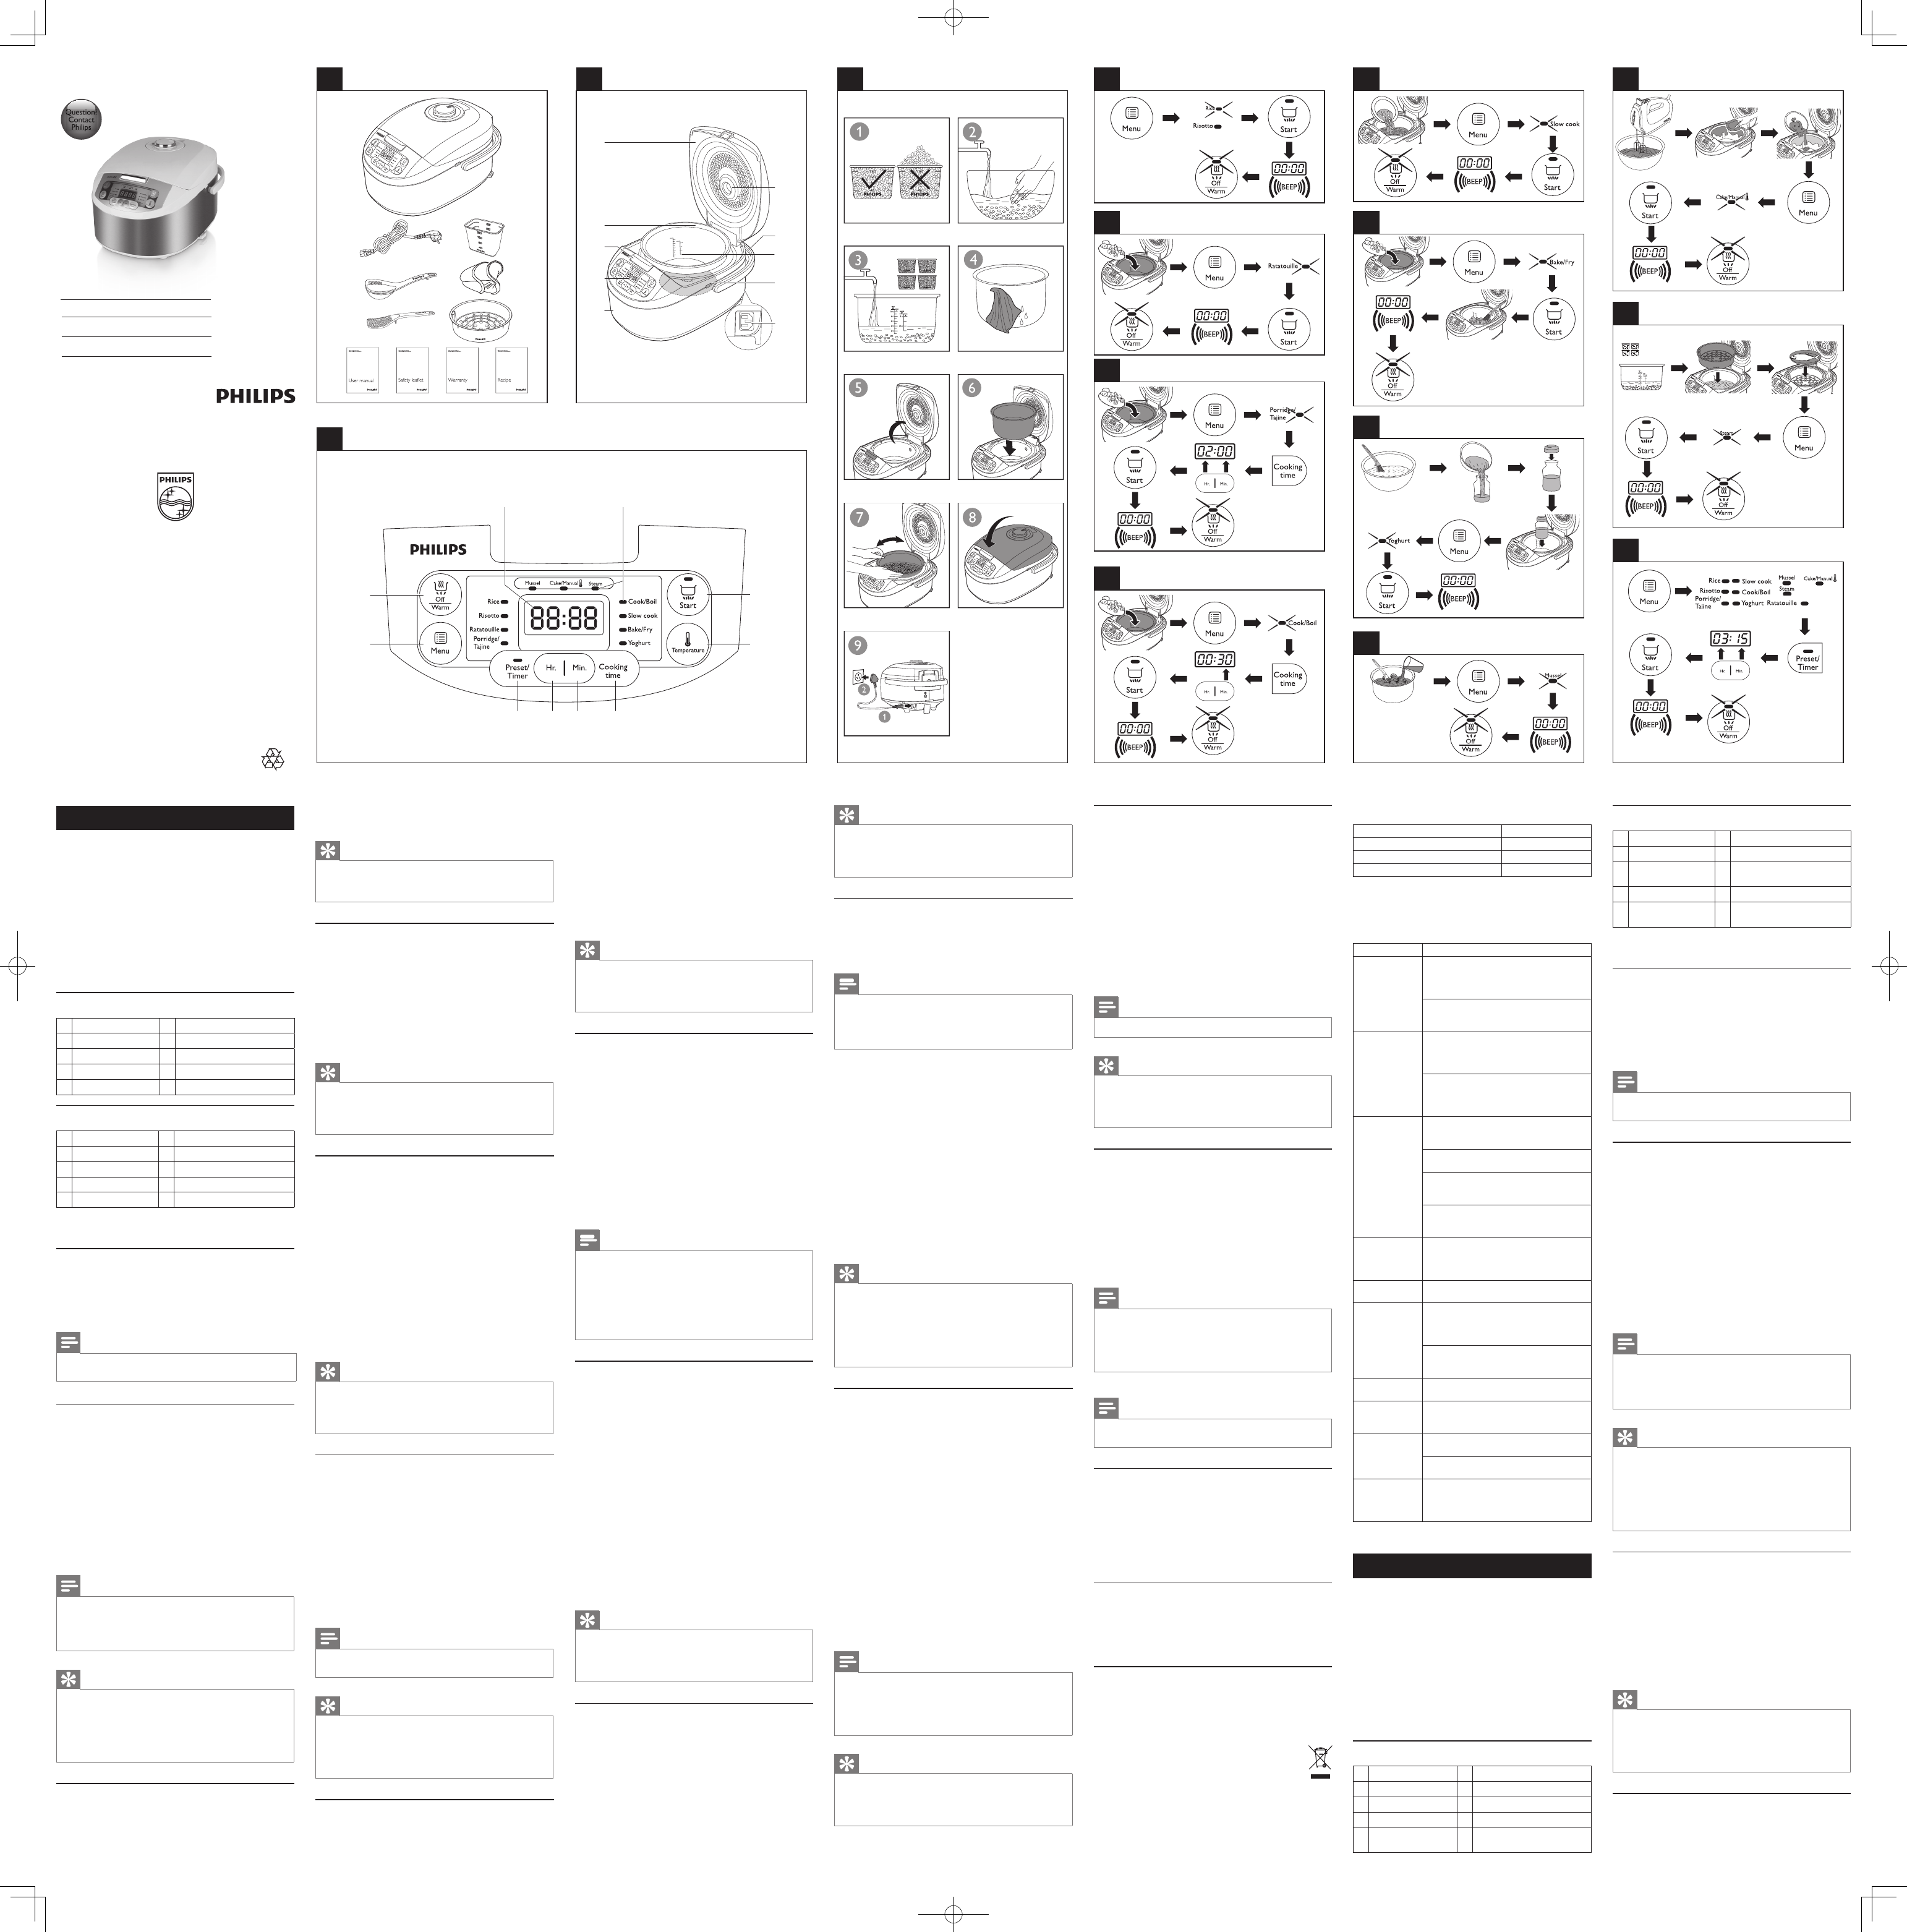
Multicooker main unit Steam basket
Rice scoop Soup ladle
Measuring cup P
User manual Safety leaet
W Recipe booklet
Silica glov
Overview (g.2)
a
Lid
f
P
b
Inner pot
g
Heating element
c
Lid release button
h
W
d
Control panel
i
Cooker handle
e
Main body
j
Detachable steam vent cap
Controls o
k
Cooking functions
p
Hour button
l
Display
q
Minute button
m
Off/Keep W
r
Cooking time button
n
Menu button
s
T
o
Preset button
t
Star
3 Using the multicook
Befor
1 T
between the inner pot and the heating element.
2 Clean the par
multicooker for the rst time (see chapter
Note
• Make sure all par
multicooker
Preparations bef(fig.4)
Before using the multicooker
1 Measure the rice using the measur
2 W
3 Put the pre-washed rice in the inner pot.
4 Add water to the level indicated on the scale inside the inner pot
that corresponds to the number of cups of r
the rice surface
5 Press the lid release button to open the lid.
6 Wipe the outside of the inner pot dr
multicooker
heating element.
7 Close the lid of the multicooker
Note
• Make sure that the outside of the inner pot is dr
there is no foreign residue on the heating element or the magnetic switch.
• Do not exceed the volume indicated nor exceed the maximum water
level indicated in the inner pot,
overo
Tip
• The level marked inside the inner pot is just an indication.
can always adjust the water lev
your own pref
indicated on the inside of the inner pot.
• Besides following the water lev
rice and water at 1:1-1.2 r
Cooking rice or risotto (g.5)
1 Follow the steps in
2 Press the menu button ( Menu) until the rice cooking function
(Rice ) or the risotto cooking function (Risotto ) is selected.
3 Press the starStart ) to star
4 When the cooking is nished,
selected cooking function light will be off.
5 The multicooker will be in k
The keep-warm indicator lights up.
Tip
• YOff/K) or unplug
multicooker to turn off the keep-warm function or when not in use
• The default cooking time is 40 minutes,
Cooking ratatouille (g.6)
1 Put food and ingredients in the inner pot.
2 Follow steps 6 and 7 in
3 Press the menu button (Menu ) until the ratatouille cooking
function (Ratatouille ) is selected.
4 Press the star Start) to star
5 When the cooking is nished,
selected cooking function light will be off.
6 The multicooker will be in k
The keep-warm indicator lights up.
Tip
• YOff/K) or unplug
the multicooker to turn off the keep-warm function or when
not in use.
• The default cooking time is 40 minutes,
Cooking porridge/tajine (g.7)
1 Put food and ingredients in the inner pot.
1 Follow steps 6 and 7 in
2 Press the menu button ( Menu) until the porridge/tajine cooking
function (Porridge/T) is selected.
3 Press the cooking time button (Cooking time ),
star
4 Press the hour button ( H ) to set a desired hour unit.
5 After the hour unit is set,Cooking
time) again,
6 Press the minute button ( Min.) to set a desired minute unit.
7 Press the star Start) to star
8 When the cooking is nished,
selected cooking function light will be off.
9 The multicooker will be in k
The keep-warm indicator lights up.
Tip
• YOff/K) or unplug
multicooker to turn off the keep-warm function or when not in use
• The default cooking time is 2 hour
time from 1 to 4 hour
Cooking/Boiling (g.8)
1 Put food and ingredients into the inner pot.
2 Follow steps 6 and 7 in
3 Press the menu button (Menu ) unitl the cooking/boiling function
(Cook/Boil ) is selected.
4 Press the cooking time button ( Cooking time),
unit star
5 Press the minute button ( Min.) to set a desired minute unit.
6 Press the star Start) to star
7 When the cooking is nished,
selected cooking function light will be off.
8 The multicooker will be in k
The keep-warm indicator lights up.
Note
• The cooking time begins once the water is boiling,
displayed as a countdo
Tip
• YOff/K) or unplug
the multicooker to turn off the keep-warm function or when
not in use.
• The default cooking time is 30 minutes.
cooking time between 5 to 30 minutes.
Slow cooking (g.9)
1 Put the food and ingredients in the inner pot.
2 Follow steps 6 and 7 in
3 Press the menu button (Menu ) until the slo
(Slow cook ) is selected.
4 Press the cooking time button ( Cooking time),
star
5 Press the hour button ( H ) to set a desired hour unit.
6 After the hour unit is set,Cooking
time) again,
7 Press the minute button ( Min.) to set a desired minute unit.
8 Press the star Start) to star
9 When the cooking is nished,
selected cooking function light will be off.
10 The multicooker will be in keep-warm mode automatically
The keep-warm indicator lights up.
Tip
• YOff/K) or unplug
multicooker to turn off the keep-warm function or when not in use
• The default cooking time is 1 hour
time between 20 minutes to 10 hours.
Baking/Fr
1 Put food and ingredients into the inner pot.
2 Follow step 6 in
3 Put the plug in the power sock
4 Press the menu button ( Menu) until the baking/fr
(Bake/Fry ) is selected.
5 Press the cooking time button ( Cooking time),
unit star
6 Press the minute button ( Min.) to set a desired minute unit.
7 Press the star Start) to star
8 During cooking,
9 When the cooking is nished,
selected cooking function light will be off.
10 The multicooker will be in keep-warm mode automatically
The keep-warm indicator lights up.
Note
• For fr
• This function may be not used for deep fr
exceed
• The default cooking time is 42 minutes.
between 5 to 59 minutes.
• When baking food rather than using oil,
the lid closed;
food for more than 50 minutes.
• When fr
Making yoghurt (g.11)
1 Whisk the ingredients for the yoghur
container
2 Put the glass container in the inner pot.
container is sealed.
3 P
container is immer
4 Follow steps 6 and 7 in
5 Press the menu button ( Menu) until the y
(Y) is selected.
6 Press the cooking time button ( Cooking time),
star
7 Press the hour button ( H ) to set a desired hour unit.
8 After the hour unit is set,Cooking
time) again,
9 Press the minute button ( Min.) to set a desired minute unit.
10 Press the starStart ) to star
11 When the cooking is nished,
selected cooking function light will be off.
12 The multicooker will be in standb
Tip
• Y
is nished.
• The default cooking time is 8 hour
time between 6 to 12 hours.
Cooking mussel (g.12)
1 Put mussels and ingredients into the inner pot.
2 Follow steps 6 and 7 in
3 Put the plug in the power sock
4 Press the menu button ( Menu) until the m
(Mussel ) is selected.
5 Press the cooking time button ( Cooking time),
unit star
6 Press the minute button ( Min.) to set a desired minute unit.
7 Press the star Start) to star
8 When the cooking is nished,
selected cooking function light will be off.
9 The multicooker will be in k
The keep-warm indicator lights up.
Preset time f
Y
The preset timer is availab
1 Follow steps 6 and 7 in
2 Press the menu button ( Menu) until y
is selected.
3 Press the preset time button (Preset/Timer ).
The preset timer star
4 Press the hour button ( H ) and minute button ( Min.) to set the
preset time.
5 Press the star Start) to conr
6 The cooking
hear a few beeps and the selected cooking function light will be off.
7 The multicooker will be in k
The keep-warm indicator lights up.
Note
• The preset timer is not availab.
Tip
• After the preset time is set,
(Off/K) to deactivate the preset function.
• YOff/K) or unplug
multicooker to turn off the keep-warm function or when not in use
K
The multicooker pro
mode.
• After you ha
button (Menu ),Star ) directl
keep-warm indicator will light up.
multicooker will switch to k
• After you ha
button (Menu ),
the starStart ),
the cooking is nished,
Note
• Except for the yoghur
product to go into the keep-warm mode (Off/K).
• In standby mode,Off/K)
to enter the keep-warm mode
• In keep-warm modeOff/Keep
W)to enter the standby mode.
4 Cleaning and Maintenance
Note
• Unplug the multicooker before star
• Wait until the m
Interior
Inside of the outer lid and the main body:
• Wipe with wr
• Make sure to remov
multicooker
Heating element:
• Wipe with wr
• Remove f
toothpicks.
Exterior
Surface of the outer lid and outside of the main body:
• Wipe with a cloth damped with soap water
• Only use soft and dr
• Make sure to remov
buttons.
Accessories
Rice scoop,
• Soak in hot water and clean with sponge.
5 Envir
Do not throw awa
waste at the end of its life,
collection point for recycling.
preser
6 Guarantee and ser
If you need ser
Philips website at www
contact the Philips Customer Care Center in your countr
nd its phone number in the worldwide guar
no Customer Care Center in your countr
dealer
Tip
• YOff/K) or unplug
multicooker to turn off the keep-warm function or when not in use
• The default cooking time is 25 minutes.
cooking time between 8 to 25 minutes.
Baking cak
1 Put the food and ingredients in the inner pot.
2 Follow steps 6 and 7 in
3 Put the plug in the power sock
Note
• When baking cake,
130°C and by 45 minutes usually deliv
• When baking food other than cake,
• Keep the lid open when baking cake at a temperature higher than 130°C
or for more than 50 minutes.
4 Press the menu button ( Menu) until the baking function ( Cak
Manual)is selected.
5 Press the cooking time button ( Cooking time),
star
6 Press the hour button ( H ) to set a desired hour unit.
7 After the hour unit is set,Cooking
time) again,
8 Press the minute button ( Min.) to set a desired minute unit.
9 Press the temperature button ( T),
cooking temperature star
10 Press the temperature button (Te) to set a desired
baking temperature
11 Press the starStart ) to star
12 When the baking is nished,
selected function light will be off.
13 The multicooker will be in keep-warm mode automatically
The keep-warm indicator lights up.
Tip
• When removing the inner pot from the m
kitchen glov
• The default cooking time is 45 minutes.
cooking time between 20 minutes to 2 hours.
• The default cooking temperature is 40°C
temperature options are 40°C
150°C
Steaming (g.14)
1 Measure a few cups of water with the measuring cup.
2 P
3 Put the steam basket into the inner pot.
4 Put the food into the steam basket.
5 Close the lid of the multicooker
6 Press the menu button ( Menu) until the steaming function ( Steam)
is selected.
7 Press the cooking time button ( Cooking time),
star
8 Press the hour button ( H ) to set a desired hour unit.
9 After the hour unit is set,Cooking
time) again,
10 Press the minute button (Min. ) to set a desired minute unit.
11 Press the starStart ) to star
12 When the steaming is nished,
selected cooking function light will be off.
13 The multicooker will be in keep-warm mode automatically
The keep-warm indicator lights up.
14 Open the lid and carefully take out the steamed food from the
plate or the steam basket.
Note
• The cooking time begins once the water is boiling,
displayed as a countdo
• When removing the steamed food from the steam bask
glove or a cloth,
• When you cook rice and steam food at the same time, mak
measure out an amount of rice that leaves enough room for the steam tray
Tip
• YOff/K) or unplug
multicooker to turn off the keep-warm function or when not in use
• The default steaming time is 30 minutes.
cooking time between 5 minutes to 2 hours.
7 Specifications
Model Number HD3037
Rated power output 980W
Rated capacity 5.0L
Rice volume 1.8L
8 T
If you encounter problems when using this m
following points before requesting service
problem,
Problem Solution
The light on the
button does not
go on.
There is a connection problem.
the power cord is connected to the cook
proper
the power outlet.
The light is defective.
Philips dealer or a ser
by Philips.
The display does
not function.
The multicooker is not connected to the po
supply
failure backup function does not work and the
display does not function.
The batter
T
ser
batter
The rice is not
cooked.
There is not enough water
according to the scale on the inside of the
inner pot.
YStart ) to
star
Make sure that there is no foreign residue on
the heating element and the outside of the
inner pot before switching the multicook
The heating element is damaged,
pot is deformed.
dealer or a ser
The cooker does
not switch to
keep-warm mode
automatically
The temperature control is defective.
appliance to your Philips dealer or a ser
center authorized by Philips.
The rice is
scorched.
Y
rice until the water r
W
the multicooker
during cooking.
Make sure that you add water to the lev
indicated on the scale inside the inner pot that
corresponds to the number of cups of r
used.
Make sure the water does not exceed the
next level on the scale,
appliance to ov
The cake result is
too hard.
Please use cake mix and follo
provided in the user manual.
I cannot get to the
desired cooking
function.
Press the menu button (Menu ) repeatedl
select the desired function as shown by the
LED indicator
Rice smells bad
after cooking
Clean the inner pot with some washing
detergent and war
After cooking,
inner lid and inner pot are cleaned thoroughly
Error message
(E1,
appear
display
There is malfunction in your multicook
the appliance to your Philips dealer or a ser
center authorized by Philips.
Nederlands
1 Uw multicook
Gefeliciteerd met uw aankoop en w
Registreer uw product op www
gebr
2 W
Multicooker Stoommand
Rijstlepel Soeplepel
Maatbeker Netsnoer
Gebr Boekje met veiligheidsinformatie
Garantiekaar
Ovenwanten van silicone
Overzicht (g.
a
Deksel
f
Stopcontact
b
Binnenpan
g
V
c
Dekselontgrendelknop
h
W
d
Conguratiescher
i
Handgreep van de cooker
e
Apparaat
j
V
stoomuitlaat
Overzicht bedieningspaneel (g.
k
Kookfuncties
p
Knop Hr
l
Display
q
Knop Min.
m
Knop Off/Keep warm
(Uit/W
r
Knop Cooking time (Kooktijd)
n
Knop Menu (Menu)
s
Knop
o
Knop Preset/Timer
(Ingestelde tijd/timer)
t
knop Star
3 De multicook
V
1 V
het beschermingsmater
verwarmingselement.
2 W
multicooker v
en onderhoud’).
Opmer
• Zorg er
gaat gebruiken.
V
V
multicooker gebruikt:
1 Meet de rijst af met de bijgeleverde maatbeker
2 W
3 Doe de gewassen rijst in de binnenpan.
4 V
maatverdeling in de binnenpan o
aantal kopjes rijst.
5 Dr
6 V
in de multicooker
met het verwarmingselement.
7 Sluit het deksel van de multicooker en steek de stekk
stopcontact.
Opmer
• Zorg er
dat het verwarmingselement en de magnetische schakelaar vrij zijn van
etensresten of ander vuil.
• Overschr
in de binnenpan niet.
Tip
• Het gemar
aanduiding.
voor verschillende soor
Overschr
binnenkant van de binnenpan niet.
• Naast het volgen van het aangegeven waterniveau kunt u ook
rijst en water toevoegen in de verhouding 1:1-1,2.
Rijst of risotto bereiden (g.
1 V
2 DrRice ) of
de risottokookfunctie (Risotto ) is geselecteerd.
3 DrStart (Star
4 W
dooft het lampje van de geselecteerde kookfunctie.
5 De multicooker schakelt automatisch o
warmhoudmodus.
Het lampje van de warmhoudmodus gaat br
Tip
• U kunt op de knop Off/K (Uit/Warm houden)
dr
halen om de warmhoudmodus uit te schakelen of als u de
multicooker niet gebruikt.
• De standaardbereidingstijd is 40 minuten en niet instelbaar
Ratatouille bereiden (g.
1 Plaats voedsel en ingrediënten in de binnenpan.
2 V
gebr
3 Dr
(ratatouille) is geselecteerd.
Specifications are subject to change without notice
© 2013 Koninklijke Philips N.V
All rights reser
HD3037_UM_Dutch_V1.0
HD3037
Register your product and get suppor
www
Alwa
Question?
Contact
Phi lips
EN User manual
NL Gebr
FR Mode d’emploi
4
1
3
2 5
6
7
8
9
12
11
10
13
a
b
d
e
f
g
h
j
c
i
k
m
n
o p q r
s
t
14
15