620962
1
Zoom out
Zoom in
Vorherige Seite
1/8
Nächste Seite
Register your product and get support at
HR7782
www.philips.com/welcome
Specifications are subject to change without notice
© 2012 Koninklijke Philips Electronics N.V.
All rights reserved.
HR7782_WE_UM_V3.0
EN User manual
DE Benutzerhandbuch
FR Mode d’emploi
NL Gebruiksaanwijzing
IT Manuale utente
EL
Εγχειρίδιο χρήσης
ES Manual del usuario
NO Brukerhåndbok
FI Käyttöopas
SV Användarhandbok
DA Brugervejledning
PT Manual do utilizador
TR Kullanım kılavuzu
3140 035 29043
1/4
English
1 Important
Read this user manual carefully before you use the appliance, and save the user manual for
future reference.
Danger
• Do not immerse the motor unit in water nor rinse it under the tap.
Warning
• Neveruseyourngersoranobjecttopushingredientsintothefeedingtubewhilethe
applianceisrunning.Onlyusethepusher.
• Beforeyouconnecttheappliancetothepower,makesurethatthevoltageindicated
onthebottomoftheappliancecorrespondstothelocalpowervoltage.
• Never connect this appliance to a timer switch, to avoid a hazardous situation.
• Ifthepowercord,theplug,orotherpartsaredamaged,donotusetheappliance.
• Ifthepowercordisdamaged,youmusthaveitreplacedbyPhilips,aservicecenter
authorizedbyPhilips,orsimilarlyqualiedpersonstoavoidahazard.
• Thisapplianceisnotintendedforusebypersons(includingchildren)withreduced
physical,sensoryormentalcapabilities,orlackofexperienceandknowledge,unless
theyhavebeengivensupervisionorinstructionconcerninguseoftheappliancebya
person responsible for their safety.
• For their safety, do not allow children to play with the appliance.
• Never let the appliance run unattended.
• Iffoodstickstothewallofthebowl,switchofftheapplianceandunplugit.Thenusea
spatula to remove the food from the wall.
• Be careful when you handle or clean the discs, the blade units of the food processor.
Thecuttingedgesareverysharp.
• Donottouchtheblades,especiallywhentheapplianceispluggedin.Thebladesare
very sharp.
• Ifthebladesgetstuck,unplugtheappliancebeforeyouremovetheingredientsthat
block the blades.
Caution
• Neverswitchofftheappliancebyturningthebowl,oritslids.Alwaysswitchoffthe
appliancebyturningtheknobto0.
• Unplugtheapplianceimmediatelyafteruse.
• Waituntilthemovingpartsstoprunningbeforeyouremovethelidofthebowl.
• Do not exceed the maximum level indication on the bowl.
• Thoroughlycleanthepartsthatcomeintocontactwithfoodbeforeyouusethe
applianceforthersttime.
• Beforeyouremoveorcleanthekneadingaccessoryordiscs,unplugtheappliance.
• Never use any accessories or parts from other manufacturers or that Philips does not
specicallyrecommend.Ifyouusesuchaccessoriesorparts,yourguaranteebecomes
invalid.
• This appliance is intended for household use only.
• Donotexceedthequantitiesandprocessingtimeindicatedintheusermanual.
• Lethotingredientscooldown(<80ºC)beforeprocessingthem.
• Always let the appliance cool down to room temperature after each batch that you
process.
• Certainingredientsmaycausediscolorationsonthesurfaceoftheparts.Thisdoesnot
haveanegativeeffectontheparts.Thediscolorationsusuallydisappearaftersome
time.
• Noise level = 85 dB [A]
Electromagnetic elds (EMF)
ThisPhilipsappliancecomplieswithallstandardsregardingelectromagneticelds(EMF).If
handledproperlyandaccordingtotheinstructionsinthisusermanual,theapplianceissafe
tousebasedonscienticevidenceavailabletoday.
Recycling
Yourproductisdesignedandmanufacturedwithhighqualitymaterialsandcomponents,
which can be recycled and reused.
When you see the crossed-out wheel bin symbol attached to a product, it means the
productiscoveredbytheEuropeanDirective2002/96/EC:
Never dispose of your product with other household waste. Please inform yourself about
the local rules on the separate collection of electrical and electronic products. The correct
disposalofyouroldproducthelpspreventpotentiallynegativeconsequencesonthe
environment and human health.
2 Introduction
CongratulationsonyourpurchaseandwelcometoPhilips!Tofullybenetfromthesupport
thatPhilipsoffers,registeryourproductatwww.philips.com/welcome.
Forrecipestousewithyourfoodprocessor,gotowww.philips.com/kitchen
3 Food processor
Warning
Neveruseyourngersoranobject(forexample,aspatula)topushingredientsintothefeeding
tubewhiletheapplianceisrunning.Onlyusethepusher.
Chopper knife
Beforeyoustart,makesureyouassembleaccordingtoFig.2.
Youcanusethechopperknifetochop,mix,blend,orpureeingredients.Youcanalsouseitto
mix and blend cake batters.
Caution
Donotusethechopperknifetochophardingredients,likecoffeebeans,turmeric,nutmeg,andicecubes,asthis
maycausethebladetogetblunt.
Note
Donotlettheapplianceruntoolongwhenyouchop(hard)cheeseorchocolate.Otherwisethese
ingredientsbecometoohot,starttomelt,andturnlumpy.
Precutlargepiecesoffoodintopiecesofapprox.3x3x3cm.
1 Turnthethebowlclockwisetoxitonthemotorunit,andthenputthetoolholder
in the bowl.
» Whenthebowlisxedcorrectly,youhearaclick.
2 Put the chopper knife on the tool holder.
3 Puttheingredientsinthebowl.
4 Putthelidonthebowl,andthenturnthelidclockwisetoxit.
» Whenthelidisassembledcorrectly,youhearaclickandthelidisxedtothe
bowl handle.
5 Putthepusherintothefeedingtube.
6 Connectthepowerplugtothepowersupply.
7 Checkthepreparationtime,themaximumamountandthespeedsettingrequiredfor
theingredientsinTable1.Turntheknobtothedesiredspeedsetting.
8 After use, turn the knob to 0,andthenunplugtheappliance.
Tip
When you chop onions, turn the knob to Pafewtimestopreventtheonionsfrombecomingtoo
nelychopped.
Whenthefoodstickstothebladeorinsidethebowl,youcandothefollowingsteps:1.Switchoff
theappliance,andthenunplugit.2.Removethelidfromthebowl.3.Removetheingredientsfrom
the blade or from the side of the bowl with a spatula.
Serrated blade
Beforeyoustart,makesureyouassembleaccordingtoFig.3.
Use the serrated blade to crush frozen fruit.
Note
Always put the blade unit in the bowl before you start.
Itisrecommendedtocutthefruitinto2x2x2cmcubesizebeforehavingitfrozen.
Formakingfruitdesserts,itisrecommendedtousespeed2 for smooth result, and speed 1 for
chunky result.
1 Turnthethebowlclockwisetoxitonthemotorunit,andthenputthetoolholder
in the bowl.
» Whenthebowlisxedcorrectly,youhearaclick.
2 Put the serrated ice blade on the tool holder.
3 Put the frozen fruit in the bowl.
4 Putthelidonthebowl,andthenturnthelidclockwisetoxit.
» Whenthelidisassembledcorrectly,youhearaclickandthelidisxedtothe
bowl handle.
5 Putthepusherintothefeedingtube.
6 Connectthepowerplugtothepowersupply.
7 Turn the knob to 1 or 2 .
8 After use, turn the speed selector to 0,andthenunplugtheappliance.
Kneading accessory
Beforeyoustart,makesureyouassembleaccordingtoFig.4.
Youcanusethekneadingtooltokneadyeastdoughforbreadandpizzas.Youneedto
adjusttheamountofliquidtoformthedoughaccordingtothehumidityandtemperature
condition.
Note
Donotusethekneadingtooltoblendcakebatters.Usethechopperknifeforthisjob.
Alwaysputthekneadingtoolinthebowlbeforeyouaddtheingredients.
Tip
IfusingHighGlutenFlour,forbestresults,use60gwaterforevery100gofour,andkneadatspeed
1for2minutes(maxtime).
1 Turnthethebowlclockwisetoxitonthemotorunit,andthenputthetoolholder
in the bowl.
» Whenthebowlisxedcorrectly,youhearaclick.
2 Putthekneadingtoolonthetoolholder.
3 Puttheingredientsinthebowl.
4 Putthelidonthebowl,andthenturnthelidclockwisetoxit.
» Whenthelidisassembledcorrectly,youhearaclickandthelidisxedtothe
bowl handle.
5 Putthepusherintothefeedingtube.
6 Connectthepowerplugtothepowersupply.
7 Turn the knob to the 1 position.
8 Checkthepreparationtime,themaximumamountandthespeedsettingrequiredfor
theingredientsinTable1.
9 After use, turn the knob to 0,andthenunplugtheappliance.
Balloon beater
Beforeyoustart,makesureyouassembleaccordingtoFig.5:
1 Put the tool holder in the bowl.
2 Put the balloon beater on the tool holder in the bowl.
3 Puttheingredientsinthebowl.
4 Putthelidonthebowl.Turnthelidclockwisetoxit.Putthepusherinthefeeding
tube.
5 Select speed 1.
6 After use, turn the speed selector to 0,andthenunplugtheappliance.
Citrus press
Beforeyoustart,makesureyouassembleaccordingtoFig.6.
You can use the citrus press to squeeze citrus fruits.
1 Turnthethebowlclockwisetoxitonthemotorunit,andthenputthetoolholder
in the bowl.
» Whenthebowlisxedcorrectly,youcanhearaclick.
2 Put the sieve for citrus press on the tool holder in the bowl. Make sure that the
projectiononthesieveislockedintheslotofthebowlhandle.
» Whenthesieveisxedcorrectly,youcanhearaclick.
3 Put the cone on the sieve.
4 Connectthepowerplugtothepowersupply.
5 CheckthemaximumamountrequiredfortheingredientsinTable1.Turntheknobto
speed 1.
» Theconestartsrotating.
6 Press the citrus fruit onto the cone.
7 Stoppressingfromtimetotimetoremovethepulpfromthesieve.Whenyounish
pressingorwhenyouwanttoremovethepulp,turntheknobto0 and remove the
bowl from the appliance with the sieve and cone on it.
Slicing discs and shredding discs
Beforeyoustart,makesureyoupickyourdesireddiscandassembleaccordingtoFig.7:
• Adjustableslicingdisctoadjustdifferentthickness
• Reversibleshreddingdisc(biggerorsmallsize)
Caution
Becarefulwhenyouhandlethedisc.Ithasaverysharpcuttingedge.
Neverusethedisctoprocesshardingredients,likeicecubes.
Donotexerttoomuchpressureonthepusherwhenyoupressingredientsintothefeedtube.
4 Cleaning
Warning
Beforeyoucleantheappliance,unplugit.
Caution
Makesurethatthecuttingedgesofthebladesanddiscsdonotcomeintocontactwithhardobjects.
Thismaycausethebladetogetblunt.
Thecuttingedgesaresharp.Becarefulwhenyoucleanthebladeunitofthefoodprocessorandthe
discs.
1 Cleanthemotorunitwithamoistcloth.
2 Cleantheotherpartsinhotwater(<60ºC)withsomewashing-upliquidorina
dishwasher.
Quick cleaning
Youcanfollowthefollowingstepstocleanthefoodprocessorbowlandblenderjareasier.
Note
Make sure that the blade is assembled in the bowl if you clean the food processor bowl.
1 Pourlukewarmwater(notmorethan0.5liters)andafewdropsofwashing-upliquid
into the food processor bowl.
2 Placethelidonthefoodprocessorbowl,andthenturnitclockwisetoxit.
3 Turn the knob to P. Let the appliance run for 30 seconds or until the food processor
bowl is clean.
4 After use, turn the knob to 0,andthenunplugtheappliance.
5 Detach the food processor bowl and rinse it with clean water.
5 Storage
1 Pushthepowercordintotheintegratedcordstorage(Fig.10).
2 Store the product in a dry place.
3 Putthediscs,kneadingtoolandshaft,andothersmallaccessoriesinthefoodprocessor
bowl(Fig.11).
6 Guarantee and service
If you have a problem, need service, or need information, see www.philips.com/support or
contactthePhilipsConsumerCareCenterinyourcountry.Thephonenumberisinthe
worldwideguaranteeleaet.IfthereisnoConsumerCareCenterinyourcountry,goto
your local Philips dealer.
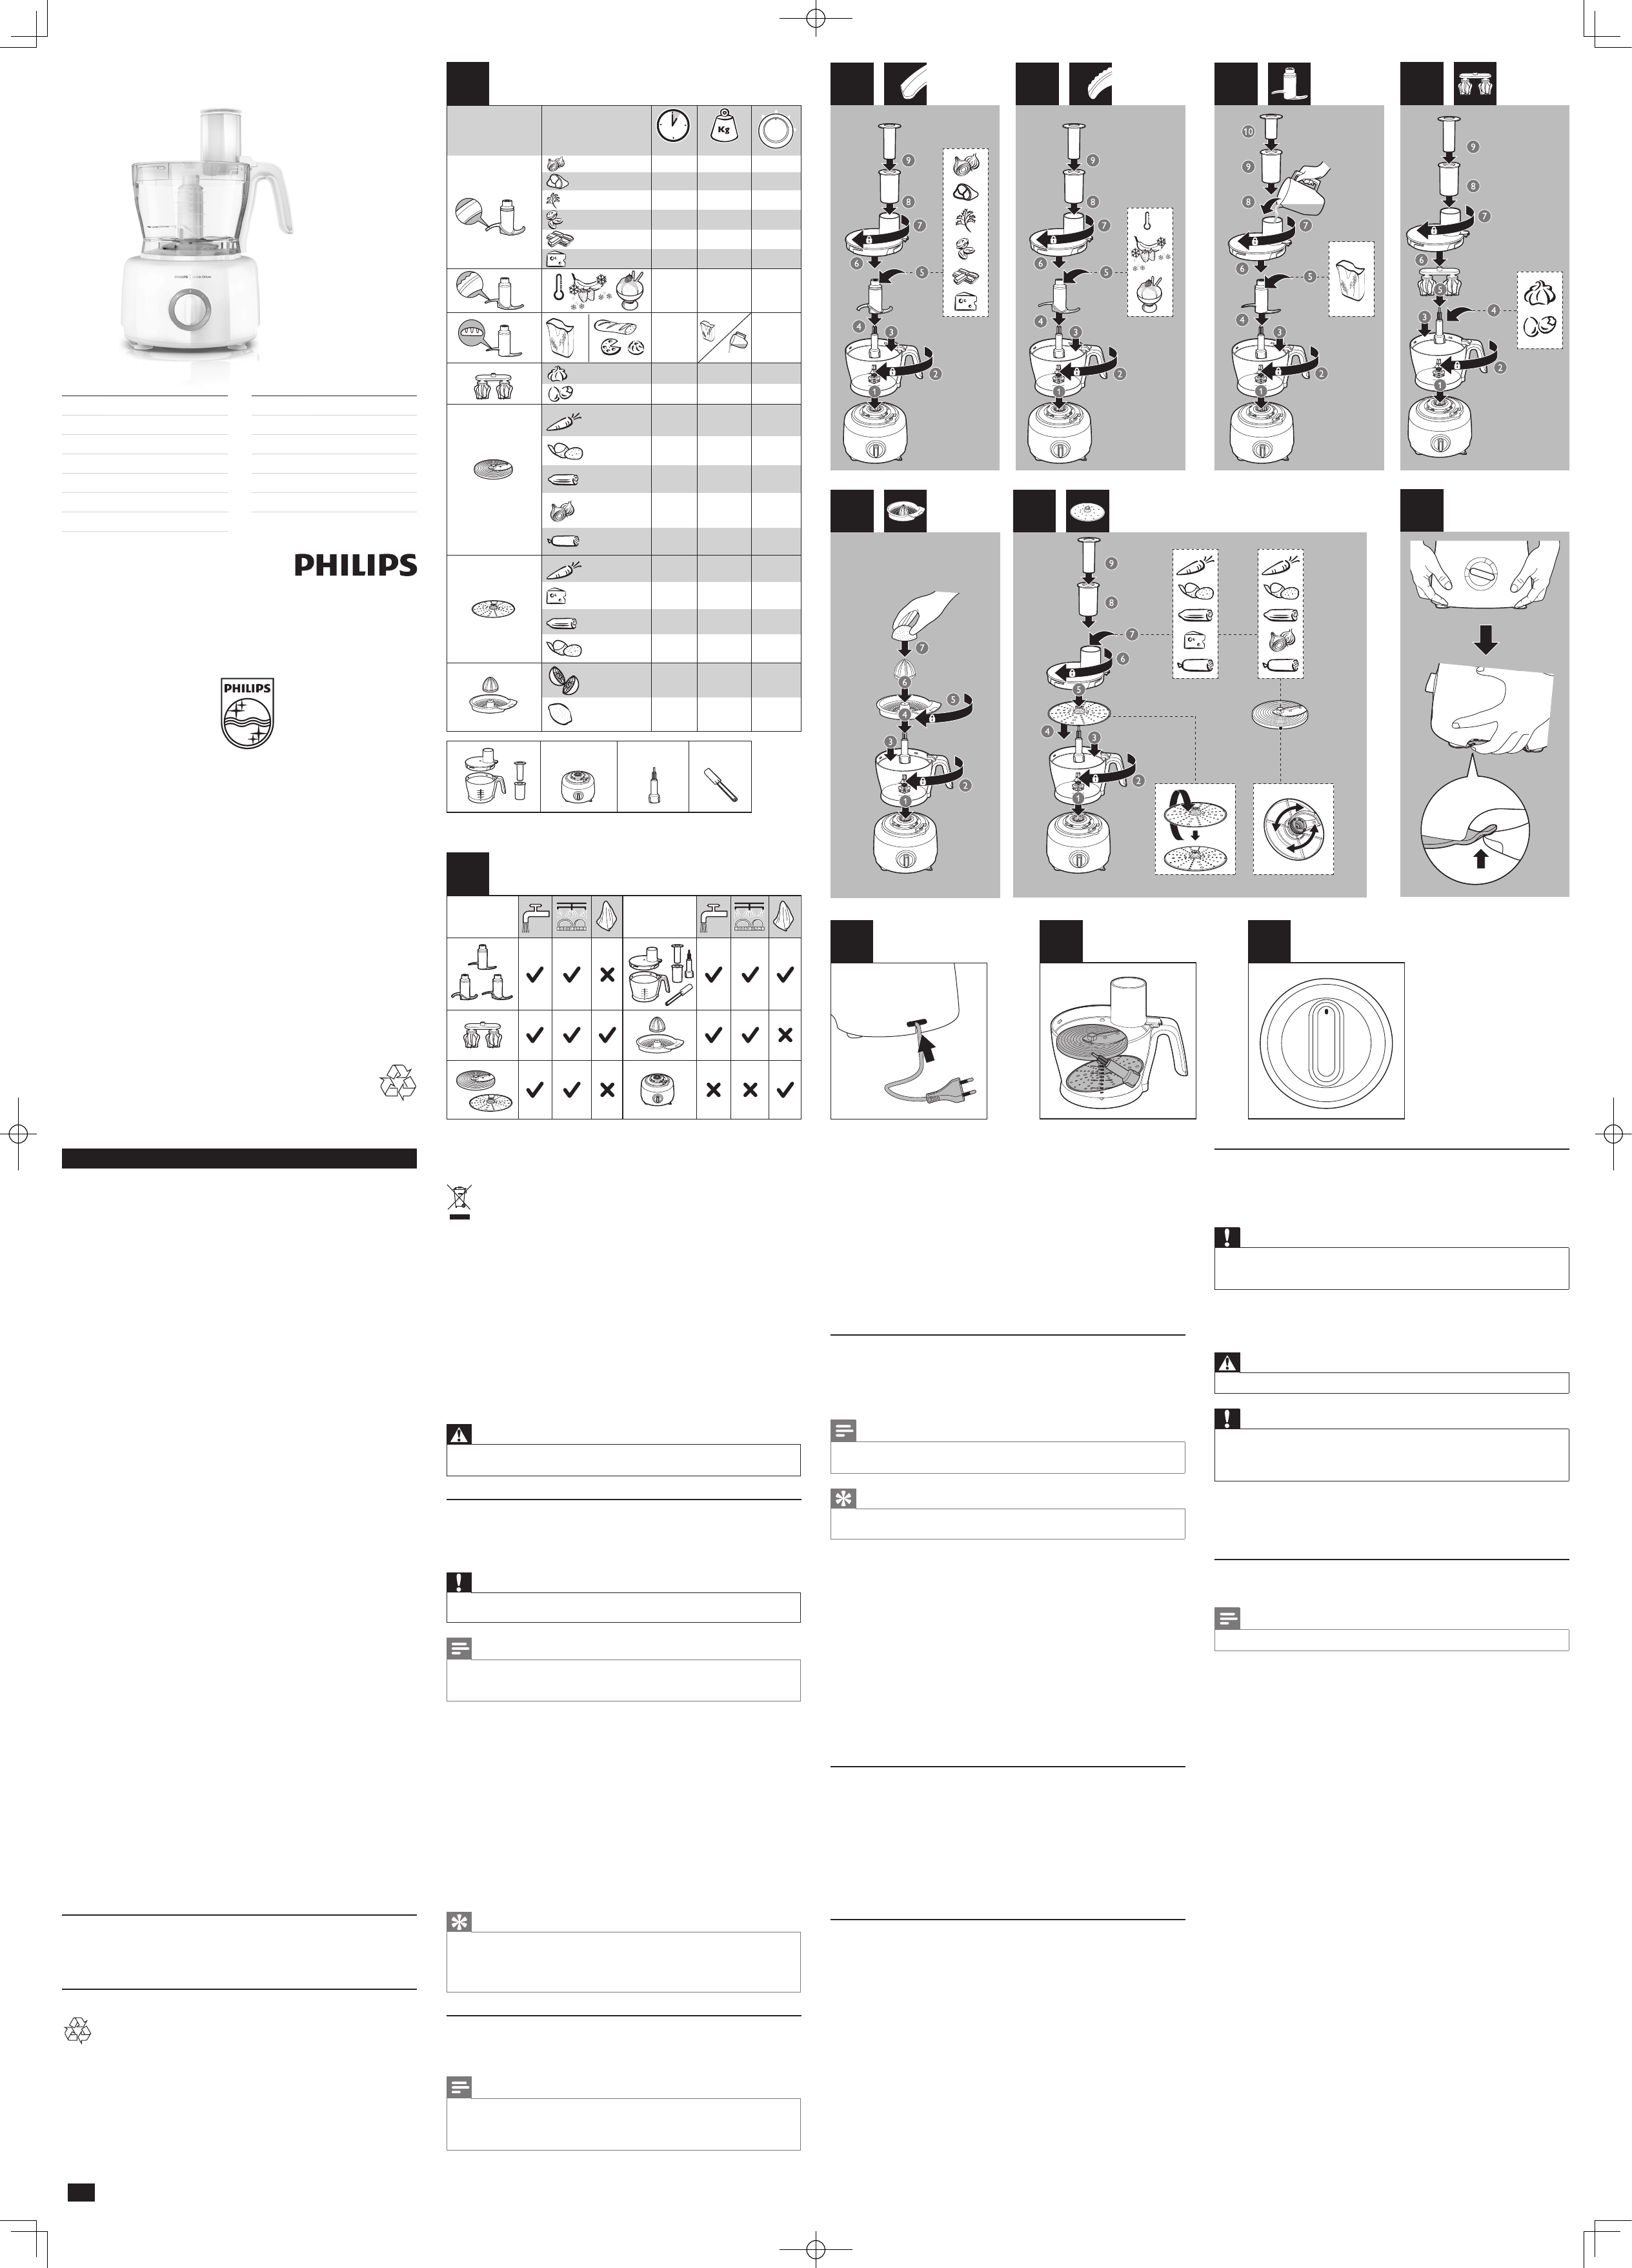
1
2 min 1 kg 1
20 sec 500 g1
30 sec 1 kg
1
30 sec 200 g
1
30 sec 3 pcs
1
30 sec 1 kg
1
(MAX)
(MAX)
(MAX)
(MAX)
5 x 1 sec 750 gP
5 x 1 sec 1 kg P/2
30 sec 100 gP
60 sec 1 kg 2
45 sec 500 g2
30 sec 400 g2
750 ml
8 pcs
1
1
30 sec 1 kg1
30 sec
1 k
g1
2 min 1 kg
600 ml
1
60-180 sec
60-300 sec
P
0
1
2
30 sec 750 g 1
30 sec 3 pcs 1
30 sec 3 pcs 1
750 g 1-260-180 sec
-4
o
C
10 11 12
0
1
P
2
9
6
5
2 3 4
-4
o
C
8
7
1

Brauchen Sie Hilfe? Stellen Sie Ihre Frage.

Forenregeln
1

Forum

philips-hr7782---jamie-oliver

Suche zurücksetzen

  • warum treibt der motor die messereinheit nicht mehr an Eingereicht am 6-11-2022 19:19

    Antworten Frage melden

Missbrauch melden von Frage und/oder Antwort

Libble nimmt den Missbrauch seiner Dienste sehr ernst. Wir setzen uns dafür ein, derartige Missbrauchsfälle gemäß den Gesetzen Ihres Heimatlandes zu behandeln. Wenn Sie eine Meldung übermitteln, überprüfen wir Ihre Informationen und ergreifen entsprechende Maßnahmen. Wir melden uns nur dann wieder bei Ihnen, wenn wir weitere Einzelheiten wissen müssen oder weitere Informationen für Sie haben.

Art des Missbrauchs:

Zum Beispiel antisemitische Inhalte, rassistische Inhalte oder Material, das zu einer Gewalttat führen könnte.

Beispielsweise eine Kreditkartennummer, persönliche Identifikationsnummer oder unveröffentlichte Privatadresse. Beachten Sie, dass E-Mail-Adressen und der vollständige Name nicht als private Informationen angesehen werden.

Forenregeln

Um zu sinnvolle Fragen zu kommen halten Sie sich bitte an folgende Spielregeln:

Neu registrieren

Registrieren auf E - Mails für Philips HR7782 - Jamie Oliver wenn:


Sie erhalten eine E-Mail, um sich für eine oder beide Optionen anzumelden.


Das Handbuch wird per E-Mail gesendet. Überprüfen Sie ihre E-Mail.

Wenn Sie innerhalb von 15 Minuten keine E-Mail mit dem Handbuch erhalten haben, kann es sein, dass Sie eine falsche E-Mail-Adresse eingegeben haben oder dass Ihr ISP eine maximale Größe eingestellt hat, um E-Mails zu erhalten, die kleiner als die Größe des Handbuchs sind.

Ihre Frage wurde zu diesem Forum hinzugefügt

Möchten Sie eine E-Mail erhalten, wenn neue Antworten und Fragen veröffentlicht werden? Geben Sie bitte Ihre Email-Adresse ein.


Info