Preparation
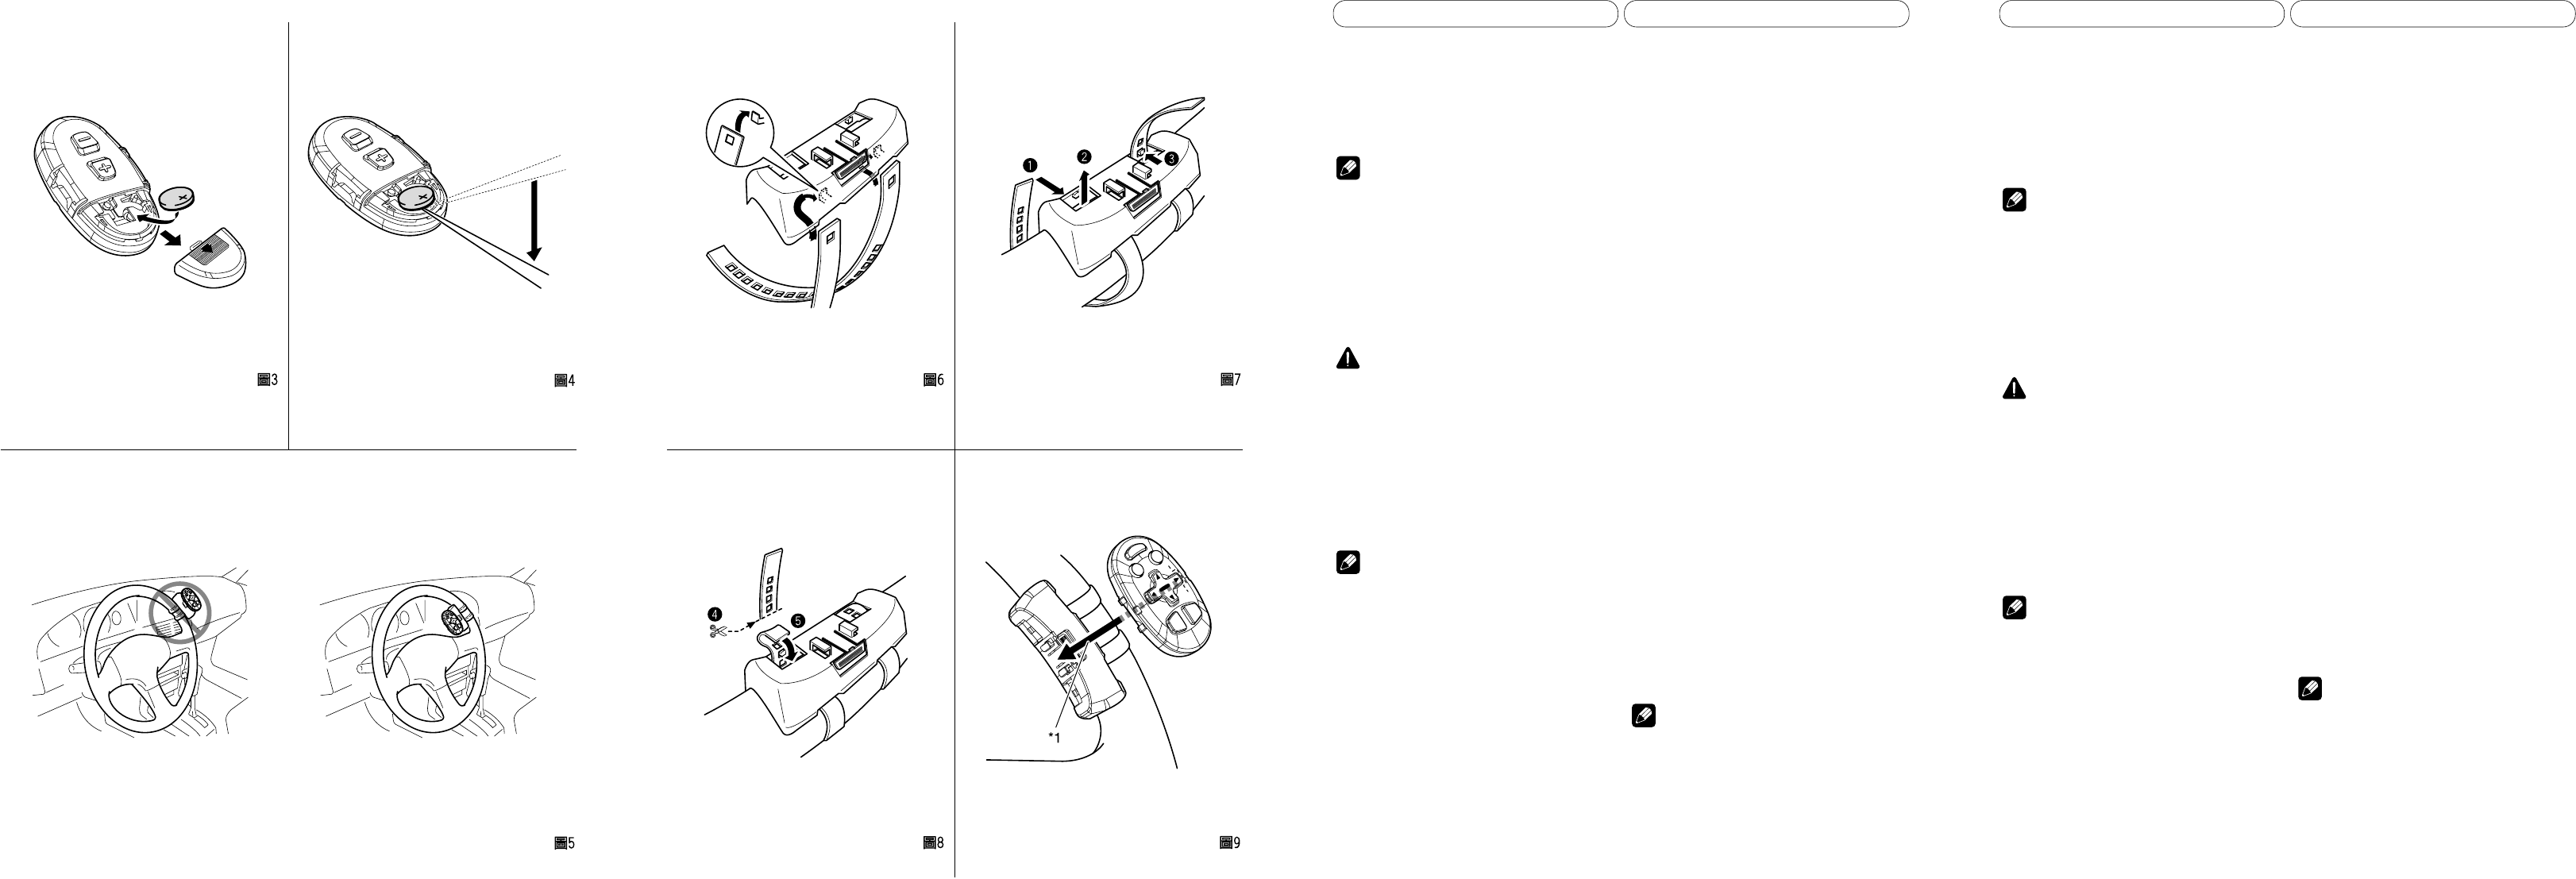
Installing the lithium battery (Fig. 3)
Open the back lid of this unit and place a lithium battery
“CR2032” in this unit with its positive (+) side up.
Note
• When using for the first time, pull out the film protrud-
ing from the tray.
Replacing the lithium battery (Fig. 4)
• Replace the battery with a CR2032 lithium battery.
• Replace the battery in the unit using a non metallic
tapered bar.
Installation
WARNING
• Avoid installing this unit in such a location where the
operation of safety devices such as airbags is pre-
vented by this unit. Otherwise, there is a danger of a
fatal accident.
• Fix this unit securely to the steering wheel with the
belt attached to the unit. If this unit is loose, it disturbs
driving stability, which may result in a traffic accident.
• Do not attach this unit to the outer circumference of
the steering wheel. Otherwise, it disturbs driving
stability, causing a traffic accident. Always attach this
unit to the inner circumference of the steering wheel
as shown (Fig. 5).
Notes
• Do not install this unit in a place that may obstruct the
driver’s view.
• Since interior layout differs depending on the type of
vehicle, the ideal installation location for the unit also
differs. When installing the unit, select a location that
assures optimum transmission of signals from the
unit to Pioneer Head Unit.
Installing the Unit on a Left-Hand-
Drive Car
1. Hook the belt on to the holder
(Fig. 6).
2. Fix the holder to the inside edge
of the steering wheel so that the
holder is facing the driver (Fig. 7).
Wrap the belt around the outside edge of the
steering wheel, passing the end through the slot in
the holder.
Pull on the belt to tighten it then secure it using
the other two hooks on the holder.
3. r Cut off the extra portion of the
belt (Fig. 8).
If some of the belt still protrudes, fold it back into
the slot so that it does not interfere with driving.
4. Fasten the other belt in the same
way (Fig. 8).
5. Install the remote control unit in
the holder (Fig. 9).
When removing the remote control unit from the
holder, move the corrugated release section (*1)
toward the steering wheel as far as possible before
sliding the remote control unit toward you.
Specifications
General
Power source ...................... 3 V DC
(Lithium Battery: CR2032)
Dimensions (W × H × D): .... 38 × 67 × 18 mm
Weight ................................. 37 g (including holder and
battery)
Infered Remote Control
<Wavelength> .................. 940 nm ±50 nm
<Output> .......................... typ; 14 mw/sr per infrared
LED (2LEDs used)
Note
• Specifications and the design are subject to possible
modification without notice due to improvements.
Fig. 3
Abb. 3
Afb. 3
êËÒ. 3
Fig. 4
Abb. 4
Afb. 4
êËÒ. 4
Fig. 5
Abb. 5
Afb. 5
êËÒ. 5
Fig. 6
Abb. 6
Afb. 6
êËÒ. 6
Fig. 7
Abb. 7
Afb. 7
êËÒ. 7
Fig. 8
Abb. 8
Afb. 8
êËÒ. 8
Fig. 9
Abb. 9
Afb. 9
êËÒ. 9
English
Preparación
Instalación de la batería de litio
(Fig. 3)
Abra la tapa posterior de esta unidad y coloque la pila de
litio “CR2032” con el lado positivo (+) dirigido hacia
arriba.
Nota
• Cuando utilice por primera vez, tire la parte saliente
de la película desde la bandeja.
Reemplazo de la pila de litio (Fig. 4)
• Cambie la pila con una pila de litio CR2032.
• Cambie la pila en la unidad utilizando una barra punti-
aguda no metálica.
Instalación
ADVERTENCIA
• Evite instalar esta unidad en un lugar en el que la
operación de los dispositivos de seguridad tales como
las bolsas de aire sea impedida por esta unidad. De
otra manera, hay el peligro de un accidente fatal.
• Fije esta unidad seguramente al volante con la correa
adjunta. Si ésta se aflojara, esto interrumpirá la esta-
bilidad del manejo, lo que podría resultar en un acci-
dente de tráfico.
• No instale esta unidad fuera de la circunferencia del
volante. De otra manera, esto interrumpirá la estabili-
dad del manejo, causando un accidente de tráfico.
Siempre instale esta unidad en el interior de la circun-
ferencia del volante, tal como se indica (Fig. 5).
Notas
• No instale esta unidad en un lugar en el que obstruya
la visión del conductor.
• Como la disposición interior difiere dependiendo del
tipo de vehículo, la ubicación ideal para la instalación
de la unidad también difiere. Cuando instale la
unidad, seleccione un lugar que asegure la trans-
misión óptima de las señales de la unidad a la unidad
principal Pioneer.
Instalación de la unidad en el coche
de manejo del lado izquierdo
1. Enganche la correa al soporte (Fig.
6).
2. Fije el soporte al borde interior del
volante, de tal forma que el
soporte mire al conductor
(Fig. 7).
Envuelva el borde exterior del volante con la
correa y pase el extremo por la ranura del soporte.
Tire de la correa para tensarla y fíjela a los otros
dos enganches del soporte.
3. r Corte la porción restante de la
correa (Fig. 8).
Si sigue sobresaliendo parte de la correa, dóblela
e introdúzcala de nuevo en la ranura, para que no
moleste durante la conducción.
4. Fije la otra correa de la misma
forma (Fig. 8).
5. Instale la unidad de control remo-
to en el sujetador (Fig. 9).
Cuando quite la unidad de control remoto del sujeta-
dor, mueva la sección de liberación corrugada (*1)
hacia el volante en lo posible y deslice la unidad de
control remoto hacia usted.
Especificaciones
General
Fuente de alimentación ..... 3 V CC
(pila de litio: CR2032)
Dimensiones ...................... 38 (An) × 67 (Al) × 18 (Pr)
mm
Peso .................................... 37 g (incluyendo la funda y
la pila)
Nota
• Las especificaciones y el diseño están sujetos a posi-
bles modificaciones sin previo aviso debido a mejo-
ramientos.
Español