DRILL
DRILL BIT SHARPENER
Assembly-, Operation and Safety Notes
OSTRZAŁKA
Wskazówki montażu, obsługi i bezpieczeństwa
FÚRÓSZÁR ÉLEZŐ
Szerelési, használati és biztonsági tudnivalók
NAPRA
Navodila za montažo, uporabo in varnostna navodila
OSTŘIČ VRTÁKŮ
Pokyny k montáži, obsluze a bezpečnostní pokyny
BRÚSKA
Pokyny na montáž, obsluhu a bezpečnostné pokyny
BOHRERSCHÄRFGERÄT
Montage-, Bedienungs- und Sicherheitshinweise
IAN 93456
J
I
K
2 1
A
E
2
1
D
B
43 mm
C
G
H
F
DRILL BIT SHARPENER
PLEASE READ THE INSTRUCTIONS BEFORE USE!
PLEASE KEEP THE INSTRUCTIONS IN
Intended use
Only for private use. Not for commercial use.
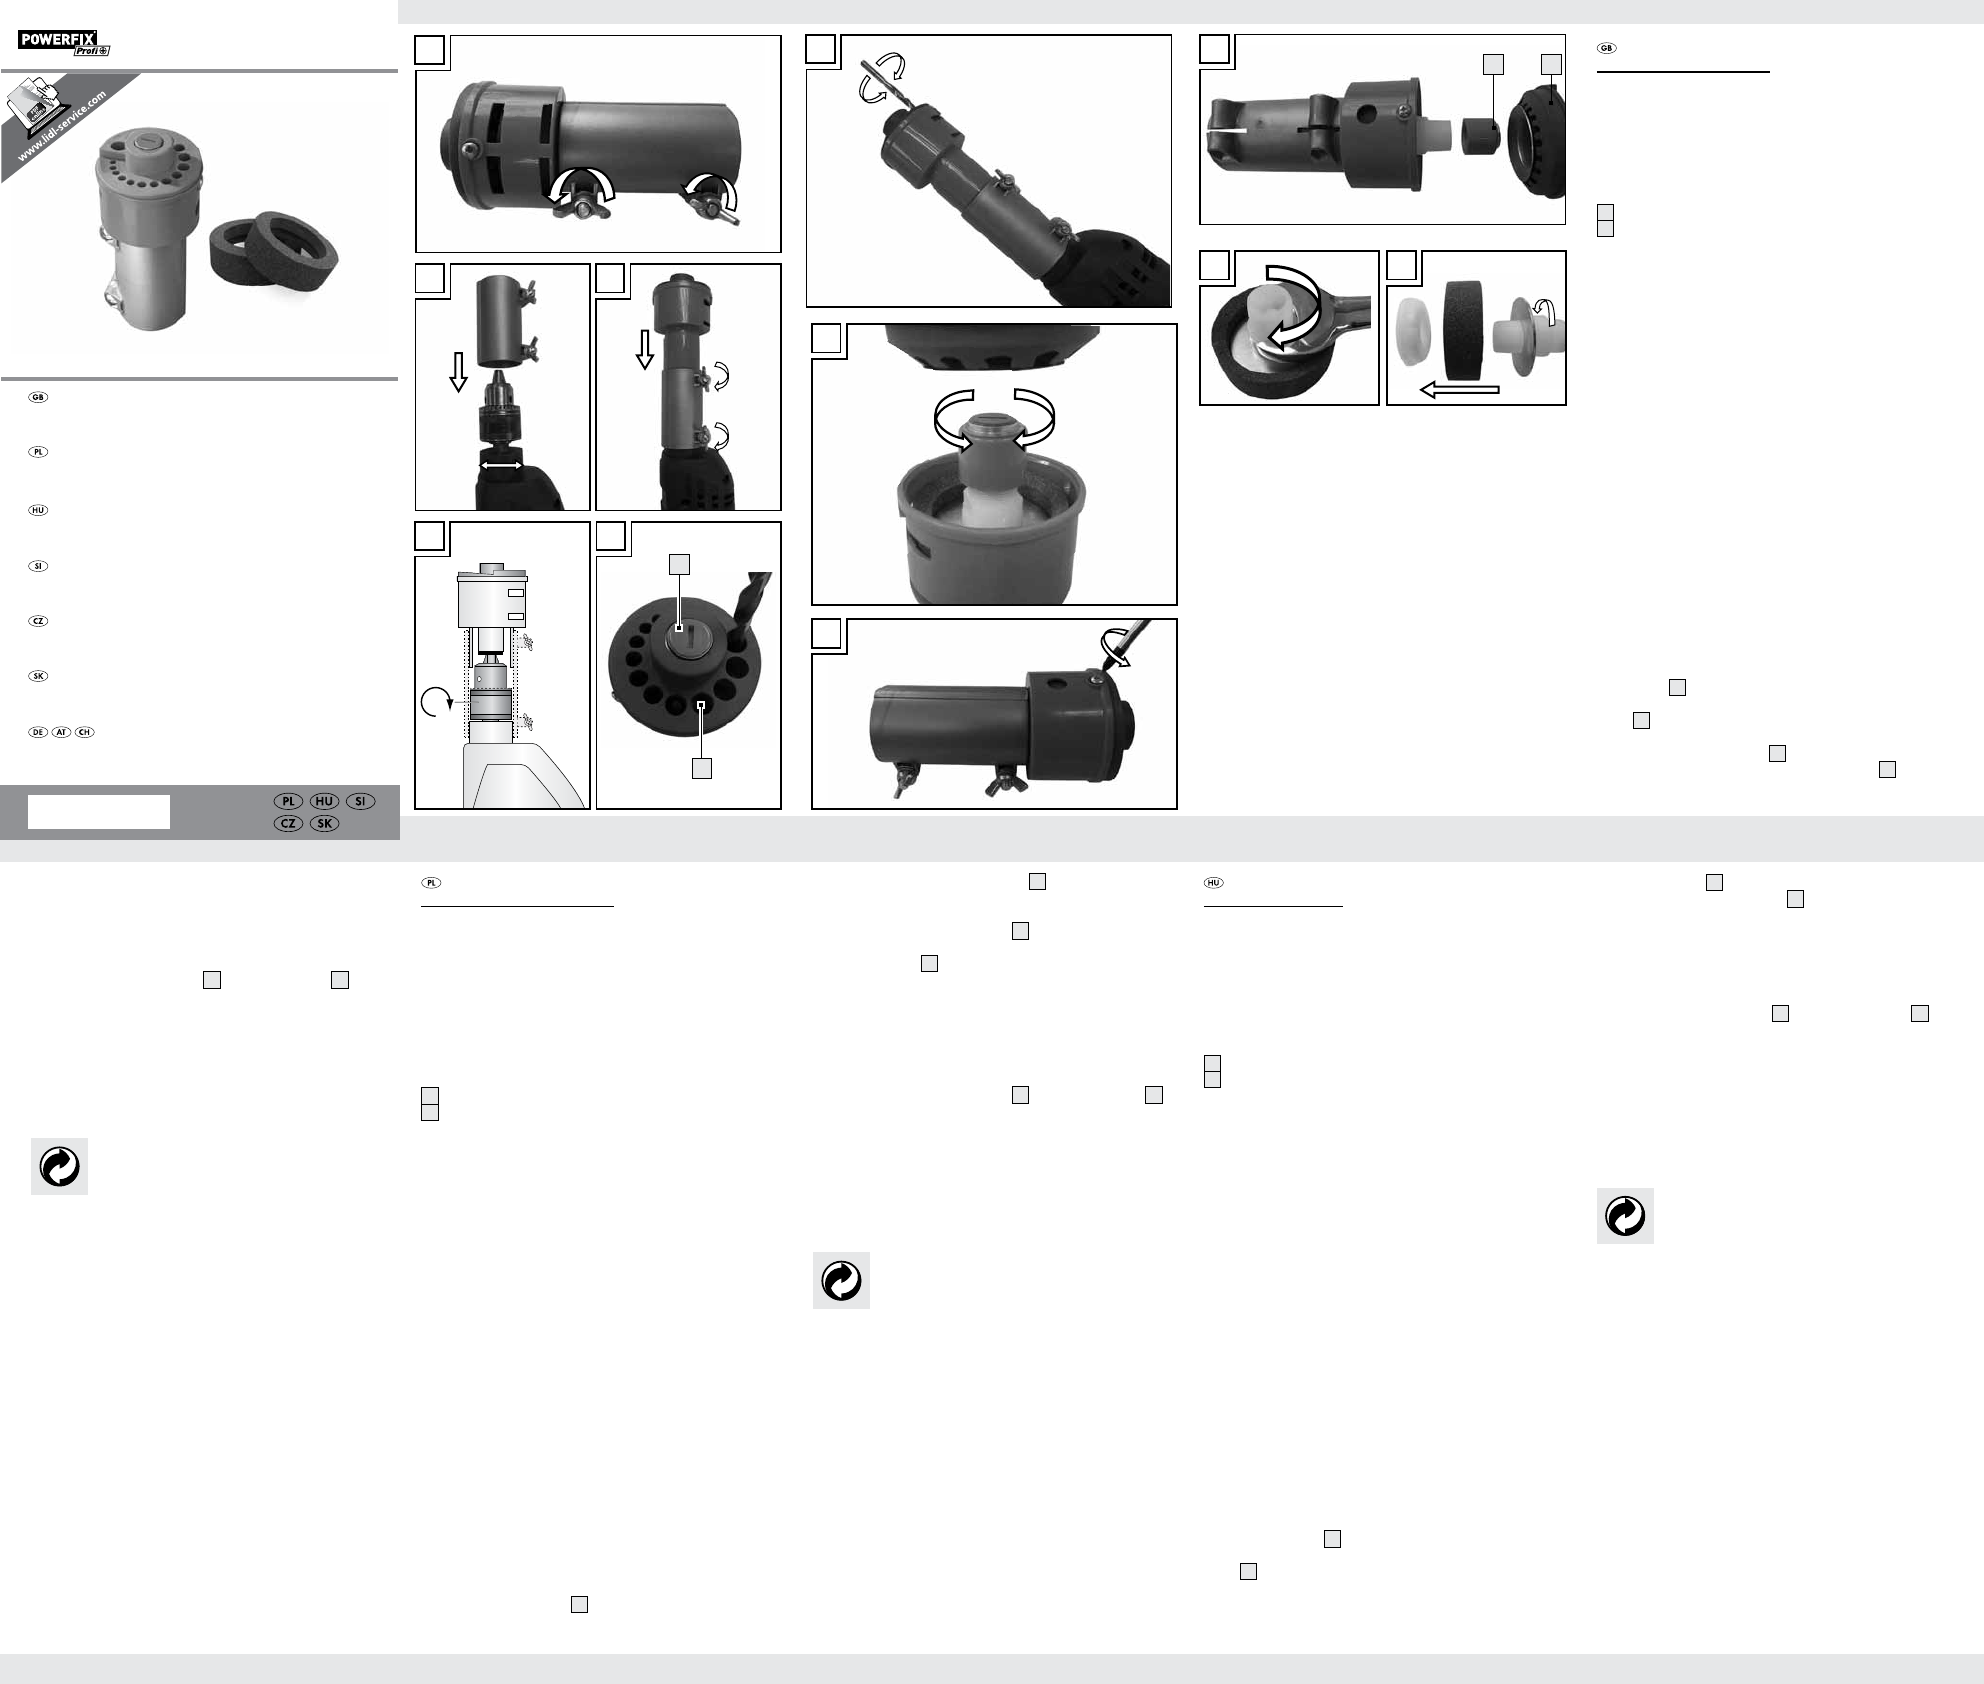
Part list
1
Drill guide
2
Setting screw
Safety notes
• Always disconnect the drill from the power supply
before assembling and adjusting the grinding disc.
• Only for sharpening HSS drill bits (Ø 3.5 – 10 mm).
• Use a drill machine with keyed chuck! Switch off the
impact function, if available!
• Not suitable for permanent operation.
• Avoid unintentionally starting up the device.
• Not suitable for outdoor use.
• Caution! Risk of sparks! Never use the device in areas
susceptible to explosion.
• Wear protective goggles.
• Immediately replace the grinding disc if it is worn out
or damaged.
Initial Start up
Close the key-type drill chuck completely
Then follow the g.
the drill.
Operation
1. Plug in the drill into a suitable power source. Observe
the specications on the tape plate of your drill.
2. Switch the drill on and allow it to reach medium speed.
(Max. 800rpm)
3. Feed the drill bit through a suitable hole in the drill
guide
1
until you have touched the grinding stone
(Fig. E). Observe the specications on the drill guide
1
. Move the drill back and forth with light pressure
until it is sufciently sharpened (Fig. F).
4. Remove the drill guide
1
to adjust the height of the
grinding disc. Then turn the setting screw
2
to adjust
the position of the grinding disc (Fig. G).
5. An old drill bit can be used as a trial to familiarize
yourself with the use of the drill bit sharpener
Replacing the grinding disc
1. Use a cross-head screwdriver to loosen and remove
the screw from the cap of the sharpener (Fig. H).
2. Remove the drill guide
1
, the setting screw
2
and
take out the grinding disc set (Fig. I).
3. Loose the threaded connection and remove the old
grinding disc (Fig. J).
4. Replace the old grinding disc with a new one and re-
assemble the threaded connection (Fig. K).
5. Repeat the steps described above in reverse
sequences to nish replacement.
Disposal
materials, which you may dispose of at local
recycling facilities.
Contact your local refuse disposal authority for more details
of how to dispose of your worn-out product.
OSTRZAŁKA
PRZED UŻYCIEM PROSZĘ PRZECZYT
OBSŁUGI!
INSTRUKCJĘ OBSŁUGI NALEŻY ST
PRZECHOWYW
Użytkowanie zgodne z przeznaczeniem
T
zastosowania.
Lista części
1
Prowadnica wiertła
2
Śruba regulacyjna
Wskazówki dotyczące bezpieczeństwa
• Zawsze należy odłączyć wiertarkę od zasilania przed
montażem i regulacją tarczy szlierskiej.
• T
• Należy użyć wiertarki z dokręcaną tuleją! Jeśli jest to
możliwe, należy wyłączyć funkcję udaru!
• Nie nadaje się do pracy ciągłej.
• Należy unikać niezamierzonego uruchomienia
urządzenia.
• Nie nadaje się do użytku na zewnątrz pomieszczeń.
• Uwaga! Ryzyko powstania iskier! Nie wolno używać
urządzenia w miejscach narażonych na wybuch.
• Nosić okulary ochronne.
• Należy natychmiast wymienić płytę szlierską, jeśli jest
zużyta lub uszkodzona.
Pierwsze uruchomienie
Należy całkowicie zamknąć na klucz tuleję wiertarki. (Rys. B)
Aby zamontować ostrzałkę do wierteł na uchwycie, postępuj
zgodnie z Rys.
Obsługa
1. Podłączyć wiertarkę do odpowiedniego źródła
zasilania. Zwrócić uwagę na specykacje podane na
tabliczce znamionowej wiertarki.
2. Włączyć wiertarkę i pozwolić jej osiągnąć prędkość
średnią. (Maks. 800rpm)
3. Zanurzyć końcówkę wiertła w odpowiedni otwór w
prowadnicy wiertła
1
, aż nie osiągnie kamienia
szlierskiego (Rys. E). Zwrócić uwagę na specykacje
podane na prowadnicy wiertła
1
. Prowadzić wiertło
w przód i w tył z lekkim naciskiem, dopóki nie zostanie
wystarczająco naostrzone (Rys. F).
4. Usunąć prowadnicę wiertła
1
, aby dostosować
wysokość tarczy szlierskiej. Następnie obrócić śrubę
regulacyjną
2
, aby dostosować pozycję tarczy
szlierskiej (Rys. G).
5. Stare wiertło może być stosowane jako próba do
zapoznania się z ostrzałką do wierteł.
Wymiana płyty szlierskiej
1. Za pomocą śrubokręta krzyżakowego poluzować i
wyjąć śrubę z kołnierza ostrzałki (Rys. H).
2. Usunąć prowadnicę wiertła
1
, śrubę regulacyjną
2
i
następnie wyjąć zestaw tarcz szlierskich (Rys. I).
3. Poluzować połączenie gwintowe i usunąć starą tarczę
szlierską (Rys. J).
4. Wymienić starą tarczę szlierską na nową i ponownie
zamontować połączenie gwintowe (Rys. K).
5. Powtórzyć czynności opisane powyżej w odwrotnej
kolejności, aby zakończyć wymianę tarczy
Usuwanie
nieszkodliwych dla środowiska i można je
usuwać poprzez lokalne placówki
recyklingu.
Odnośnie możliwości usuwania zużytego produktu prosimy
dowiadywać się w zarządzie gminy lub miasta.
FÚRÓSZÁR ÉLEZŐ
HASZNÁLA
ŐRIZZE MEG
Rendeltetésszerű használat
Kizárólag magánhasználatra. Kereskedelmi felhasználásra
nem alkalmas.
Alkatrészlista
1
Furatvezető
2
Beállítócsavar
Biztonsági utasítások
• A
mindig szüntesse meg a fúrógép áramellátását.
• Kizárólag HSS fúrófejek élesítésére (Ø 3,5 – 10 mm).
• A
funkciót kapcsolja ki, ha az épp aktív
• Nem alkalmas hosszú idejű használatra.
• Működés alatt ne hagyja felügyeleten kívül.
• Nem alkalmas kültéri használatra.
• Vigyázat, szikrázik!
robbanásveszélyes környezetben.
• Hordjon védőszemüveget.
• A
Üzembe helyezés
Zárja le a kulcsos tokmányt teljes mértékben (lásd B. ábra)
A
szerint.
Kezelés
1. Csatlakoztassa a fúrógépet egy megfelelő
áramforráshoz. Ehhez vegye gyelembe a fúrógépe
adattábláján megadott értékeket.
2. Kapcsolja be a fúrógépet, majd hagyja futni közepes
sebességen (max. 800 rpm) fordulatszámon.
3. V
furatvezetőbe
1
addig, míg a köszörűkőhöz nem
ér (E. ábra). Ehhez vegye gyelembe a furatvezető
1
adatait is. Mozgassa a fúrót enyhe nyomással
előre-hátra addig, míg az megfelelően éles nem lesz
(F
4. Ekkor a csiszolólemez beállításához vegye le a
furatvezetőt
1
.
csavarja a beállítócsavart
2
(G. ábra).
5. Az csiszolóberendezés működésének megértéséhez
használjon egy régi fúrót.
A
1. A
csillagcsavarhúzó segítségével (H. ábra).
2. V
1
és a beállítócsavart
2
,
majd végül a a csiszólólemez elemeit is (I. ábra).
3. Csavarja ki a csavarokat és vegye le a régi
csiszolólemezt (J. ábra).
4. Cserélje ki a régi csiszolólemezt egy újra, majd
csavarozza vissza a csavarokat (K. ábra).
5. Végül a szétszerelés lépéseit ismételje meg
fordított sorrendben, ezzel a csiszolólemez cseréje
befejeződött.
Mentesítés
amelyeket a helyi újraértékesítési tartályokon
keresztül mentesíthez.
A
vagy városa illetékes hivatalánál tudhatja meg.