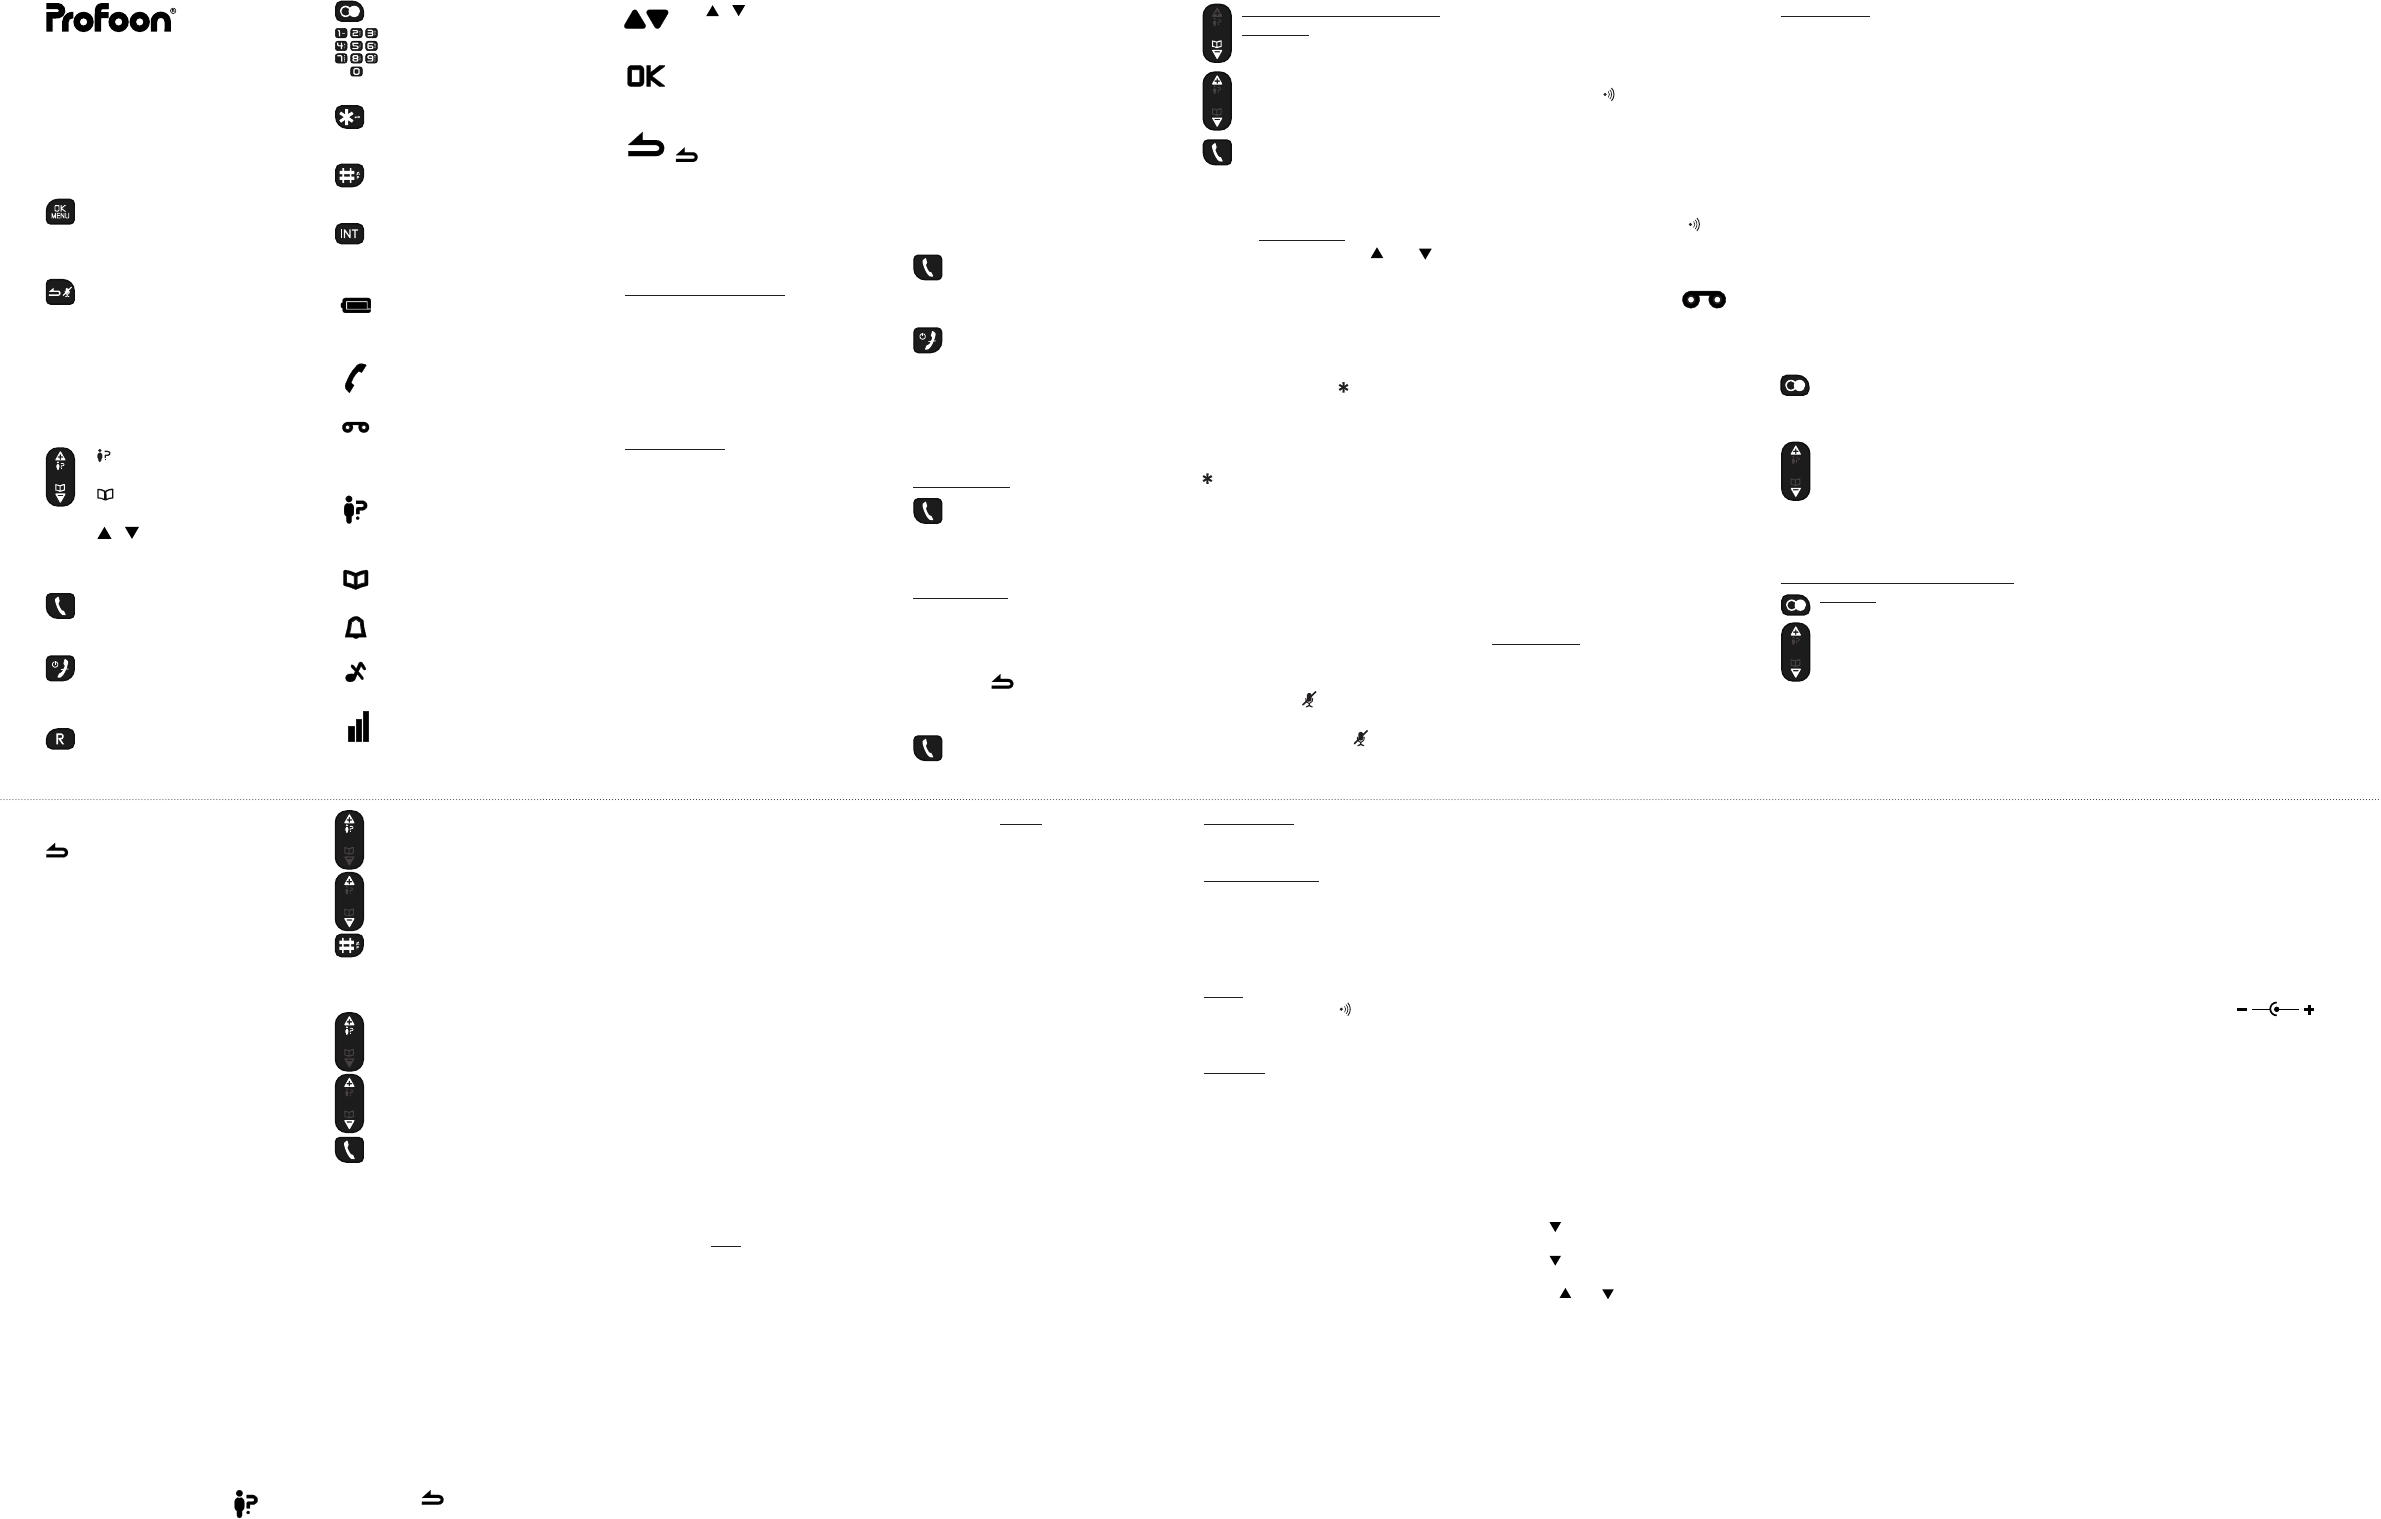
Redial button
Keypad
Key-lock button
(press and hold for 2 sec.)
ringer-off button
(press and hold for 2 sec.)
Intercom button (only when
using multiple handsets)
2 DISPLA
remains lit: batteries are full,
ashing: batteries are nearly
empty
remains lit: during a call,
ashing: incoming call
you’ve received a V
message (only when using
the FSK system)
you’ve received new calls (only
available when subscribed to
the ‘Caller-ID’
illuminates when the phone-
book is opened
the alarm function is enabled
the ringtone of the handset is
disabled
remains lit when within range
of the base, ashes while
searching for the base
USER MANUAL
1 OVERVIEW HANDSETBUTT
OK button
to open the menu and to
conrm a selection
Correction button, to delete
the last input;
briey press and hold to
switch between displaying the
handset name and displaying
the time
during a call to mute the
microphone
: to open the Caller-ID
memory
: to open the phonebook
memory
/ : buttons: to scroll set-
tings and memories
Call button: to answer incom-
ing calls
End button: briey press to
end a call; press and hold to
switch off the handset
R/Flash function button, see
paragraph 4.6
dialing from the phonebook
memory:
press the Phonebook button
search for the desired contact
press the phone-on key; the
number will be dialed
4.4 Speaker volume:
Y
volume during a call. Y
from 5 levels. Uuse the and
buttons to increase or decrease the
volume
4.5 Key lock:
Y
pressing any buttons by accident:
press and hold the button for at
least 2 seconds
until the text ‘KEYS LOCKED’
the display to enable the key-lock function
to disable the key lock, keep the key
pressed for more than 2 seconds
again.
4.6 R/Flash:
During the call, shortly press the key
R to give a FLASH pulse.
The interruption time of the FLASH pulse
is adjustable; for this, see in paragraph
1
4.7 Mute (microphone off):
T
press the key during the call,
T
shortly press the key again.
to delete all last dialed numbers
press the OK button and follow the
on-screen instructions
6 PHONEBOOK
6.1 Introduction:
The handset is provided with a
phonebook memory with a ca-
pacity of 50 contacts, each with a
phonenumber of up to 24 digits and a
name of up to 12 characters.
The phone book memory in the
handset is connected to the function
Caller Identication. When you are
called by somebody
and number you have programmed
in the memory
person is also displayed beside
the number on the display of your
handset.
6.2 Programming:
press the MENU button and then the
OK button
press the OK button and enter the
name using the keypad
press the OK button and use the
keypad to enter the phone number
press and hold the # button for 2 seconds
to insert a dialing pause
press the OK button
6.3 Checking and dialing memory
contacts:
press the honebook button and
search for the desired contact
press the phone-on key; the number
will be dialed
6.4 Correcting:
press the MENU button
press the OK button and select EDIT
ENTRY
press the OK button and search for
to switch on:
press and hold the End button for
2 seconds to switch the handset on
again
The handset also switches on when
replacing it onto the base or charger.
4.1 Call duration:
During the phone call, the elapsed
call duration is displayed on the
handset display
10 seconds after disconnecting the call,
the call duration timer will disappear from
the display
5 REDIALLING
Each handset memorizes the 5 last
numbers you’ve dialed with the hand-
set. Y
follows:
press the Redial button
the last dialed number will appear in
the display
search for the desired recently
dialed number
press the phone-on key; the number
will be dialed
copy to the phonebook memory /
deleting
press the Redial button
search for the desired number
press the MENU button and select:
SA
number
selected number
the selected number or DELETE
4.8 Handset search function:
In case you’ve misplaced the hand-
set, you can easily nd it again as
follows:
briey press the button at the bottom
of the base.
The handset will start ringing for 30
seconds while the text ‘P
in the display
The handset will stop ringing after 30
seconds or after pressing a random button
(handset) or when pressing the button
(base) again to manually stop the signal
earlier
4.9 V( )(*)
In case the carrier left a V
message for you, a notication symbol
will appear in the display of the hand-
set.
This symbol goes off as soon as you
have listened to this message. This
symbol also disappears after reset-
ting the phone (see paragraph 1
*: This function is only available on the
FSK system and when this is supported by
the carrier
4.10 T
Y
handset to save battery power or in
case you don’t want to be disturbed:
to switch off:
pick up the handset from the base or
charger and press and hold the End
button for 2 seconds to completely
switch off the handset
2. insert the supplied batteries into
the battery compartment according
to the markings.
3. Slide the battery cover back onto
the handset and place the handset
on the base/charger station.
4. Leave the handset continuously
during 15 hours on the base sta-
tion, to cradle/charge the batteries
properly
4 CALLING
4.1Answering calls:
Press the key phone-on to
accept a call.
4.2 End the call:
press the key phone-off to end
a call
T
handset back on the base station or the
cradle/charger
4.3 Dialing numbers:
Direct dialing:
Press the phone-on key and
enter the phone number
through the keyboard; this number
will be dialed directly
Block dialing:
Enter the phone number through the
keyboard.
• press and hold the # button for at least
2 seconds to insert a dialing pause
• press the button to delete any
incorrect input
press the phone-on key; the
number will be dialed
use / to display other
options or memories
illuminates when conrming a
selection by pressing the OK
button
illuminates when pressing the
button to go back a step
in the menu or to delete any
input
3 INST
3.1 Base station:
T
1.
insert the small plug of the tele-
phone cable into the TEL.LINE in-
put at the rear of the base (depress
the plug until you hear a click)
2.
phone socket.
Power supply:
1.
6V input at the bottom of the base
2.
wall socket
3.2 Cradle/charger:
If your phone has been delivered
with multiple handsets, 2 batteries
and a cradle/charger with adapter will
be included for every handset. Plug
the adapter of these chargers in a
230 V
3.3 Handset:
1.
the handset, by sliding the battery
cover down.
the desired contact
press the OK button and press the
button to delete the name
use the keypad to enter the new
name and press the OK button
repeat this for the number and press
the OK button
6.5 Deleting:
press the MENU button
press the OK button and select
DELETE (to only delete the selected
number) or DELETE
press the OK button and search for
the desired contact
press 2x the OK button to delete the
selected or all contacts
7 CALLER IDENTIFICA
7.1 Introduction:
If you have the service Caller Identi-
cation at your disposal, the number
of the calling party is displayed on
the display of your handset(s). If
your carrier also transmits names, or
you have programmed this number
including name and the phone book
memory of the handset, the name is
also displayed on the display
The PDX-500 series is suitable for
both the DTMF system, offered by
the Dutch PTT and for the FSK sys-
tem, offered by the Belgian PTT
by cable companies in the Nether-
lands and Belgium for as far as this
service is offered. See paragraphs
8.6 for more information.
7.2 Indication new calls ( )
indicates you’ve received on or more
new calls you haven’t checked yet
7.3 View memory:
the last received call appears in
the display
scroll through the memory
press the key # to view the time
and date of the call
(when a name is displayed, press 2x the
OK button to show the time and date)
7.4 Callback:
the last received call appears
on the display
search for the desired call
press the phone-on key; the
number will be dialed
7.5 Copying / deleting:
open the Caller-ID memory and
search for the desired call
press the MENU button and select
SA
number in the handset, DELETE to
delete the call or DELETE
delete all last incoming calls
press the OK button and follow the
on-screen instructions
8 TIME & DA
8.1 Introduction:
In standby mode, you can have the
display show the actual time (brief-
ly press the button) and when
receiving any incoming calls, the time
and date of the call are registered.
Y
follows:
8.2 Time and date setup:
open the menu and select CLOCK &
ALARM
press the OK button and select
DA
press the OK button and use the key-
pad to enter the following in order:
- the last 2 digits of the year
- the month (use 2 digits)
- the date (use 2 digits)
press the OK button and use the key-
pad to enter the following in order:
- the hours (use 2 digits)
- the minutes (use 2 digits)
press the OK button and the End but-
ton to return the handset to standby
mode
9
9.1 Introduction:
Y
alarm tone at a preset time.
9.2 Alarm time setup:
open the menu and select CLOCK &
ALARM
press the OK button and select
ALARM
press the OK button and select ‘OFF’
to disable the alarm function, ‘ON
ONCE’
only once or ‘ON DAIL
alarm sound every day
after selecting ‘ON ONCE’
DAIL
enter the alarm time
press the OK button and the End but-
ton to return the handset to standby
mode
when the alarm function is enabled,
the alarm symbol will appear in the
display
9.3 Alarm signal setup:
open the menu and select CLOCK &
ALARM
press the OK button and select
ALARM TONE
press the OK button to select the
desired tone
(you can choose from 3 different signals
with a xed volume)
press the OK button and the End but-
ton to return the handset to standby
mode
9.4 Operation:
• At the preset time, the alarm signal
will sound for 60 seconds or until
you press a random button to stop
the alarm beforehand.
• Y
when the key-lock function is
enabled.
• The alarm signal has a xed
volume.
• When you’re currently on a call
when the alarm sounds, the re-
ceiver will emit three short notica-
tion tones.
call, the alarm signal will continue.
10 MUL
10.1 Intercom:
Press the key INT
as soon as the dialed device an-
swers, you can start the internal
conversation
press the End button to disconnect
the call
10.2 Forwarding / conference:
During the call with the outside line,
press the key INT
Call transfer:
after the call is answered, press the
End button to transfer the call
Conference call:
after the call is answered, press the
OK button to start a 3-way confer-
ence call
10.3
Registering (additional) handsets:
base:
press and hold the button on the
base for 8 seconds
handset:
open the menu and select the option
[
press the OK button and select the
option [ REGISTER ]
press the OK button and use the
keypad to enter the PIN code (factory
code 0000 or your personal code)
press the OK button, the handset will
now start searching for the base
After several seconds, the handset will
have found the base and the internal
handset number will appear at the right
side in the display
10.4 De-registering handsets:
T
[ UNREGISTER ] in the menu
[
1 TELEPHONE SETUP
1 HANDSET SETUP:
press the MENU button to open the
menu
select the option [ PERSONAL
and press the OK button
select the desired option and press
the OK button
[ HANDSET NAME ]
Y
the handset. When the handset is
in standby mode, this name will be
shown in the display of the handset.
[ MELODY ]
Use this option to set the ringtone
and ring volume and whether a
sound must be emitted when press-
ing on of the buttons
[ LANGUAGE ]
The various instructions in the
display can be shown in different
languages. This option allows you to
set the desired language.
In case you’ve set an unknown language
and don’t know how to restore the English
language, please see below:
1.
2.
3. key once.
4.
5. key twice.
6.
7. and buttons to select the
English language and press the OK
button to conrm this language
8.
1 BASE SETUP:
press the MENU button to open the
menu
select the option [
and press the OK button
select the desired option and press
the OK button
[ CHANGE PIN ]
A
or de-registering additional handsets
and for certain other functions. The
default PIN code set in the factory
is 0000, but you can use this menu
option to change the code into a
personal code.
See item [ RESET ] if you’ve forgotten
your PIN code.
[ REGISTER ]
This function is described in detail in
chapter 10.3.
[ UNREGISTER ]
This option allows you to unregister
lost or faulty handsets.
[ RESET ]
In case you’ve forgotten your person-
al settings or the PIN code, you can
use this option to restore the default
factory settings.
Keep in mind that in addition to
resetting your settings, the PIN
code will be 0000 again and the
Caller-ID memory and last dialed
number memory will be empty again.
The phonebook memory will not be
deleted.
[ RECALL
Y
the R/FLASH pulse on SHORT
ms), MEDIUM (270 ms) or LONG
(600 ms).
Refer to the user manual of your home or
ofce switchboard or consult your carrier
concerning the desired interruption time.
100 ms is the standardized interruption
time, and this time is set at the factory
12 SPECIFICA
Protocol: DECT / GAP
Caller-ID: DTMF & FSK, auto
selection, 10 memories
Dialing: TONE
FLASH: 100, 270 & 600mS
Phonebook memory: 50 memories
Power supply charger: 2x 1.2V
300mAh, NiMH battery
Power supply base station: Power
supply
Range: 50 m indoors / 300 m
outdoors
Operational life (with full batteries):
Standby:> 100 hours,
use:> 10 hours
Connection factor: ETSI 50
Operational temperature: 0°C to 40°C
Storage temperature: -20°C to 60°C
GB v1.0
PDX-500
PDX-520