5.3 Selecting kilometres/miles
Selecting this setting follows immediately after entering the tyre size. Press the
RIGHT key to choose KILOMETRES (KM) or MILES (M), and conrm with the LEFT key.
The system will then switch to the age and weight setting mode.
5.4 Setting the age and weight
After the KM/MILE setting, the ones digit of the age entry will blink. Use the RIGHT
key to increase the ones digit and then conrm the value desired with the LEFT key.
The display will now switch to the tens digit. Set the desired value using the RIGHT
key and conrm the desired age with the LEFT key. The display will now change to the
ones digit of the weight setting. Set the value desired with the RIGHT key and conrm
with the LEFT key. Repeat this process up to the hundreds digit. After conrming, the
display will switch to the inspection display.
5.5 Setting the inspection interval
A ‘600 KM/M’ display will now blink. This function enables you to set the number
of kilometres/miles until the next inspection of your bicycle. By pressing the RIGHT
key you can set the number between 100 and 900 kilometres/miles. Conrm your
setting with the LEFT key. Once you have travelled the distance you have set here, a
spanner symbol will appear in the display to remind you of your bicycle inspection.
To switch o this symbol press the RIGHT key. After setting the inspection interval,
the display will switch to setting the inspection interval for the 2nd bicycle.
Repeat the steps described above. The display will now switch to setting the time.
5.6 Setting the 12/24-hour display
Press and hold down the LEFT key; the 24-hour display will blink. Use the RIGHT key
to choose the 12- or 24-hour display setting and conrm with the LEFT key.
5.7 Setting the clock
Directly after selecting the 12/24-hour display setting, you now set the time. The
hours display will blink. Pressing the RIGHT key will cause the hours display to
increase by 1. Then press the LEFT key – the minutes display will blink. Pressing the
RIGHT key will cause the minutes display to increase by 1. Then press the LEFT key
again to conrm your setting. You have now completed all your settings and the
bicycle computer is ready for use.
5.8 Bicycle computer check
To check that the bicycle computer and sensor have been correctly installed, press
the LEFT key to activate the display. Ensuring that the computer is rmly attached
to the computer mount, turn the front wheel of your bicycle and the speed will
be displayed.
5.9 Restart/Reset
To reset entered data, press both the LEFT and RIGHT key at the same time for
approx. 3 seconds. Following a restart/reset, you must enter all the settings again
(refer to sections 5.2 - 5.7).
5.10 Automatic starting/stopping of readings
You must switch on the bicycle computer each time before use (display is blank) by
pressing a key. When you start riding, all the readings will automatically start until
the bicycle comes to rest. When you continue riding, the readings will automatically
continue. The bicycle computer will switch o automatically if the bicycle is not in
use for a period longer than 5 minutes to save the battery.
6. MODES/FUNCTIONS
After starting up the bicycle computer, the display will show the speed and the
modus most recently used.
The speed is continuously calculated and updated, and ALWAYS shown in the upper
part of the display. Measuring range: 0.1 – 99.9
Press the RIGHT key to switch between the following modes:
• ODO(totaldistancetravelled):
All kilometres (miles) travelled will be stored. Maximum memory: 9,999.9
• DST(journeydistance):
Automaticallystartedwhenjourneybegins.Maximummemory:999.9
• MXS(maximumspeed):
The maximum speed attained will be stored. Maximum memory: 99.9
• AVS(averagespeed)
Maximum memory: 99.9
• TM(journeytime/journeychronometer):
Automaticallystartedwhenjourneybegins.Maximummemory:9hrs59
min 59 sec
• Temperature
Press and hold down the LEFT key in the temperature mode until C (Celsius) is
blinking. You can now change to F (Fahrenheit) using the RIGHT key. Conrm the
desired setting with the LEFT key.
• Caloriecounter-CAL
This mode displays the average calorie consumption rate.
• Fatburningrate-F
This mod displays the average fat burning rate in grams.
• SCAN(Scanfunction):
Rolling function display: keep pressing the RIGHT key until you reach the SCAN
mode. The word SCANwillappearinthedisplay.Inthismode,theDST,MXS,
AVS,TMfunctionswillautomaticallybedisplayedinapprox.4secondintervals.
• One-oscanningquickrun-through:
IfyoukeeptheRIGHTkeypresseddownforapprox.3seconds,aone-oquick
run-through will be performed against concurrent back lighting
• Backlighting
Briey pressing the LEFT key will activate the backlighting for approx. 3 seconds.
Atthesametime,thecomputerdisplaywillswitchtojourneytimemeasurement
(TM). Pressing the LEFT key again will activate the backlighting for another 3
seconds and the display will switch back to the previously set function. Briey
pressing the LEFT key twice in succession will activate the backlighting in the
respective mode for approx. 3 seconds.
• Time
Speedtrendandcomparisonarealwaysdisplayedduringthejourney:
• Speedtrend:
Shows the current speed: the wheels of the bicycle symbol will rotate forwards if
you are accelerating, or backwards if you are slowing down.
• Speedcomparison:
A “+” or “-“ sign will appear on the right of the speed display. This indicates
whether you are riding faster or slower than the previously attained average
speed(AVS).
• Displaymemory:
Thebicyclecomputerhasauniquedisplaymemoryenablingthejourney
distance(DST),averagespeed(AVS)andjourneytime(TM)toberecordedat
theendofthejourney.Attheendofthejourney(orastage),presstheLEFT
key.TheDST,AVSundTMreadingswillbesavedandmaybeviewedatalater
date (display will blink). By pressing the RIGHT key, you can then view the saved
WIRELESS
BICYCLE COMPUTER
OPERATING INSTRUCTIONS
Art. Nr.: 0523 | 20 functions
readings. To exit this mode, press the LEFT key. This display memory is suitable
for–amongstotherthings–recordingdataafteraracetoquicklysavethe
readings after crossing the nishing line.
To delete the readings refer to section 6.1
6.1Resettingtheroutedata(DST,TM,AVS)tozero
Press the RIGHT key to display (DST), and then keep the LEFT key pressed down for
approx.3seconds.The3routedatareadings(journeydistance–DST,journeytime
–TM,averagespeed-AVS)willberesettozero.
6.2Resettingthemaximumspeed(MXS)tozero
KeeppressingtheRIGHTkeyuntilthemaximumspeed(MXS)isdisplayedandthen
keeptheLEFTkeypresseddownforapprox.3seconds.Themaximumspeed(MXS)
will be reset to zero.
6.3 Resetting the calorie consumption rate (CAL) to zero
Keep pressing the RIGHT key until the calorie consumption rate (CAL) is displayed.
Then keep the LEFT key pressed down for approx. 3 seconds and the average calorie
consumption rate will be reset to zero.
6.4 Resetting the fat burning rate (F) to zero
Repeatedly press the RIGHT key until the fat burning rate (F) is displayed. Then
keep the LEFT key pressed down for 3 seconds and the average fat burning rate
will be reset to zero.
6.5 Manually setting the total distance travelled
To enter the total distance (ODO) travelled after replacing a battery or a reset, you
rst have to repeat all the setting steps from sections 5.2 Setting the tyre size to
5.7 Setting the clock.
First press the RIGHT key until the mode (ODO) is displayed. Then keep the LEFT key
pressed down for 3 seconds: the last digit of the total distance travelled will start
blinking. Press the RIGHT key to set the desired number for this digit, and conrm
by pressing the LEFT key. Then select the next digit and repeat this process until you
have entered the value desired for the total distance travelled. Then press the LEFT
key again to return to the normal (ODO) mode.
6.6 Switching between bicycle 1 and bicycle 2
By briey pressing the LEFT and RIGHT keys at the same time, you can switch the
measuring functions between bicycle 1 and bicycle 2. A dot followed by either the
number 1 or 2 will be displayed to the left of the speed display.
The total distance travelled (ODO) for bicycle 1 and 2 will be added when both
readings are displayed at the same time.
Whenyouchangethedisplay(betweenbicycle1and2),thedataforDST,TM,AVS,
MXS,CAL,andFwillbereset.
7. REPLACING THE BATTERIES
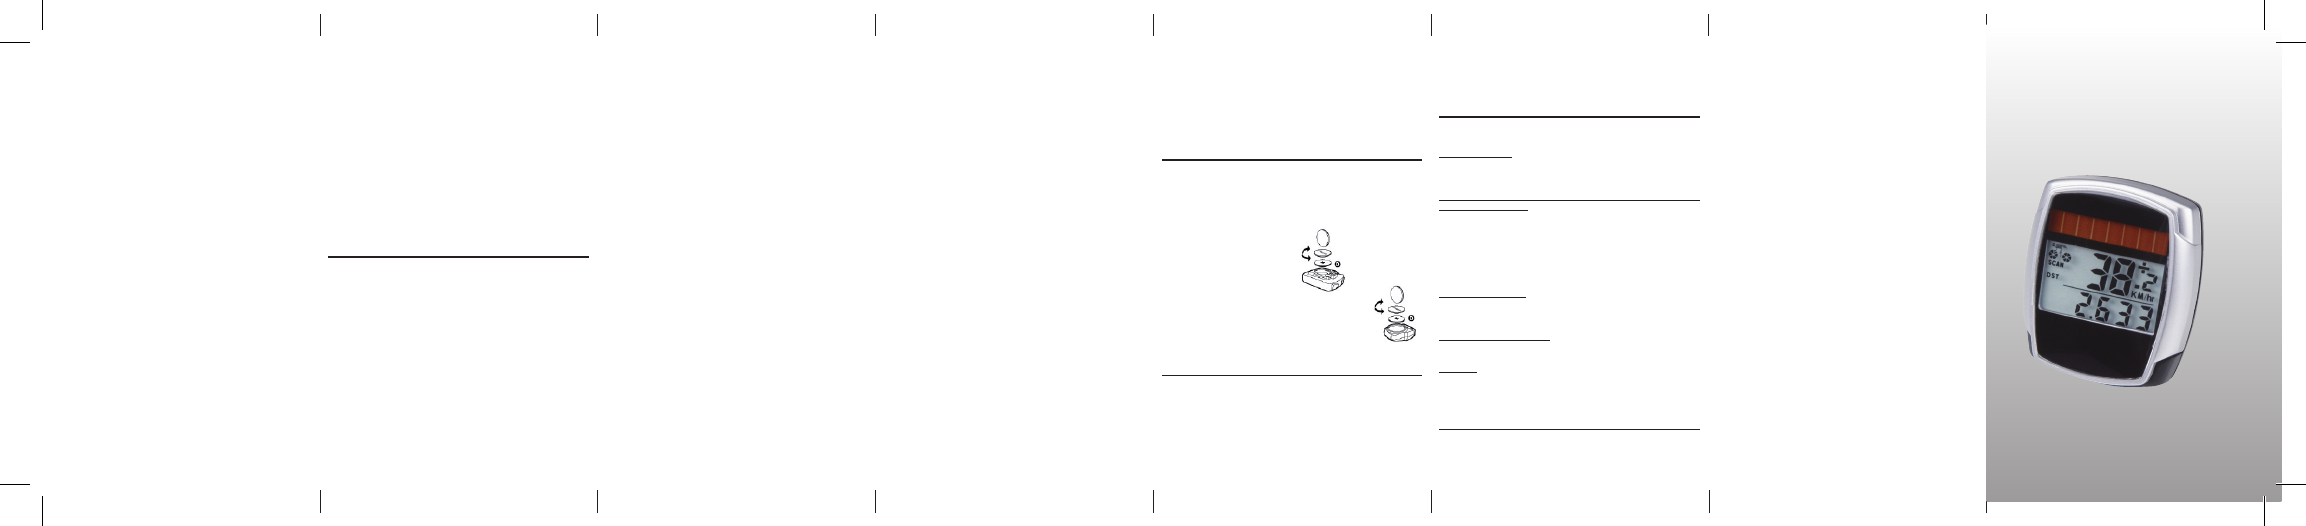
7.1 Bicycle computer
Unscrew the lid of the battery compartment (located on the underside of the bicycle
computer)usingacoin.Insertthe3Vbatterysothatthepluspole(+)isvisible.
Replace the lid and screw shut. After the batteries are inserted, all the settings must
be repeated (refer to section 5.2 Setting the tyre size).
7.2 Sensor
Insert the battery in the sensor so that the plus pole (+) is
facing the lid of the battery compartment. Then close the lid
using a coin.
8. DECLARATION OF CONFORMITY
It is hereby conrmed that the designated product conforms to the fundamental
requirementsofthefollowingEuropeanguidelines:.
2004/108/EGEMVguideline
European Parliament and Council guideline from 15.12.2004
2006/95/EG Low voltage guideline
European Parliament and Council guideline from 12.12.2006
The conformity of this product with the guidelines is established by its full compli-
ance with the harmonised and non-harmonised standards.
9. DESCRIPTION OF ERRORS
In the event of an error occurring, please check the following points rst, before you
make any complaint about the bicycle computer.
Speed not displayed
• Checkforcorrectmagnet/sensoralignment
• Checkbatteries
Incorrect speed reading, or speed is displayed when not in motion, or maximum
speed display is too high
• Checkthatyouhavetherightsettingforthetyresize
• Checkthatyouhavetherightkm/milessetting
• Checkthatmagnetandsensorarecorrectlypositioned
• ItispossiblethatunknownatmosphericorRFdisturbances,atmosphericor
radio interferences, high-voltage power lines, railway lines etc. may also
cause an incorrect speed display.
No display (blacked out)
Too high temperature, or display is exposed to direct sunlight. Display will return to
normal when cooled o.
Display shows erratic numbers
Remove bicycle computer battery and reinsert.
No display
• Checkthebatteries
• Checkthatthebatteriesareinsertedtherightwayround(+/-).
10.WARRANTYPROVISIONS
Bicycle computer article no.: 0523
This bicycle computer is provided with a 2-year warranty. The warranty period starts
from the date of purchase (purchase receipt, proof of purchase). During the warranty
period, address any complaints you may have to your dealer or the service address
provided below. During this period we will correct free of charge all faults caused by
material defects or malfunctioning.
Batteries, defects caused by improper handling, a fall, impact and the like are
excluded from the warranty. Please note that the warranty period is not aected by
any repair or replacement. The 2-year warranty period starting from the purchase
date shall remain in eect.
After the warranty period has expired, you will still be able to send the defective
bicycle computer to the service address provided below to be repaired. Any repairs
causedafterthewarrantyperiodhasexpiredare,however,subjecttocharge.After
prior telephone contact, please send your properly packaged bicycle computer (with
your purchase receipt) with sucient postage to the following address:
Prophete GmbH u. Co. KG
Lindenstrasse 50
D-33378 Rheda-Wiedenbrück
Phone: +49 (0) 5242 4108-59
Fax: +49 (0) 5242 4108-73
Email address: service@prophete.net
Website: www.prophete.de