656685
3
Zoom out
Zoom in
Vorherige Seite
1/6
Nächste Seite
Handle the product with care, it can be damaged by impacts, blows, or
accidental falls, even from a low height.
If the product casing is damaged, discontinue product usage! When it
is still connected to the mains, do not touch the radio-controlled switch
socket or the connected device! First, switch off the mains socket to
which the radio-controlled switch socket is connected (switch off at the
circuit breaker and the RCD). Only then can you remove the radio-control-
led switch socket from the mains socket. Take the product to a specialist
workshop or dispose of it in an environmentally friendly way.
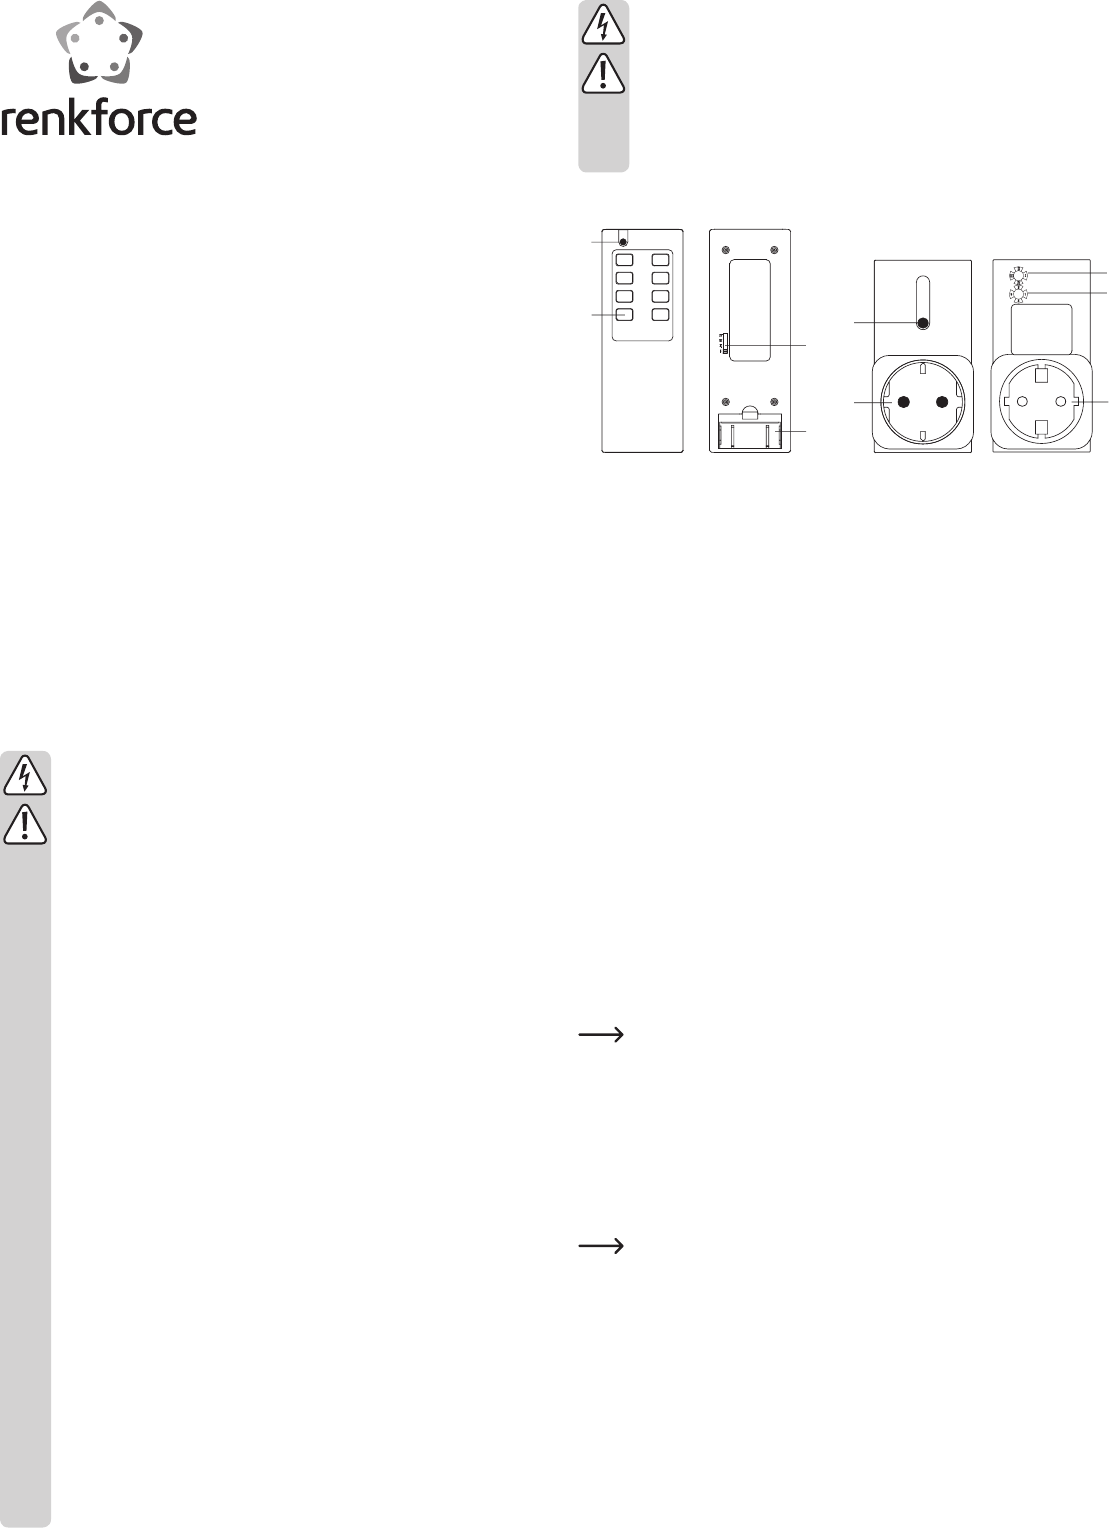
Controls
A Control-LED (lights up on use of buttons)
B
Keypad for switching channels 1 to 4 (left column “ON” = on, right column “OFF” = off)
C Coding switch I, II, III, IV for one of the four address codes
D Battery compartment for a 12 V battery of type “23A”
E Control-LED (lights up when the mains socket on the front is activated)
F Front socket for connecting of a consumer load, with child-proof lock
G Coding switch I, II, III, IV for one of the four address codes
H Coding switch for switch channel selection 1, 2, 3, 4
I Safety plug for connection to the mains socket
Inserting/Replacing the Battery
Open the battery compartment (D) on the back of the hand-held radio transmitter and
insert a 12 V-battery (type “23A”) with the correct polarity (observe imprint in the bat-
tery compartment or the figure above). Close the battery compartment again.
The battery needs to be replaced if the range of the hand-held radio transmitter is
significantly reduced or the control-LED (A) no longer lights up when the buttons are
used.
Setting the Address Codes
One of the four address codes (I, II, III, IV) can be set on both the hand-held radio
transmitter and the radio-controlled switch socket. Therefore, up to four identical
radio-controlled switch sets can be operated without influencing each other.
Select one of the address codes (I, II, III, IV) on the hand-held radio transmitter via the
sliding switch (C). Set exactly the same address code on the related radio-controlled
switch socket(s); use a flat screwdriver for turning the coding switch (G).
If you set a different code on the hand-held radio transmitter and the radio-
controlled switch socket, the radio-controlled switch socket will not react to
the switching commands on the hand-held radio transmitter!
Setting the Switching Channel of the Radio-Controlled
Switch Socket
On the back of the radio-controlled switch socket there is a further coding switch (H)
that is marked by the numbers “1”, “2”, “3” and “4”. It is used to select one of the four
switching channels (the hand-held radio transmitter has also imprinted the numbers
“1”, “2”, “3” and “4”) if more than one radio-controlled switch socket is operated.
It is of course possible to set the same switching channel for two or more ra-
dio radio- controlled switch sockets. By this the two radio-controlled switch
sockets are activated or deactivated by one keystroke.
Start-up, Function Test
Plug the radio-controlled switch socket (without the consumer load connected!) into
the designated earthed mains socket.
You can now test the function of the radio-controlled switch socket, by briefly pressing
the respective “ON” button for the corresponding switching channel (1, 2, 3 or 4). The
red control-LED (E) on the radio -controlled switch socket lights up. The mains socket
(F) on the front is now activated; mains voltage is available and a connected consumer
load is turned on.
Briefly press the button “OFF” of the switching channel and the control-LED (E) is
turned off. The mains voltage at the mains socket (F) and therefore the connected
consumer load is turned off.
G
Operating Instructions
Radio-controlled switch set, 4 parts
Item no. 1208454
Intended Use
The product consists of a radio-controlled main socket and a radio-controlled hand-
held transmitter. By using the radio-controlled hand-held transmitter, a consumer load
connected to the remote-controlled radio switch socket can be turned on or off.
All the safety instructions and operating notes in these operating instructions must
be followed carefully. These instructions not only protect the device but, in particular,
your health. Therefore, please read the entire operating instructions before using the
product.
This product complies with the applicable national and European requirements. All
names of companies and products are trademarks of the respective owners. All rights
reserved.
Package contents
3x radio-controlled mains socket
Hand-held radio transmitter
12 V special battery for hand-held radio transmitter
Operating instructions
Safety Instructions
Damages due to failure to follow these operating instructions will void the
warranty/guarantee! We do not assume any liability for any resulting dam-
age!
We do not assume any liability for material and personal damage caused
by improper use or non-compliance with the safety instructions. In such
cases, the warranty/guarantee will be null and void.
The unauthorized opening, conversion and/or modification of this product
is not permitted for safety and approval reasons (CE).
Do not use this product in hospitals or medical institutions. Although the
product only emits relatively weak radio signals, these may lead to the
malfunction of life-support systems. The same may also apply to other
zones.
The radio-controlled switch socket(s) is/are designed in accordance with
protection class I. Only a standard mains socket (230 V/AC, 50 Hz with pro-
tective earth) for the public supply grid may be used as the power source
for the radio-controlled switch socket(s).
The hand-held radio transmitter is powered by a 12 V battery (type “23A”).
The product is not a toy and does not belong in the hands of children.
Therefore, be especially careful when children are around. Children might
try to push objects through the socket openings, for example. There is
danger of a life-threatening electric shock!
The product must only be used in dry, enclosed indoor rooms, it must not
get damp or wet. Never touch the product, or the mains plug, with wet or
damp hands when trying to connect a plug to the radio-controlled switch
socket.
There is danger of a life-threatening electric shock!
Never remove a mains plug from the socket on the front side of the radio-
controlled switch socket by pulling the power cable. Always pull the plug
from the socket, in the radio-controlled switch socket, using the gripping
surface provided on the side.
Do not connect adaptor plugs in series!
The device is only voltage-free when it disconnected from the mains sock-
et.
Do not overload the radio-controlled switch socket (take note of the input
power in the technical data at the end of the operating instructions!).
Do not leave packaging material carelessly lying around, since it could
become a dangerous plaything for children.
ON
OFF
1
2
3
4
A
B
C
D
-
+
E
F
G
H
I
3

Brauchen Sie Hilfe? Stellen Sie Ihre Frage.

Forenregeln

Missbrauch melden von Frage und/oder Antwort

Libble nimmt den Missbrauch seiner Dienste sehr ernst. Wir setzen uns dafür ein, derartige Missbrauchsfälle gemäß den Gesetzen Ihres Heimatlandes zu behandeln. Wenn Sie eine Meldung übermitteln, überprüfen wir Ihre Informationen und ergreifen entsprechende Maßnahmen. Wir melden uns nur dann wieder bei Ihnen, wenn wir weitere Einzelheiten wissen müssen oder weitere Informationen für Sie haben.

Art des Missbrauchs:

Zum Beispiel antisemitische Inhalte, rassistische Inhalte oder Material, das zu einer Gewalttat führen könnte.

Beispielsweise eine Kreditkartennummer, persönliche Identifikationsnummer oder unveröffentlichte Privatadresse. Beachten Sie, dass E-Mail-Adressen und der vollständige Name nicht als private Informationen angesehen werden.

Forenregeln

Um zu sinnvolle Fragen zu kommen halten Sie sich bitte an folgende Spielregeln:

Neu registrieren

Registrieren auf E - Mails für Renkforce 1208454 wenn:


Sie erhalten eine E-Mail, um sich für eine oder beide Optionen anzumelden.


Das Handbuch wird per E-Mail gesendet. Überprüfen Sie ihre E-Mail.

Wenn Sie innerhalb von 15 Minuten keine E-Mail mit dem Handbuch erhalten haben, kann es sein, dass Sie eine falsche E-Mail-Adresse eingegeben haben oder dass Ihr ISP eine maximale Größe eingestellt hat, um E-Mails zu erhalten, die kleiner als die Größe des Handbuchs sind.

Ihre Frage wurde zu diesem Forum hinzugefügt

Möchten Sie eine E-Mail erhalten, wenn neue Antworten und Fragen veröffentlicht werden? Geben Sie bitte Ihre Email-Adresse ein.


Info