Installation
The monitor can be set up using the foot enclosed or installed in a headrest or installation opening, e.g. in a
caravan, using the mounting frame.
ƽ
fl uences
driver’s activity nor distracts him from the traffi c.
lead to injury to the vehicle‘s occupants in the event of an accident.
fi
monitor or other components must always be carried out in such a manner that neither
the traffi c safety nor the designed stability of the car is impaired. With many vehicles, the
MOT will be void, if you cut out a section of the sheet metal.
fuel tank or similar systems will not be damaged.
being dismounted in the event of an accident. Therefore mount it safely and in a place
where it cannot become a danger for the passengers.
•
brackets.
• Pull the monitor out of the mounting frame.
Installing the foot
•
screws.
•
cleaning agent before you start. Please note that the temperature must be at least 15 °C when using the
adhesive pad.
•
•
clamping screw
• The angle of the monitor can be adjusted with the second screw on the foot.
Installation
• Cut out a mounting opening of 177 x 120 mm. The required mounting depth is 18 mm.
•
provides corresponding holes.
☞
Turn the mounting frame so that the opening for the connection cable is on the bottom right.
•
snap it into place.
Connection
ƽ
The electric connection should always be carried out by a specialist.
the vehicle battery must be disconnected during connection.
completely connected.
leads, as normal test lamps consume excessive voltage and may thus damage the vehi-
cle‘s electronics.
Use rubber grommets at cable gland points.
+12V
•
monitor
•
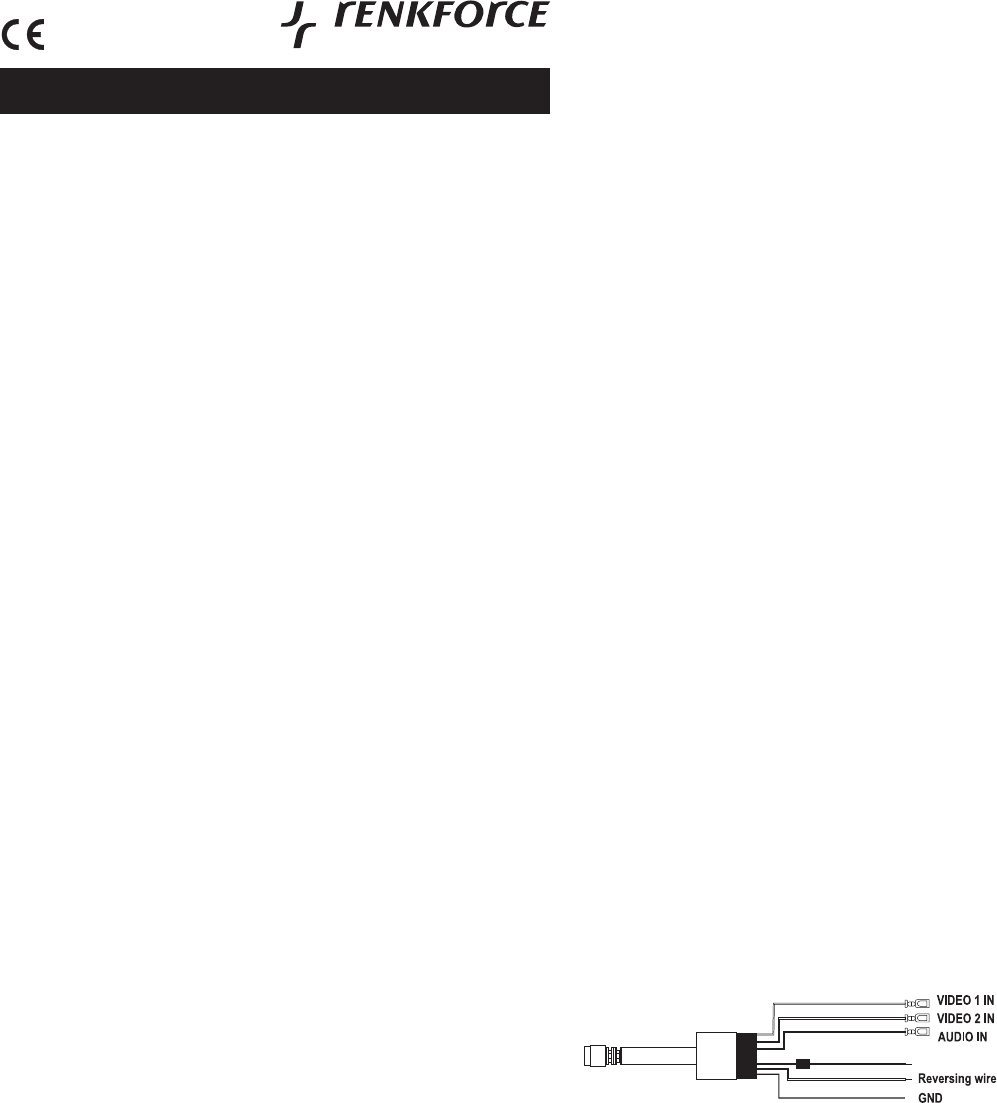
• Connect the red RCA
•
or the video output of your reversing camera.
• Connect the black cable GND to the vehicle’s ground.
• Connect the red +12 V cable to a connector that only carries +12 V while the ignition is switched on.
☞
Do not connect this terminal to continuous current, otherwise the on-board battery could be dis-
charged when the vehicle is parked for a longer period of time.
•
wire” to the terminal that carries +12 V when the reverse gear is engaged.
☞
This cable automatically switches the video input to the VIDEO 2 IN input (signal of the reversing
camera) if the reverse gear is engaged. It can be connected to the cable of the reversing light,
for example.
•
cable enclosed (yellow = video, red = audio).
•
☞
The connector VIDEO 1 IN will be deactivated as long as the adapter cable is plugged in.
•
monitor
☞
The inbuilt loudspeaker of the monitor will be deactivated as long as the headset is plugged in.
╞
OPERA
T
Item no. 37 39 65
Intended use
The monitor is used to play back audio and video signals of externally connected devices in vehicles.
This product is only approved for the connection to 12 V direct current on-board networks with the negative
pole of the battery to the car body
of on-board voltage.
The user must make sure that the way the product is installed protects the product from humidity and wetness.
Any use other than the one described above damages the product. Moreover
short-circuit, fi re, electric shock, etc..
No part of the product should be modifi ed or reassembled.
This product complies with the national and European legal requirements.
ƽ
Always follow the safety instructions.
Safety Instructions
ƽ
instructions! We do not assume liability for any resulting damage.
or non-compliance with the safety instructions. In such cases, the warranty will be null and
void.
ƽ
manual.
☞
• fi rst time. Therefore, please follow the operating
instructions carefully
•
sengers. The driver must not be distracted by this. Prior to the installation, ask for information about the
statutory regulations in your country
• fi cation to the product is not permitted.
•
battery connected to the body of the vehicle). Never connect the device to a different power supply
•
involved when using electrical devices.
•
mechanical stress.
•
anymore. Disconnect the device from the power supply (remove the batteries) and take it to a specialist
service centre.
• Only use the device in a temperate climate, never in a tropical climate.
•
•
• Please observe the additional safety instructions in the individual chapters of this manual.
•
in these operating instructions, please contact our technical advisory service or another specialist.
Inserting/changing the batteries of the remote control
ƽ
Keep batteries out of the reach of children.
Make sure that the polarity is correct when inserting the battery
Remove the battery when the device will not be used for a while.
able protective gloves.
fi
batteries. There is danger of an explosion.
• Pull out the battery holder on the backside of the remote control.
•
cated on the battery holder
• Slide the battery compartment cover on to the remote control again. It must snap in place.
•
one of the same type.
V 05/12