All rights reserved. No part of this publication may be reproduced in any form without the written permission of ROLAND
CORPORATION.
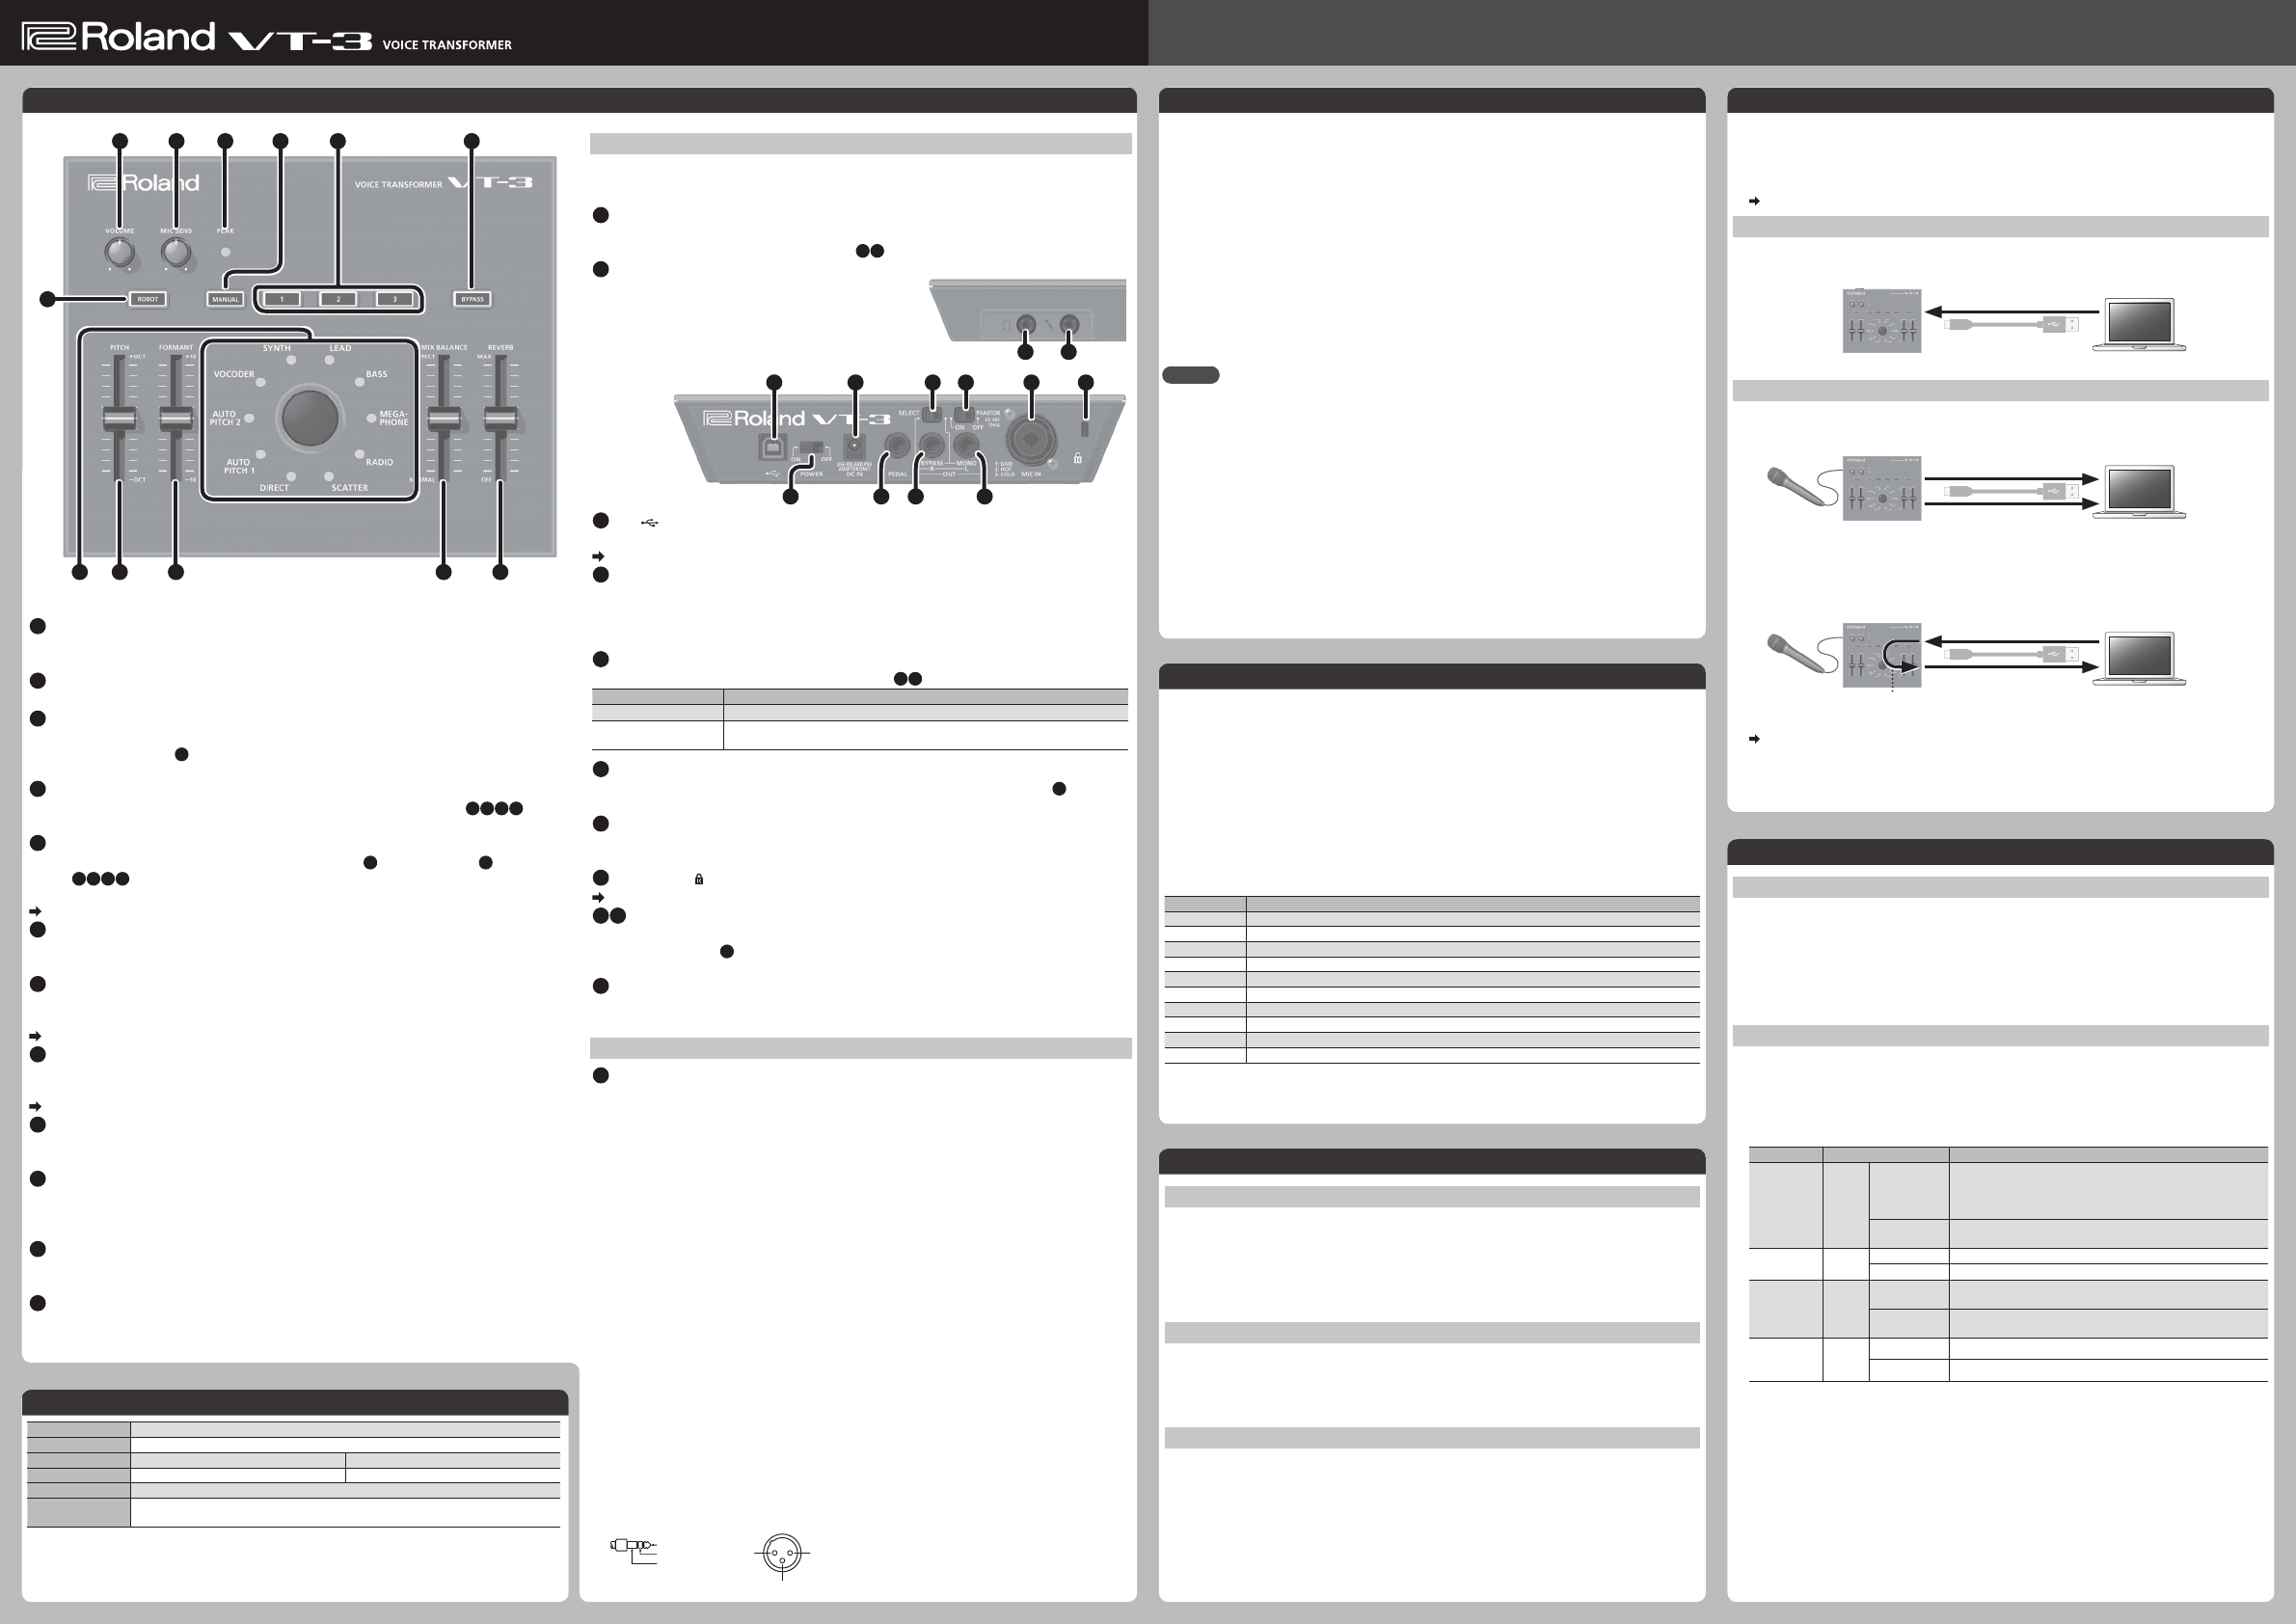
USB Audio Interface
By using a commercially available USB 2.0 cable to connect the VT-3 to your computer, you can
use the VT-3 as a USB audio interface.
* You must install the USB driver before connecting the VT-3 to your computer.
Download the USB driver from the Roland website.
For details, refer to Readme.htm which is included in the download.
http://www.roland.com/support/
Playback
You can use the VT-3 to listen to the sound that’s played by your computer.
The sound will be output from the VT-3’s OUT jacks and from the PHONES jack.
Recording
The mic sound processed by the VT-3 can be recorded on your computer.
The VT-3 will output the eect-processed sound and the unprocessed sound (bypass).
Loop-back
The sound that’s played by your computer can be mixed on the VT-3 with the mic sound and
sent back to the computer.
* You can also change the settings so that loop-back will not occur.
Refer to “Various Settings”
Computer sound
Eect
Bypass
Mic sound
Mic sound
+
Computer sound
Computer sound
Loop-back
Scene Memory
Recalling
1.
Press the scene memory button [1]–[3] that you want to recall.
The button lights, and the [ROBOT] button, character knob and slider settings (the scene) are
recalled instantly.
* When you recall a scene, the current positions of the sliders will not match the actual sound.
* If you operate the sliders after recalling a scene, the slider settings will be reected in the sound. In this case,
the scene memory button will blink.
Saving
Here’s how to save the settings of the [ROBOT] button, the character knob and the sliders to a
scene memory button [1]–[3].
1. Press and hold the scene memory button [1]–[3] in which you want to save the settings.
When all of the scene memory buttons [1]–[3] blink, the settings have been saved.
Copying
Here’s how to copy a scene to another number.
1. Press the scene memory button that you want to copy; it is recalled.
2. Press and hold the copy-destination scene memory button.
When all of the scene memory buttons [1]–[3] blink, the copy has been completed.
Modifying Your Voice
Here’s how to apply an eect that modies your voice.
1. Connect your mic to the MIC IN jack (front or rear).
If you’ve connected a condenser mic to the XLR connector of the MIC IN jack (rear), turn the
[PHANTOM] switch on.
2. Turn the [BYPASS] button on.
3. While vocalizing into the mic, adjust the input sensitivity with the [MIC SENS] knob.
Adjust this so that the PEAK indicator lights occasionally.
4. Press one of the scene memory buttons [1]–[3].
5. Turn the [BYPASS] button o.
6. Vocalize into the mic.
The eect-processed voice will be output.
MEMO
•Adjust the input sensitivity accurately. The eect will not work correctly if the mic input level
is too low or too high.
•When vocalizing into the mic, the voice of only one person should be input. The eect will
not work correctly if multiple voices are being input.
•Make sure that the sound from the speaker does not enter the mic.
* Acoustic feedback could be produced depending on the location of microphones relative to speakers. This
can be remedied by:
•Changing the orientation of the microphone(s).
•Relocating microphone(s) at a greater distance from speakers.
•Lowering volume levels with the [VOLUME] knob.
Adjusting the Voice
Here’s how to use the character knob and the sliders to adjust the voice.
1. Press the [MANUAL] button.
Alternatively, you can press a scene memory button and make adjustments to that saved
scene.
2. Use the character knob to select the character you want.
You can choose a character from the following list.
3. Choose [ROBOT] button on or o.
If you turn this on, produces an expressionless robotic voice at a xed pitch.
4. Use the sliders to adjust settings such as PITCH and FORMANT.
CharacterExplanation
DIRECTTurns o the character eect.
AUTO PITCH 1A pitch-corrected voice.
AUTO PITCH 2An electronic pitch-corrected voice.
VOCODERA classic vocoder voice.
SYNTHThe pitch of the input voice is detected and used to play a synth sound.
LEADThe pitch of the input voice is detected and used to play a synth sound.
BASSThe pitch of the input voice is detected and used to play a bass sound.
MEGAPHONEProduces a distorted voice as when using a megaphone.
RADIOProduces a voice as heard from the radio.
SCATTERRepeats the input voice at eective intervals.
Panel Descriptions
1
98101112
23645
7
1
[VOLUME] knob
Adjusts the output volume of the OUT jacks and the PHONES jack.
* This does not aect the volume of USB audio.
2
[MIC SENS] knob
Adjusts the input sensitivity of the mic connected to the MIC IN jacks (front/rear).
3
PEAK indicator
Lights if the mic input level is excessive.
Use the [MIC SENS] knob (
2
) to adjust the sensitivity so that this indicator lights occasionally.
If it lights frequently, lower the sensitivity.
4
[MANUAL] button
If you turn this on to make the button light, the current settings of the sliders (
9101112
) are
applied to the sound.
5
Scene Memory buttons [1]–[3]
Instantly recall the settings (scenes) of the [ROBOT] button (
7
), character knob (
8
) and the
sliders (
9101112
).
The scene memory button that you recall is lit. You can store up to three scenes.
Refer to “Scene Memory”
6
[BYPASS] button
If you turn this on to make the button light, the eects (including reverb) will be bypassed.
* If you use the footswitch to bypass, reverb will still be applied.
7
[ROBOT] button
If you turn this on to make the button light, produces an expressionless robotic voice at a xed
pitch.
Refer to “Adjusting the Voice”
8
Character knob
Selects the vocal character.
The LED of the selected character is lit.
Refer to “Adjusting the Voice”
9
[PITCH] slider
Adjusts the pitch of the voice.
You can adjust this in a range of 1 octave up or down.
10
[FORMANT] slider
Adjusts the formant.
Negative (“-”) settings produce a masculine character; positive (“+”) produce a feminine
character.
11
[MIX BALANCE] slider
Adjusts the balance between the unprocessed voice (NORMAL) and the eect-processed voice
(EFFECT).
12
[REVERB] slider
Adjusts the amount of reverberation.
Connecting Your Equipment
* To prevent malfunction and equipment failure, always turn down the volume, and turn o all the units
before making any connections.
A
PHONES jack (stereo miniature phone type)
Connect headphones (sold separately) here.
This outputs the same sound as the OUT jacks (
IJ
).
B
MIC IN jack (front) (miniature phone type)
Connect a mic that is compatible with plug-in power
(sold separately).
* This is only for use with a mic that is compatible with
plug-in power. Do not connect any other type of mic.
C
USB() port
Use a commercially available USB 2.0 cable to connect this to your computer.
Refer to “USB Audio Interface”
D
DC IN jack
Connect the included AC adaptor here. Use only the supplied AC adaptor.
Using any other adaptor may cause overheating and malfunctions.
* When connected via USB, power is supplied from the USB connection, so the AC adaptor does not need to
be connected.
E
[SELECT] switch
Switches the audio that is output from the OUT jacks (
IJ
).
SwitchExplanation
R-LStereo audio will be output.
BYPASS-MONO
The unprocessed sound (BYPASS) and the processed sound (MONO) will be output
separately.
F
[PHANTOM] switch
Turn this “ON” if you want phantom power to be supplied to the MIC IN jack (rear) (
G
).
* Phantom power is not supplied to the TRS phone plug.
G
MIC IN jack (rear) (1/4” TRS phone type/XLR type)
Connect a mic (sold separately) here. If a condenser mic is connected to the XLR connector,
phantom power can be supplied.
H
Security slot ()
http://www.kensington.com/
IJ
OUT jacks
Connect these jacks to your amp or monitor speakers.
If the [SELECT] switch (
E
) is set to “BYPASS-MONO,” The unprocessed sound (BYPASS) and the
processed sound (MONO) will be output separately.
K
PEDAL jack
Connect a footswitch (sold separately). The footswitch can turn BYPASS on/o.
* If you bypass using the footswitch, reverb will still be applied.
Turning the Power On/O
L
[POWER] switch
Turn the power of the VT-3 on/o.
* After you’ve made connections correctly, be sure to turn on the power in the order of the VT-3 rst, and
then the connected system. Powering-on in the incorrect order may cause malfunctions or damage.
When turning the power o, power-o the connected system rst, and then the VT-3.
* This unit is equipped with a protection circuit. A brief interval (a few seconds) after turning the unit on is
required before it will operate normally.
* Before turning the unit on/o, always be sure to turn the volume down. Even with the volume turned down,
you might hear some sound when switching the unit on/o. However, this is normal and does not indicate
a malfunction.
* This instrument is equipped with balanced (XLR/TRS) type jacks. Wiring diagrams for these jacks are shown
below. Make connections after rst checking the wiring diagrams of other equipment you intend to
connect.
AB
Front panel
CDE
JK
F
I
GH
L
Rear panel
1: GND2: HOT
3: COLD
1: GND2: HOT
3: COLD
TIP: HOT
RING: COLD
SLEEVE: GND
Main Specications Roland VT-3: VOICE TRANSFORMER
Power SupplyAC adaptor, or obtained via USB port (USB bus power)
Current Draw380mA
Dimensions210 (W) x 175 (D) x 57 (H) mm8-5/16 (W) x 6-15/16 (D) x 2-1/4 (H) inches
Weight690g1 lbs 9 oz
AccessoriesAC adaptor, Owner’s manual, Leaet “USING THE UNIT SAFELY”
Options
(sold separately)
Footswitch: BOSS FS-5L, FS-5U
Pedal Switch: DP-2
* In the interest of product improvement, the specications and/or appearance of this unit are subject to
change without prior notice.
Various Settings
Restoring the Factory Settings (Factory Reset)
Here’s how to return the VT-3 to its factory-set state.
1. While holding down the [BYPASS] button, turn on the power.
The [MANUAL] button blinks.
If you decide to cancel the factory reset, turn o the power.
2. Press the [MANUAL] button to execute the factory reset.
3. When all buttons are lit, turn the VT-3’s power o, then on again.
Loop-Back and Footswitch Settings
1.
While holding down the [MANUAL] button, turn on the power.
All of the character knob LEDs are lit, and the [BYPASS] button is blinking.
If you decide not to change the settings, turn o the power.
2. Use scene memory buttons [1], [2], and [3] and the [ROBOT] button to make settings.
ParameterButtonExplanation
USB audio
loop-back
[1]
Lit (on)
The sound played back by your computer is mixed on the VT-3
with the sound of the mic, and returned to the computer. The
sound is also output from the VT-3’s OUT jacks and PHONES jack.
(default)
Unlit (o)
The sound played back by your computer is output from the
VT-3’s OUT jacks and PHONES jack.
Footswitch
polarity
[2]
Lit (normal)Normally you’ll leave this “lit.” (default)
Unlit (inverse)If the footswitch polarity is reversed, choose the “unlit” setting.
Footswitch
type
[3]
Lit
(latch)
Choose the “lit” setting if you’ve connected a latch-type
footswitch (BOSS FS-5L). (default)
Unlit
(unlatch)
Choose the “unlit” setting if you’ve connected an unlatch-type
footswitch (BOSS FS-5U, Roland DP-2).
BYPASS
button
function
ROBOT
Lit (mute)
Press the [BYPASS] button to mute.
Unlit (bypass)
Press the [BYPASS] button to disable the eect.
3. Press the [BYPASS] button to save the settings.
The settings are saved, and the VT-3 restarts.
Brauchen Sie Hilfe? Stellen Sie Ihre Frage.
Missbrauch melden von Frage und/oder Antwort
Libble nimmt den Missbrauch seiner Dienste sehr ernst. Wir setzen uns dafür ein, derartige Missbrauchsfälle gemäß den Gesetzen Ihres Heimatlandes zu behandeln. Wenn Sie eine Meldung übermitteln, überprüfen wir Ihre Informationen und ergreifen entsprechende Maßnahmen. Wir melden uns nur dann wieder bei Ihnen, wenn wir weitere Einzelheiten wissen müssen oder weitere Informationen für Sie haben.
Art des Missbrauchs:
Forenregeln
Um zu sinnvolle Fragen zu kommen halten Sie sich bitte an folgende Spielregeln:
Lesen Sie zuerst die Anleitung;
Schauen Sie nach, ob die Frage bereits gestellt wurde;
Stellen Sie die Frage so deutlich wie nur einigermaßen möglich;
Erwähnen Sie was Sie bereits versucht haben um das Problem zu lösen;
Ist Ihr Problem von einem Besucher gelöst dann lassen Sie ihn / sie wissen in diesem Forum;
Falls Sie reagieren möchten, so verwenden Sie bitte das Antworten- Formular;
Da ihre Frage für alle Besucher sichtbar ist, sollten Sie lieber keine persönliche Daten erwähnen.
Neu registrieren
Registrieren auf E - Mails für Roland VT-3 wenn:
neue Frage gestellt werden
neue Handbücher vorhanden sind
Sie erhalten eine E-Mail, um sich für eine oder beide Optionen anzumelden.
Das Handbuch wird per E-Mail gesendet. Überprüfen Sie ihre E-Mail.
Wenn Sie innerhalb von 15 Minuten keine E-Mail mit dem Handbuch erhalten haben, kann es sein, dass Sie eine falsche E-Mail-Adresse eingegeben haben oder dass Ihr ISP eine maximale Größe eingestellt hat, um E-Mails zu erhalten, die kleiner als die Größe des Handbuchs sind.
Ihre Frage wurde zu diesem Forum hinzugefügt
Möchten Sie eine E-Mail erhalten, wenn neue Antworten und Fragen veröffentlicht werden? Geben Sie bitte Ihre Email-Adresse ein.