1
INTRODUCTION
Dear customer,
Thank you for purchasing a Sagemcom DECT telephone we appreciate your trust in us.
This product was manufactured with the utmost c
recommend that you refer to this user guide. You can also find informati
www.sagemcom.com
For your c
RECOMMENDATIONS AND SAFETY INSTRUCTIO
Your DECT telephone must not be installed in a humid room (wash-up room, bathroom,
laundry r
telephone must be operated at temperatures ranging from 5°C and 45°C.
Only use the supplied power adapter, conit to the base socket a
installation instructions provided in this booklet and the indications on the i
label affixed to it (voltage, current, electric network frequency). As a precaution, in case
of danger, the mains adapters act as a disconnecting mechanism for the 230V power
supply. They should be placed near the device a
This telephone was designed for us
In case of a pr
telephone cord.
For your personal safety, never place your handset on the base without the batteri
or without the battery cover, you could get an electric shock.
To avoid damaging your handset, only use certified rechargeable AAA batteries NiMH
1.2 V 400 mAH, never use non rechargeaes in the handset
battery c
At the end of their useful life, b
instructions presented in this booklet.
Your DECT telephone has an inside radio range of about 50 metres and up to
300 metres
example)
Some sensitive medical equipment and s
frequency transmissions of your telephone. In all cases, we ask that you respect the
safety recom
In areas where storms are frequent, we recommend that you protect your telephone line
using a sur
This equipment does not function in the case of an electric network shutdown: for
emergenc
The CE marki
1999/5/CE of the European Parli
equipment and telecommunication t
users, for electromagnetic interf
spectrum attributed to ground and spatial communication to prevent damaging
interfer
The declarwww.sagemcom.com site
"support " section or can be obt
Sagemcom Broadband SAS
250, route de l'Empereur - 92848 Rueil-Malmaison Cedex - France
2
BEFORE YOU BEGIN
Make sure your package includes the following: Base unit, handset, one battery compartment cover,
telephone line cord, AC power supply, two rechargeable batteries, and this user guide.
In the case of purchasing a pack duo or trio, you w
handset charger, one battery comtment cover, two rechargeable batteries.
Installing the phone
T
Power socket
+
_
+
Rechargeable
batteries
_
Paging button
- Pressed briefly : telephone set paging.
- Hold down pressed (4 seconds minimum) :
telephone set registration.
1. Insert the batteries, taking care to respect the polarity as indica ted in the compartment.
2. Put the compartment door back on. «SEARCHING ...» appears on the screen.
3. Plug the power supply cord into AC outlet and the other end into the power jack on the base
bottom.
4. Plug one end of the telephone line cord into
the jack on the base.
5. A welcome message in all the languages supported by the telephone is displayed on
press
*.
6. Select or keys, pr .
7. A screen a .
You will hear a confirmation tone.
8. Place the handset in the base station to charge for 15 hours prior to first use.
9. After
key. You can hear dial tone
* : depending on version
3
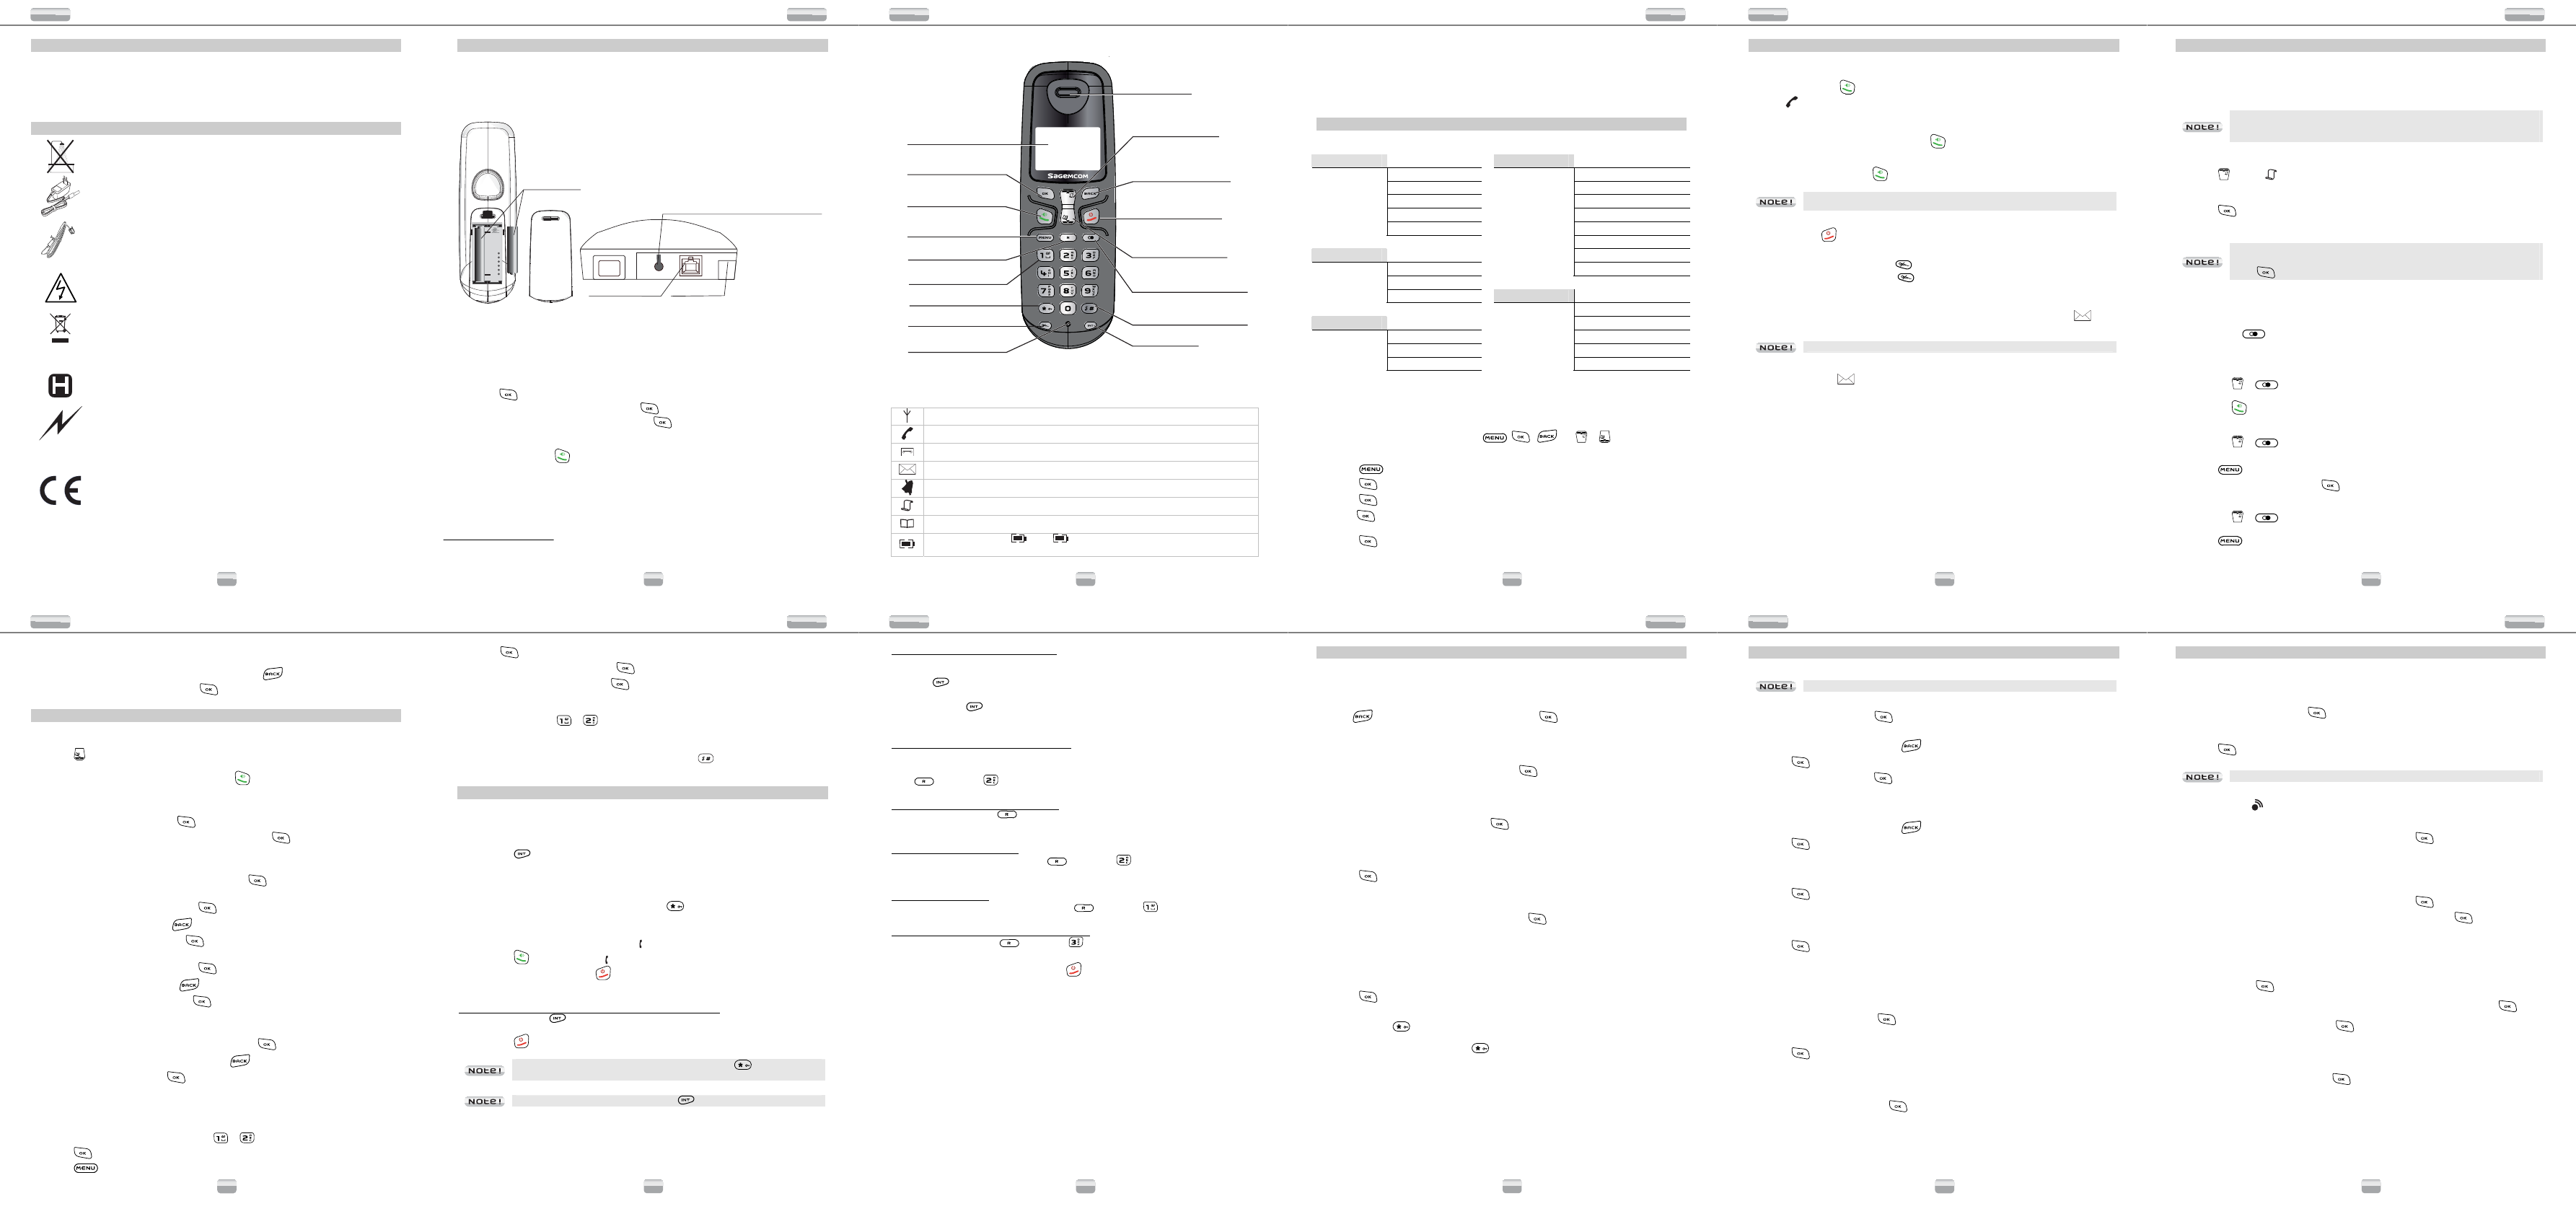
Handset keys
Intercom k
Earpiece
Red key:
T
Switch handset on/off
Access to phonebook /
Navigation key down
Navigation key up /
Access the caller list
Deactivate /
ringer (Press and hold)
Microphone
Screen
Access to outgoin
Menu key
OK key:
Selection / V
Green key:T
Activate, deactivate keypad
lock (Press and hold)
R key:
Second call / conference
Back key / Cancel /
Correction /
Change stan
(Press and hold)
Activate / Deactivate the
microphone
Access to voice messaging
service (Press and hold) *
* The voice mail number can be programmed.
T
Quick guide to handset display icons
Signal strength icon (blinking when no signal or the signal strength is weak).
Call (blinks when you receive a call)
Answering machine icon (appea
Voicemail icon: indicates that new messages are
Handset ringer muted.
Received call list (
Phonebook icon (appears when you
Charging status icon (
: Full ; + flashing (charger not connected) : Flat; blinking
during charging).
4
Changing the batteries
Make sure the telephone is OFF before you replace batteries.
1. Remove the batteries compartment door.
2. Remove old batteries.
3. Insert the new batteries.
4. Put the batteries compartment door back on.
5. Place handset in the base to ch
MENU STRUCTURE
Quick reference
phonebook New Advanced set Change pin
List
Edit
delete
delete reset
Directe mem. AUTO PREFIX*
Recall time
Personal set Handset name Dial mode*
Handset First
LANguage
Auto ANSW MACHINE** PLAY
DELETE
Clock&alarm date / time ANSW. ON/OFF
Set format RECORD OGM
Alarm ANSWER
Alarm SETTINGS
* depending on version
** D17V only
Navigation
To navigate among the menus, use the keys: , , and or ( or ).
Exampl: To change the ring tone, go to the menu Perso / Handset tone / ring tones .
To do this:
1. Press
. Select " Personal set " using the or key.
2. Press
. Select " Handset tone " using the or key.
3. Press
. Select "ring tones " using the or key.
4. Press
. 10 melodies are available: " melody 1 " " melody 10 ".
Select the desired melody using the or key.
5. Press
key to confirm your selection.
5
CALLS
Make a call
Ensure that the handset is switched on.
1. Press the Talk key
. you will hear the dialling tone and the display will sh
icon
.
2. Enter the phone number.
- OR-
1. Enter the phone number first and then press
key.
Answering a call
When the phone r key to an
You can adjust the volume of what you hear through the handset at any time by
pressing or ҏ key.
Ending a call
To end a call press .
Microphone mute function
- Enable MUTE: press key. The di mute on ".
- Disable MUTE function : press the
key. Your correspondent can hear you again.
Voice Mail (According to operator)
With this function you can receive calls in your absence on a voice message r
telephone network. To indicate that a new message has been received
and
the new event message "
voicEmail
" are displayed on the Handset screen.
Your voicemail number is not set in the factory.
1. Dial the number of your operators
2. The envelope icon
disappears when there are no more new messages.
6
CALL LOG
Calling Line Identificatio
This CLIP phone stores and displays CLIP in
You must subscribe to CLIP service in order to use this unit.
If you have not subscribed to CLIP service or if the caller number is suppressed, the display shows
“unknown”.
Display of numbers not available:
- Un : you are not in same area as your contact.
- Hi : your contact does not want its number
Received c
The received call log presents the calls you received. (max.10 la
1. Press
, the icon is displayed.
2. The most recent name or call number is displayed according to whether your contact's number
is included in your phonebook or not.
3. Press
to display the date and the time of the call.
4. Press or key to go through the list.
If the number is too long (more than 12 digits), the screen will not show the number
in full.
Press key to go to last number page for CID length.
Dialled call log
The dialled call log presents the calls you made (max. 5 last calls
To consult the list:
1. Press
.
2. The last dialled number is displayed. Press the
or key to consult the list of the last 5
numbers dialled.
Calling back a caller
1. Press or key.
2. Press or key to select a
3. Press
key to dial the number.
Making an entry in the directory from the list of calls r
1. Press or key.
2. Use or to select the de
3. Press
key, then select "sa ".
4. Enter the name of the entry. Press
.
Deleting caller list record
1. Press or key.
2. Press or key to select a
3. Press
.
- Select delete " to delete the current record.
- Select delete all " to delete the e
7
4. A confirmation screen appears.
5. Using the telephone touch keys:
- If you do not wish to delete the current record, pr
.
- To delete the
.
PHONEBOOK
You can store 80 phonebook entries (24 digi
Dialling a memory number
1. Press key to consult the list of contacts.
2. Press or key to consult directory entries.
3. When you have selected the desire number, press
.
Creating / Storing a mem
1. Go to the menu " phonebook " / " new entry "
2. Enter the name of the entry. Press
.
3. Enter the number of your entry using the keypad
.
Editing a memory
1. Go to the menu " phonebook " / " edit entry ".
2. Select the entry you want to edit using or . Press
.
3. You will then enter the name input screen and the cursor will be at the end of the name :
- The information is accurate.
key.
- To correct the name, press
key to delete characters.
- Enter the new name and press
key.
4. You will then enter the number screen and the cursor will be at the end of the number :
- The information is accurate. Press
key.
- To correct the number, press
key to delete the numbers.
- Enter the new number and press
key.
Deleting a memory / the w
1. Go to the menu " phonebook " / " delete " (or " delete all " to delete th
2. Select the entry you want to delete using or . Press
:
- If you do not wish to delete the entry, press
.
- To delete the entry, pr
key.
Assign a shortcut
This menu allows you to record two quick dial numbers assigned to the keys 1 and 2 on the keypad.
1. Go to the menu " phonebook " / " direct mem. ".
2. Select the key you want to assign
or ).
3. Press
, " no number " is displayed on the screen.
4. Press
, " eidt number " appears on the screen.
8
5. Press .
6. Enter the name of the entry and press
to confirm.
7. Enter the number of the entr to confirm. You will hear a confirmation tone.
To call the number you have assigned to one
number was programmed (
or ).
Inserting a pause (in dialling)
You can insert a pause in
While dialling the number you wan
to insert the pause: The
display shP.
USING THE MULTI -HANDSET CAPABILITIES
These functions are used for handset management when two or more handsets are registered on the
same base.
Intercom Call/Intercom
1. Make sure your handset is on standby mode.
2. Press
key on the hand
- If your installation has two handsets, the second handset is dirhandset "
followed by the handset number are displayed on the screen.
- If your telephone installation has more than two handsets, the iINT blinks on the screen
and the number of all registered handse
- Enter the desired handset number or press the
key if you want to call all handsets.
Answering an internal call
1. The ring melody from an internal call is different from an external call. " handset " and the calling
handset number appear on the screen. The "
" is blinking.
2. Press
key to answer. " stop blinking.
3. Ending an internal call press the
key.
Managing an
Transfering an external call to another handset registered on same base
1. During a call, press . The external user is put on hold.
2. Enter the internal call number. When the user answers, yo
3. Press
key to transfer
To switch from one call to another, press and hold down the key until an aural
signal is heard.
If the called handset does not answer, to take back the call.
9
Making conference calls (3-way conversation)
You can connect one external call to two handsets registered at the base station. To set up a
telephone conference from an external call:
1. Press
key. The external user is put on hold.
2. Enter the internal call number. Wait until the internal user answers.
3. Press
key, until an aural signal is hearto start a three-way confer
"conference" is displayed on the handset screen.
Two outside calls
Taking a second call while you are already on line
During a call, a beep is emitted by your operator to info
displays the number of this second caller on hold.
Press
then the key to take back this new call.
Your first contact is put on hold a
Making a second call whil
During a conversation, press then
The call in process is then put on hold and you can take the second call back.
Switching from one call to the other
To switch from one call to the other, press .
The call in process is then put on hold and you can take the second call back.
Ending one of the two call
To end one call and continue with the other then the key .
The call in process i
To set up a 3-way conference (th
During a conversation, press then the key .
You can then talk with the 2 contacts at the
To end the 3-way conference, press the red key
.
10
CUSTOMISING THE HANDSET
Handset naming
The default name of the handset is "
handset N
" where
N
is the number of the registered handsets.
1. Go to the menu " personal " / " handset name ".
2. Use the keypad to enter the new name (up to 10
Use
key to delete wrong input if necessary. Press .
Handset ringer lev
1. Go to the menu " personal " / " handset tone " / " ring volume ".
2. Use or to select the volume
to confirm your selection.
Handset ring
1. Go to the menu " personnalis ." / " handset tone " / " ring tones ".
Ten melodies are available: " melody 1 " " melo".
2. Use or to select the ring tone. Pres
.
Key tone On/Off
1. Go to the menu " personal " / " handset tone " / " key beep ".
An information screen shows you the current state. Use or to modify it.
2. Press
key to confirm your selection.
Modifying the language
1. Go to the menu " personal " / " language ".
2. Use or to choose the desired language. Press
key to confirm your selection.
Auto talk off
When active, the auto talk off feature enables you to automatically hang up as soon as you put the
handset on its base.
1. Go to the menu " personal " / " auto hang-up ".
An information screen shows you the current state. Use or to modify it.
2. Press
key to confirm
Key lock
1. Press key for 1 second. An information screen shows you that the keys are
locked.
2. To recover to normal, press and
key 1 sec.
11
SETTING THE DATE AN
Time and date
After a power cut the time has to be reset.
1. Go to the menu " clock & alarm " / " date/time". Current date is displayed.
- To keep the date, press
.
- To change it, enter the new date in 20YY/MM/format.
- To go back to change the entry
.
2. Press
. Current time is displayed.
- To keep the time, press
.
- To change it, enter the new time in the HH : MM format.
(If, after entering the time, the time format is 12H, use the keaM and the key to
set pM).
- To go back to change the entry
.
3. Press
.
Hour format
1. Go to the menu "clock & alarm " / " set format " / " time format ".
A screen displays the or to change it.
2. Press
.
Date format
1. Go to the menu "clock & alarm " / " set format " / " date format ".
A screen displays the current format, use or to change it.
2. Press
.
Alarm clock
1. Go to the menu " clock & alarm " / " alarm ".
To activate the alarm once, select "on once ".
To repeat the alarm each day at the programmed time, select "on daily ".
To deactivate the alarm, select "off ".
2. Select your choice then press
.
Enter the time when you want theHH – mm ".
(If, after entering the time, the time format 12H, use key to set a
aM and the key to set pM).
3. Press
.
Modifying alarm tone
1. Go to the menu " clock & alarm " / " alarm tone ".
3 melodies are avmelod", " melody 2" et " melody 3".
2. Select the desired melody, press
key to confirm yo
You will hear a confirmation tone.
12
ADVANCED SETTINGS
Base master PIN code
Your base station code (default setting 0000 ) is required to access certain security functions. This
may be at least 4 digits and a m
1. Go to the menu " advanced set " / " change pin ".
2. Enter your old code first, press
.
3. Enter your new PIN code.
Each time a digit is entered the «_» is replaced by a «*».
4. Press
key to confirm your new PIN code. You will hear a confirmation tone.
Carefully note your base station code. You will need it to change cer
Association of handset & base
1. Press key for 5 seconds (after 1 minute if no Handset has started association
process the base goes back to standby).
2. Go to the menu " advanced set " / " registration ".
3. Enter the 4 digit base master PIN code (default 0000). Press
.
4. Once the handset is registered. The handset automatically exits th
5. The handset number assigned automatically brs on the screen.
Disassociation of a handse
1. Go to the menu " advanced set " / " unregister ".
2. Enter the 4 digit base master PIN code (default 0000). Press
.
3. Select the handset you want to delete using the or key then press
(at standby state
"pls reg h/s " is displayed on the screen).
Modifying the country (depending on version)
1. Go to the menu " advanced set " / "country ".
2. Enter the base master PIN code (default 0000). Each time a digit is entered the «_» is replaced
by a «*». Press
key to confirm.
3. Using or key, select the country where you will use
.
4. A appears, press
.
The message "wait .." appears
Restoring the Hands
1. Go to the menu " advanced set " / " reset ".
2. A confirmation screen appears, p
.
Dépliant LU D17TV__EN.fm Pag