77997
4
Zoom out
Zoom in
Vorherige Seite
1/9
Nächste Seite
11
THE INSTALLATION AND FITTING WORK MUST BE
CARRIED OUT BY AN AUTHORISED INSTALLATION
TECHNICIAN ACCORDING TO APPLICABLE REGU-
LATIONS.
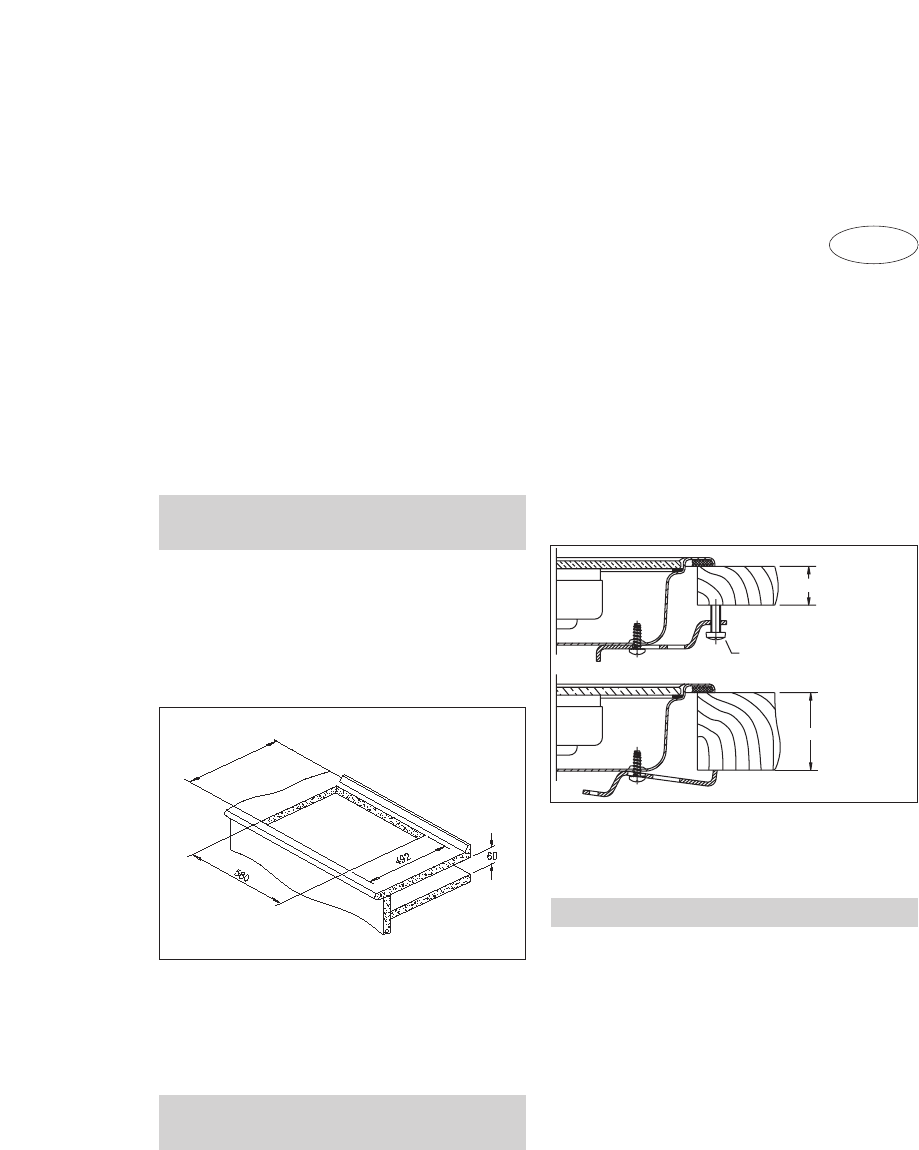
To install these hobs, a hole with the dimen-
sions specified in the figure, must be cut out
of the top of the work surface furniture.
The fixing system for these hobs is designed
for work surfaces of 20, 30 and 40 mm thick.
The underside of any furniture located verti-
cally above the hob must be at a minimum dis-
tance of 60 mm.
Once the hob location has been measured,
the sealing strip must be fixed to the undersi-
de of the hob.
Attach the fixing clamps as shown in the figu-
re, screwing them to the holes in the undersi-
de of the hob with the self-tapping screws pro-
vided (ø 4.2 mm).
If the furniture thickness is 30 mm or less, use the
M5 self-tapping screws supplied to hold the hob in
place, inserting them through the holes in the
clamps. The screws will form a thread in these
holes as they are screwed into them. These thre-
ads should be formed before the clamp is atta-
ched to the hob.
The clamps and the sealing strip are included
in the delivery contents.
Before connecting the hob to the electrical
supply, check that the voltage and frequency
of the supply correspond to those shown on
the rating plate on the base of the hob.
The electrical connection should be carried out
using a single-pole switch or a plug, provided this
is accessible, of a rating suitable for the power of
the hob and with a separation of at least 3mm
between contacts, to ensure that the hob can be
disconnected from the mains in case of emer-
gency or for cleaning.
The supply must include a suitable earth con-
nection, in compliance with applicable regula-
tions.
If it should be necessary to replace the flexi-
ble hob mains cable, the new cable should be
Note
Selecting a location
for the hob (see fig. 3)
Installation
GB
Fig. 3
575 maximum
Anchoring of the hob
(see fig. 4)
Self-tapping screw for
for mounting surfaces
20 and 30 mm thick
20/30 mm
40 mm
Fig. 4
Electrical connections
4

Brauchen Sie Hilfe? Stellen Sie Ihre Frage.

Forenregeln

Missbrauch melden von Frage und/oder Antwort

Libble nimmt den Missbrauch seiner Dienste sehr ernst. Wir setzen uns dafür ein, derartige Missbrauchsfälle gemäß den Gesetzen Ihres Heimatlandes zu behandeln. Wenn Sie eine Meldung übermitteln, überprüfen wir Ihre Informationen und ergreifen entsprechende Maßnahmen. Wir melden uns nur dann wieder bei Ihnen, wenn wir weitere Einzelheiten wissen müssen oder weitere Informationen für Sie haben.

Art des Missbrauchs:

Zum Beispiel antisemitische Inhalte, rassistische Inhalte oder Material, das zu einer Gewalttat führen könnte.

Beispielsweise eine Kreditkartennummer, persönliche Identifikationsnummer oder unveröffentlichte Privatadresse. Beachten Sie, dass E-Mail-Adressen und der vollständige Name nicht als private Informationen angesehen werden.

Forenregeln

Um zu sinnvolle Fragen zu kommen halten Sie sich bitte an folgende Spielregeln:

Neu registrieren

Registrieren auf E - Mails für Smeg SE 640 CXM wenn:


Sie erhalten eine E-Mail, um sich für eine oder beide Optionen anzumelden.


Andere Handbücher von Smeg SE 640 CXM

Smeg SE 640 CXM Bedienungsanleitung - Deutsch - 9 seiten

Smeg SE 640 CXM Bedienungsanleitung - Holländisch - 9 seiten


Das Handbuch wird per E-Mail gesendet. Überprüfen Sie ihre E-Mail.

Wenn Sie innerhalb von 15 Minuten keine E-Mail mit dem Handbuch erhalten haben, kann es sein, dass Sie eine falsche E-Mail-Adresse eingegeben haben oder dass Ihr ISP eine maximale Größe eingestellt hat, um E-Mails zu erhalten, die kleiner als die Größe des Handbuchs sind.

Ihre Frage wurde zu diesem Forum hinzugefügt

Möchten Sie eine E-Mail erhalten, wenn neue Antworten und Fragen veröffentlicht werden? Geben Sie bitte Ihre Email-Adresse ein.


Info