ESPAÑOL es
1A
• Lea completamente estas instrucciones antes de utilizar su apara
• Este manual es parte integrante del producto. Consérvelo en un
lugar seguro para futuras consultas.
• Este aparato es sólo para uso doméstico
diferente al indicado podrí
• Los niños deberían ser supervisados pa
el aparato.
• Este aparato no est
(incluidos niño
estén reducidas, o carezcan de experiencia o con
han tenido supervisi
una persona resp
• No realice ninguna mo
cualquier anom
acuda a un servi
• No utilice piezas o accesorios no suministrados o r
SOLAC.
• Antes de ench
voltaje indicado coincide
• Desenchue después de su uso y antes de
desmontar o montar
o limpieza. Desenchúfelo también en caso de apagón. Cuando enchufe
o desenchufe el aparato,
• No tire nunca del ca
aparato tirando siempre de la clavija,
• Evite que el cable de alimentación entre en conta
cortantes o superficies calientes. No deje el cable colgand
de la mesa o encimera, para evitar que los niños tiren
caer el aparato.
• Si el cable de ali
fabricante, poa o po
con el fin de evitar un peligro.
• Retire todas las bolsas d
cartones y pegat
aparato que sirvieron como protección de transporte o promoción de
venta.
• Sitúe el aparato de calef
(pegamentos, co
• La colocación
correctamente y ha
normas.
• No instalar el aparato bajo una toma
• Con el fin de ev
déjelo funcionando durante 2 horas en la temperatu
d
No usar este aparato de calef
una bañera, ducha o piscina.
d
El aparato debe instalarse de
termostato, toma
directa o indirectamente p
bañera o ducha.
• Utilice siempre el aparato en posición horizontal.
• Mantenga
materiales combustibles , cortina
• No use el aparato nunca sobre supercies mojadas ni e
• El aparato debe
disponga de un contacto de tie
q
Atención! Cuando desee desprenderse
deposite en la basura si
recogida de residuos más cercano a su domicilio para
tratamiento. De esttá co
medio ambiente.
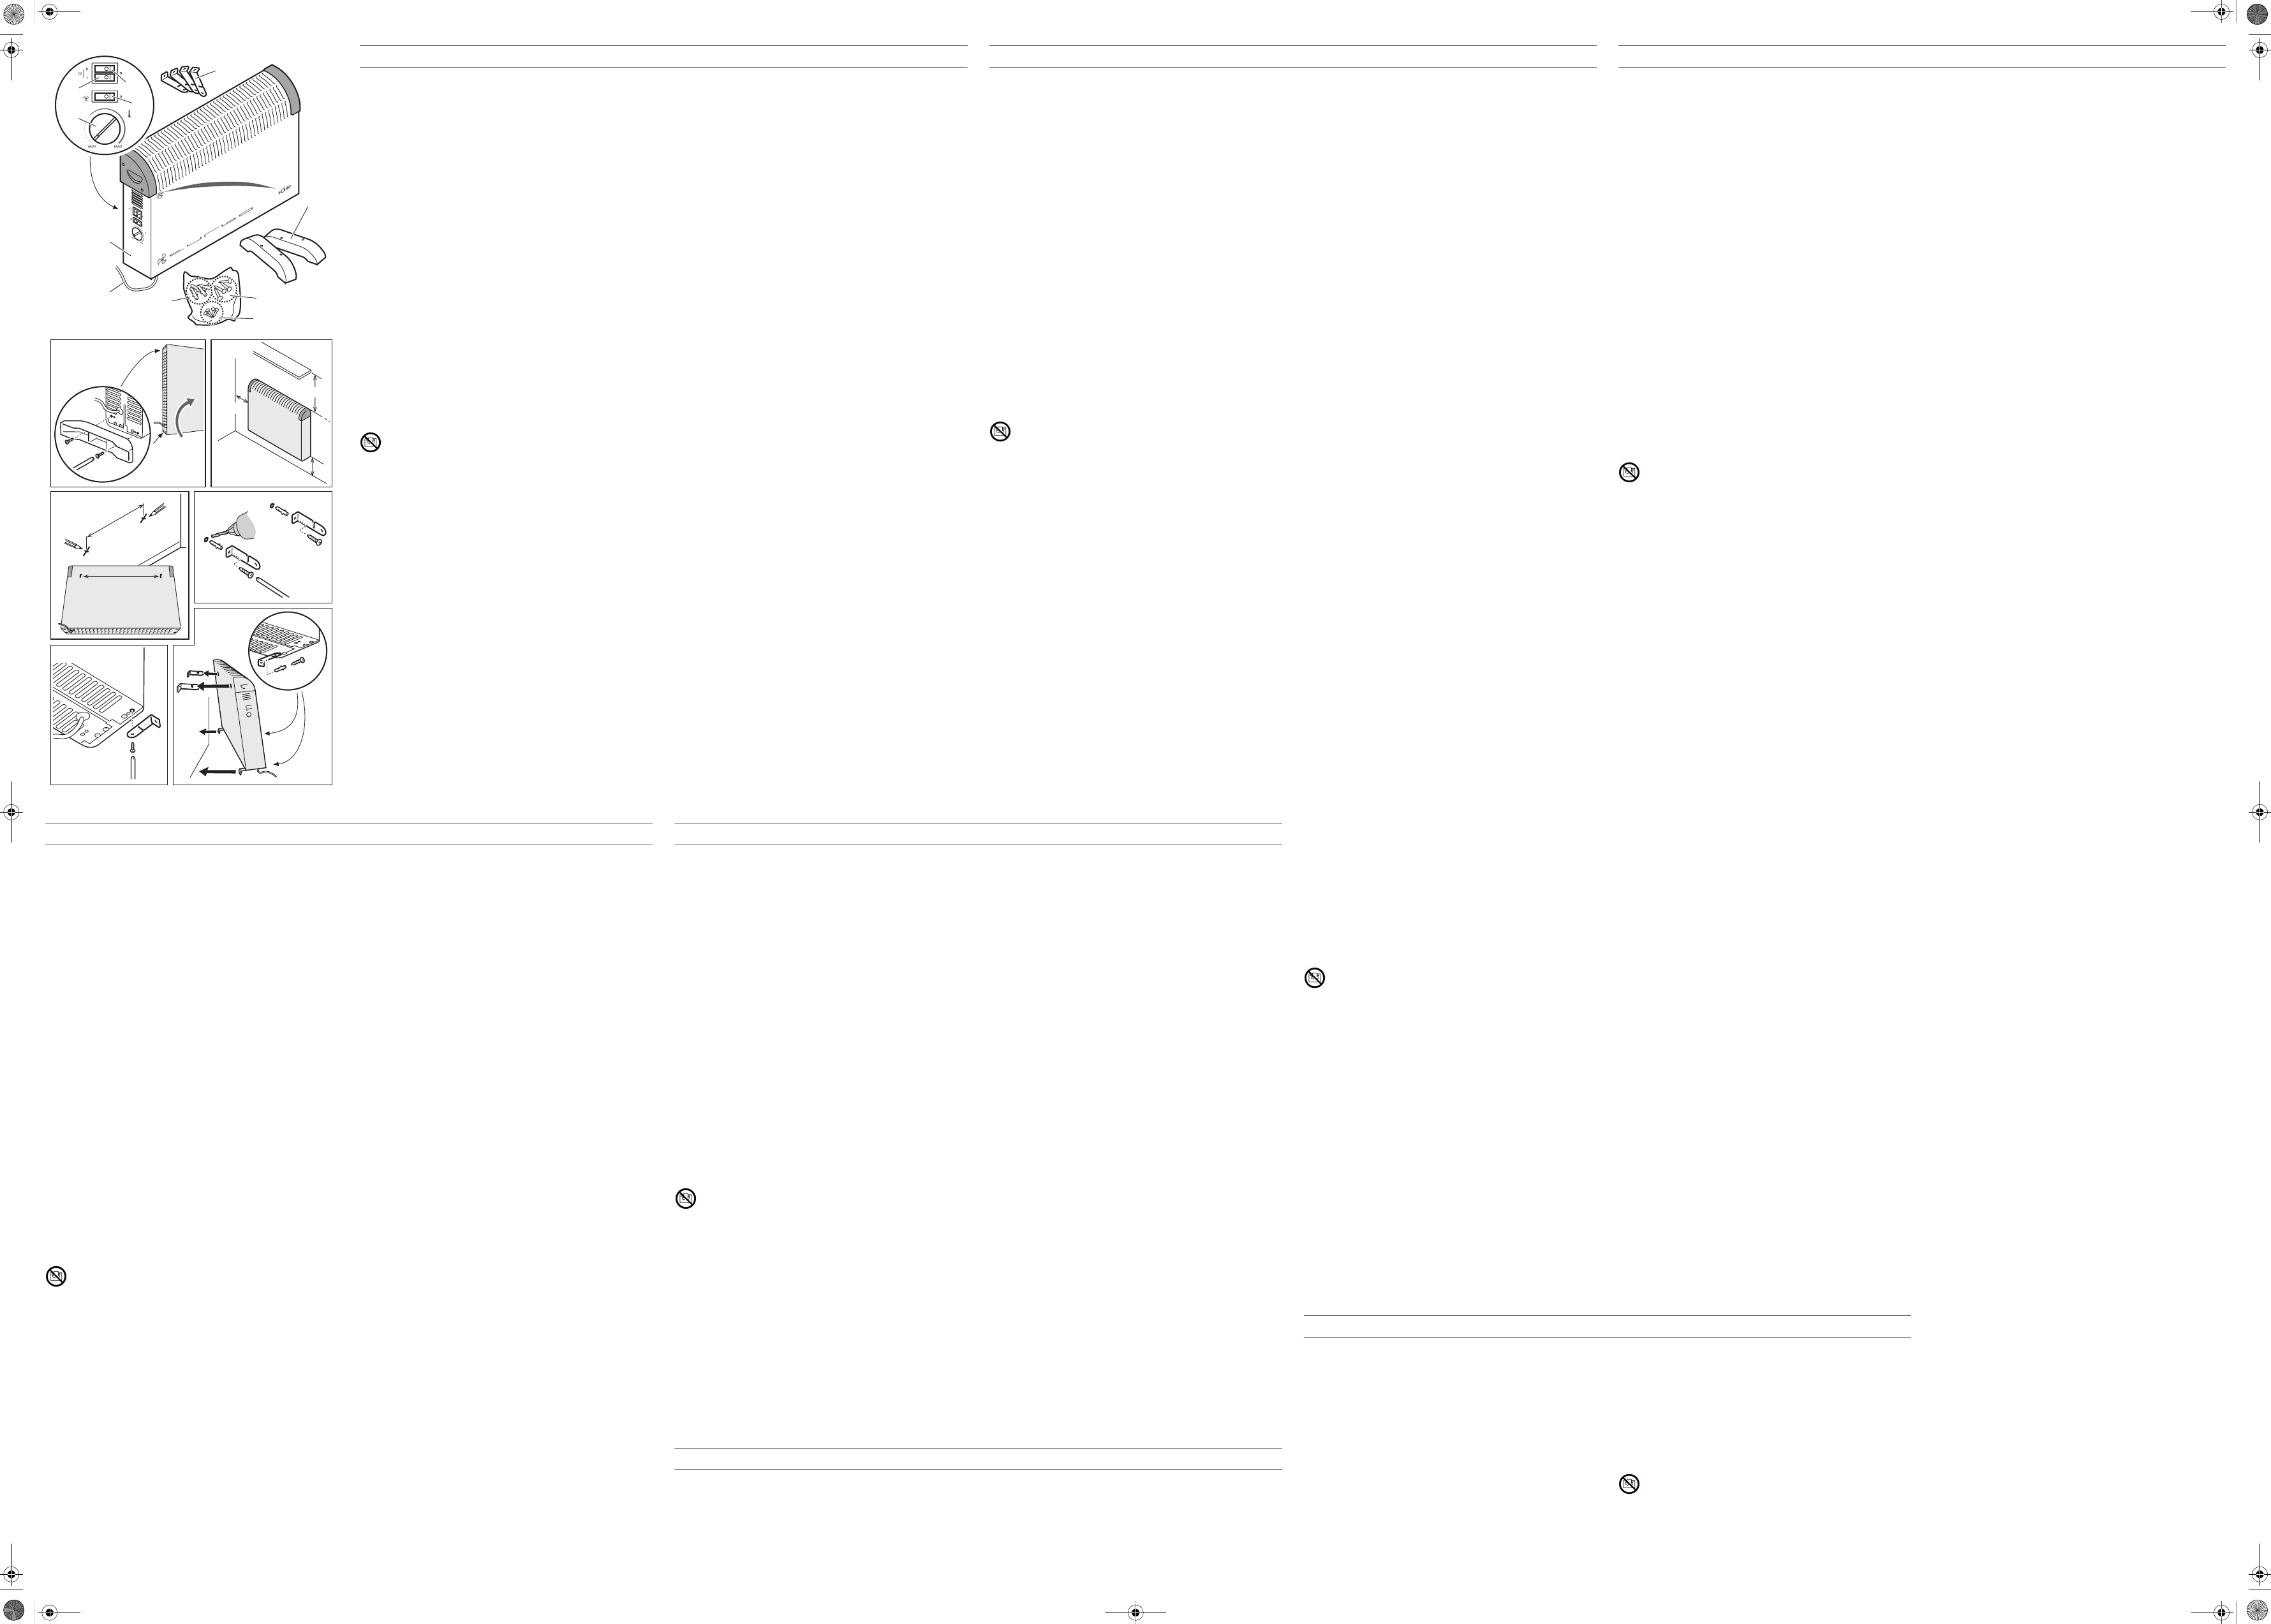
2 COMPONENTES PRINCIPALES
1 Cuerpo principal
2 Interruptor I (750W)
3 Interruptor II (1250W)
4 Interruptor ventilador
5 Termostato de temperatura
6 Cable de conexión a la red
7 Patas de plástico (2 unidades)
8 Soportes pared (4 unidades)
9 Tornillos para patas/soporte inferior pared (4 unid
10
11
3M
Para su utilización sobre el suelo
1 Fije las patas en la p
suministrados (Fig. 1)
Para su utilización mural
Z No instalar el aparato en una zo
Z Instale els distancias de seguridad in
respecto de cualquier muro u obstáculo (Fig. 2).
1 Marque las posi
soportes superiores (Fig. 3).
2 Realice los 2 orificios y coloque los tacos suministrados (10) (Fig. 4).
3 Fije los soportes
suministrados (11) (Fig. 4).
4 Fije los soportes
suministrados (9) (Fig. 5).
5 Cuelgue el convector de los sopo
Z Asegúrese de que el convector queda en posición horizontal.
6 Con el convector colocado marq
debe realizar el orificio a taladrar para
7 Realice el orificio en la pared
necesario retire el convect
a colocarlo al
8 Fije el soporte infer
Z Para el montaje a
tornillos y tacos suministrados, par
vendedor experto.
4 FUNCIONAMIENTO Y USO
1 Conecte el aparato a la red.
2 Seleccione la temperatura qI (2) y
II (3) y el termostato de temper
3 Para alcanzar de forma correcta la temperatura en la habitación
los interruptores I (750W) y II (1250W), obteniend
(III= 2.000W) y gire
4 Cuando la habitación haya al
lentamente el termostato de temperat
aparato se apagará y encen
adecuada en la habitación.
5 Si desea disminuir l
únicamente uno de los dos inI (7II (1250W) y repita
el proceso anterior con el termostato de t
6 Pulse el interruptor ventilador (4) para
i La
encendido.
i Un
en caso de sobrecalentamiento acci
rejas de entrada y salida del ai
sobrecalentamiento el á a funcio
seguridad interrumpe el funcio
el servicio post-venta mas cercano.
5 MANTENIMIENTO Y LIMPIEZ
‹
Antes de proceder a su limpieza asegúrese de q
desenchufado. Utilice un pañ
‹ No
debajo del grifo.
• No utilice productos abrasivos ni
epoxi, ya que podría decolorar el ap
En orden a evitar un sobrecalentamie
calefacción.
El apara
recipien
armario o c
caliente.
No utilice e
ENGLISH en
1 CAUTION
• Read these instructions carefully bef
• This manual is an integral part of the product. Keep it in a safe
place for future reference.
• This appliance is exclusively for househol
use. It is dangerous to use it for any purpose other than the one
indicated.
• Children must be su
appliance.
• This appliance is not to be used by persons (or children) whose
physical, sensorial or menta
experience or knowle
the appliance by a person responsible
• Do not make any modifications o
of any anomaly in the cord or
it and take it to an authorised service centre.
• Do not use any parts or accessories no
SOLAC.
• Before plugging the appli
voltage is the same as in your home.
• Always unplug the app
removing parts, and performing any maintenance or cleaning
operations. Also unplug it in the case of a power cut. The appliance
must be switched off befo
• Never pull the cord or use it to han
the appliance by pulling the connect
• Make sure the cord does not come into contact with sharp edges or hot
surfaces.
worktop, to prevent children
fall.
• If the power cordhould be replaced b
or by your after-sales service shop or similar qu
prevent possible
• Remove all elements from t
for protection d
plastic bags, plastic sheets, cardboard and
• Position the fan
curtains, carpets).
• Choose the place where the heat
to the instructions an
• Do not install the appliance under
• To avoid the new smell of the appliance when
switch it on and leave it ope
d
Do not use the heater near a bath,
d
The appliance must be installed so
and power cable cannot be touched dir
person in the bath or shower
• Always use the appliance in a horizontal
• Keep the front
inflammable materials, curt
• Do not use the appliance on wet surfaces or outdoors.
• The appliance must be connected to a
ground connecti
q
CAUTION! When you want to dispose of the appli
throw it in the rubbish bin. Take it to the CL
collection centre closest to your home for processing. You will thus
be helping to take care of the envi
2 MAIN COMPONENTS
1 Main body
2 Switch I (750 W)
3 Switch
4 Fan switch
5 Temperature thermostat
6 Mains power cable
7 Plastic legs (2 units)
8 Wall brackets (4 units)
9 Screws for legs/lower wall bracket (4 units)
10
11
3 ASSEMBLY
For floor use:
1 Fix the legs to the bottom of the applian
(fig. 1)
For wall use:
Z Do not install the appliance in a vent
Z Always observe the minty distan
obstacles and the heater during installat
1 Mark the positions of the 2 holes to be drilled
brackets (fig.
2 Drill the 2 holes and insert the wall plug
3 Fix the upper bra
(Fig. 4).
4 Fix the lower brackets (8) t
(fig. 5).
5 Suspend the heater f
Z Ensure that the heat
6 With the heat
drilled for fixing the lower bracket.
7 Drill the hole into the wal
remove the heater so you can work wit
when you have finished).
8 Fix the lower bracket (8) to the wall using the plug an
(fig. 6).
Z To mount the hea
plugs provided. For other surfaces, consult
4 OPERATION AN
1 Plug the appliance into the mains socket.
2 Select the desired temperature usin
temper
3 To achieve the corre
W) and II (1250 W), ob
turn the temperature
4 When the room reaches the desi
temperature thermostat (5) to the
off in order to maintain th
5 If you wa
two switches I (750 W) or II (
the temperature thermostat
6 Press the fan switch
i The
i The
of accidental overheating (e.g. if the air input and output grilles
become blocked). When the fan heater cools down it will switch on
again. If the saf
contact your nearest
5 CLEANING AND MAINTENANCE
‹
Ensure that the apparat
damp soft cloth.
‹ Never sub
• Do not use abrasive pr
this may discolour the
To prevent ov
The applian
container
a wardrobe o
flow.
Do not use the he
FRANÇAIS fr
1 ATTENTION
• Lisez attentivement ce mode d'emploiiliser l'appareil
• Ce manuel fait partie du produit. Conservez-le dans un lieu sûr afin
de pouvoir le consulter ultérieureme
• Cet appareil est destiné uniqueme
industriel. Tout usage autre que celui indiqué pourrait s’avérer
dangereux.
• Les enfants doivent êt
avec l’appareil.
• À moins d’avoir été supervisées ou d’avoir reçu les inst
de la personne responsable de leur sécurité, les personnes (y compr
des enfants) aux capacités physiques, sensoriel
réduites, ou manquant d’expéri
pas utiliser cet
• Ne modifiez ni ne répa l’appareil. Si vous consta
anomalie sur le cordon
et amenez-le à un centre de service technique agréé.
• N’utilisez pas de pièces ni d'accessoires non f
par SOLAC.
• Avant de brancher l’appareil au secteur,
correspond bien à celle de votre logement
• Débranchez toujours
monter des pièce
nettoyage. Débranchez-le égalem
Lorsque vous branchez ou débr
position « arrêt ».
• Ne tirez jamais su
Débranchez
cordon.
• Prenez garde à ce que
avec des éléments tranchant
le cordon pendre au
que les enfants ne tirent dessus et ne le fassent tomber.
• Si le cordon d’alimentation est end
le fabricant, par un service après-vente ou par
afin d’écarter
• Retirez tous les sachets en papier ou en plastique,
les cartons et autocollants éventuels apposés sur l'appareil ou à
l'extérieur lui servant de protect
promotion.
• Éloignez l’appareil de chau
rideaux, tapis, etc.).
• L’emplacement de l’ap
et son installation doit être réalisée conf
• Ne pas installer l’appareil sous une prise de courant
• Afin d’éviter l’odeur de neuf de l’a
allumez-le et laissez-le fonctionner à la température la plus
pendant 2 heures.
d
Ne pas utiliser cet appareil de chauffage à proximité d
baignoire, d’
d
L’appareil doit être instal
thermostats, prise de branchemen
touchés, directement ou indirecteme
trouve dans la baignoire ou so
• Utilisez toujours l’appareil en position ho
• Tenez la partie frontale de l’appareil éloignée d’au moins 90 cm de tout
meuble, matériau combustible, rideau,
• Ne l'utilisez jamais sur des surfaces mouillées ni à l'extérieur.
• L’appareil doit être bra
prise de terre adaptée.
q
ATTENTION ! : Pour mettre l’appar
JAMAIS à la poub
RECYCLAGE ou à la déchetterie la plus proche af
recyclé. Vous contribuerez a
l’environnement.
2 PRINCIPAUX ÉLÉMENTS
1 Corps principal
2 Interrupteur I (750W)
3 Interrupteur II (1250W)
4 Interrupteur ventilateur
5 Thermostat de température
6 Cordon d'alimentation
7 Pieds en plastique (2 unités)
8 Supports muraux (4 unités)
9 Vis
10
11
3M
Pour son utilisation au sol
1 Fixez les pieds su
fournies (Fig.
Pour sa fixation au mur
Z Ne pas installer l’appareil dans une zone
Z Installez l’app
par rapport
1 Marquez la position des 2 orifà percer pour la fi
supérieurs (Fig. 3).
2 Percez les 2 orifices et introduisez-y les che
3 Fixez les supports supérieurs (8) au mur à l’aide des vis fournies (11)
(Fig. 4).
4 Fixez les supports inférieur convectede des vis fournies
(9) (Fig. 5).
5 Accrochez le convecteur aux supports supéri
Z Assurez-vous que le coit bien
6 Après avoir installé le convecteur, marquez au mur l’emplacement
l’orifice que vo
7 Percez le trou au mur et introduisez-y la cheville fournie (si nécessaire,
retirez le convecteur pour tr
à la fin de l’opération).
8 Fixez le support inférieur
(Fig. 6).
Z Pour monter l’appa
utilisez les vis et les chevilles fournies ; types de surfaces,
renseignez-vous au
4 FONCTIONNEMENT ET UTILISATION
1 Branchez l’appareil.
2 Sélectionnez la tempér
etII (3) et du thermostat de
3 Pour que la pièce atteigne co
Appuyez sur les interrupt
la puissance maximum (III= 2
température (5) au maximum.
4 Quand la pièce a
thermostat de tempé
s’allumera pour maintenir la températ
5 Si vous souhai
qu’un seul des interrupteu
manipulation avec le thermo
6 Appuyez sur l’interrupteur venti
ventilateur.
i L’opt
allumé.
i Un dispo
de surchauffe accidentelle (par
de sortie d’air, etc.). L
reprendra son fonctionnement normal. Si le dispositif de sécurité
interrompt le fonctionnement de manière rép
avec le service après-vente le plus proche de chez vous.
5E
‹
Avant de procéder à son nettoyage, assurez-vous d’avoir bien
débranché l’appa
‹ Ne t
mettez pas non plus sous le robinet.
• N’utilisez pas de produits abrasifs ou incompatibles avec la pei
Epoxy susceptibles de décolorer l’appareil.
Afin d’évit
chauffage.
L’apparei
vêtements, u
sous une armoi
l’air chaud.
N'utilisez
vêtements.
DEUTSCH de
1 ACHTU
• Lesen Sie diese Anweisu
aufmerksam durch.
• Diese Bedienungsanleitung ist Bestandteil des Produkts.
Bewah
auf.
• Dieses Gerät ist ausschließlich für den Hausge
gewerbliche Zwecke bestimmt. Jede andere Verwendung als die
vorgesehene kann gefährlich se
• Kinder nicht unbeaufsichtigt lassen um sicherzustel
Gerät nicht als S
• Dieses Gerät darf nicht
eingeschränkten körperlicheorischen oder geistigen Fähigkeit
bzw. ohne ausreichende Erfaund Kenntnisse
sei denn unter der
ihre Sicherheit verantwortliche
• Nehmen Sie keine Änderungen oder Reparaturen am Gerät vor.
Benutzen Sie das Gerät ni
einem andere
Kundendienst.
• Verwenden Sie ausschließlich von SOLAC geliefer
Teile bzw. Zubehör.
• Vergewissern Sie sich vor dem Netzan
angegebene Netzsp
übereinstimmt.
• Trennen Sie das Gerät nach dem Gebrauch,
Aufsetzen eines Teil
vom Netz. Bei S
muss ausgeschaltet sein, wenn Sie es an das Netz anschließen oder
vom Netz trennen.
• Ziehen Sie nicht a
auf. Ziehen Sie stets am Netzstecker, nicht am Kabel, wenn Sie das
Gerät vom Netz trennen.
• Achten Sie darauf, dass das Netzkab
heißen Flächen in Berührung kommt.
die Tischkante bzw. Abstellfläche hängen, um zu verhindern, dass
Kinder daran ziehen und das Gerät
• Sollte das Netzkabel beschädigt sein, darf es vorsichtsh
Hersteller, seinem a
Fachpersonal ausgetauscht werden.
• Entfernen Sie alle Papier- und K
Kartons bzw. Aufkleber in oder am Gerät
Werbungselemente di
• Stellen Sie den Heizstrah
Materialien (Klebstoff
• Der Aufstellungsort d
nach den geltenden Normen gewählt werden
• Das Gerät nicht unter
• Zur Vermeidung des unange
stellen Sie das Gerät auf die Höchststufe ein
Stunden eingeschaltet
d
Benutzen Sie das Gerät nicht
Badewanne, Dusche ode
d
Das Gerät muss so montiert werden, dass die Schalter, der
Thermostat und der Stecker nicht direkt oder indirekt
Personen berührt werden kön
Dusche befinden.
• Das Gerät immer i
• Die Vorderseite des G
von Möbeln, entflammbaren Materialien wie Gardinen,
Fußbodenbelägen, Polstersesse
• Stellen Sie das Gerät niem
auf.
• Stellen Sie sicher, dass die Steckd
q
ACHTUNG! Das Gerät KEINESFALLS über de
entsorgen, sondern zum nächstgelegenen
oder zu einer Abfallann
So leisten Sie
2 HAUPTBESTANDTEILE
1 Gehäuse
2 Schalter I (750 W)
3 S
4 Ventilatorschalter
5 Thermostat
6 Netzkabel
7 S
8 Wandmontageteile (4 Stck.)
9 Schrauben für Füße/ untere Wandhalterung (4 Stck.)
10
11
3M
Verwendung auf dem Bod
1 Montieren Sie Stützfüße anha
der Untersei
Verwendung an der Wa
Z Gerät nicht in einem Belüftungsbe
Z Halten Sie bei de
Sicherheitsabst
2).
1 Markieren Sie di
oberen Wandhal
2 Bohren Sie die 2
ein (Abb. 4).
3 Montieren Sie
mitgelieferten Schrau
4 Montieren Sie d
mitgelieferten Schrau
5 Hängen Sie den
(8).
Z Stellen Sieonvektor in waagerecht
befindet.
6 Markieren Sie
Wandhalterung.
7 Bohren Sie das Loch in die
Dübel ein (nehmen Sie den Konve
ungehindert arbeiten zu könne
ein).
8 Montieren Sie die untere Wan
Dübels und der Schraube an der Wand (Abb. 6).
Z Zur Montage auf eine
Schrauben und Dübel. Bei anderen Ob
an Ihren Fachhändl
4 BETRIEB UND VERWENDUNG
1 Schließen Sie das Gerät ans Netz an.
2 Stellen Sie die gewü
(3) sowie des Thermostats (
3 So erreichen Sie die
Schalter I (750 W) und II
(III= 2000 W) einzustellen, und dre
höchste Stuf
4 Sobald die gewünschte Raumtemperat
Thermostat (5) langsam nach
ein, dass die gewünschte Temperatur im Raum konstant geha
5 Wenn Sie die Betriebstemperatur senken möchten,
einen der beiden SchalterI (750 W) oder
wiederholen den o.g Vorgang
6 Drücken Sie auf den Ventilatorsch
einzuschalten.
i Der V
ist.
i Eine
es zu einer unbeabsichtigten Überhitzung (z.B. verstop
und Abluftgitter o.ä.) kommt. Nach dem Abklingen der Überhitzu
nimmt das Gerät seinen Bet
Geräts wiederholt durch die S
wenden Sie sich bitt
5 INSTANDHALTUNG UND REINIGUNG
‹
Vor der Reinigung Netzstecker zieh
verwenden.
‹ Das G
nicht unter den
• Keine Scheuermi
schädlich sind, da das Gerät sonst seine Farbe verliert
Zur Vermeidung von Überhitzun
bedecken.
Benutzen Sie das Gerät keine
Wäscheständer und stellen Sie keine
Gegenstände darauf niemals unter einen Schrank
oder andere Gegenstände, welche die Warmluf
behindern.
Benutzen Sie den Heizstrahle
PORTUGUÊS pt
1 ATENÇÃ
• Leia completamente
• Este manual é parte in
para eventual consulta posterior.
• Este aparelho destina-se apenas à utiliz
Qualquer utilização diferente da indicada poderia ser perigosa.
• As crianças devem ser supervisionadas para assegurar que não brincam
com o aparelho.
• Este aparelho
apresentem capacidades físicas
de experiência e conhecimento, excepto se
receberam instruções so
responsável pela sua segurança.
• Não realize
qualquer anomalia no
contacte um serviço de assistência autorizado.
• Não utilize peças ou a
recomendados pela SOLAC.
• Antes de ligar o aparelho à rede eléctrica, verifique se a tensão indicada é
igual à da sua residência.
• Desligue sempre
montar peças e realizar qualquer
Desligue-o também em caso de corte de energia. Quando ligar ou desligar o
aparelho da tomada, este deve estar desligado.
• Nunca puxe nem pendure o aparelho pelo cabo. Desligue o aparelho da
tomada puxando sempre pela ficha, nunca pelo cabo.
• Evite que
superfícies quentes. Não permita que o ca
mesa, ou no tampo, de forma a
façam cair o aparelho.
• Se o cabo de alimentação estiver danificado, deve ser substituído pelo
fabricante, pelo
semelhante, com o fim de evitar riscos.
• Retire todas as embalagens de papel ou de plást
cartões e eventuais autocolantes que se encontrem dentro ou fora do
aparelho e que serviram como protecção de transporte ou promoção de
venda.
• Coloque o aparelho de aquecimento afast
(colas, cortinas, tapetes…).
• A colocação do aparelho de aquecimento deve ser correctamente escolhida
e deve realizar-se segundo as regras e em conformidade com as normas.
• Não instale o apare
• Com o objectivo de
utilização ligue-o e deixe-o a funcionar durante 2 horas na temperatura mais
alta.
d
Não utilizar este aparelho de aquecimento próximo de uma banheira,
duche ou piscina.
d
O aparelho deve ser instalado de forma que os interruptores, o
termóstato, a tomada móvel de ligação, não possam ser tocados
directa ou indirectamente por uma pessoa que se encontre na banheira
ou no duche.
• Utilize sempre o aparelh
• Mantenha a parte da frente do aparelho
móveis, materiais combustíveis, cortinas, carpetes, poltronas, etc.
• Não utilize o aparelho
• O aparelho
contacto de ligação à terra adequado.
q
ATENÇÃO!!: Quando pretender desfazer-se do aparelho, NUNCA o
deite no caixote do lixo, faça-o no seu ECOPONTO ou no ponto de
recolha de resíduos mais perto de sua casa, para o seu posterior
tratamento. Desta forma, está a contribuir para a protecção do meio
ambiente.
2 COMPONENTES PRINCIPAIS
1 Corpo principal
2 Interruptor I (750W)
3 Interruptor II (1250W)
4 Interruptor ventilador
5 Termóstato de temperatura
6 Cabo de ligação à rede eléctrica
7 Pés de plástico (2 unidades)
8 Suportes de parede (4 unidades)
9 Parafusos para pés/suporte inferior de parede (4 unidades)
10 Buchas de nylon (4 unidades)
11 Tira-fundos (4 unidades)
3M
Para a sua utilização sobre o chão
1 Fixe os pés na parte inferior do aparelho através dos parafusos (9) fornecido
(Fig. 1).
Para a sua utilização na parede
Z Não instale o aparelho sob uma zona de ventilação.
Z Instale o aparelho respeitando as distâncias de segurança indicadas
relativamente a qualquer parede ou obstáculo (Fig. 2).
1 Marque as posições dos 2 orifícios a efectuar para a fixação dos suporte
superiores (Fig. 3).
2 Faça os 2 orifícios e coloque a
3 Fixe os suportes superiores (8) na parede com os parafusos f
4 Fixe os suportes superiores (8)
5 Pendure o convector dos sup
Z Certifique-se de que o convector fica na posição horizontal.
6 Com o convector colocado, marque na parede a posição onde deve realizar
o orifício para fixar o suporte inferior.
7 F
o convector p
8 Fixe o suporte inferior (8) na pa
Z Para a montagem numa parede de tijolos, coberta de gesso, utilize os
parafusos e as buchas fornecidos, para outros tipos de
ao vendedor especializado.
4 FUNCIONAMENTO E UTILIZAÇÃO
1 Ligue o aparelho à rede.
2 Seleccione a tempera
e o termóstato de temperatura (5).
3 Para atingir de forma
interruptores I (750W) e II (1250W), obtendo a potência máxima
e rode o termóstato de temperatura (5) para o máximo.
4 Quando a divisão tiver alcanç
o termóstato de temperatura (5) para a esquerda. O aparelho desliga-se e
liga-se para manter a temperatura adequada na divisão.
5 Se desejar diminuir
um dos dois interruptores I (750W) ou II (1250W) e repita o processo anterior
com o termóstato de temperatura (5).
6 Prima o interruptor ventilador (4) p
i A op
i Um dispo
caso de sobreaquecimento acidental
e saída do
sobreaquecimento passe. Se
funcioname
próximo.
5 MANUTENÇÃO E LIMPEZA
‹ Antes de proce
desligado. Utilize um pano macio levemente humidecido.
‹ Não subme
debaixo da torneira.
• Não utilize produtos abrasivos nem que sejam incompatíveis com a pintura
epoxi, já que poderia descolorir o aparelho.
ITALIANO it
1A
• Leggere le presenti istruzioni in ogn
l'apparecchio.
• Il presente manuale è
luogo sicuro per poterlo consultare in futuro.
• Il presente apparecchio è destinato unicamente all'uso domestico e non
industriale. Per evitare pericoli, non utilizzare l'appa
da quelli a cui è destinato.
• Assicurarsi che i bambini
• L’apparecchio non è indicato per essere utilizzato da persone (bambini
compresi) con cap
dell'esperienza e delle cono
ricevuto una supervisione o istruzioni relative all’uso dell’apparecchio stesso
da una persona responsabile della loro sicurezza.
• Non apportare modifiche né riparazioni di sorta all’apparecchio. In presenza
di qualunque anomalia
non utilizzarlo e consultare un servizio di assistenza autorizzato.
• Non usare pezzi o accessori non forniti o non raccomandati da S
• Prima di collegare l’apparecchio alla rete elettrica, verificare che il voltagg
indicato coincida con quello della sua abitazione.
• Scollegare sempre l’apparecchio dalla rete elettrica dopo l’uso e prima
smontare o montare dei pezzi o svolgere qualsiasi attività di ma
pulitura. Scollegare l’apparecchio dalla rete elettrica anche in caso di black-
De forma a evitar um sobreaquecimento, nã
aquecimento.
O aparelho não deve, em caso
ou qualquer outro objecto, nem ser
de qualquer outro obstáculo à circulação do ar quente.
Não utilize o aparelho de aquecimento para secar roupa.
out. In fase
l’apparecchio deve restare sempre spento.
• Non tirare mai il cavo né appendere l’apparecchio allo stesso. Scollegare
l’apparecchio dalla rete elettrica impugnando sempre la spina e non il cavo di
alimentazione.
• Evitare che il cavo entri in contatto con schegge taglienti o superfici calde.
Non lasciare il cavo sospeso dal bordo di tavoli
tirarlo e far cadere l'apparecchio.
• Se il cavo di alimentazione è danneggiato farlo sostituire dal produttore, da
un servizio di assistenza post-vendita o da personale qualificato per evitare
pericoli.
• Rimuovere tutti i sacchetti di carta
ed eventuali adesivi che si trovano dentro o fuori l'apparecchio e che sono
stati utili
vendita.
• Posizionare l'apparecchio di riscaldamento lontano da materiali infiammabili
(colle, tende, tappeti e simili).
• La posizione dell'apparecchio di riscaldamento deve es
correttamente e il posizionamento dev
e le norme vigenti.
• Non installare l'apparecchio sotto una presa d
• Onde evitare l'odore di nuovo dell'apparecchio, al suo primo utilizzo
accenderlo e lasciarlo in funzione per 2 ore alla temperatura massima.
d
Non utilizzare questo apparecchio di riscaldamento nelle immediate
vicinanze di una vasca, doccia o piscina.
d
L'apparecchio deve essere installato in modo che interruttori,
termostato e presa mobile di collegamento non siano a contatto,
o indiretto, con una persona che si trova nella vasca o nella doccia.
• Utilizzare sempre l'apparecchio in posizione orizzontale.
• Tenere la parte anteriore dell'apparecchio a una distanza di almeno 90 cm da
mobili, materiali combustibili, tende, moquette, poltrone e così via.
• Non utilizzare mai l'apparecchio su superfici umide e
• Collegare l'apparecchio a un
adeguata.
q
ATTENZIONE: Non smaltire MAI l'apparecchio insieme ai rifiuti
domestici. Portarlo presso il CENTRO DI SMALTIMENTO o di raccolta
più vicino perché possa essere smaltito adeguatamente. In questo
modo si contribuirà alla tutela dell'ambiente.
2 COMPONENTI PRINCIPALI
1 Corpo principale
2 Interruttore I (750 W)
3 Interruttore II (1250 W)
4 Interruttore del ventilatore
5 Termostato
6 Cavo di alimentazione
7 Gambe di plastica (2 unità)
8 Supporti a parete (4 unità)
9 Viti per gambe/supporto inferiore a parete (4 unità)
10 Ancoraggi di nylon (4 unità)
11 Tirafondi (4 unità)
3 MONTAGG
Per utilizzo a pavimento
1 Fissare le gambe alla parte inferiore dell'apparecchio tramite le viti (9) in
dotazione (Fig. 1)
Per utilizzo a parete
Z Non installare l'apparecchio in una zona di ventilazione.
Z Installare l'apparecchio rispettando le distanze di sicurezza indicate, rispetto
a qualsiasi muro od ostacolo (Fig. 2).
1 Contrassegnare le posizio
superiori (Fig. 3).
2 Praticare i 2 fori e
3 F
4 Fissare i supp
5 Appendere il con
Z Accertarsi che il convettore sia in posizione orizzontale.
6 Con il convettore in posizione, contrassegnare sulla parete la posizione in cui
occorre praticare il foro per fissare il supporto inferiore.
7 Praticare il foro
(se necessario, rimuovere il conv
posizionarlo nuovamente alla fine).
8 F
Z Per il montaggio su una parete di mattoni rivestita di gesso, utilizzare le viti e
gli ancoraggi in dotazione; per altri tipi di superficie, rivolgersi a un rivenditore
esperto.
4 FUNZIONAMENTO E UTILIZZO
1 Collegare l'apparecchio a
2 Selezionare
il termostato (5).
3 Per ragg
interruttori I (750 W) e II (1250 W), ottenendo la potenza massima (III = 2.000
W), e ruotare il termostato (5) fino a raggiungere il valore massimo.
4 Quando la stanz
lentamente il termostato (5) verso sinistra. L'apparecchio si spegnerà e si
accenderà per mantenere costante la temperatura nella stanza.
5 Se si desidera diminuire la temperatura di esercizio, lasciare premuto
soltanto uno dei due interruttori I (750 W) o II (1250 W) e ripetere la procedura
precedente con il termostato (5).
6 Premere l'interruttore del v
i
L'opzione v
i
L'apparecchi
funzionament
di un'ostruzione delle griglie di ingresso e di uscita dell'aria e così via).
L'apparecchio tornerà a funzionare appena raggiungerà la temperatura
normale. Se il di
funzioname
5 MANUTENZIONE E PULIZIA
‹
Prima di procedere alla sua pulizia, si assicuri che l'apparecchio sia
connesso. Utilizzi un panno morbido leggermente inumidito.
‹ Non
sotto il rubinetto.
• Non utilizzi prodotti abrasivi né che
giacchè potrebbe decolorare l'apparecchio.
NEDERLANDS nl
1 WAARSCHUWINGEN
• Lees deze gebruiksaanw
gebruik te nemen.
• Deze gebruiksaanwijzing is
gebruiksaanwijz
kunnen slaan.
• Het apparaat is uitslu
bedrijfsmatig gebruik. Elk ander gebruik dan hier vermeld
• Laat kinderen niet zonder toezicht in de buurt van het apparaat om er zeker
van te zijn dat ze er niet mee spelen.
• Dit apparaat mag niet door mensen (met inbegrip van kinderen) met
lichamelijke, zintuigl
ervaring en kennis gebruikt worden, met uitzondering van hen die door een
met hun veiligheid belaste persoon opgeleid of gesuperviseerd werden voor
het gebruik van dit apparaat.
• Voer geen enkele wijziging of reparatie aan het apparaat uit. Bij defecten aan
het netsnoer of een ander deel van het apparaat, het apparaat niet gebruiken
maar naar een erkende technische dienst brengen.
• Gebruik geen onderdelen of hulpstukken die niet door SOLAC geleverd of
aanbevolen zijn.
• Kijk, alvorens het apparaat
voltage overeenkomt met de netspanning bij u thuis.
• Trek altijd na gebruik
onderdelen verwijdert
reinigingswerkzaamheden aan het apparaat verricht. Trek de stekker er ook
bij stroomuitval uit. Wanneer u de stekker in of uit het stopcontact doet, dient
het apparaat uit te staan.
• Trek nooit aan het sn
Neem de stekker uit het stopcontact
te trekken.
• Zorg ervoo
oppervlakken. Laat het snoer niet over de rand van de tafel of het aanrecht
hangen om te voorkomen dat kinderen eraan trekken en het apparaat op de
grond valt.
• Laat als het
of door vergelijkbaar
vermijden.
• Verwijder alle papieren of plas
stickers die evt. aan de binnen- of buitenkant van het apparaat aangebracht
werden ter bescherming tijdens het transport of voor reclamedoeleind
• Plaats het verwarmingsapparaat uit de buurt van brandbare materialen
gordijnen, vloerkleden...).
• Het verwarmin
volgens de regels en veiligheidsvoorschriften.
• Installeer het ap
• Om te voorkomen dat het apparaat bij het eerste gebruik naar “nieuw” ruikt,
het apparaat gedurende 2 uur inge
d
Gebruik dit apparaat niet in de onmiddellijke nabijheid van een bad,
douche of zwembad.
Per evitare una situazione di surriscaldamento, non coprire
l'apparecchio di riscaldamento.
L'apparecchio non deve essere in nessun caso coperto da indumenti,
recipienti o qualsiasi altro oggetto e non deve essere posizionato sotto
un armadio o qualsiasi altro ostacolo alla circolazione di aria calda.
Non utilizzare l'apparecchio di riscaldamento per asciugare indumenti.
Om oververhitting te voorkomen, het verwarmingsapparaat nooit
bedekken.
Het apparaat mag nooit bedekt worden met kleding, bakken of andere
voorwerpen en mag niet geplaatst worden
wat de circulatie van de warme lucht belemmert.
Gebruik het verwarmingsapparaat niet om kleding te drogen.
d
Het apparaat moet zodanig geïnstalleerd worden dat de schakela
de thermostaat en het verplaatsbare aansluitsnoer niet direct of indirect
aangeraakt kunnen worden door iemand die zich in bad of onde
douche bevindt.
• Gebruik het apparaat altijd in horizontale st
• Houd de voorzijde van he
brandbaar materiaal, gordijnen, vloerbedekking, stoelen, enz.
• Gebruik dit apparaat nooit op een natte
• Het apparaat dient aangesloten te worden op een stopcontact met een goede
aardleiding.
q
¡LET OP: Wanneer u het apparaat wilt afdanken, deponeer het dan IN
GEEN GEVAL bij het huisvuil, maar breng he
naar het dichtstbijzijnde recyclingcentrum of vuilophaalpunt. Op deze
wijze draagt u bij aan het behoud van het milieu.
2 BELANGRIJKSTE ONDERDELEN
1R
2 Schakelaar I (750W)
3 Schakelaar II (1250W)
4 Ventilatorschakelaar
5 Thermostaat
6 Netsnoer
7 Plastic poten (2 stuks)
8 Wandsteunen (4 stuks)
9 Schroeven voor de poten/onderste wandsteun (4 stuks)
10 Nylon pluggen (4 stuks)
11 Wandschroeven (4 stuks)
3M
Voor gebruik op de gron
1 Bevestig de poten aan d
meegeleverde schroeven (9) (afb. 1)
Voor wand
Z Installeer het apparaat niet op een plek waar geventileerd wordt.
Z Installeer het apparaat met inachtneming van de aangegeven
veiligheidsafstanden ten opzichte van wanden of obstakels (afb. 2).
1 Markeer de positie van de twee gaten die geboord moeten worden voor de
bevestiging van de bovenste steunen (afb. 3).
2 Boor de 2 gaten en doe de meegeleve
3 Bevestig de bovenste steunen (8) aan de wand met behulp van de
meegeleverde schroeven (11) (afb. 4).
4 Bevestig de onderste s
meegeleverde schroeven (9) (afb. 5).
5 Hang het apparaat op aan de bovens
Z Zorg ervoor dat het apparaat horizontaal blijft.
6 Terwijl het apparaat aan de steunen hangt, de plek op de wand markeren
waar het gat geboord moet worden om de onderste steun te bevestigen
7 Boor het gat in de wand en doe er de meegeleverde plug in (haal het apparaat
indien nodig van de wan
weer op als u klaar bent).
8 Bevestig de onderste steun (8) aan de wand met behulp van de
meegeleverde plug en schroef (11) (afb. 6).
Z Voor wandmontage op een met gips bepleisterde bakstenen muur dient u de
meegeleverde schroeven en pluggen te gebruiken. Raadpleeg
deskundige verkoper voor andere soorten oppervlakken.
4 WERKING EN GEBRUIK
1 Steek de stekker in het stopcontact.
2 Stel de gewenste temperatuur in me
en de thermostaat (5).
3 O
Druk op de schakelaars I
wordt verkregen (III=
4 Als het vertrek de gewenste temperatuur heeft bereikt, draai dan de
thermostaat (5) langzaam naar links. Het apparaat gaat afwisselend uit en
aan om de juiste temperatuur in het vertrek te handhaven.
5 Als u de werktemperatuur
schakelaars I (750W) of II (1250W)
proces met de thermostaat (5).
6 Door op de ventilatorschakelaar (4) te drukke
i De
i
Het apparaat beschikt
onderbreekt als er per ongeluk oververhitt
het luchtrooster). Als de over
aan. Als het beveiligingsm
neem dan contact op met de di
5 ONDERHOUD EN REINIGING
‹
Zorg dat voor de reiniging de stekker uit het wandcontact is losgenomen.
Gebruik een zachte, vochtige doek.
‹ Dompel het appara
de kraan.
• Gebruik, om de kleur te beschermen, geen bijten
de epoxylaag kunnen aantasten.
600mm
400mm
300mm
8
7
9
11
10
1
6
Fig. 3
Fig. 4
Fig. 2
415mm
Fig. 5
Fig. 6
Fig. 1
3
2
4
5
DESPLEGABLE_CONVECTOR_CO8500.fm Page 1 Friday, May 14,