ESPAÑOL es
1 Indicaciones de Seguridad
• Lea completamente estas instruccione
• Este manual es parte integrante del
para futuras consultas.
• Los niños deberían ser supervisados p
aparato.
• Este aparato no está destinado para s
cuyas capacidades físicas, sensoriale
de experiencia o conocimiento, salv
relativas al uso del aparato por una perso
• No realice ninguna modificación ni rep
anomalía en el cable u otra parte del aparato, no lo use y acuda a un servici
de asistencia autorizado.
• No utilice piezas o accesorios no
• Antes de enchufar el aparato a la
indicado coincide con el de su
• Desenchufe el aparato siempre después de su uso y antes de de
montar piezas y realizar cualquier tarea de mantenimiento o limpieza.
Desenchúfelo también en c
aparato, debe estar desconectado.
• No tire nunca del cable ni cuelgue el aparato por él. Desenchufe el aparato
tirando siempre de la clavija, nunca de
• Evite que el cable de alimentación entre en contacto
superficies calientes.
• No introduzca nunca el cuerpo principal del
en el lavavajillas.
• El aparato debe conectarse a una
un contacto de tierra adecuado.
C
La temperatura en las ranuras de entrada de pan y en las varillas
calientapanes puede ser elevada cuando el aparato está en
funcionamiento. La temperatura de los paneles metálicos de
cuerpo principal también puede ser
• El pan puede arder, de modo que
proximidad o debajo de materiales comb
• No deje el tostador en funcionami
conectado a un temporizador externo ni a un sistema separado de con
remoto.
b
¡¡A
lo deposite en la basura, sino que acuda al PUNTO LIMPI
recogida de residuos mas cercano a su domicilio, para su
posterior tratamiento. De esta manera, esta contribuyendo al
cuidado del medio ambiente.
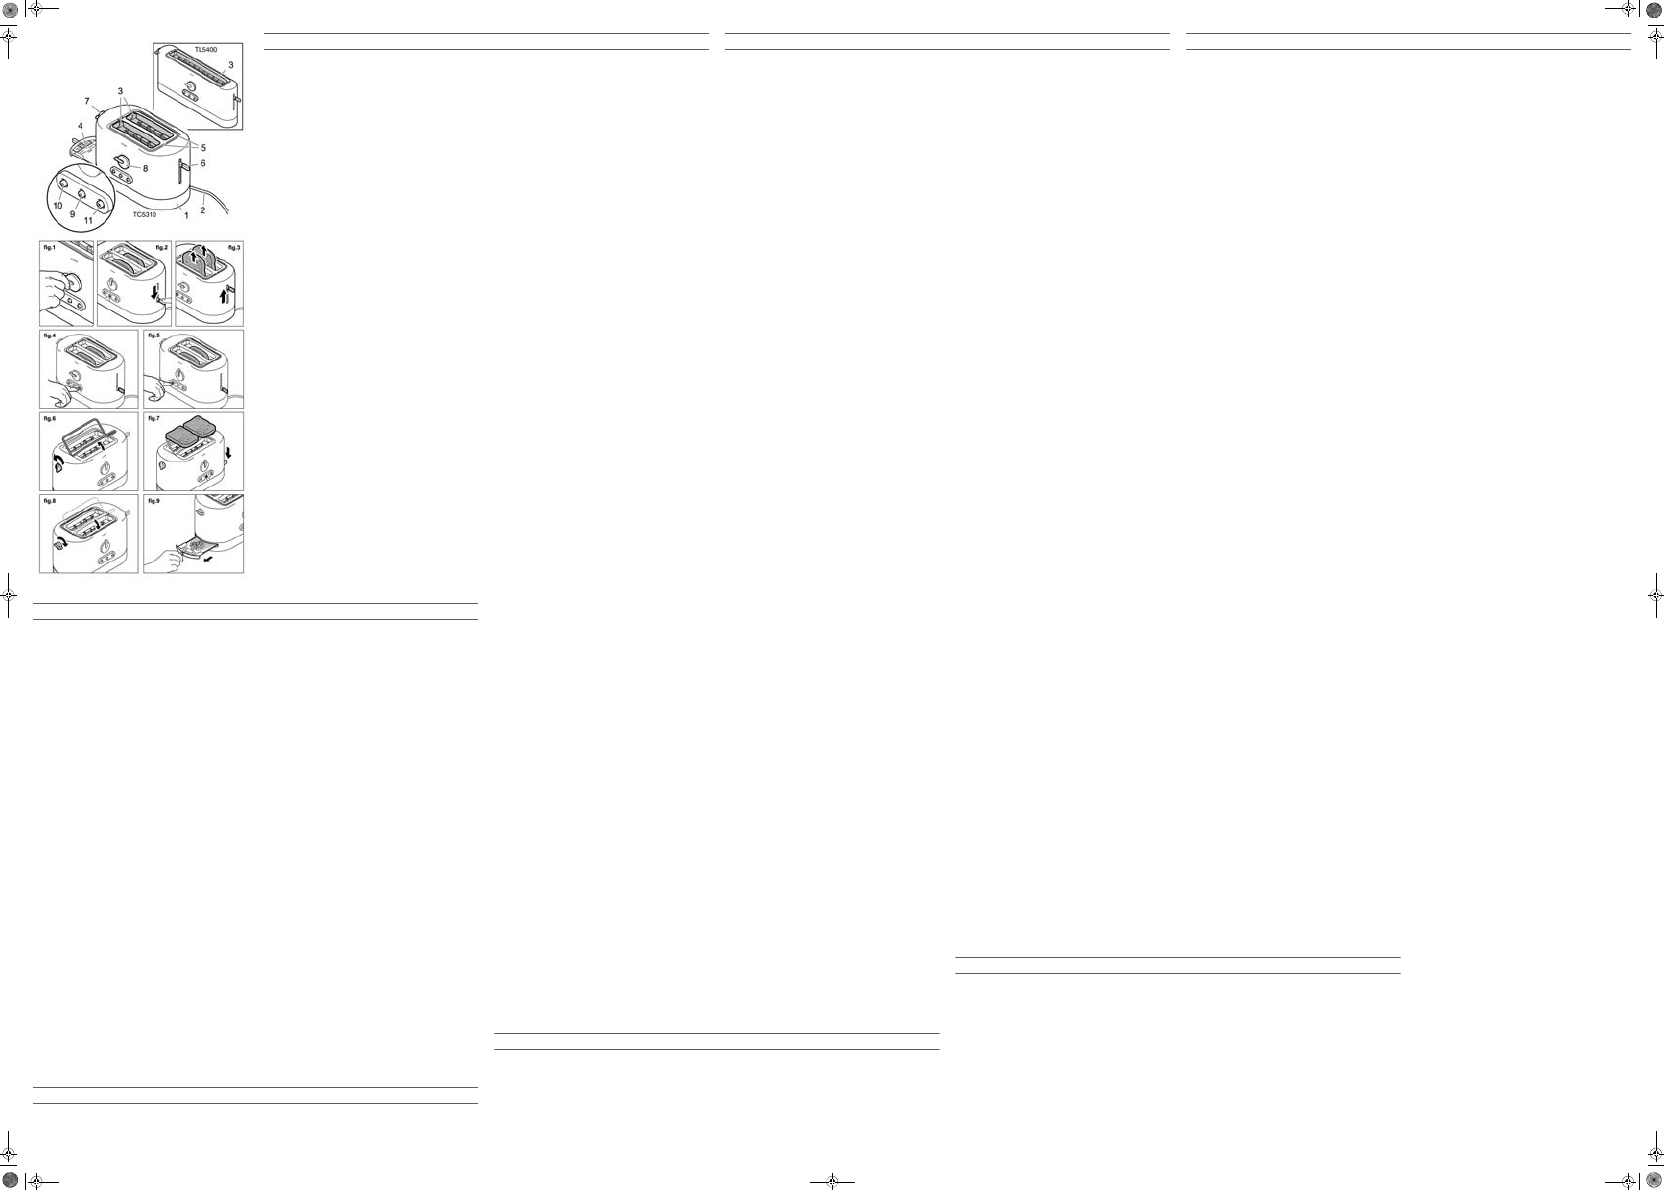
2 Descripción
Partes principales
1 Cuerpo principal
2 Cable de conexión a la red
3 Ranuras de entrada de pan
4 Bandeja recogemigas
5 Varillas calientapanes
Mandos
6 Mando de puesta en marcha
7 Mando varillas calientapanes
8 Mando de regulación del nivel de tostado
9 Botón con piloto luminoso de funcionamiento, paro y expulsión
automática
10 Botón y piloto función descongelar
11 Botón y piloto función recalentar
3 Utilización
) Este aparato ha sido diseñado para descongelar, tostar y calent
) Retire completamente todos los elementos que se encuentran dentro o
fuera del aparato que sirvieron
n Nunca introduzca
cualquier otro objeto se encuentre
durante el funcionamiento.
n No cubra el tostador cuando esté en uso.
) Coloque correctamente la bandeja recogemigas. Nunca u
tostador sin colocar correctamente la bandeja recogemig
• Antes de utilizar el to
durante unos minutos.
principio.
1 Enchufe la clavija a la red, recogiendo el ca
recogecables de la parte inferior del aparat
de tostado mediante el mando (8) (fig.
ajusta el tiempo que dura el proceso de tostado.
2 Introduzca el pan por las ranuras (3) y deslice hacia abajo el mando de
puesta en marcha (6) (fig. 2). Se ilumina el piloto de funcio
3 El proceso de tostado finalizará automáticamente, aunque si lo dese
puede detenerlo anticipadamente pulsando el botón (9). Al f
mando de puesta en marcha (6) retorna a su posició
(9) se apaga y las tostadas aparecen en la parte superior
de entrada (fig. 3).
) En caso de que el pan se bloquee en el interior del tostador, desenchufe
el aparato, espere a que se enfríe y extraiga el pan con la mano.
Función recalentar
) Esta función es útil para volver a calentar pan ya tostado que se ha
enfriado por haber transcurrido un tiempo conside
tostado no se altera.
1 Introduzca el pan ya tostado por las ran
mando de puesta en marcha (6) y presione el botón (11) (fig. 4). Se
enciende el piloto de funcionamiento (9) y e
La posición del mando (8) no influye
2 Transcurridos unos segundos, las tostadas son expulsadas y los dos
pilotos se apagan.
Función descongelar
) Esta función le permite descongelar y tostar
sólo paso. Mediante esta función, se alarga en un 30%
aproximadamente el tiempo que dura el proceso de tostado.
1 Regule a
introduzca el pan en las ranuras de entrada.
2 Deslice hacia abajo el mando de puesta en marcha (6) y pul
de descongelación (10) (fig. 5). Se encienden el piloto de
descongelación (10) y de funcionamiento (9).
3 El proceso de descongelación y tostado se realiza
un sólo paso, aunque si lo dese
pulsando el botón (9). Tras finalizar el proceso, las to
expulsadas y los pilotos (9) y (10) se apagan.
Función calientapanes
) Esta función le permite calentar pan en la par
sin introducirlo por las ranuras.
1 Para utilizar el calientapanes haga
hasta que las varillas metálicas queden en su posición más elevada
(fig. 6).
2 Coloque los panecillos sobre las varillas, regule el mando
de nivel de tostado (8) y deslice ha
marcha (6). El piloto luminoso (9) se encenderá (fig. 7).
3 Retire los panecillos de las varillas cuando el mando de puesta en
marcha (6) vuelva a su posición inicial. El piloto lumin
apagará.
4 Una vez terminada la utilización del calientapanes, gire el mando (7)
hacia la derecha hasta que las varillas queden en su posición inicial (fig.
8).
4 Limpieza y Conservación
) Limpie el aparato antes del primer uso, inmediata
cada uso y tras
n No introduzca ningún objeto,
entrada de pan.
n Antes de limpiar el tostador, asegúrese de que está desenchufad
la red y completamente frío.
1 Limpie el cuerpo exterior del aparato con un paño húmedo.
2 Extraiga la bandeja recogemigas tirando de ella hacia af
limpie las migas, restos de pan, etc.
3 Coloque de nuevo la bandeja y asegúrese de que queda colocada
correctamente.
4 Para guardar el aparato, recoja el cable de aliment
en el soporte situado en la base.
ENGLISH en
1 Safety Instructions
• Read these instructions fully before u
• This manual is an integral part of the product. Keep it in
reference.
• Children should be supervised to
appliance.
• This appliance is not intended for use by persons (includi
reduced physical, sensory or mental capabilities, or lack of experience and
knowledge, unless they have been given superv
use of the appliance by a person respon
• Do not modify or repair the appliance in any w
the cord or any other part of th
authorised service centre.
• Do not use parts or accessories
by SOLAC.
• Before plugging the appliance into the mains, check tha
matches your home voltage.
• Always unplug the appliance after u
performing any maintenance and clea
a power cut. The appliance
unplugging it.
• Never pull on the cord or hang the appliance from it. Alw
appliance by pulling on the plug, nev
• Prevent the cord from coming into contac
• Never submerge the main body of the appliance in water or any other liqu
and do not put it in the dishwasher.
• The appliance must be connected to a
connection.
C
The bread slots and bread-heating elements can get very hot
when using the appliance. The metal panel
also get very hot.
• The bread can ignite, so the bread toaster should not be used in the proximity
of or under combustible material, such as
• Do not leave the toaster working unattended
Do not use the toaster
connected to an external timer or a separate remote control system.
b
CAUTION! When you want to dispose of the appliance, NEVER
throw it in the rubbish bin. Take it to your nearest
or the waste collection centre closest to your home for processi
You will thus be helping to take care of the environment.
2 Description
Main components
1 Main body
2 Power cord
3 Bread slots
4 Crumb tray
5 Bread-heating elements
Controls
6 Operating control
7 Bread-heating element contr
8 Browning level selector control
9 On, off and automatic release button with indicator light.
10 Defrost function butt
11 Reheat function button and pilot li
3U
) This appliance is designed to defrost, toast and heat bread.
) Completely remove any elements located inside or around the
appliance which were used for transporting and packing it.
n Never insert any utensils in th
objects from being placed above the bread slot during operat
n Never cover the toaster when in use.
) Install the crumb tray correctly. Never use the toaster without having
correctly installed the crumb tray.
• Before using the toas
minutes. It is normal for i
1 Plug the appliance into the mains, winding the
cord winder at the bottom of the appli
adjust the browning level to your liking (fig. 1). This con
the duration of the toasting process.
2 Insert the bread in the slots (3) and press the op
2) down. The operating pilot light (9) comes on.
3 The toasting process ends automatically altho
stop it early by pressing the button (9).
(6) returns to its initial position, the pilot light (9) goes out
appears at the top of the bread slots (fig. 3).
) If the bread gets stuck inside the toaste
it to cool down and remove the bread using your hand.
Reheat func
) This function is useful for reheating bread
has cooled down after a considerable time has passed. The browning
level is not affected.
1 Insert the previously toasted bread in t
control (6) down and press the button (11) (fig. 4). The operating (9) and
reheating (11) pilot lights come on. The position of the con
not affect the process.
2 After a few seconds, the toast is ejected and both pilot lights go out.
Defrost function
) This function allows you to defrost and toast bread in one convenient
step. This function extends the duration o
around 30%.
1 Adjust the browning level to your liking using the control (8) and insert
the bread in the slots.
2 Slide the operating control (6) down and press the defrost butt
(fig. 5). The defrost (10) and operating (9) pilot lights come on.
3 The defrosting and toasting process is performed
single step, although, if you want, you can stop it early by pressing the
button (9). At the end of the process,
lights (9) and (10) go out.
Roll warming function
) This function allows you to heat bread on the top of the toaster, wit
inserting it in the slots.
1 To use the bread roll warmer, turn the control (7) t
metal rods are at their highest position (Fig.6).
2 Place the rolls on the rods, set the
and slide the operating control (6) down. The in
on (Fig.7).
3 Remove the rolls from the rods when
its home position. The indicator light (9) will go off.
4 When you have finished using the roll war
right until the rods are at their home position (Fig.8).
4 Cleaning and Stor
) Clean the appliance before using it for t
each use and after not using it for a long period of time.
n Do not insert any objects, not even a clot
n Before cleanin
and completely cold.
1 Clean the outside of the appliance with a damp cloth.
2 Remove the crumb tray by pulling it outwards (fig. 9) and clean up any
crumbs, bits of bread, etc.
3 Place the tray back in place and ensure it is placed correctl
4 To store the appliance, store the power cord by winding
located on the base.
FRANÇAIS fr
1 Indications de sécurité
• Lisez attentivement ce mode d'empl
• Ce manuel fait partie du produit. Conservez-le dans un lieu sûr afin de pouvoi
le consulter ultérieurement.
• Veillez à ce que les enfants ne
• Il est recommandé de ne pas laisser cet appareil
compris d’enfants) ayant un handic
personnes ne disposant pas
nécessaires, à moin
supervise ou leur apporte des instruct
• Ne modifiez ni ne réparez jamais l’
le câble ou sur une autre partie de l’appareil, ne
centre de service technique agréé.
• N’utilisez pas de pièces ni d'accessoi
SOLAC.
• Avant de brancher l’appareil a
indiquée correspond bien à celle de
• Débranchez toujours l’appareil a
des pièces et d'effectuer toute opération
Débranchez-le égal
branchez ou débranchez l’appareil, c
• Ne tirez jamais sur le câble et ne susp
Débranchez l’appareil en tirant toujo
• Prenez garde à ce que le cordon d'alimentation n'entre pas en contact ave
éléments tranchants ou des surfaces
• N’introduisez jamais le corps principa
liquide, et ne le mettez pas au lav
• L’appareil doit être branché à une prise
terre adaptée.
C
La température des fentes d’introduction du pai
« réchauffe-pain » peut être élevée lorsque l’appareil est en
fonctionnement. La température des panneaux métalliques du
corps principal peut également être élevée.
• Le pain peut s'enflammer ; pour cette raison, n’utilisez pas le grille-pain à
proximité ou sous des matériaux com
• Ne laissez pas le grille-pain fonc
grille-pain s'il est b
télécommande séparé.
b
ATTENTION ! Lorsque vous souhaitez vous débarrasser de
l'appareil, ne le jetez JAMAIS à la poubelle, mais rendez-vous à
un POINT VERT ou de recyclage des déchets le plus proche de
votre domicile pour son traitement ultérieur. Vous cont
ainsi à la préservation de l’environnement.
2 Description
Principaux éléments
1 Corps principal
2 Cordon d'alimentation
3 Fentes d’introduction du pain
4 Plateau ramasse-miettes
5 Support « réchauffe-pain »
Boutons de fonctionnement
6 Bouton de mise en marche
7 Bouton support « réchauffe-pain »
8 Bouton de réglage de la températ
9 Bouton avec voyant lumineux de fonctionnement,
automatique.
10 Bouton et voyant fonction décongélation
11 Bouton et voyant fonction réchauffage
3 Utilisation
) Cet appareil est conçu pour décongeler, griller et réchauffe
) Retirez complètement tous les éléments se trouvant dans ou hors de
l’appareil, destinés au transport et à l’emballage de celui-ci.
n N'introduisez jamais d'ustensiles dans le
ou tout autre objet ne se trouve au niveau de la rainure d’
pain pendant le fonctionnement de l’appareil.
n Ne couvrez pas le grille-pain lorsqu
) Placez correctement le plateau ramasse-miettes. N’utilisez jamais le
grille-pain si le plateau ramasse-miettes n’est pas placé correctement.
• Avant d'utiliser l
pain pendant quelque
début.
1 Branchez la prise de courant, placez la pa
range câbles de la partie inférieure de l’appareil, et
température comme vous le souhaitez grâce
bouton (8) vous permet d’obtenir du pain plus ou moins grillé.
2 Introduisez le pain dans les fentes (3) et déplacez le bouton de mise en
marche (6) vers le bas (fig. 2). Le voyant de fonctionnement s’al
(9).
3 L'appareil s’arrêtera automatiquement lorsque
grillé ; cependant, si vous le souhaitez, vous pouvez interrompre le
fonctionnement en appuyant sur le bouton (9
le bouton de mise en marche (6) retrouve sa position i
(9) s’éteint et le pain grillé apparaît
d’introduction (fig. 3).
) Si le pain reste bloqué à l'intérieur du grille-pain, débr
attendez qu'il refroidisse et retirez le pain.
Fonction réchauffage
) Cette fonction sert à réchauffer du pain déj
sera pas plus grillé.
1 Introduisez le pain déjà grillé dans les fentes (3), déplacez le bout
mise en marche (6) vers le bas et appuyez sur le bouton (11) (fig. 4). Le
voyant de fonctionnement (9) s’allume ainsi que celui de réchauffage
(11). La position du bouton (8) ne modifie pas le processus.
2 Quelques secondes plus tard, les tartine
voyants s’éteignent.
Fonction décongélation
) Cette fonction vous permet de décong
facilement en un seul geste. Cette fonction augmente d’environ 30 % la
durée nécessaire afin d'obtenir du pain grillé.
1 Réglez le bouton (8) si vous souhaitez obte
grillé et introduisez le pain dans les fentes d’introduction.
2 Faites glisser vers le bas le bouton de mise en marche (6) et appuyez
sur le bouton de décongélation (10) (fig. 5)
(10) s’allume ainsi que celui de fonctionnement (9
3 L'appareil s’arrêtera automatiquement lorsque le pain ser
et grillé ; cependant, si vous le souhaitez, vous po
fonctionnement en appuyant sur le bouton
les tartines sont expulsées et les voyants (9) et (10) s’éteignent.
Fonction pour tiédir des petits pains
) Cette fonction vous permet de réchauffer du pain sur la partie
supérieure du grille-pain, sans l’introduire dans les fentes.
1 Pour faire tiédir des petits pains, fa
gauche jusqu’à ce que les barres métal
position la plus élevée (Fig.6).
2 Placez les petits pains sur les barres, réglez la commande de réglage
du niveau de grillé (8) et faites glisser vers le bas la commande de mise
en marche (6). Le voyant lumineux (9) s’allumera (Fig.7).
3 Retirez les petits pains des barres lorsque la commande de mise en
marche (6) reviendra dans sa position initiale. Le voyant lumine
s’éteindra.
4 Après avoir fini d’utiliser la fonction de réchauffage de petits pains,
tournez la commande (7) vers la droite jusqu’à ce que les barres
reviennent dans leur position initiale (Fig.8)
4 Nettoyage et entretien
) Nettoyez l’appareil avant sa première utilisation, immédiate
chaque utilisation et après une longue période d’inutilisation.
n N’introduisez aucun objet,
d’introduction du pain.
n Avant de nettoye
complètement froid.
1 Nettoyez l'extérieur de l'appareil avec un chiffon sec.
2 Extraire le plateau ramasse-miettes en l
nettoyez les miettes et les restes de pain.
3 Placez de nouveau le plateau et assurez-vous qu’i
correctement.
4 Pour ranger l’appareil, enroulez le câble sur
de la base.
DEUTSCH de
1 Sicherheitshinweise
• Lesen Sie diese Anweisungen vor Inbetriebna
• Diese Bedienungsanleitung ist Bestandteil des
einem sicheren Ort zum späteren
• Lassen Sie Kinder nicht mit diesem Gerät s
• Dieses Gerät ist nicht für den Gebrauch durch Personen (einschließl
Kindern) mit einer körperlichen, sensitiven oder
durch Personen, die nicht über die notwendige Erfahrung oder Kenntnis
verfügen, geeignet, e
zuständigen Person beau
eingewiesen.
• Nehmen Sie keine Änderungen oder Repa
das Gerät im Falle eines Defekts a
Geräteteil nicht und bringen Sie es zu
• Verwenden Sie ausschließlich von SOLAC
bzw. Zubehör.
• Vergewissern Sie sich vor dem Netzanschlu
angegebene Netzspannung mit jen
• Trennen Sie das Gerät nach dem G
Aufsetzen eines Teils sowie
Bei einem Stromausfall ebenfall
ausgeschaltet s
trennen.
• Ziehen Sie nicht am Kabel bzw. häng
Ziehen Sie stets am Steck
trennen.
• Achten Sie darauf, dass das Netzkabe
Flächen in Berührung kommt.
• Das Gehäuse nicht in Wasser oder andere Flüssig
der Spülmaschine reinigen.
• Das Gerät muss an eine vorschriftsmäßig ge
werden.
C
Die Toastschlitze und Brötchenaufla
wenn das Gerät in Betrieb ist. Die Metallplatten des Gehäuses
können ebenfalls heiß sein.
• Das Brot kann zu brennen beginnen, der T
von bzw. unter entflammbaren Material
• Den Toaster während des Betriebs niemals
Sie diesen Toaster weder mit externer Zeituhr no
b
ACHTUNG!! Das Gerät KEINESFALLS über den Hausmüll
entsorgen, sondern zum nächstgelegenen WERTSTOFFHOF oder
zur Abfallannahmestelle zur Weiterverwertung bringen. So leiste
Sie einen Beitrag zum Umweltschutz.
2 Beschreibung
Hauptbestandteile
1 Gehäuse
2 Netzkabel
3 Toastschlitze
4 Krümelschublade
5 Stäbe Brötchenauflage
Bedienung
6 EIN/AUS-Schalter
7 Schalter Brötchenauflage
8 Röstgradregler
9 Stop- und Auswurftaste mit Betriebsanzeige
10 Taste und Leuchta
11 Taste und Leuchta
3 Verwendung
) Dieses Gerät ist zum Auftauen, Toasten und Aufwärmen von Brot
vorgesehen.
) Entfernen Sie sämtliches Transport- bzw. Verpackungsmaterial im oder
am Gerät.
n Keine Gegenstände in den Toaster stecke
weder das Kabel noch andere Gegenstände während des Betrie
der Brotaufnahme liegen.
n Den Toaster während
) Krümelschublade richtig einsetzen. Den Toaster ni
eingesetzte Krümelschublade verwenden.
• Toaster vor der ersten Be
nehmen. Die anfängl
1 Schließen Sie das Gerät ans Netz an,
Kabel im Kabelfach auf der Unterseite des Geräts auf. Stellen Sie den
Röstgrad mithilfe des Reglers (8) auf die
Mithilfe des Reglers (8) wird die Röstzeit eingestellt.
2 Stecken Sie die Brotscheiben in die Toastschlitze (3) und schieben Sie
den EIN-Schalter (6) nach unten (Abb. 2). Die
leuchtet auf.
3 Der Röstvorgang stoppt automatisch. Wenn Sie ihn jedoch vorzeit
abbrechen möchten, so drücken Sie die Stopptaste (9). Am En
Röstvorganges kehrt der EIN-Schalter (6) i
Position zurück, die Betrieb
Brotscheiben springen aus den Toastschlitzen (Abb. 3).
) Bleibt die Brotscheibe im Toaster stecken, Netzstecke
abwarten, bis sich das Gerät abkühlt, um das Brot herauszunehmen.
Aufwärmfunktion
) Diese Funktion ist nützlich zum erneuten Aufwärmen von bere
getoastetem und nach einiger Zeit au
bleibt dabei gleich.
1 Stecken Sie die Brotscheiben in die Toastschlitze (3), schieben Sie den
EIN-Schalter (6) nach unten, und drücken Sie auf di
4). Die Betriebsanzeige (9) sowie die Leuchtanzeige für
Aufwärmfunktion (11) leuchten auf.
keinen Einfluss auf den Vorgang.
2 Nach einigen Sekunden springen die Toasts heraus, und die
Leuchtanzeigen erlöschen.
Auftaufunktion
) Mit dieser Funktion können Sie Brot bequem in einem Schritt auftauen
und toasten. Der Röstvorgang verlängert sich dabei um ca
1 Stellen Sie den Röstgrad mithilfe des Regler
Stufe, und stecken Sie die Brot
2 Schieben Sie den EIN-Schalter (6) nach
Auftautaste (10) (Abb. 5). Die Leucht
sowie die Betriebsanzeige (9) leuchten auf.
3 Der Auftau- und Röstvorgang wird automatisch in einem Schrit
durchgeführt. Wenn Sie ihn vorzeitig
Sie die Stopptaste (9). Sobald der Vorgan
Toasts heraus und die Leuchtanzeigen (9) und (10) erlöschen.
Aufwärmen von Brötchen
) Mit dieser Funktion können Sie Brötchen auf dem Toaster e
ohne sie in die Toastschlitze zu stecken.
1 Zum Brötchenrösten Schalter (7) nach links
Metallstangen ihre höchste Stellung erreich
2 Brötchen auf die Stangen legen, Regler (8) auf
und Hebel (6) nach unten drücken. Die Lampe (9) leuchtet auf (Fi
3 Sobald der Hebel (6) in die Ausgangsstellung zurückkehrt,
Brötchen von den Stangen genommen wer
4 Nach der Benutzung, Regler (7) wieder nach re
Stangen erneut in ihrer Ausgangsstellung befinden (Fig. 8).
4 Reinigung und Aufbewahrung
) Reinigen Sie das Gerät vor der ersten Verwendung, unmittelb
jeder Verwendung, und wenn Sie es für längere Zeit nicht benutzt
haben.
n Keinerlei Gegenstä
n Achten Sie vor jeder Reinigung dara
getrennt und vollständig ausgekühlt ist.
1 Reinigen Sie die Außenseite des Geräts mit
2 Entnehmen Sie die Krümelsch
(Abb. 9) und reinigen Sie sie von Krümeln und Brotresten.
3 Setzen Sie die Schublade wieder ein, und stellen Sie sicher, dass sie
richtig sitzt.
4 Zum Aufbewahren des Geräts wickeln Sie das Netzkabel im Kabelfach
an der Unterseite des Gerät
PORTUGUÊS pt
1 Indicações de segurança
• Leia completamente estas instruçõe
• Este manual é parte integrante do produto. Guarde-o em lu
eventual consulta posterior.
• Deve evitar-se que as crianças brinquem
• Este aparelho não é indicado para util
incluídas) com alguma limitação física,
sem a experiência ou conhec
responsável pela sua segurança
instruções sobre a utilização do aparel
• Não realize qualquer mod
qualquer anomalia no cabo ou outra parte do aparelho, não o utili
um serviço de assistência autorizado.
• Não utilize peças ou acessórios que não tenham s
recomendados pela SOLAC.
• Antes de ligar o aparelho à rede eléctrica, verifique se a voltagem in
coincide com a da residência.
• Desligue o aparelho sempre dep
montar peças e realizar qualquer tarefa de manutenção ou limpeza. Desligue-
o também em caso de corte de energi
tomada, deve estar desligado.
• Nunca puxe pelo cabo nem segure o aparelho através dele. Desli
aparelho da tomada puxando sempre
• Evite que o cabo de ligação entre e
superfícies quentes.
• Nunca submergir o corpo principal do apare
líquido, nem na máquina de lavar
• O aparelho deve ligar-se a uma tom
contacto de ligação à terra adequado.
C
A temperatura nas ranhuras de entrada de pão e nas grelhas de
aquecimento de pão pode ser elevada quando o aparelho estive
em funcionamento. A temperatura do
principal também pode ser elevada.
• O pão pode arder, pelo que não
proximidade ou sob materiais com
• Não deixe a torradeira em funcionam a
torradeira ligada a um temporiz
controlo remoto.
b
ATENÇÃO!!: Quando pretender desfazer-se do aparelho,
deite no caixote do lixo, faça-o no seu ECOPONTO ou no ponto de
recolha de resíduos mais perto de sua casa, para o seu posterior
tratamento. Desta forma, está
ambiente.
2 Descrição
Partes principais
1 Corpo principal
2 Cabo de ligação à rede
3 Ranhuras de entrada de pão
4 Bandeja recolhe-migalhas.
5 Grelhas de aquecimento do pão
Comandos
6 Comando de colocação em funcionamento
7 Comando das grelhas de aquecimento do pão
8 Comando de regulação do nível de torragem
9 Botão com piloto luminoso de funcionamento, paragem e expulsão
automática.
10 Botão e piloto função descongelar
11 Botão e piloto função reaquecer
3 Utilização
) Este aparelho foi concebido para descongelar, torrar e aquecer pão.
) Retire completamente todos os elementos que se enco
fora do aparelho que sirvam para o transporte e embalagem.
n Nunca introduzir utensíl
outro objecto se encontre sobre a boca de entrada d
funcionamento.
n Não tape a torradeira quando esta
) Coloque correctamente a bandeja recolhe-migalhas. Nunca ut
torradeira sem colocar correctamente a bandeja recolhe-migalhas.
• Antes de utilizar a torradeira pe
pão durante uns minutos
1 Ligue a ficha na tomada, colocando o cabo que sobra no re
que se encontra na parte inferior do ap
nível de torragem com o comando (8
ajusta-se o tempo que dura o processo de torragem.
2 Introduza o pão pelas ranhuras (3) e deslize para baixo o comando de
colocação em funcionamento (6) (Fig. 2). O pilot
acende-se (9).
3 O processo de torragem acaba automaticame
desejar, o possa interromper antecipadamente premind
Ao finalizar, o comando de colocação em funcionamento (6
posição inicial, o piloto (9) desliga-se e as torradas surgem na parte
superior das ranhuras de entrada (fig. 3).
) Se o pão ficar bloqueado no interior da torradeira,
espere que a torradeira esfrie e retire o pão com a mão.
Função reaquecer
) Esta função é útil para voltar a aquecer pão já torrado que arrefeceu por
ter decorrido um tempo considerável. O nível de torragem não se altera.
1 Introduza o pão já torrado pelas ranh
comando de colocação em funcionamento (6) e pressione o botão (11)
(Fig. 4). Acende-se o piloto de funcion
(11). A posição do comando (8) não tem influência no processo.
2 Decorridos
desligam-se.
Função descongelar
) Esta função permite-lhe descongelar e torrar pão comodament
único passo. Através desta função, aumenta-se em 30%
aproximadamente o tempo que dura o processo de torragem.
1 Regule a seu gosto o nível de torragem através do comando (8) e
introduza o pão nas ranhuras de entrada.
2 Deslize para baixo o comando de colocação em funcionamento (6)
carregue no botão de descongelação (10) (fig.
pilotos de descongelação (10) e de funcionamento (9).
3 O processo de descongelação e torragem realiza-se automaticamente
num único passo, embora, se o desejar, o possa
antecipadamente premindo o botão (
torradas são expulsas e os pilotos (9) e (10) desligam-se.
Função de aquecimento de pão
) Esta função permite aquecer pão na pa
o introduzir nas ranhuras.
1 Para utilizar o aquece pães faça girar o comando (7) para a esquerda
até que as varetas metálicas fiquem na sua posiçã
(Fig.6).
2 Coloque os pãozinhos sobre as varetas, regule o comando de
regulação de nível de torragem (8) e deslize para baixo o comando de
colocação em funcionamento (6).
(Fig.7).
3 Retire os pãozinhos das varetas quando o comand
funcionamento (6) volte a sua posição inicial. O piloto luminoso (9)
apagar-se-á.
4 Uma vez terminada a utilização do aquece pã
para a direita até que as varetas fiquem na sua posição inicial (Fig.8).
4 Limpeza e conservação
) Limpe o aparelho antes da primeira utilização, imediatamente após
cada utilização e após um longo período de tempo sem usar.
n Não introduza nenhum object
entrada de pão.
n Antes de limpar a torradeira, assegure
rede e completamente fria.
1 Limpe o exterior do aparelho com um pano húmido.
2 Retire a bandeja recolhe-migalhas puxando-
as migalhas, restos de pão, etc.
3 Coloque novamente a bandeja e assegure-se de que fica
correctamente colocada.
4 Para guardar o aparelho, recolha o cabo de alimentação enr
no suporte situado na base.
ITALIANO it
1 Indicazioni di sicurezza
• Leggere con attenzione le present
• Il presente manuale è parte integrante del p
sicuro per poterlo consultare in futuro.
• Tenere lontano dalla portata dei bam
• L'apparecchio non è adatto a essere utilizzato da
con menomazioni fisiche, sensoriali
dell'esperienza o delle conos
o istruite da un responsabile che
• Non modificare né riparare in alcun modo l'app
il cavo di alimentazione o con altri co
un servizio di assistenza aut
• Non utilizzare componenti o acces
• Prima di collegare l'apparecchio
riportata sulla targhetta corrisponda a que
• Scollegare l'apparecchio dalla rete
aggiungervi componenti e
Scollegarlo inoltre in caso di sp
prima di collegarlo e scollegarlo dalla
• Non tirare il cavo, né appendere l'apparecchio per il cav
l'apparecchio tirando la spina, mai il c
• Evitare che il cavo entri in contatto
• Non immergere mai il corpo princi
liquido, né lavarlo in lavastovig
• Collegare l'apparecchio a una presa di corrente
adeguata.
C
La temperatura dei vani di tostatura e delle griglie di riscaldamento
può raggiungere livelli molto alti durante il funzionament
dell'apparecchio. Anche la temperatura dei pannelli metallici del
corpo principale può essere elevata.
• Il pane potrebbe scottare. Pertanto il tostap
vicinanze di materiali combust
• Non lasciare il tostapane in funzione senz
tostapane a un timer esterno o a un telecoman
b
ATTENZIONE: non smaltire MAI l'apparecchio insieme ai rifiuti
domestici. Portarlo presso il CENTRO DI SMALTIMENTO o di
raccolta più vicino perché possa
questo modo si contribuirà alla tutela dell'ambiente.
2 Descrizione
Componenti principali
1 Corpo principale
2 Cavo di alimentazione
3 Vani di tostatura
4 Vassoio raccoglibriciole
5 Griglie di riscaldamento
Comandi
6 Comando di accensione
7 Comando griglie di riscaldamento
8 Comando di regolazione del livello di tostatura
9 Bottone con spia luminosa di funzionamento, arresto ed espul
automatica
10 Pulsante e spia
11 Pulsante e spia funzio
3 Utilizzo
) L'apparecchio è progettato per scongelare, tostar
) Togliere completamente tutti i compon
all'apparecchio utilizzati per il trasporto e l'imballaggio dello stesso.
n Non introdurre mai utensili nel tostapan
oggetti vengano a trovarsi sopra
il funzionamento.
n Non coprire il tostapane quando è in uso.
) Alloggiare bene il vassoio raccoglibriciole. Non utilizzare mai il
tostapane senza aver prima collocato correttamente il vassoio.
• Prima di utilizzare il to
pane per alcuni minuti. È normal
all'inizio.
1 Collegare la presa alla rete di alimentazione avendo cura di riporre il
cavo in eccesso nell'apposito raccoglitore in fondo all'apparecchio;
regolare a proprio piacimento il livello di t
(fig. 1). Il comando (8) consente di regolare la durata della tostat
2 Introdurre il pane nei vani di tostat
accensione (6) (Fig. 2). Si accende la spi
3 Il processo di tostatura si concluderà automaticamente; se lo si
desidera, tuttavia, sarà possibile bloccarlo anticipatamente preme
pulsante (9). Una volta completato il processo, il comando di
accensione (6) tornerà sulla posizione iniziale; la spia (9) si spegnerà e
le fette di pane tostato usciranno dai vani. 3).
) Se il pane rimane bloccato nel tostapane, scollegare l'appa
attendere che si raffreddi, quindi rimuovere il pane con le mani.
Funzione di riscaldamento
) Questa funzione è utile per scaldare di nuovo del pane
precedentemente tostato e raffreddatosi. Il livello di to
modificato.
1 Introdurre il pane già tostato nei vani di tostat
comando di accensione (6), quindi il pulsante (11)
accendono la spia di funzionamento (9) e q
La posizione del comando (8) non influisce i
2 Dopo qualche secondo le fette di pane vengono espu
spengono.
Funzione di scongelamento
) Questa funzione consente di scongelare e tostare il pane comodamente
e con un solo gesto. Se si utilizza questa funzione, la durata del
processo di tostatura aumenta di circa il 30%.
1 Regolare a proprio piacimento il livello di tostatura tramite
(8), quindi introdurre il pane
2 Abbassare quindi il comando di accensione (6) e premere il pulsante di
scongelamento (10) (fig. 5). Si accend
e di funzionamento (9).
3 Il processo di scongelamento e tostatura si concluderà
automaticamente e in un solo gesto; se lo si desidera, tuttavia
possibile bloccarlo anticipatamente premendo il pulsante (
completato il processo, le fette di pane tosta
dall'apparecchio e le spie (9) e (10) si spengono.
Funzione scaldapane
) Questa funzione consente di scaldare il pane sulla parte superio
tostapane senza introdurlo nei vani di tostatura.
1 Per utilizzare lo scaldapane faccia girare il comando (7) verso sinistra
finché le asticelle metalliche rimangano nella loro p
(Fig.6).
2 Collochi il pane sulle asticelle, regoli il comando di regolazione d
di tostatura (8) e muova verso il basso il comand
La spia luminosa (9) si accenderà (Fig.7).
3 Ritiri il pane delle asticelle quando il comand
ritorna alla sua posizione inizia
4 Una volta terminata l’utilizzazione dello scaldapane, giri il
yerso destra finché le asticelle rimangano nella loro
(Fig.8).
4 Pulizia e conservazione
) Pulire l'apparecchio prima del primo utilizzo, dopo ogni utilizzo e dopo
che è trascorso un lungo periodo senza averlo utilizzato.
n Non introdurre oggetti,
n Prima di pulire il tostapane, assicurarsi che sia stato scollegato dalla
rete elettrica e sia completamente
1 Pulire la parte esterna dell'apparecchi
2 Estrarre il vassoio di raccolta delle briciole tirandolo verso l'esterno (fig.
9) e rimuovere briciole, residui di pane e così via.
3 Riposizionare il vassoio correttamente.
4 Prima di conservare l'apparecchio, avvolgere il cavo di alimentazione
sull'apposito supporto presente alla base dello stesso.
NEDERLANDS nl
1 Veiligheidsinstructies
• Lees deze gebruiksaanwijzingen helemaal
gebruik te nemen.
• Deze gebruiksaanwijzing is onderde
gebruiksaanwijzing op een veilige plek
slaan.
• Laat kinderen niet met dit apparaat spelen.
• Dit apparaat is niet geschikt om ge
kinderen) met een lichamelijke, zintui
personen zonder de nodige ervaring of ke
veiligheid verantwoordelijk is
gebruik van dit apparaat.
• Voer geen enkele wijziging of repara
van het netsnoer of een ander deel van het apparaat,
naar een erkende technische serviced
• Gebruik geen onderdelen of hulpstuk
aanbevolen zijn.
• Kijk, alvorens het apparaat op
voltage overeenkomt met de netsp
• Trek altijd na gebruik de stekker uit
verwijdert of aan
apparaat verricht. Trek de stekker er ook bij stroom
of uit het stopcontact doet, dient het a
• Trek nooit aan het snoer of laat het apparaat nooit aan h
de stekker uit het stopcontact door aan de ste
trekken.
• Zorg ervoor dat het netsnoer niet in co
oppervlakken.
• Dompel de romp van het apparaat noo
onder; stop deze evenmin in de
• Het apparaat dient aangesloten te worden
aardleiding.
C
In de broodsleuven en rond de verhittingsdraden kan het heet zijn
wanneer het apparaat in werking is. De metalen panelen van de
romp kunnen ook heet zijn.
• Brood kan vlam vatten. Daarom mag de b
brandbare materialen, zoals bijv.
• Laat de broodrooster niet zonder
niet wanneer hij aangesloten is op een externe timer of op een aparte
afstandsbediening.
b
LET OP! Deponeer als u
vuilnisbak, maar wend u tot
ophaaldienst in uw woonpl
draagt u bij aan het b
2 Beschri
Belangrijkste onderdelen
1R
2 Netsnoer
3 Broodsleuven
4 Kruimellade
5 Verhittingsdraden
Knoppen
6 AAN-UIT-schakelaar
7 Knop verhittingsdraden
8 Bruiningsregelaar
9 Stop- en uitwerptoets met
10 Knop en lampje voor ontdooifunctie
11 Knop en lampje voor opwarmfunctie
3G
) Dit apparaat is ontworpen om brood te ontdooien, t
warmen.
) Verwijder alle transport- en verpakkingselementen binnen en buiten
apparaat in hun geheel.
n Steek nooit vreemd
gebruik van de broodrooster op, da
voorwerp zich in de broodsleuven
n Dek de broodrooster tijden
) Breng de kruimellade goed aan. Gebruik de broo
kruimellade er niet goed ingescho
• Zet de broodrooster
zonder brood. De aanvan
1 Steek de st
voorop het apparaat voor het overtoll
bruiningsgraad met knop (8) in (Afb. 1). Met be
roostertijd ingesteld worden.
2 Steek de sneetjes brood in de b
hendel (6) omlaag (afb. 2).
3 De broodrooster stopt automatisch, ma
voortijdig met knop (9) afbreken. Zodra het roosteren is voltooid, keer
de Aan-/Uit-hendel (6) terug in zijn uitgangspositie, het contr
(9) dooft en de sneetjes brood verschijnen in het bovenste gede
de broodsleuven (afb. 3).
) Blijft een sneetje brood in de broodroo
uit het stopcontact en wacht tot het appara
met de hand te verwijderen.
Opwarmfunctie
) Deze functie is handig om al gerooste
deze na lange tijd helemaal afgekoeld is. De bruin
onveranderd.
1 Steek de toasts in de broodsleuven (3) en schuif de Aan-/Uit-hendel (6)
omlaag en druk op knop (11) (afb. 4). De controlelampjes In werking (9)
en Opwarmen (11) gaan branden. De stand van de knop (8) is niet van
invloed op het proces.
2 Na enkele seconden worden springen de toasts
controlelampjes.
Ontdooifunctie
) Met deze functie kunt u brood in een en dezelfde stap handig ontdooien
en roosteren. Met behulp van deze
30 % verlengd.
1 Stel de bruiningsgraad naar uw voorkeur met behulp van de knop (8) in
en steek het brood in de sleuven.
2 Schuif de Aan-/Uit-hendel (6) omlaag en druk op de ontdooiknop (10) (afb.
5). De controlelampjes Ondooien (10)
3 Het ontdooien en roosteren stopt automatisch i
kunt het ook voortijdig met knop
proces, springen de toasts omhoog en dove
Broodopwarmfunctie
) Met deze functie kunt u brood boven op de broodrooster opwarmen
zonder het in de sleuven te steken.
1 Voor het roosteren van broodjes schakel
metalen stangen hun hoogste stand hebben bereikt (Fig. 6).
2 Broodjes op de stangen plaatsen, bruiningsregelaar (8) zoajs gewenst
instellen en de schakelhendel (6) naar beneden
gaat branden (Fig. 7).
3 Zodra de schakelhendel (6) in de ui
kunnen de broodjes van de stangen worden genomen. Het
controlelampje (9) dooft.
4 Na het gebruik, de broodjesopzetregelaar (7) opnieuw naar rechts
draaien, tot de stangen opnieuw in hun uitgangsposi
4 Reiniging en onderhoud
) Reinig het apparaat voordat u het voor het eer
onmiddellijk na elk gebruik en na een lange peri
geweest.
n Steek geen enkel vo
n Alvorens de broodro
de stekker uit het stopconta
afgekoeld is.
1 Reinig de buitenkant van het apparaat met een vochtige doek.
2 Verwijder de kruimellade door hem naar buiten t
verwijder, kruimels, broodresten, e.d.
3 Schuif de kruimellade er weer in en controleer of deze helemaal goed
geplaatst is.
4 Om het apparaat te bewaren, rol het netsnoer op de de
houder aan de onderkant op
DESPLEGABLE_TC5310.fm Page 1 Monday, June 15, 2009 11:17 A