1. MEMORISING TRANSMITTERS
1.1. Memorising T
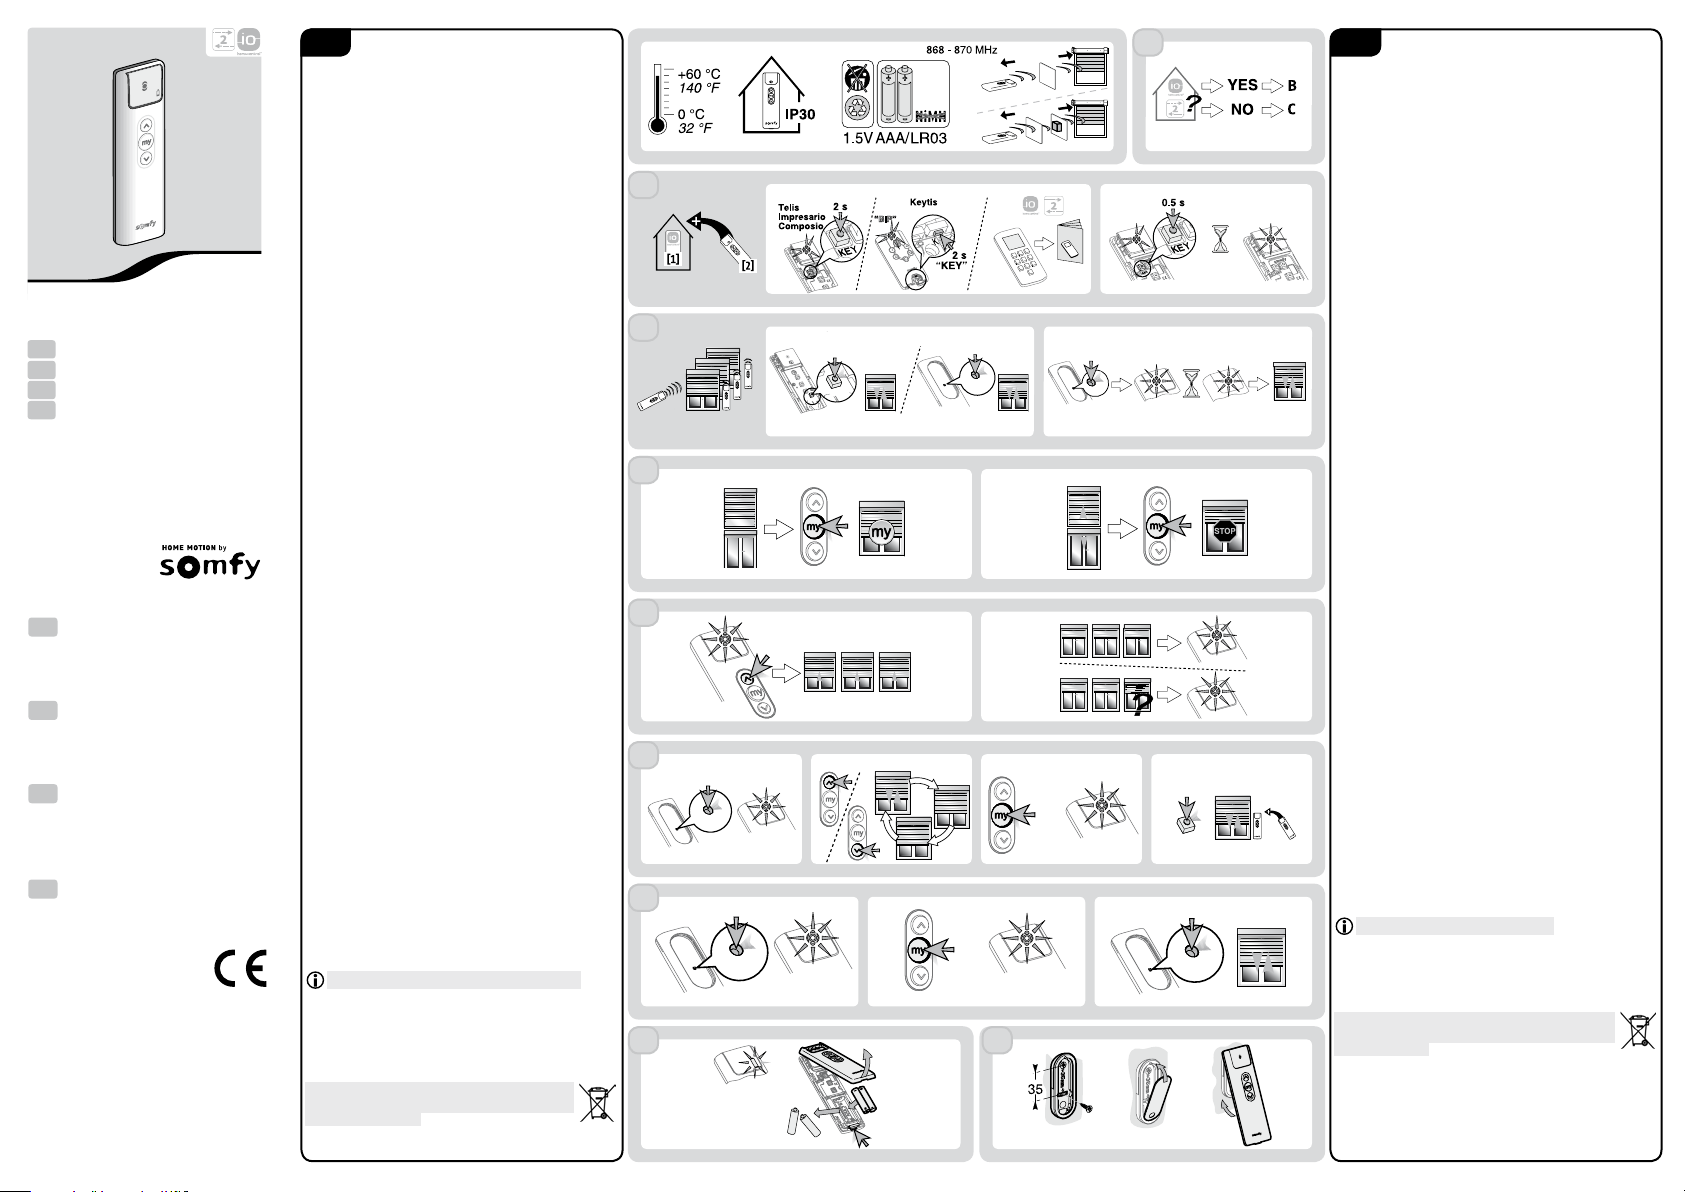
►Figure A
Is an io-homecontrol remote control transmitter already a
part of the installation?
YES ’go to step: B Memorising the System Key
NO ’go to step: C Programming the T
1.2. Memorising The System Key
►Figure B
1) Place existing transmitter 1 in key transfer mode
-From the Keytis, T
transmitter: press the “KEY” button for two seconds.
-Using other transmitters: refer to the instructions.
2) Briey press the “KEY” button on the
transmitter
1.3. Programming The T
►Figure C
1) Press the “PROG” button on the Situo transmitter for two
seconds: the shutter will move briey
2) Briey press the “PROG” button on the
transmitter and the T
a few seconds to one minute approximately
on the number of products): programming in progress.
-When the indicator lights green and stays on and a brief
shutter motion is observed: programming complete.
-Indicator light blinks orange: programming has failed,
repeat the procedure.
2. USING THE TRANSMITTERS
2.1. Using “My” Favourite Position
►Figure D
1) When all the shutters are stopped, briey pressing
the “my” button moves the shutters to your favourite
position.
2) When one of the shutters is moving, briey pressing the
“my” button stops the shutter
2.2. Information Feedback
►Figure E
1) While the shutters are moving:
-Indicator light blinks green: order in progress
-Indicator light lit green: order correctly executed
-Indicator light blinks orange: problem, one of the
shutters has not reached the requested position
(obstacle, situo in manual mode, etc).
2.3. Replacing a faulty Situo transmitter
►Figure F
1) Press the “PROG” button on the T
seconds until the indicator light lights when the button is
released; the shutters will move briey
2) Select the required shutter using the up or down buttons
on the T
shutter 1, 2... all shutters, shutter 1...). The selected
shutter will move briey
3) Conrm the selection by pressing the “my” button on
T
4) Briey press the “PROG” button on the new transmitter:
a brief shutter movement occurs, the transmitter is
memorised.
2.4. Clearing the programming
►Figure G
1) Press the “PROG” button on the T
two seconds until the indicator light lights.
2) Press the “my” for two seconds until the indicator light
lights.
3) Briey press the “PROG” button on the
transmitter: a brief shutter movement will occur
2.5. Replacing The Battery
►Figure H
If the “low battery” indicator light lights when the transmitter
buttons are pressed, the battery requires replacing.
Replacing the battery does not mean that the system has to
be reprogrammed.
Please separate the storage cells and batteries
from other types of waste and recycle them via your
local collection facility
2.6. Mounting The T
►Figure I
ÍR/.È4B$Î
T
EN
ES
PT
EL
www.somfy
Ref.5015143B
EN
Somfy hereby declares that this product
conforms to the essential requirements and
other relevant provisions of Directive 1999/5/CE.
declaration of conformity is available at www
com/ce. Images are not contractually binding.
ES
Por la presente, Somfy declara que el
producto cumple con los requisitos básicos y
demás disposiciones de la directiva 1999/5/CE.
Podrá encontrar una declaración de conformidad en
la página web www
PT
Pelo presente documento, a Somfy declara
que o aparelho está conforme às exigências
fundamentais e às outras disposições pertinentes da
directiva 1999/5/CE. Uma Declaração de
Conformidade encontra-se disponível na Internet,
em www
EL
Με
συσκευή συμμορφώνεται με τις ουσιώδεις
απαιτήσεις και τις λοιπές σχετικές διατάξεις της
οδηγίας 1999/5/ΕΕ. Μια δήλωση συμμόρφωσης
διατίθεται στην
SOMFY SAS, capital 20.000.000 Euros,
RCS
201
EN 1. MEM
1.1. Memorizar el T
►Figura A
¿Existe ya un mando a distancia io-homecontrol en la
instalación?
SÍ ’pasar a la etapa: Memorizar la clave del sistema B.
NO ’pasar a la etapa: Programar mando a distancia C.
1.2. Memorizar la clave del sistema
►Figura B
1) Colocar el mando a distancia existente nº 1 en el modo
transferencia de clave
-En el caso de mandos a distancia Keytis, T
Impresario, Composio: pulsar (2 s) el botón “KEY”.
-Otros mandos a distancia: consultar el manual.
2) Pulsar brevemente el botón “KEY” de T
1.3. Programar T
►Figura C
1) Pulsar (2 s) el botón “PROG” del Situo: movimiento breve
de la persiana.
2) Pulsar brevemente el botón “PROG” de T
de T
aproximadamente, dependiendo del número de productos):
programación en marcha.
-El testigo permanece iluminado de color verde y la persiana
se mueve brevemente: programación efectuada.
-El testigo parpadea de color naranja: fallo en la
programación, repetir el procedimiento.
2.1. Utilizar “My” posición favorita
►Figura D
1) Si todas las persianas están paradas, con una pulsación corta en
el botón “my” las persianas se sitúan en la posición favorita;
2) Si una de las persianas está en movimiento, con una pulsación
corta sobre el botón “my” la persiana se detiene.
2.2. Señalización de operaciones
►Figura E
1) Durante el movimiento de las persianas:
-T
-T
-T
no ha alcanzado la posición deseada (obstáculo, Situo en
modo manual...).
2.3. Sustituir un Situo defectuoso
►Figura F
1) Pulsar el botón “PROG” de T
encienda (2 s), al soltar el botón; las persianas se moverán
brevemente.
2) Seleccionar la persiana deseada con las teclas de subida o
de bajada de T
las persianas; a continuación, persiana 1, persiana 2... todas
las persianas, persiana 1...), la persiana seleccionada hará
un movimiento breve.
3) Conrmar la
hasta que se encienda el testigo (2 s).
4) Pulsar brevemente el botón “PROG” del nuevo emisor:
la persiana se moverá ligeramente y el emisor quedará
memorizado.
2.4. Borrar la programación
►Figura G
1) Pulsar el botón “PROG” del emisor T
encienda el testigo (2 s).
2) Pulsar “my” hasta que se encienda el testigo (2 s).
3) Pulsar brevemente el botón “PROG” del emisor T
movimiento breve de las persianas.
Este procedimiento no cambia la clave.
2.5. Cambiar la pila
►Figura H
Si se enciende el testigo “pila débil” al pulsar las teclas del
emisor
programar de nuevo.
Separe las pilas y las baterías de almacenamiento del
resto de residuos y recíclelas a través de un centro
ocial de
2.6. Fijar el emisor
►Figura I
ES
P
SOME COUNTRIES (e.g. : US)
A
Repeater
15 m
30 m
D1 2
F1 2 3 4
PROG
PROG
2 s
Telis 1 io
PR OG
2 s
PR OG
2 s
PROG
0.5 s
Situo io
Telis 1 io
PR OG
2 s
PR OG
2 s
PROG
0.5 s
Situo io
E1
G1 2 3
PROG
2 s
PROG
2 s
Telis 1 io
P R O G
0.5 s
PR O G
2 s
Telis 1 io
P R O G
2 s
PR OG
2 s
Telis 1 io
PROG
PROG
C2
PROG
2 s
PROG
2 s
PROG
PROG
Situo io mobile
0.5 s
P R O G
Situo io
2 s
Situo io A/M
P R O G
PROG
2 s
P R O G
PR OG
Situo io mobile
0.5 s
P R O G
Telis 1 io
PROG
Situo io Telis 1 io
2 s
Situo io A/M
PROG
PROG
2 s
P R O G
PR OG
Situo io mobile
0.5 s
PROG
1
B2
H I