2-586-553-12 (1)
© 2005 Sony Corporation Pr
Printed on 100% recycled paper using V
(V
oil based ink.
continued on the reverse
Digital Still Camera
Operating Instructions
Before oper
volume) th
Refer to “User’
(separate v
Explains a
your camera.
Read This Firs
Read This Firs
DSC-W5/W7/W15/W17
http://www
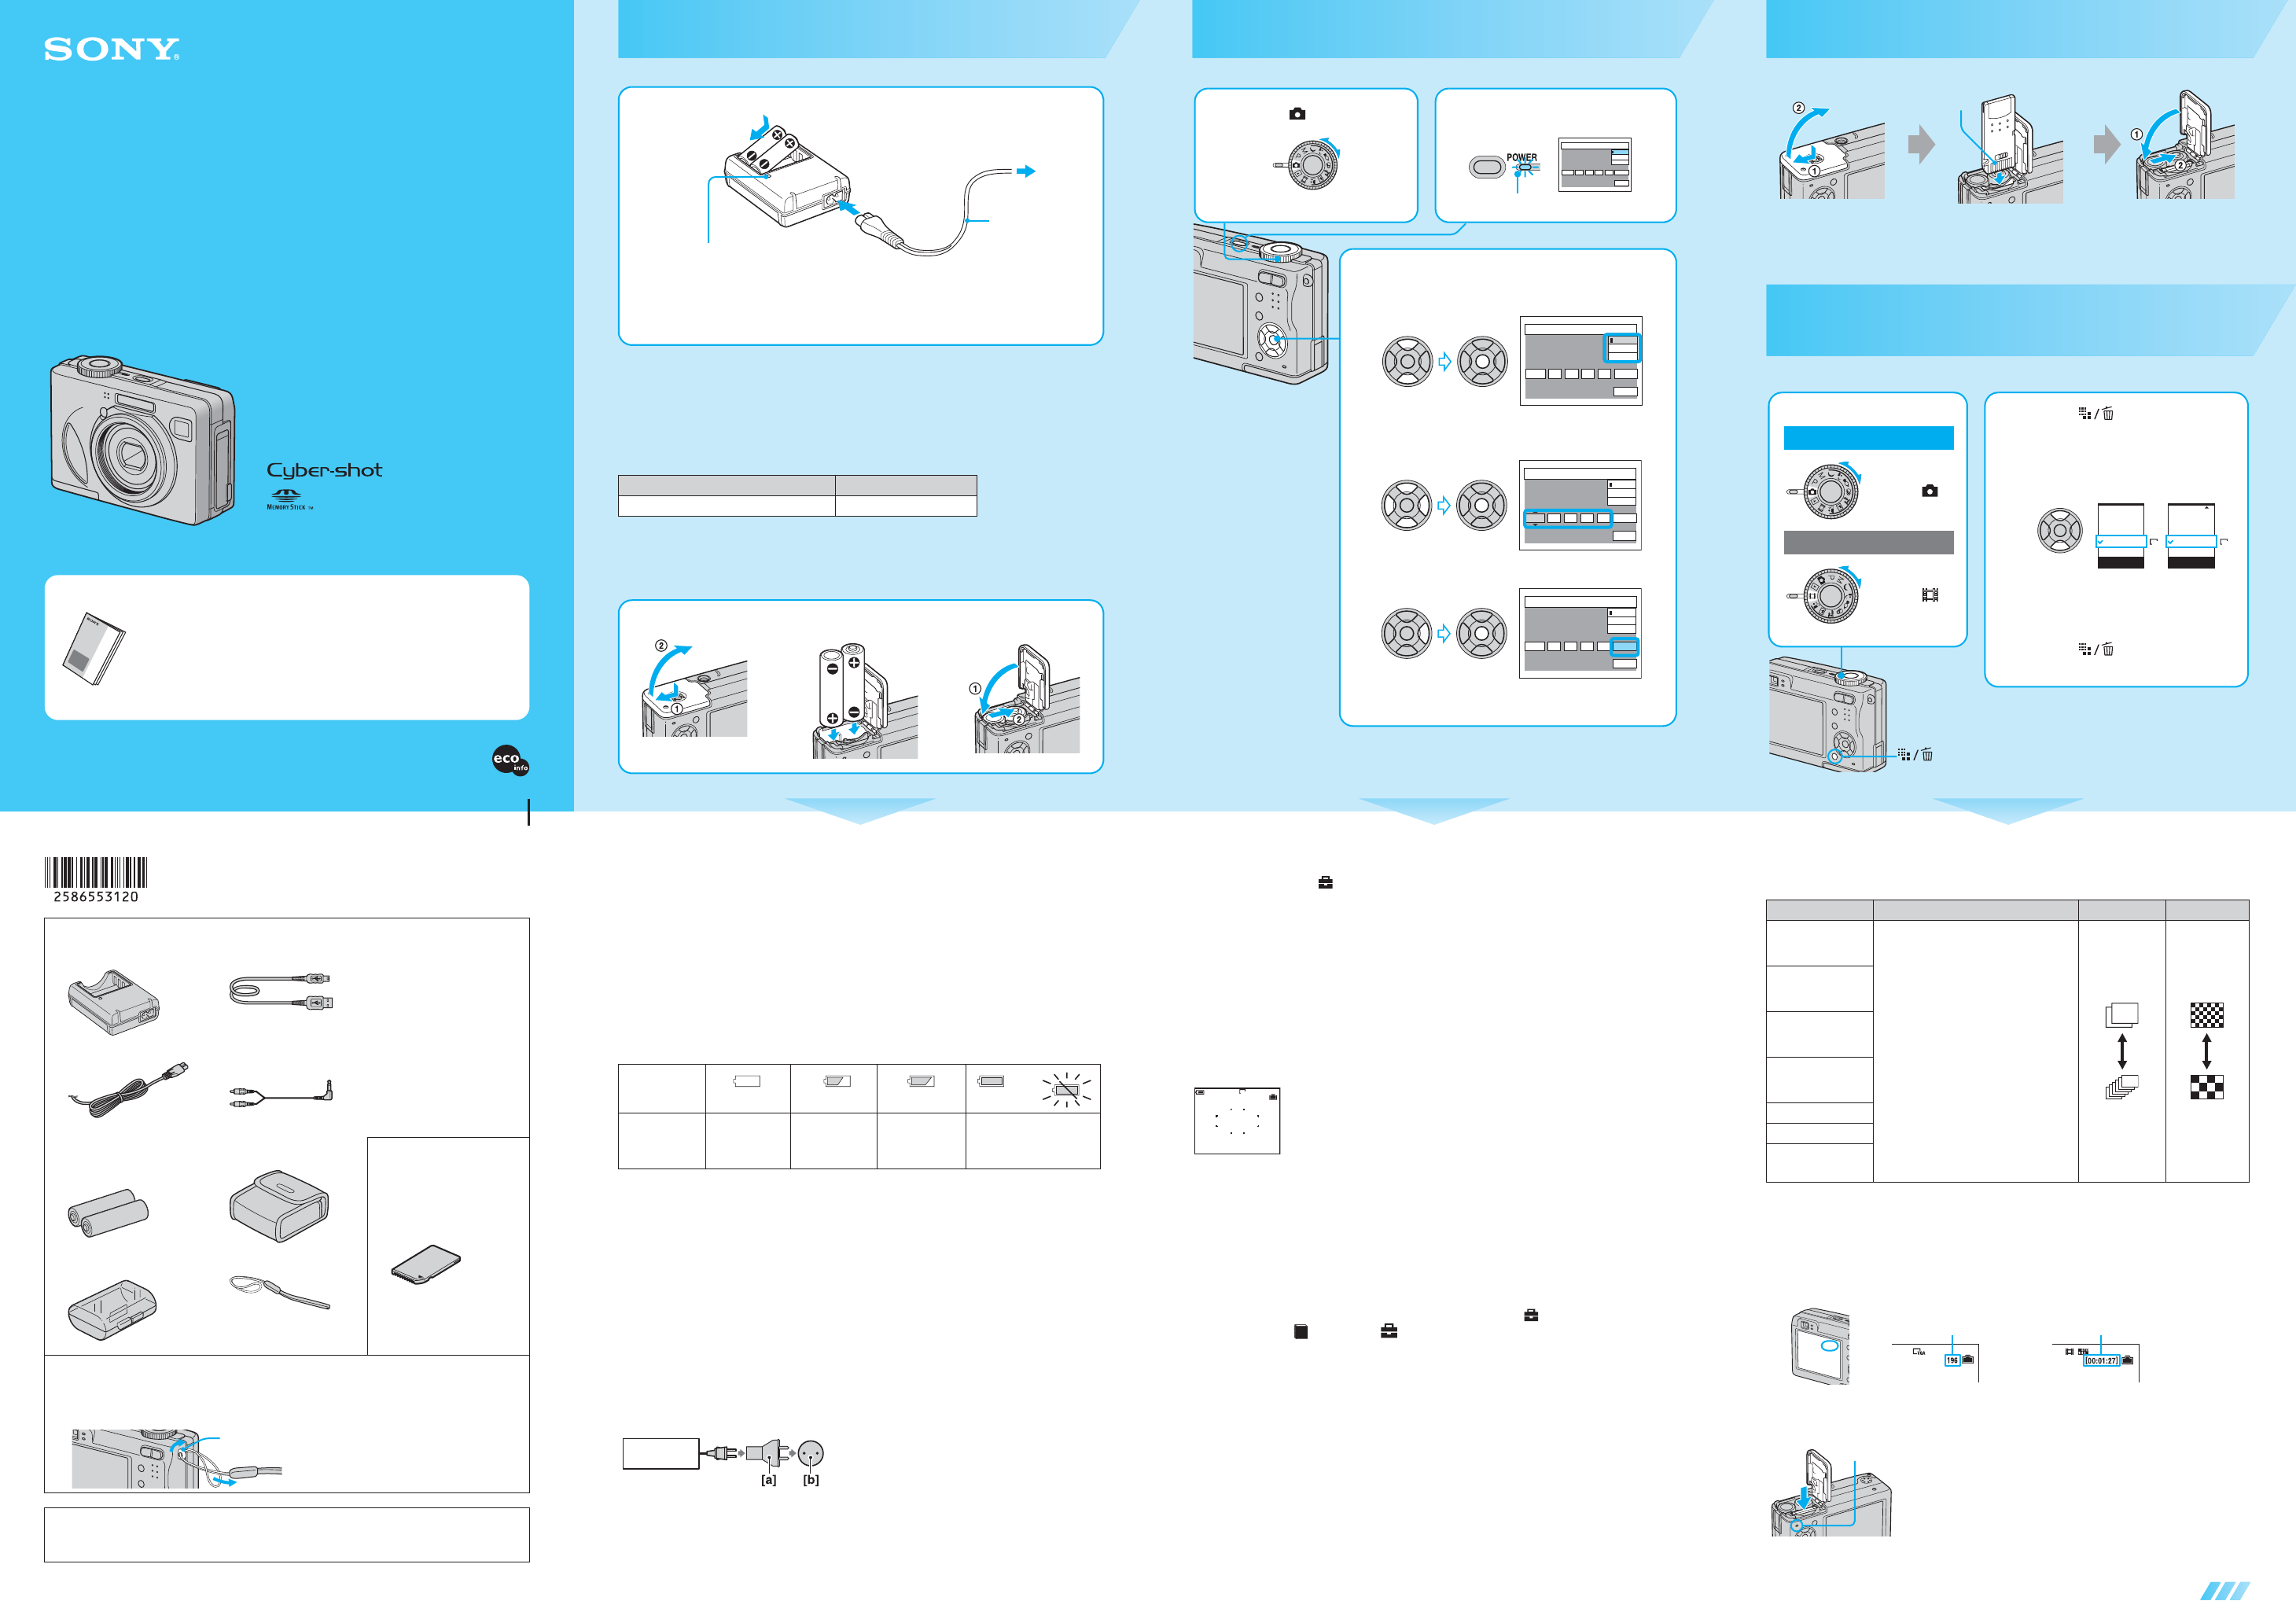
Checking the
• Ni-MH battery charger BC-
CS2A/CS2
• USB cable (1) • CD-ROM (Cyber
application software) (1)
• Operating instructions
digital still cam
This First” (this manual) (1)
• Operating instructi
“User’
Troubleshooting” (1)
• Power cord (mains lead) (1) • A/V cable (1)
• HR6 (size AA) Nickel-Metal
Hydride batteries (DSC-W5/
W7 (2), DSC-W15/W17(4))
• Soft carrying case (1) (DSC-
W15/W17 only)
A “Memory Stick” is not
supplied.
The camera has the o
internal memory (32 MB),
howe
“Memory Stick” is
recommended.
• Battery case (DSC-W
(1), DSC-W15/W17(2))
• Wrist strap (1)
Notes before use
• Charge the suppli
• The camera is a precision instru
apply force to it. Att
Additional information on this product and and questions can be
found at our Customer
Hook
Prepare the batter
• Connect the battery charger to an easily acce
• Even if the CHARGE lamp is not lit, the battery charger is not disconnected from the A
source (mains) as long as it
while using the battery char
the wall outlet (wall socket).
• When charging is finished, disconnect the power cord (mains lead) from the wall outlet (wall
socket), and remove the Nickel-Metal Hydride batteries from the battery charger
• Time required to charge fully depleted Nickel-Metal Hydride batteries at a temperature of 25°C
(77°F). Charging may take longer under certain circumstances
• The CHARGE lamp may remain
Nickel-Metal Hydride battery Charging time
NH-AA-D× 2 (supplied) Approx. 6 hours
1
Battery charger
2 Connect the power code
(mains lead).
3 T
(wall socket)
P
(mains lead)
1 Insert the batteries.
Charging indicator
Light on: Charging
Light off: Completed (Remove
batteries.)
Match 3 /# and
insert.
Using batteries other than the supplied ones
Y
batteries/ZR6 (size AA) Oxy Nickel Prt “User’
(page 91
Using the AC Adaptor
Yt “User’
TRefer to the operating instructions supplied with the A
T
Press PO
T
Hold the camera with the batt
the batteries. Be careful not to
T
Y
country or re
commercially av
outlet (wall socket) [b].
Battery
remaining
indicator
Battery
remaining
guidelines
Sufficient
pow
remaining
Battery half Battery low
recording/
playback will
stop soon.
Change the bat
fully charged ones, or
charge the batteries. (The
warning indicator flashes.)
• The displayed time remaining m
• When using alkaline batteries/Oxy Nickel Primary Battery
the corre
• When the AC Adaptor (not supplied) is used, the battery remaini
• Do not use an electronic transformer (t
this may cau
BC-CS2A/
CS2B
T
1 Select . 2 Press PO
2005
/:
/
1 1
12 00
AM
OK
Cancel
Clock Set
D/M/Y
M/D/Y
Y/M/D
Lighting
3 Set the c
1 Select the date display format with v /V, then press z .
2 Select each item with b /B and set the nume
v/ V, then press z.
3 Select [OK] with B , then press z .
• Tz.
2005
/:
/
1 1
12 00
AM
OK
Cancel
Clock Set
D/M/Y
M/D/Y
Y/M/D
2005
/:
/
1 1
12 00
AM
OK
Cancel
Clock Set
D/M/Y
M/D/Y
Y/M/D
2005
/:
/
1 1
10 30
AM
OK
Cancel
Clock Set
D/M/Y
M/D/Y
Y/M/D
T
Select [Clock Set] in the (Setup) screen and perform the pr3 above.
t “User’s Guide/T
On the clock display
• If you sel3-1, set the time on a 24-hour cycle.
• Midnight is i
When turning on the power
• Unless you set the clock, the Clock Set screen appears each time the camera is turned on.
• Do not touch the lens
with the lens portion extended
• The following screen appears when the c
T
Press PO
• If the camera is running on battery power and you do not operat
turns off automatically to prevent wearing down the battery (Auto power-of
Changing the language setting
Y
language setting, press MENU to display (Setup) with the control
button, then, select [ Language] in (Setup1), and select the desired language. t “User’s
Guide/T
VGA
96
S AF
A
1
Insert a “Memor
Select the image size for use
Insert the “Memory Stick” al
When there is no “Memory Stick” inserted
The camera records/plays back images using the internal memory (32 MB). t “User’
T
T
2 Press
3 Select the size with v /V.
• The screen above is for sti
For movies, select [640(Fine)] (“Memory Stick
PR
4 Press (Image Size) to
complete the setting.
VGA(E-Mail)
1M
3M
3:2
5M
1M
Image Size
VGA(E-Mail)
1M
3M
3:2
5M
1M
Image Size
DSC-W5/
W15
DSC-W7/
W17
1 Select a mode.
Still image:
Select .
Movie:
Select .
button
On still image sizes
For details on the image size t “User’s Guide/T
*
On recordable nu
Recordable number of still images and recordable
size selected.
For details on recordable number or time t “User’
• Number of recordable images
T
When the access lamp is lit
Nev
Image size Guidelines No. of images Printing
7M (3072×2304)
(the default setting of
DSC-W7/W17)
For printing high density im
A4 size
Less
More
Fine
Rough
3:2 (3072×2048)
(DSC-W7/W17
only)*
5M (2592×1944)
(the default setting of
DSC-W5/W15)
For printing high density im
A5 size
3:2 (2592×1728)
(DSC-W5/W15
only)*
3M (2048×1536)
1M (1280×960) For printing in postcard size
For recording a larger number of images
For attaching im
home pa
VGA(E-Mail)
(640×480)
Still i Movies
Maximum recordab Maximum recordab
Open the cover
Access lamp
4 Insert the charged batteries.
Bottom
While pressing OPEN, open the
cov
Match 3 /# and
inser
(X:100.0%, Y:100.0%) Created with Grafikhuset CMYK PDF Creator for SOHC2 at Sony Human Capital.