PT, RO, SI, SK, FI, SE, UK, IS, LI, NO, CH, AL, BA, MK, MD,
RS, ME, XK, TR:
5150 - 5350 MHz band is restricted to indoor
operations only.
This radio equipment is intended to be used with the
approved version(s) of software that are indicated in
the EU Declaration of Conformity. The software
loaded on this radio equipment is verified to comply
with the essential requirements of the Directive
2014/53/EU.
The software version can be found via: Refer to
[System Information] under [Setup] - [Advanced
Settings] - [System Settings].
Disposal of old electrical &
electronic equipment
(applicable in the European
Union and other countries
with separate collection
systems)
This symbol on the product or on its packaging
indicates that this product shall not be treated as
household waste. Instead it shall be handed over to
the appropriate collection point for the recycling of
electrical and electronic equipment. By ensuring that
this product is disposed of correctly, you will help to
prevent potential negative consequences for the
environment and human health, which could be
caused by inappropriate waste handling of this
product. The recycling of materials will help to
conserve natural resources. For more detailed
information about recycling of this product, please
contact your local Civic Office, your household waste
disposal service or the shop where you purchased
the product.
For the customers in Australia or New
Zealand
It should be installed and operated with at least
20cm and more between the radiator and person’s
body (excluding extremities: hands, wrists, feet and
ankles).
For the customers in Australia and India
Disposal of old electrical &
electronic equipment
(applicable in the European
Union and other countries
with separate collection
systems)
What You Can Do with the Rear Speakers
The following are available when the
rear speakers are used with the Sound
Bar (HT-Z9F/HT-ZF9) (not supplied).
•You can enjoy the surround sound
that makes you feel as if you were
actually listening to a live
performance.
•You can update the software of the
rear speakers. For details, refer to the
Operating Instructions supplied with
the Sound Bar (HT-Z9F/HT-ZF9).
Note
•The rear speakers are designed
exclusively for use with the Sound Bar
(HT-Z9F/HT-ZF9) and cannot be used
with other devices.
•Install the rear speakers vertically.
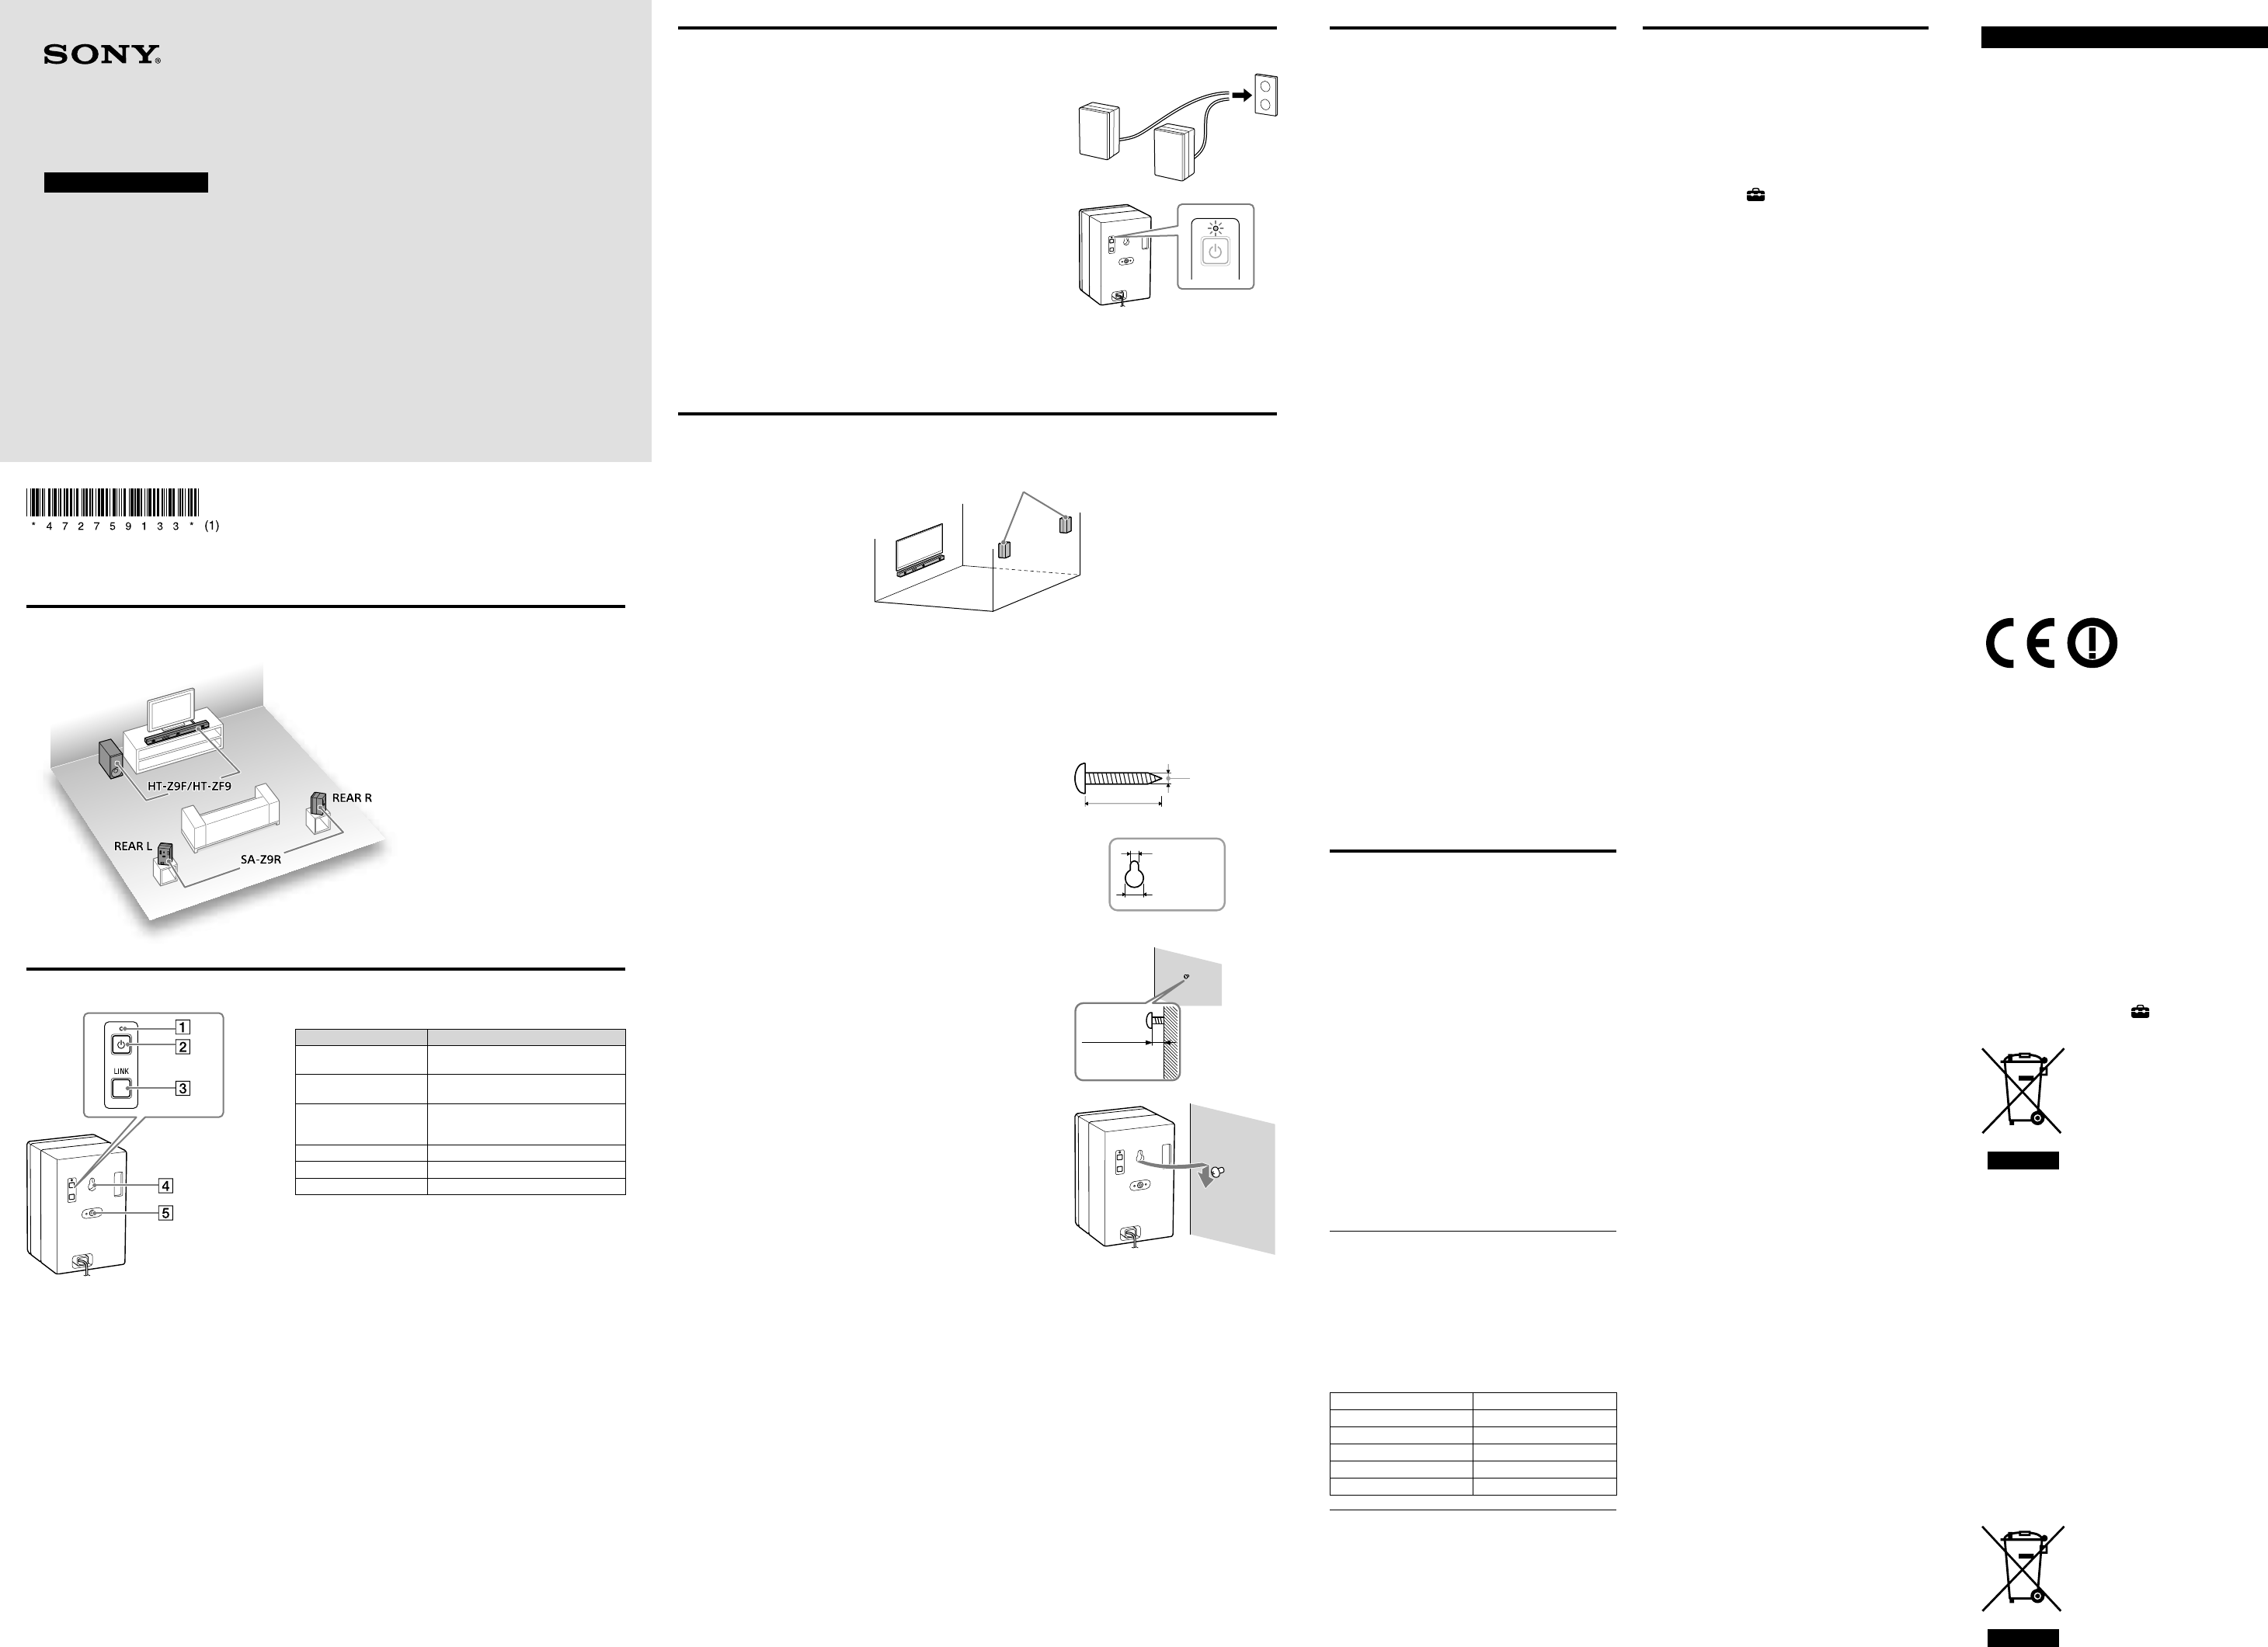
Parts and Controls
Power indicator
Indicator status (color)Rear speaker status
Flashes slowly (green)The rear speaker is not connected to the
Sound Bar (HT-Z9F/HT-ZF9).
Lights up (green)The rear speaker is connected to the
Sound Bar (HT-Z9F/HT-ZF9).
Flashes twice repeatedly
(green)
The rear speaker is attempting to
connect to the Sound Bar (HT-Z9F/
HT-ZF9).
Flashes/lights up (orange)The software is updating.
Lights up (red)The rear speaker is in standby mode.
Turns offThe rear speaker is turned off.
Power indicator
(power) button
LINK button
Wall mount hole
Mounting hole for the general speaker stand
Connection
1 Connect the AC power cord (mains lead).
The rear speaker is turned on and connected to the Sound Bar
(HT-Z9F/HT-ZF9) wirelessly.
2 Make sure that the power indicator on the rear speaker lights in
green.
When the power indicator lights in green, the connection of the rear
speaker and the Sound Bar (HT-Z9F/HT-ZF9) is established.
If the connection is not established, connect the rear speaker to the
Sound Bar (HT-Z9F/HT-ZF9) manually. For details, refer to the
Operating Instructions supplied with the Sound Bar (HT-Z9F/HT-ZF9).
3 Install the rear speaker by considering the right/left of the rear speaker.
Check the label on the rear of the rear speaker. “REAR R” is for the right, “REAR L” is for the left.
Mounting the Rear Speaker on a Wall
You can mount the rear speakers on a wall.
Rear speakers
Note
•Prepare screws (not supplied) that are suitable for the wall material and strength. As a plasterboard wall is
especially fragile, attach the screws securely in the wall beam. Install the speakers horizontally, hung by
screws in studs in a continuous flat section of the wall.
•Have the installation done by a Sony dealer or licensed contractor and pay special attention to safety during
the installation.
•Sony shall not be held responsible for accidents or damage caused by improper installation, insufficient wall
strength, improper screw installation or natural disaster, etc.
1 Prepare a screw (not supplied) that is suitable for the wall mount
hole on the rear of the rear speaker.
4 mm
More than 30 mm
Hole on the rear of the rear speaker
5.0 mm
10 mm
2 Fasten the screw in the wall.
Approx.
9.5 mm
3 Hang the rear speaker by confirming the right/left of the rear
speaker.
Check the label on the rear of the rear speaker. “REAR R” is for the
right, “REAR L” is for the left.
Brauchen Sie Hilfe? Stellen Sie Ihre Frage.
Missbrauch melden von Frage und/oder Antwort
Libble nimmt den Missbrauch seiner Dienste sehr ernst. Wir setzen uns dafür ein, derartige Missbrauchsfälle gemäß den Gesetzen Ihres Heimatlandes zu behandeln. Wenn Sie eine Meldung übermitteln, überprüfen wir Ihre Informationen und ergreifen entsprechende Maßnahmen. Wir melden uns nur dann wieder bei Ihnen, wenn wir weitere Einzelheiten wissen müssen oder weitere Informationen für Sie haben.
Art des Missbrauchs:
Forenregeln
Um zu sinnvolle Fragen zu kommen halten Sie sich bitte an folgende Spielregeln:
Lesen Sie zuerst die Anleitung;
Schauen Sie nach, ob die Frage bereits gestellt wurde;
Stellen Sie die Frage so deutlich wie nur einigermaßen möglich;
Erwähnen Sie was Sie bereits versucht haben um das Problem zu lösen;
Ist Ihr Problem von einem Besucher gelöst dann lassen Sie ihn / sie wissen in diesem Forum;
Falls Sie reagieren möchten, so verwenden Sie bitte das Antworten- Formular;
Da ihre Frage für alle Besucher sichtbar ist, sollten Sie lieber keine persönliche Daten erwähnen.
Neu registrieren
Registrieren auf E - Mails für Sony SA-Z9R wenn:
neue Frage gestellt werden
neue Handbücher vorhanden sind
Sie erhalten eine E-Mail, um sich für eine oder beide Optionen anzumelden.
Das Handbuch wird per E-Mail gesendet. Überprüfen Sie ihre E-Mail.
Wenn Sie innerhalb von 15 Minuten keine E-Mail mit dem Handbuch erhalten haben, kann es sein, dass Sie eine falsche E-Mail-Adresse eingegeben haben oder dass Ihr ISP eine maximale Größe eingestellt hat, um E-Mails zu erhalten, die kleiner als die Größe des Handbuchs sind.
Ihre Frage wurde zu diesem Forum hinzugefügt
Möchten Sie eine E-Mail erhalten, wenn neue Antworten und Fragen veröffentlicht werden? Geben Sie bitte Ihre Email-Adresse ein.