A side
Face A
Seite A
Lado A
Uiteinde A
Lato A
Lado A
E
1
Upper side
Haut
Oben
Lado superior
Bovenste
opening
Lato superiore
Parte superior
Lower side
Bas
Unten
Lado inferior
Onderste
opening
Lato interiore
Parte inferior
V
Bande V
Klettband
Cinta velcro
Klittenband
Nastro V
Fita velcro
2
Upper side
Haut
Oben
Lado superior
Bovenkant
Lato superiore
Parte superior
Lower side
Bas
Unten
Lado inferior
Onderkant
Lato inferiore
Parte inferior
2
D
1
A side
Face A
Seite A
Lado A
Uiteinde A
Lato A
Lado A
Pull
Tirer
Ziehen
Tire
T
Tirare
Puxe
1
A side
Face A
Seite A
Lado A
Uiteinde A
Lato A
Lado A
B side
Face B
Seite B
Lado B
Uiteinde B
Lato B
Lado B
3
4
12
B side
Face B
Seite B
Lado B
Uiteinde B
Lato B
Lado B
A side
Face A
Seite A
Lado A
Uiteinde A
Lato A
Lado A
Lower side
Bas
Untere Seite
Lado inferior
Onderkant
Lato inferiore
Parte inferior
Upper side
Haut
Obere Seite
Lado superior
Bovenkant
Lato superiore
Parte superior
Pull
Tirer
Ziehen
Tire
T
Tirare
Puxe
Upper side
Haut
Oben
Lado superior
Bovenkant
Lato superiore
Parte superior
Lower side
Bas
Unten
Lado inferior
Onderkant
Lato
inferiore
Parte inferior
F
G
H
1
Lower side
Bas
Unten
Lado inferior
Onderkant
Lato inferiore
Parte inferior
2
B side
Face B
Seite B
Lado B
Uiteinde B
Lato B
Lado B
3
A side
Face A
Seite A
Lado A
Uiteinde A
Lato A
Lado A
B side
Face B
Seite B
Lado B
Uiteinde B
Lato B
Lado B
I
1
2
Upper side
Haut
Oben
Lado superior
Bovenkant
Lato superiore
Parte superior
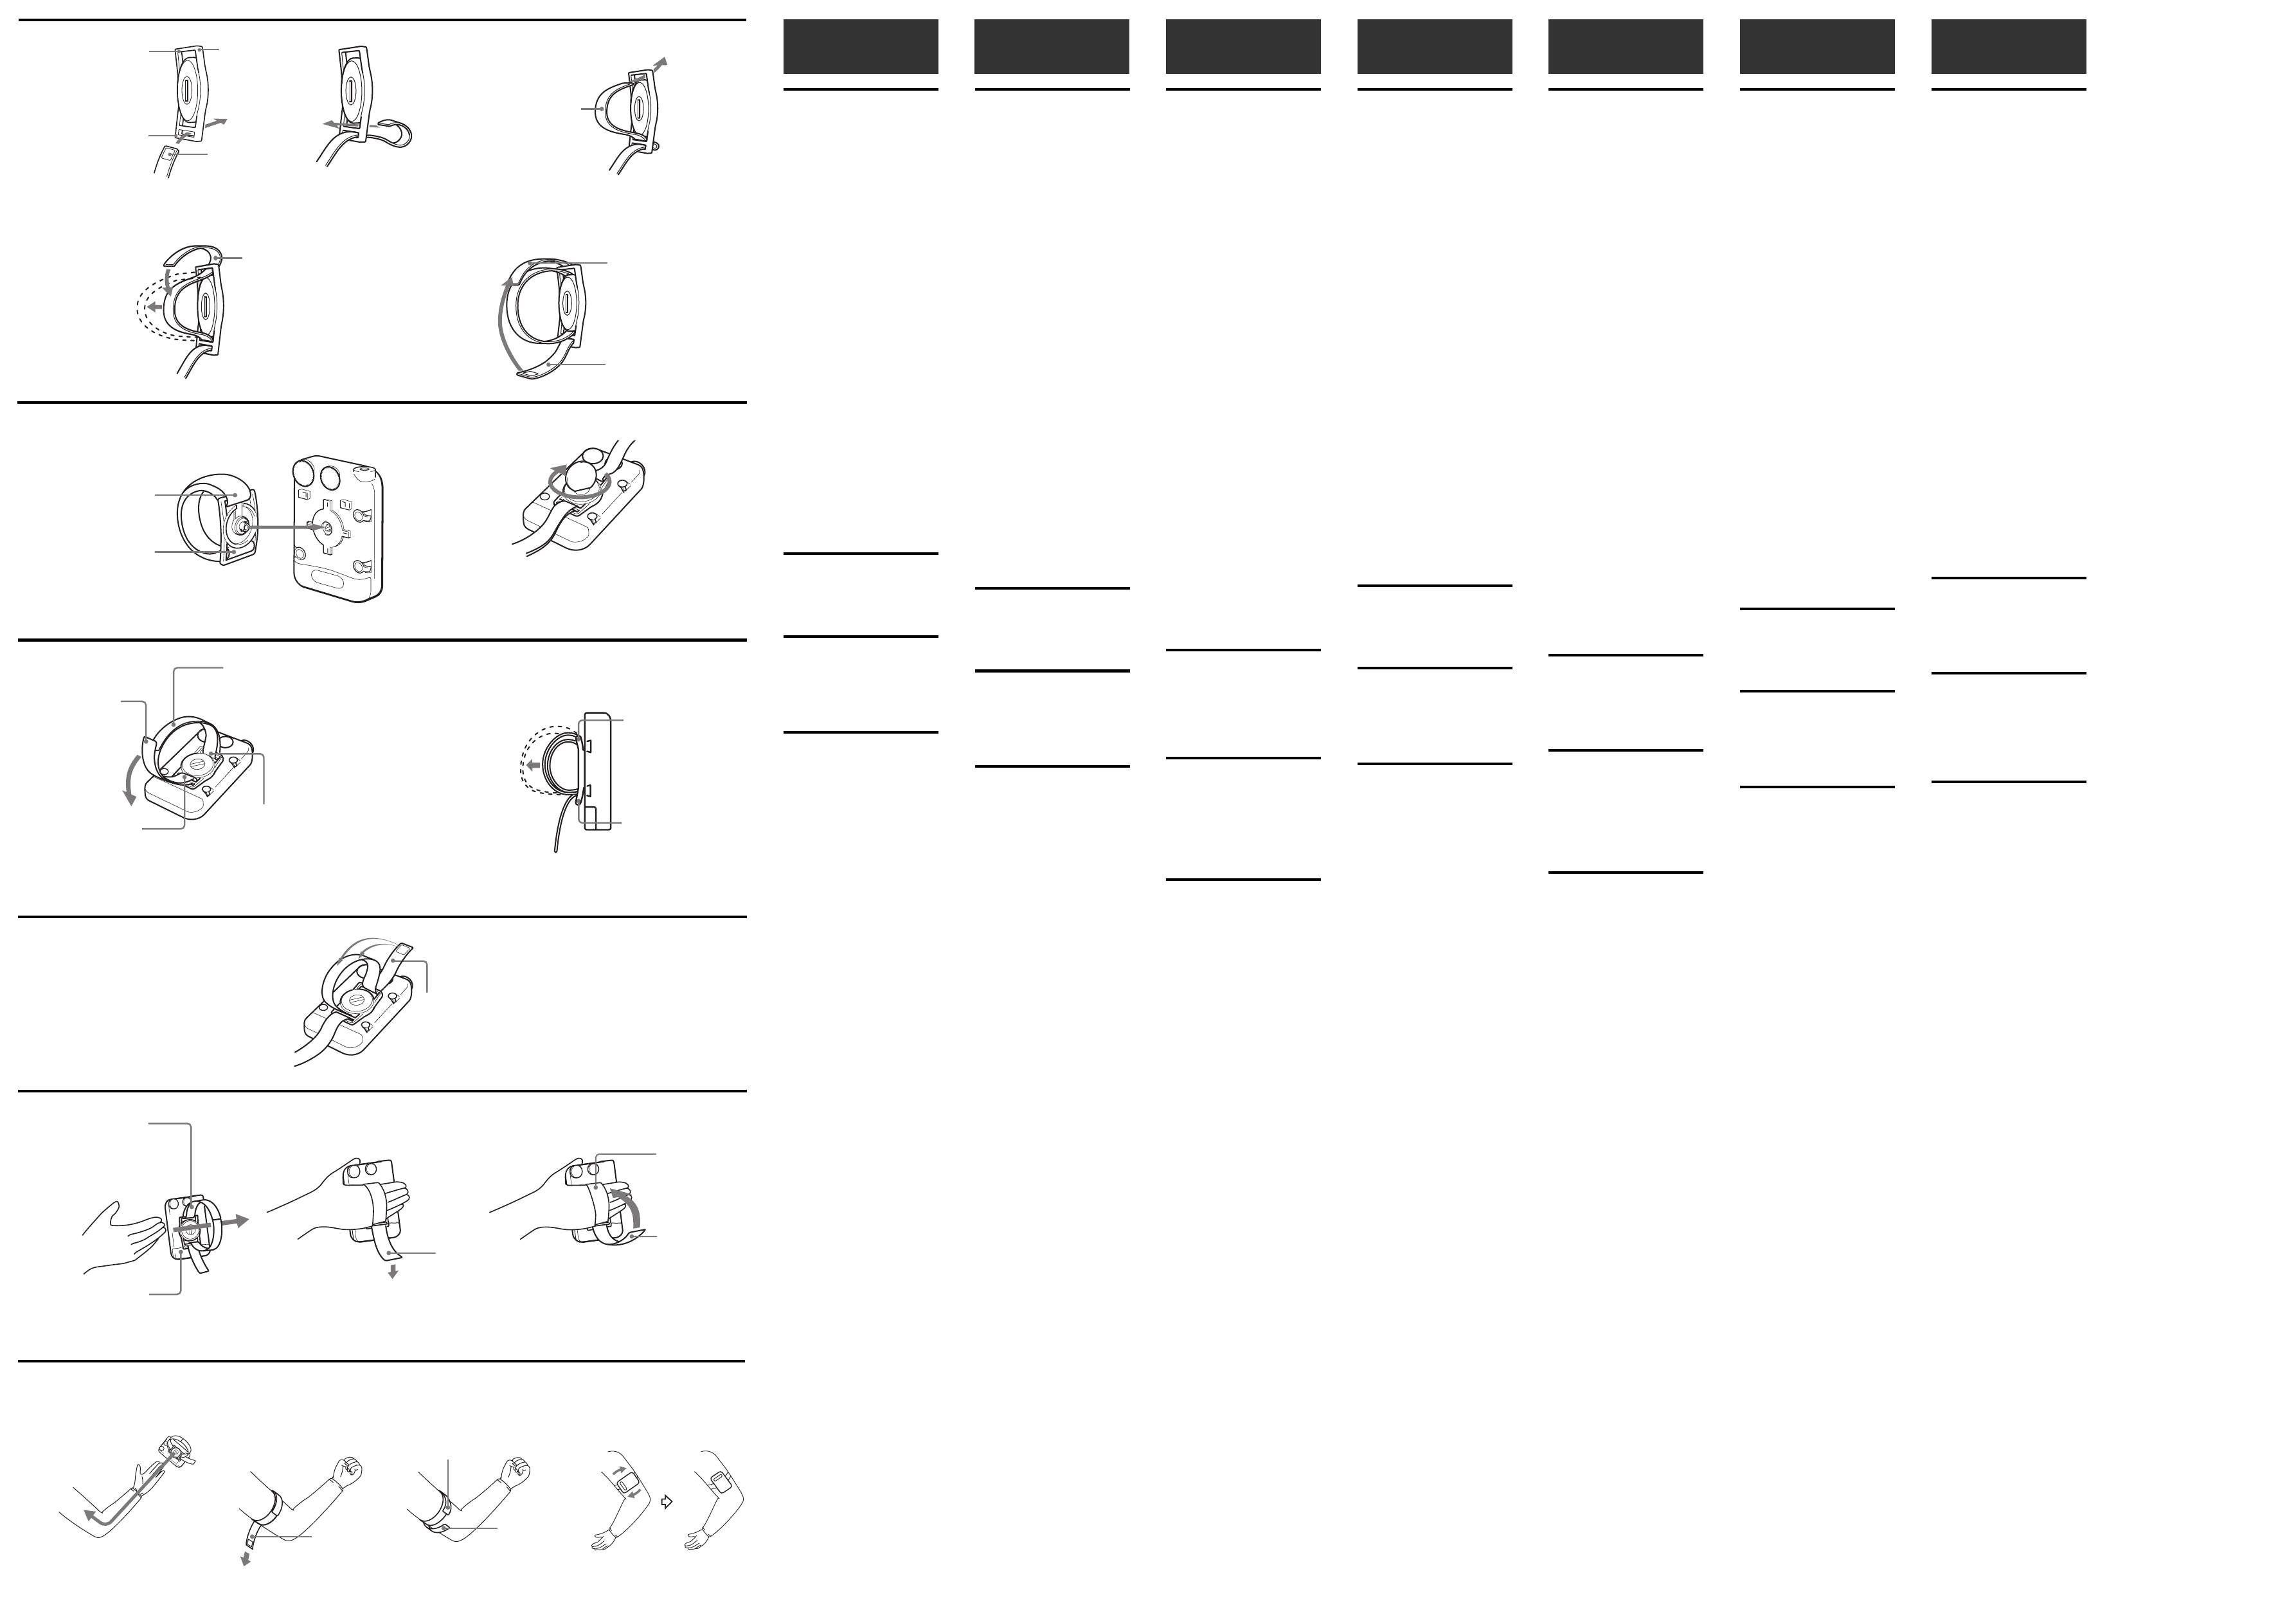
Before attaching to
your hand or arm
When you use the unit while doing
sports, use the arm band to attach the
unit to your hand or arm.
Threading the arm band
to the mount (See Fig. D )
1 Thread the arm band to the
lower side of the mount.
The arm band which has
Velcro tape must be above.
2 Thread the A side to the upper
side of the mount.
3 Attach the A side to the band
1 and pull the band 2 to
extend the loop.
4 Attach the B side to the A side.
Connecting the mount to
the unit
(See Fig. E)
1 Connect the mount that is
attached the arm band to the
knob of the unit.
2 Fasten the shaft using a coin.
Adjusting the length of
the band (See Fig. F)
1 Detach the B side from the A
side.
2 Extend the loop to be able to
insert your hand or arm.
To adjust more tightly
(or loosely) (See Fig. G)
Change the position of the A side and
reattach to the band.
Attaching to your
hand (See Fig. H)
1 Put your hand into the loop.
2 Pull the B side.
3 Attach the B side to the A side.
Attaching to your arm
(See Fig. I)
1 Put your arm into the loop.
2 Pull the B side.
3 Attach the B side to the A side.
4 Rotate the unit.
Specifications
Frequency range:
FM: 87.6 - 108 MHz
AM: 530 - 1 710 kHz
Power output:
Headphones: 3.6 mW + 3.6 mW
(at 10 % harmonic distortion)
Output:
Headphones jack (ø 3.5 mm stereo
minijack) load impedance 16 Ω
Power requirements:
1.5 V DC, one R6 (size AA) battery
Dimensions:
Approx. 65 × 96.8 × 26 mm (w/h/d)
(2
5
⁄8 × 3
7
⁄8 × 1
1
⁄16 inches) excl.
projecting parts and controls
Mass:
Approx. 95.8 g (3.4 oz) incl. battery
Supplied accessories
Stereo headphones (1, Vertical-in-the-
ear type), Belt Clip (1), Arm band (1),
Mount (1)
Design and specifications are subject
to change without notice.
English
3
A side
Face A
Seite A
Lado A
Uiteinde A
Lato A
Lado A
4
2
Avant de l’attacher á
la main ou au bras
Si vous utilisez l'appareil en
pratiquant un sport, utilisez le bracelet
pour attacher l'appareil à votre
poignet.
Enfiler le bracelet sur la
monture
(Voir Fig. D)
1 Enfiler le bracelet sur le bas de
la monture.
La partie du bracelet avec la
bande Veicro doit être tournée
vers haut.
2 Enfiler le côté A sur le haut de
la monture.
3 Fixer le côté A au ruban 1 et
tirer le ruban 2 pour allonger
la boucle.
4 Fixer le côté B sur le côté A.
Fixation de la monture
sur l’appareil
(Voir Fig. E )
1 Fixer la monture attachée au
bracelet sur le bouton de
l'appareil.
2 Serrer l’axe à l’aide d’une
pièce.
Régler la longueur du
bracelet
(Voir Fig. F)
1 Détacher le côté B du côté A.
2 Agrandir la boucle afin de
pouvoir passer le bras ou la
main.
Pour serrer ou desserrer le
bracelet (Voir Fig. G)
Changez la position du côté A et
rattacher le bracelet.
Fixation à la main
(Voir Fig. H )
1 Passer la main dans la boucle.
2 Tirer le côté B.
3 Fixer le côté B sur le côté A.
Fixation à Au bras
(Voir Fig. I )
1 Passer le bras dans la boucle.
2 Tirer le côté B.
3 Fixer le côté B sur le côté A.
4 Tourner l’allareil.
Spécifications
Gamme de fréquences:
FM: 87,6 - 108 MHz
AM: 530 - 1 710 kHz
Puissance de sortie:
Casque d’ecoute: 3,6 mW + 3,6 mW
(à 10 % de distorsion harmonique)
Sortie:
Prise de casque (minijack 3,5 mm ø,
stéréo) à basse impédance 16 Ω
Alimentation:
Courant continu de 1,5 V, une pile
R6 (format AA)
Dimensions:
Env. 65 × 96,8 × 26 mm (l/h/p)
(2
5
⁄8
× 3
7
⁄8 × 1
1
⁄16 pouces)
saillies et commandes non comprises
Poids:
Env. 95,8 g (3,4 on.) pile comprise
Accessoires fournis
Casque stéréo (1, type s’adaptant
verticalement sur l’oreille), Clip de
ceinture (1), Bracelet (1), Monture (1)
La conception et les spécifications
peuvent être modifiées sans préavis.
Vor dem Anbringen
des Gerätes an Ihrer
Hand oder Ihrem Arm
Beim Sport können Sie das Gerät mit
dem Armband an der Hand oder am
Arm tragen.
Anbringen des Bandes
(Siehe Abb. D)
1 Schieben Sie das Armband
durch die untere Öffnung der
Befestigungsplatte.
Das Teil mit dem Klettband
muss nach oben weisen.
2 Schieben Sie die Seite A durch
die obere Öffnung der Platte.
3 Befestigen Sie das Klettband
auf Seite A 1 und ziehen Sie
dann am Band 2 , um eine
Schlaufe zu bilden.
4 Bringen Sie die Seite B an der
Seite A an.
Anbringen des Gerätes
an der
Befestigungsplatte
(Siehe Abb. E)
1 Bringen Sie die
Befestigungsplatte des
Armbandes am Gerät an.
2 Arretieren Sie die Platte mit
einer Münze.
Stellen Sie die Länge des
Bandes ein
(Siehe Abb. F )
1 Nehmen Sie die Seite B von
der Seite A ab.
2 Vergrößern Sie die Schlaufe,
so dass Ihr Arm bzw. Ihre
Hand hindurchpasst.
Zum Straffen (oder lockern)
(Siehe Abb. G)
Bringen Sie das Klettband von Seite A
an einer anderen Stelle an.
Anbringen an der
Hand (Siehe Abb. H)
1 Führen Sie Ihre Hand durch
die Schlaufe.
2 Ziehen Sie an der Seite B.
3 Bringen Sie die Seite B an der
Seite A an.
Anbringen am Arm
(Siehe Abb. I )
1 Stecken Sie Ihren Arm in die
Schlaufe.
2 Ziehen Sie an der Seite B.
3 Bringen Sie die Seite B an der
Seite A an.
4 Drehen Sie das Gerät.
Technische Daten
Empfangsbereich:
UKW: 87,6 - 108 MHz
MW: 530 - 1 710 kHz
Augangsleistung:
Kopfhörer: 3,6 mW + 3,6 mW
(bei 10 % Klirrgrad)
Ausgang:
Kopfhörerbuchse (Stereo-
Minibuchse, ø 3,5 mm) für
Kopfhörer mit einer Impedanz von
16 Ω
Stromversorgung:
1,5 V Gleichspannung aus einer
Mignonzelle (R6/Größe AA)
Abmessungen:
ca. 65 × 96,8 × 26 mm (B/H/T)
ausschl. vorspringender Teile und
Bedienungselemente
Gewicht:
ca. 95,8 g (einschl. Batterie)
Mitgeliefertes Zubehör
Stereo-Kopfhörer (1, (vertikal im Ohr
sitzend)), Gürtelclip (1), Armband (1),
Befestigungsplatte (1)
Änderungen, die dem technischen
Fortschritt dienen, bleiben
vorbehalten.
Antes de fijar la para
el brazo a su mano o
brazo
Cuando utilice la unidad al practicar
deportes, utilice la banda para el brazo
a fin de fijarla a su mano o brazo.
Para pasa la para el brazo
por el soporte
(Consulte la fig. D)
1 Pase la para el brazo por el
lado inferior del soporte.
La parte con la cinta velcro
debe quedar hacia arriba.
2 Pase el lado A por la parte
superior del soporte.
3 Fije el lado A a la banda 1 y
tire de la banda 2 para
alargar el lazo.
4 Fije el lado B al lado A.
Conexión del soporte a la
unidad (Consulte la fig. E)
1 Conecte la montura fijada a la
banda para el brazo al mando
de la unidad.
2 Apriete el eje utilizando una
moneda.
Ajuste de la longitud de
la banda
(Consulte la fig. F)
1 Quite el lado B del lado A.
2 Extienda el lazo para poder
pasar su mano o brazo.
Para apretarla (o aflojarla)
(Consulte la fig. G)
Cambie la posición de la parte A y
vuelva a fijar la banda.
Fijación a su mano
(Consulte la fig. H )
1 Coloque su mano en el lazo.
2 Tire del lado B.
3 Fije el lado B al lado A.
Fijación a su brazo
(Consulte la fig. I )
1 Pase su brazo por el lazo.
2 Tire del lado B.
3 Fije el lado B al lado A.
4 Gire la unidad.
Especificaciones
Gama de frecuencias:
FM: 87,6 - 108 MHz
AM: 530 - 1 710 kHz
Salida de potencia:
Auriculares: 3,6 mW + 3,6 mW
(al 10 % de distorsión armónica)
Salida:
Toma de auriculares (minitoma
estéreo de 3,5 mm de diá)
impedancia de carga de 16 Ω
Alimentación:
1,5 V CC, una pila R6 (tamaño AA)
Dimensiones:
Aprox. 65 × 96,8 × 26 mm (an/al/
prf) excluyendo partes y controles
salientes
Masa:
Aprox. 95,8 g sin incluir la pila
Accesorios suministrados
Auriculares estereo (1), vertical en el
oido
Presilla para cinturón (1), Banda para
el brazo (1), Soporte (1)
Diseño y especificaciones sujetos a
cambio sin previo aviso.
Prima di applicare
l’apparecchio alla
mano o al braccio
Quando si porta con sé l’apparecchio
durante attività sportive, usare la
fascia per attaccarlo alla mano o al
braccio.
Applicazione della fascia
alla fibbia
(Vedere la Fig. D)
1 Far passare la fascia nel lato
inferiore della fibbia.
La parte con il nastro velcro
deve essere rivolta verso l’alto.
2 Far passare il lato A nel lato
superiore della fibbia.
3 Applicare il lato A alla fascia
1 e tirare la fascia 2 per
estendere il cappio.
4 Applicare il lato B al lato A.
Collegamento della
fibbia all’apparecchio
(Vedere la Fig. E)
1 Collegare la fibbia attaccata
alla fascia alla manopola
sull’apparecchio.
2 Stringere il fermo usando una
moneta.
Regozione della la
lunghezza della fascia
(Vedere la Fig. F)
1 Staccare il lato B dal lato A.
2 Estendere il cappio per
inserirvi la mano o il braccio.
Per stringere (o allentare)
(Vedere la Fig. G)
Cambiare la posizione del lato A e
riattaccarlo alla fascia.
Applicazione alla
mano (Vedere la Fig. H )
1 Inserire la mano nel cappio.
2 Tirare il lato B.
3 Attaccare il lato B al lato A.
Applicazione al braccio
(Vedere la Fig. I )
1 Inserire il braccio nel cappio.
2 Tirare il lato B.
3 Attaccare il lato B al lato A.
4 Ruotare l’apparecchio.
Caratteristiche
tecniche
Campo di trequenza:
FM: 87,6 - 108 MHz
AM: 530 - 1 710 kHz
Uscita di potenza:
Cuffie: 3,6 mW + 3,6 mW (al 10 % di
distorsione armonica)
Uscita:
Presa cuffie (ø 3,5 mm, minipresa
stereo), impedenza di carico 16 Ω
Alimentazione:
1,5 V CC, una pila R6 (formato AA)
Dimensioni:
Circa 65 × 96,8 × 26 mm (l/a/p)
esclusi comandi e parti sporgenti
Massa:
Circa 95,8 g, inclusa la pila
Accessori in dotazione
Cuffie stereo (1, tipo verticale
nell’orecchio)
Gancio per cintura (1), Fascia per
braccio (1), Fibbia (1)
Disegno e caratteristiche tecniche sono
soggetti a modifiche senza preavviso.
Français Deutsch Español Italiano Português
Mount
Monture
Befestigungsplatte
Soporte
Gesp
Fibbia
Adaptador
Voorbereidingen voor
het dragen om pols of
arm
Voor gebruik van de radio tijdens
sporten e.d. kunt u het apparaat met
de armband om uw pols of bovenarm
bevestigen.
Bevestigen van de gesp
aan de armband
(Zie afb. D )
1 Steek het uiteinde van de
armband door de onderste
opening van de gesp.
Houd de kant met het
klittenband boven.
2 Steek het uiteinde A door de
bovenste opening van de gesp.
3 Maak het uiteinde A vast aan
de armband 1 en trek aan de
band 2 om de lus groter te
maken.
4 Bevestig het uiteinde B
bovenop uiteinde A.
Aanbrengen van de radio
op de gesp
(Zie afb. E )
1 Plaats de armband met de
schroefknop van de gesp op
de uitsparing achterin de
radio.
2 Draai de schroefknop vast met
een muntstuk.
Stel de lengte van de
band bij (Zie afb. F)
1 Maak uiteinde B los van
uiteinde A.
2 Maak de lus ruim genoeg om
uw arm of hand er doorheen
te kunnen steken.
Strakker (of losser)
bevestigen (Zie afb. G)
Maak uiteinde A los en druk het op
een betere plaats weer vast.
Om uw pols dragen
(Zie afb. H)
1 Steek uw hand door de lus.
2 Trek het uiteinde B strak.
3 Bevestig uiteinde B bovenop
uiteinde A.
Om uw arm dragen
(Zie afb. I )
1 Steek uw arm door de lus.
2 Trek het uiteinde B strak.
3 Bevestig uiteinde B bovenop
uiteinde A.
4 Draai de radio in de gewenste
stand.
Technische gegevens
Frequentiebereik:
FM: 87,6-108 MHz
AM: 530-1 710 kHz
Uitgangsvermogen:
Hoofdtelefoon: 3,6 mW + 3,6 mW
(bij 10 % harmonische vervorming)
Uitgang:
Hoofdtelefoon-aansluiting (stereo
ministekkerbus, 3,5 mm ø),
belastingsimpedantie 16 Ω
Stroomvoorziening:
1,5 volt gelijkstroom, van één R6
(AA-formaat) batterij
Afmetingen:
Ca. 65 × 96,8 × 26 mm (b/h/d)
zonder uitstekende delen en
knoppen
Gewicht:
Ca. 95,8 g, inclusief batterij
Bijgeleverd toebehoren
Stereo hoofdtelefoon (1), (verticaal in
het oor passend)
Ceintuurklem (1), armband (1),
gesp (1)
Wijzigingen in ontwerp en technische
gegevens voorbehouden, zonder
kennisgeving.
Antes de prender na
sua mão ou no seu
braço
Quando utilizar o aparelho enquanto
pratica esportes, use a cinta de braço
para prender o aparelho na sua mão
ou no seu braço.
Passando a cinta pelo
adaptador (Veja fig. D)
1 Passe a cinta de braço pela
parte inferior do adaptador.
A parte com a fita velcro deve
estar voltada para cima.
2 Passe o lado A pela parte
superior do adaptador.
3 Fixe o lado A na cinta 1 e
puxe a cinta 2 para alongar a
alça.
4 Fixe o lado B ao lado A.
Fixação do adaptador ao
aparelho (Veja fig. E )
1 Fixe o adaptador ajustado com
cinta de braço à saliência do
aparelho.
2 Aperte o fecho usando uma
moeda.
Ajuste do comprimento
da cinta (Veja fig. F)
1 Desprenda o lado B do lado A.
2 Estire a alça de modo que
possa inserir sua mão ou seu
braço.
Para ajustar mais apertado
(ou mais folgado) (Veja Fig. G)
Altere a posição do lado A e recoloque
a cinta.
Para prender na sua
mão (Veja fig. H )
1 Passe a sua mão por dentro da
alça.
2 Puxe o lado B.
3 Fixe o lado B ao lado A.
Para prender no seu
braço (Veja fig. I )
1 Passe o seu braço por dentro
da alça.
2 Puxe o lado B.
3 Fixe o lado B ao lado A.
4 Gire o aparelho.
Especificações
Gama de frequências:
FM: 87,6 - 108 MHz
AM: 530 - 1 710 kHz
Potência de saida:
Auscultadores: 3,6 mW + 3,6 mW
(a 10 % de distorção harmónica)
Saida:
tomada dos auscultadores (mini-
tomada estéreo de ø 3,5 mm) com
impedância de carga de 16 Ω
Alimentação:
1,5 V CC, 1 pilha R6 (tamanho AA)
Dimensões:
Aprox. 65 × 96,8 × 26 mm (l/a/p)
excluindo partes e controlos
salientes
Peso:
Aprox. 95,8 g incluindo a pilha
Acessórios fomecidos
1 par de auscultadores estéreo (tipo
vertical)
1 Presilha para cinto
1 cinta de braço
1 adaptador
Design e especificações sujeitos a
alterações sem aviso prévio.
A side
Face A
Seite A
Lado A
Uiteinde A
Lato A
Lado A
B side
Face B
Seite B
Lado B
Uiteinde B
Lato B
Lado B
B side
Face B
Seite B
Lado B
Uiteinde B
Lato B
Lado B