• Skin: If battery acid comes in contact with skin, rinse immediately with water, then wash thoroughly with soap and water. If redness,
pain, or irritation occurs, seek immediate medical attention.
• Eyes: If battery acid comes in contact with eyes, flush eyes immediately, for a minimum of 15 minutes and seek immediate medical
attention.
• Read and Understand This Instruction Manual Before Using This Unit.
SAVE THESE INSTRUCTIONS
WARNING: TO REDUCE THE RISK OF INJURY OR PROPERTY DAMAGE: Follow these instructions and those published by the
manufacturer of any engine you intend to use with this battery charger. Review cautionary markings on the battery charger and engine.
INTRODUCTION
Congratulations on purchasing your new Stanley
®
Fatmax
®
8 Amp Battery Charger. Read this Instruction Manual and follow the
instructions carefully before using your new battery charger.
PREPARING TO CHARGE
1. Remove battery completely from boat/airplane or any confined area before charging.
2. If it is necessary to remove battery from vehicle to charge, or to clean terminals, always remove grounded terminal from battery first.
Make sure all accessories in the vehicle are off, so as not to cause an arc.
3. Clean battery terminals, taking care to avoid getting corrosive material in eyes.
4. Add distilled water in each cell until battery acid reaches level specified by battery manufacturer. This helps purge excessive gas from
cells. Do not overfill. For a battery without cell caps (maintenance free), carefully follow manufacturer’s charging instructions.
5. Study all battery manufacturer’s specific precautions, such as removing or not removing cell caps while charging, and recommended
rates of charge.
CHARGER LOCATION
• Locate charger as far away from battery as cables permit.
• Never place charger directly above battery being charged; gases from battery will corrode and damage charger.
• Never allow battery acid to drip on charger.
• Never operate charger in a closed-in area or restrict ventilation in any way.
• Marine batteries must be removed and charged on shore.
• Do not set a battery on top of charger.
GUIDE TO CONTROLS AND INDICATORS
Charged LED: Lights green to indicate the battery is fully charged. The unit automatically goes into Float Charge
mode.
Charging LED: Lights yellow to indicate there is a good connection to the battery and the battery is charging.
Reverse polarity LED: Lights red to indicate a reverse polarity connection is detected.
Mode Selector Button: Button for selecting either Motorcycle Mode or Vehicle Mode.
Power LED: Lights green to indicate the unit is properly plugged into a functional 120 volt AC outlet.
Motorcycle Mode LED: Lights green when Motorcycle Mode is selected (suitable for most small vehicles, such as
motorcycles).
Vehicle Mode LED: Lights green when Vehicle Mode is selected (suitable for general automotive vehicles).
OPERATING INSTRUCTIONS
IMPORTANT: ALWAYS disconnect the AC power cord from the AC power outlet before connecting (or disconnecting) the
charger to (or from) the battery.
Charging Using the Supplied Battery Clamps
WARNING: A spark near the battery may cause an explosion. To reduce the risk of a spark near the battery, position AC
and DC cords away from hood, door, or moving engine parts. Never charge the battery while the engine is operating.
1. Unplug the charger's AC power cord from the AC power outlet.
2. Disconnect the Battery Clamps, Terminal Rings or DC Accessory Plug from the battery charger's Double Barrel Charger Connector.
3. Check polarity of battery posts. Positive (POS, P, +) battery post usually has larger diameter than negative (NEG, N, –) post.
4. Determine which post of battery is grounded (connected) to the chassis. If negative post is grounded to chassis (as in most vehicles),
see 5. If positive post is grounded to the chassis, see 6.
5. For negative-grounded vehicle, connect positive (red) clamp from battery charger to positive (POS, P, +) ungrounded post of battery.
Connect negative (black) clamp to vehicle chassis or engine block away from battery. Do not connect clip to carburetor, fuel lines, or
sheet-metal body parts. Connect to heavy gauge metal part of the frame or engine block.
6. For positive-grounded vehicle, connect negative (black) clamp from battery charger to negative (NEG, N, –) ungrounded post of
battery. Connect positive (red) clamp to vehicle chassis or engine block away from battery. Do-not connect clip to carburetor, fuel lines
or sheet-metal body parts. Connect to a heavy gauge metal part of the frame or engine block.
7. Insert the double barrel tip of the battery clamp cable into the double barrel tip of the double barrel charger connector (male-to-
female and female-to-male) and position it as far away from the battery as possible.
8. Insert the AC plug of the battery charger into a (powered) standard North American 120 volt 60Hz outlet. The Power LED will light
green to indicate the unit is in standby mode and ready to use.
Note: If the Power LED does not come on, check connection with the AC outlet. Make sure the AC outlet is functional.
9. When the charger is properly connected, choose the following operation mode for the battery to be charged by pressing the Mode
Selector Button.
• Motorcycle Mode, suitable for most small vehicles like motorcycles.
• Vehicle Mode, for most automobiles.
The corresponding mode LED (Motorcycle Mode or Vehicle Mode) will light green. The charging process will start automatically after a
few seconds and the Charging LED () will light yellow to indicate the unit is in charging mode.
Notes: If the clamps are incorrectly connected with regard to polarity, the Reverse Polarity/Fault LED () will light. Unplug the charger; then remove the
clamps. Reconnect the clamps properly.
If the Charging LED did not come on, check the connection to the battery. If the clamps are properly connected, the battery may be in fault
condition. Manufacturer suggests to have the battery tested by a qualified battery service technician.
10. When the battery is fully charged, the charger will automatically go into Float Charge Mode and the Charged LED () will light. In
this mode, the charger monitors the battery voltage and charges as necessary to assure the battery maintains full capacity. The
charger remains in Float Charge Mode as long as the charger is connected to the battery and is plugged into a functioning AC outlet.
When disconnecting charger, disconnect AC cord, remove clamp from vehicle chassis, and then remove clamp from battery terminal.
Connecting and Charging the Battery with the Terminal Rings
CONNECTING THE CHARGER WITH TERMINAL RINGS
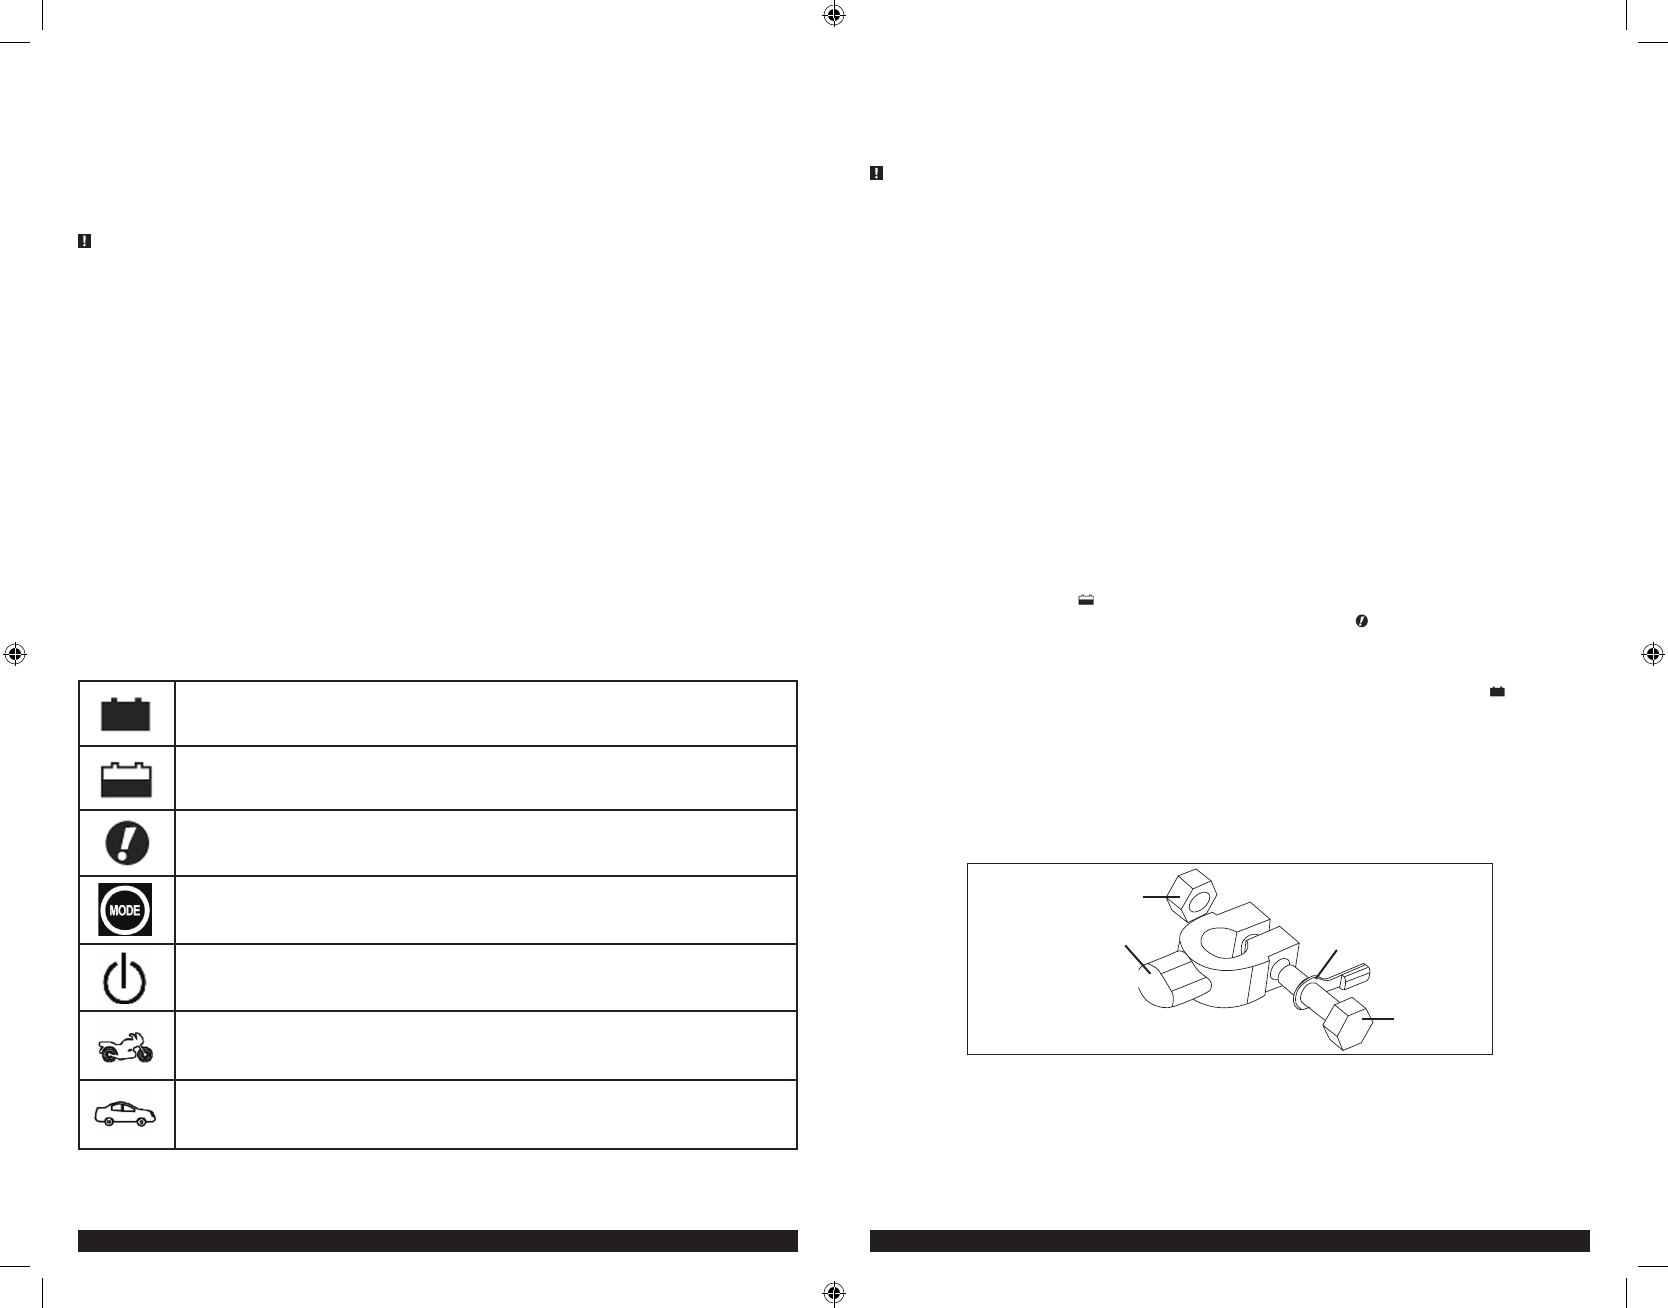
The charger’s output leads have crimped, color-coded terminal rings (RED-POSITIVE and BLACK-NEGATIVE). These rings connect directly to
the corresponding connectors on the battery posts.
NUT
CONNECTOR
TERMINAL RING
BOLT
1. Remove the nuts from the bolts of the battery post’s connectors.
2. Position the RED terminal on the bolt of the POSITIVE battery post connector.
3. Position the BLACK terminal on the NEGATIVE post connector; then replace the nuts.
IMPORTANT: If there is any problem connecting the output leads, check with a reputable auto supply store or contact the Customer
Service Department toll-free at 1-877-571-2391 for assistance in finding an appropriate connection device for your particular application.
Libble nimmt den Missbrauch seiner Dienste sehr ernst. Wir setzen uns dafür ein, derartige Missbrauchsfälle gemäß den Gesetzen Ihres Heimatlandes zu behandeln. Wenn Sie eine Meldung übermitteln, überprüfen wir Ihre Informationen und ergreifen entsprechende Maßnahmen. Wir melden uns nur dann wieder bei Ihnen, wenn wir weitere Einzelheiten wissen müssen oder weitere Informationen für Sie haben.
Art des Missbrauchs:
Forenregeln
Um zu sinnvolle Fragen zu kommen halten Sie sich bitte an folgende Spielregeln:
Lesen Sie zuerst die Anleitung;
Schauen Sie nach, ob die Frage bereits gestellt wurde;
Stellen Sie die Frage so deutlich wie nur einigermaßen möglich;
Erwähnen Sie was Sie bereits versucht haben um das Problem zu lösen;
Ist Ihr Problem von einem Besucher gelöst dann lassen Sie ihn / sie wissen in diesem Forum;
Falls Sie reagieren möchten, so verwenden Sie bitte das Antworten- Formular;
Da ihre Frage für alle Besucher sichtbar ist, sollten Sie lieber keine persönliche Daten erwähnen.
Neu registrieren
Registrieren auf E - Mails für Stanley BC8S wenn:
neue Frage gestellt werden
neue Handbücher vorhanden sind
Sie erhalten eine E-Mail, um sich für eine oder beide Optionen anzumelden.
Das Handbuch wird per E-Mail gesendet. Überprüfen Sie ihre E-Mail.
Wenn Sie innerhalb von 15 Minuten keine E-Mail mit dem Handbuch erhalten haben, kann es sein, dass Sie eine falsche E-Mail-Adresse eingegeben haben oder dass Ihr ISP eine maximale Größe eingestellt hat, um E-Mails zu erhalten, die kleiner als die Größe des Handbuchs sind.
Ihre Frage wurde zu diesem Forum hinzugefügt
Möchten Sie eine E-Mail erhalten, wenn neue Antworten und Fragen veröffentlicht werden? Geben Sie bitte Ihre Email-Adresse ein.