-
Diese
und gef
in -
fü
Garantie
durch den
onale
oder Gewährleistungen
de
V
od
Verh
Verp
1
vorhanden
schlitzschrauben verwenden.
2.
Hz.
immer a
-
-
-
-
wird
War Hängen
nichts ü
ta
-- GB -- DIRECTIONS FOR USE
Before operating the heater, please read these instructions thoroughly to avoid damage and
hazardous situations Any use o this h o than t stipulated i th instruction m
may cause fire, electric shock or injury
Warranty does
misuse or ab
warranty be taken
excluded or modified.
Before
not try to repair it yourself but contact
Do let play w packaging environment by dispos of the
accordance with the national regulations
1. Your product
The product is sold without accessor
Depending
fix it to the wall we suggest you use nylon rawplugs and cross head screws included.
Contact your dealer immediately if the product is damaged or
2. For your ow
This heater provides an additional
Make
50Hz.
Don't
is on the “O” position ¿ ”.
Switch off the product and unplug
While in operation,
- at least
- if wall mounted, not
- leaving the air ou
- never placed immediat
Do
very hot during operation (over 80°C/176°F).
WAR i order t a cover t. Do hang
heater and do cover it it’s w T i c written o t prod s the
symbol
This product may not
capacities,
person responsible fo th s have suitably by the Children be
supervised to ensure they do not play with the product.
Do
inflammable vapors/gases.
If
authorized
damage.
Do not use this heater
Do not clean the product
Do not wind the cable around the device when it is in operati
The appliance must be positioned so t
3. Safe positioning
Only ever use the appliance in an upright position;
When
object/surface.
When
2 are respected. Do
As the heater is a cl
The heater has an IPX1 protection level against water and, if wall mounted may be installed in
bathrooms. In
valid in your State.
Never install/use this appliance in the Zones 0, 1 or 2 illustrated in picture 3:
On no account m
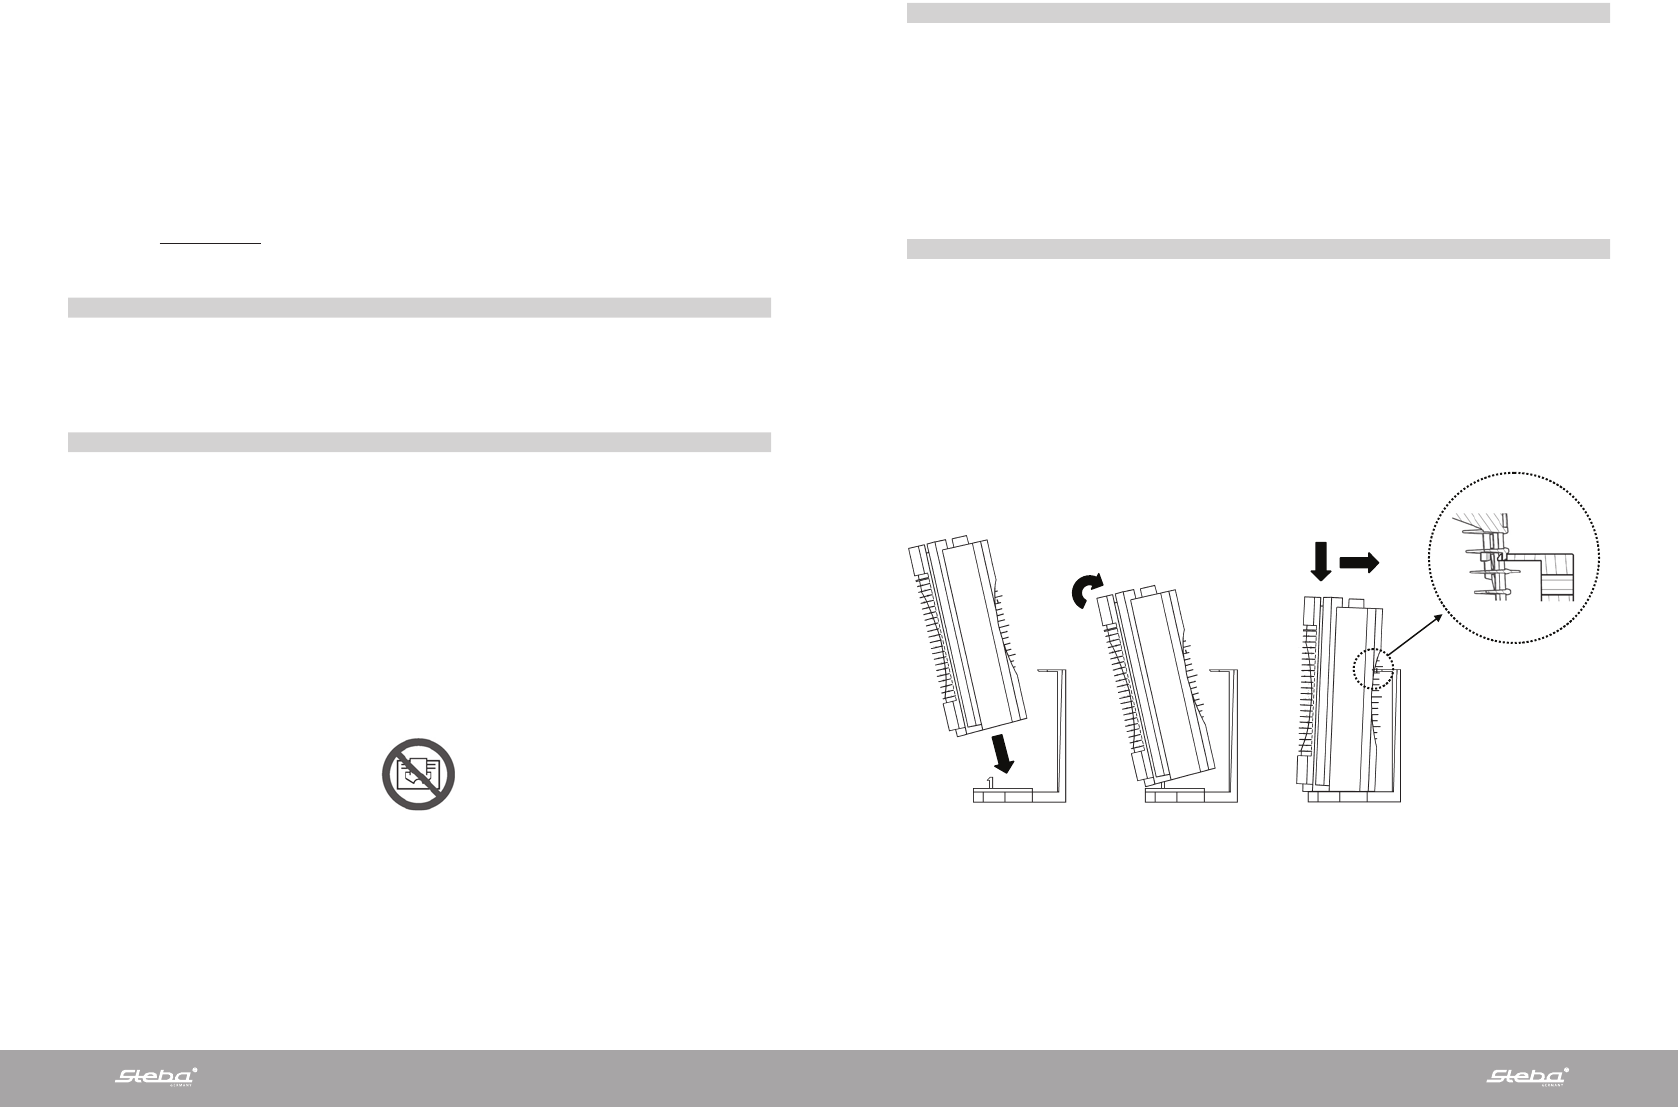
4. Wall mounting
After carefully reading section 3,
To hang on the product
- Lay t base o product t base t w b coupling plastic created
make the lodging easier;
- Push a
- Check t h o pivot the back g
the heater. Moderately shake the heater
To release the product f
- Use
product by pulling it on the top
- Once the product has bee
1
2
3
4
click!
ten
Erfahrung
dieser Person
damit
allgemein
einem
3.
ren
pla
werden.
ten.
4. W
Bil
-
Positionierung
-
-
Gitter des
-
ist.
-- I -- ISTRUZIONI D’USO
Si
danneggiamenti o comunque il verificarsi di situazioni di pericolo. utilizzo del prodotto
diverso da q indicato n presente m può c incendi, p e o ferite e
rende nulla qualsiasi garanzia.
La garanzia non si applica ad alcun difetto, deterioramento, perdita, ferimento o danneggiamento
riconducibili ad un uso non corretto del prodotto. Rimangono garantiti tutti i diritti di legge in materia.
Nessuna condizione di garanzia può escludere o modificare le condizioni di garanzia regolamentate da
leggi dello Stato che no
Prima ogni operazione, l’imballo l integrit p
caso si evidenziassero dei difetti o danni, non installare né cercare di riparare l’apparecchiatura, ma
rivolgersi al rivenditore.
Non lasciare l’imballo alla portata dei bambini e
1. Il vostro prodotto
Il prodotto viene fornito senza acce
In funzione della v può essere presente una staffa per l’aggancio a muro del
termoventilatore. Per fissarla vi suggeriamo di utilizzare i
Qualora il prodotto sia danneggiato o la staffa mancante contattate immediatamente il vostro
rivenditore.
2. Per la vostra sicurezza
Questo t è una f d risca ausiliario e deve essere utilizzato
esclusivamente per questo scopo.
Assicuratevi che l’alimentazione di ret
Non
assicuratevi sempre che l’interruttore o ¿ ”;
Spegnete il prodotto con l’interruttore e scollegatelo dalla rete se prevedete di non utilizzarlo per
lunghi periodi;
Durante il funzionamento collocate il termoventilatore
- ad almeno 1m da oggetti infiammabili o mobili;
- se installato a muro, no
- lasciando libere le di ingresso di uscita nessun essere presente
raggio di 1m dalla griglia anteriore e di 50cm
- mai posizionato immediatamente sotto ad
Non lasciate che animali o bambini giochino o tocchino il termoventilatore. Attenzione! Durante il
funzionamento la griglia di
IMPORTANTE: per e s non mai il p N a mai
alcun oggetto o coperta sull’apparecchio mentre è in funzione. Questo è chiarament scritto
sull’apparecchio o illustrato
Questo prodotto non d da persone (bambini inclusi) con
sensoriali o mentali ridotte, o con inadeguata esperienza e conoscenze, che non siano sotto la
supervisione di una persona responsabile per la loro sicurezza o che non siano da
adeguatamente istruiti. I bambini devono essere s per che non giochino con il
prodotto.
Non utilizzate il termov in stanze s di gas esplosiv di vapori generati solventi e
vernici o comunque di vapori/gas infiammabili.
Se il cavo è danneggiato e dovete sostituirlo non es questa operazione da soli, riportate il
termoventilatore ad un centro di riparazioni qualificato perché è richiesto l’intervento di personale
specializzato al fine di
Non utilizzate questo termo
Non
altre sostanze;
Non arrotolate mai il cavo quando è in funzione e non portate il
con superfici taglienti.
Il termov dev essere posizionato modo tale che la presa alimentazione sempre
raggiungibile.
3. Posizionamento sicuro
Utilizzate il termoventilatore solo in po
Nell’uso portatile rispettate sempre la di di almeno 1m da qualsiasi oggetto/superficie
infiammabile;
Se installato a muro rispettate le distanze mini indicate in figura e 2. Non posizionate mai il
prodotto in modo tale ch
Il termoventilatore è costruito in doppio isola elettrico (classe II) e, pertanto, non richiede il
collegamento di terra.
Il di protezione a
fissaggio a
eseguita in accordo alla
Non installare mai l’apparecchio all’interno delle zone 0, 1
I
all’interno della vasca da bagno o della doccia.
4. Installazione a muro
Dopo attentamente quanto riportato al l'installazione seguendo
le istruzioni indicate in
Per fissare il prodotto
- Appoggiate
per semplificare il posizio
- Premere leggermente il prodotto il e l parte su al s di
fissaggio;
- Controllare che la linguetta forata del supporto murale si sia correttamente agganciata alla
nervatura presente sulla griglia posteriore del prodotto. Dopo ogni installazione scuotere
lievemente il prodotto per assicurarsi
1
2
3
4
click!