BCF 819 Baby Monitor
ENGLISH
Operating manual
Please read and observe the following in
formation and keep the operating manual
nearby for future reference!
1
25
24
23
22
21
20
19
18
17
16
15
14
12
11
10
9
8
7
6
5
4
3
2
26
27
13
28
29
Safety information
WARNING!
• Risk of fatal injury through cable!
Children could become entangled in the cables and strangle
themselves.
Ensure that the baby monitoring units and power cables are
out of reach of babies/children, i.e. they are at least one meter
away.
• Risk of explosion!
Only use the power adapter plugs supplied!
Only use batteries supplied or ones of the same type!
Always treat batteries with due care and attention and only
use batteries as described.
Never use standard and rechargeable batteries together.
Never use rechargeable batteries or standard batteries with
different capacities or charge statuses together. Never use
standard or rechargeable batteries which are damaged.
• Risk of suffocation through small objects, packaging and
protective foil!
Keep children away from the product and its packaging!
CAUTION!
• Risk of fire through power adapter plugs!
Power adapter plugs can heat up.
Never leave any objects on the power adapter plugs. Ensure
access to power adapter plugs is not obstructed by furniture or
such.
• Risk of tripping due to improperly laid cable!
Lay the cables so that nobody can trip over them!
• Risks to health and the environment from batteries!
Never open, damage or swallow batteries or allow them to
pollute the environment. They could contain toxic and ecolo
gically harmful heavy metals.
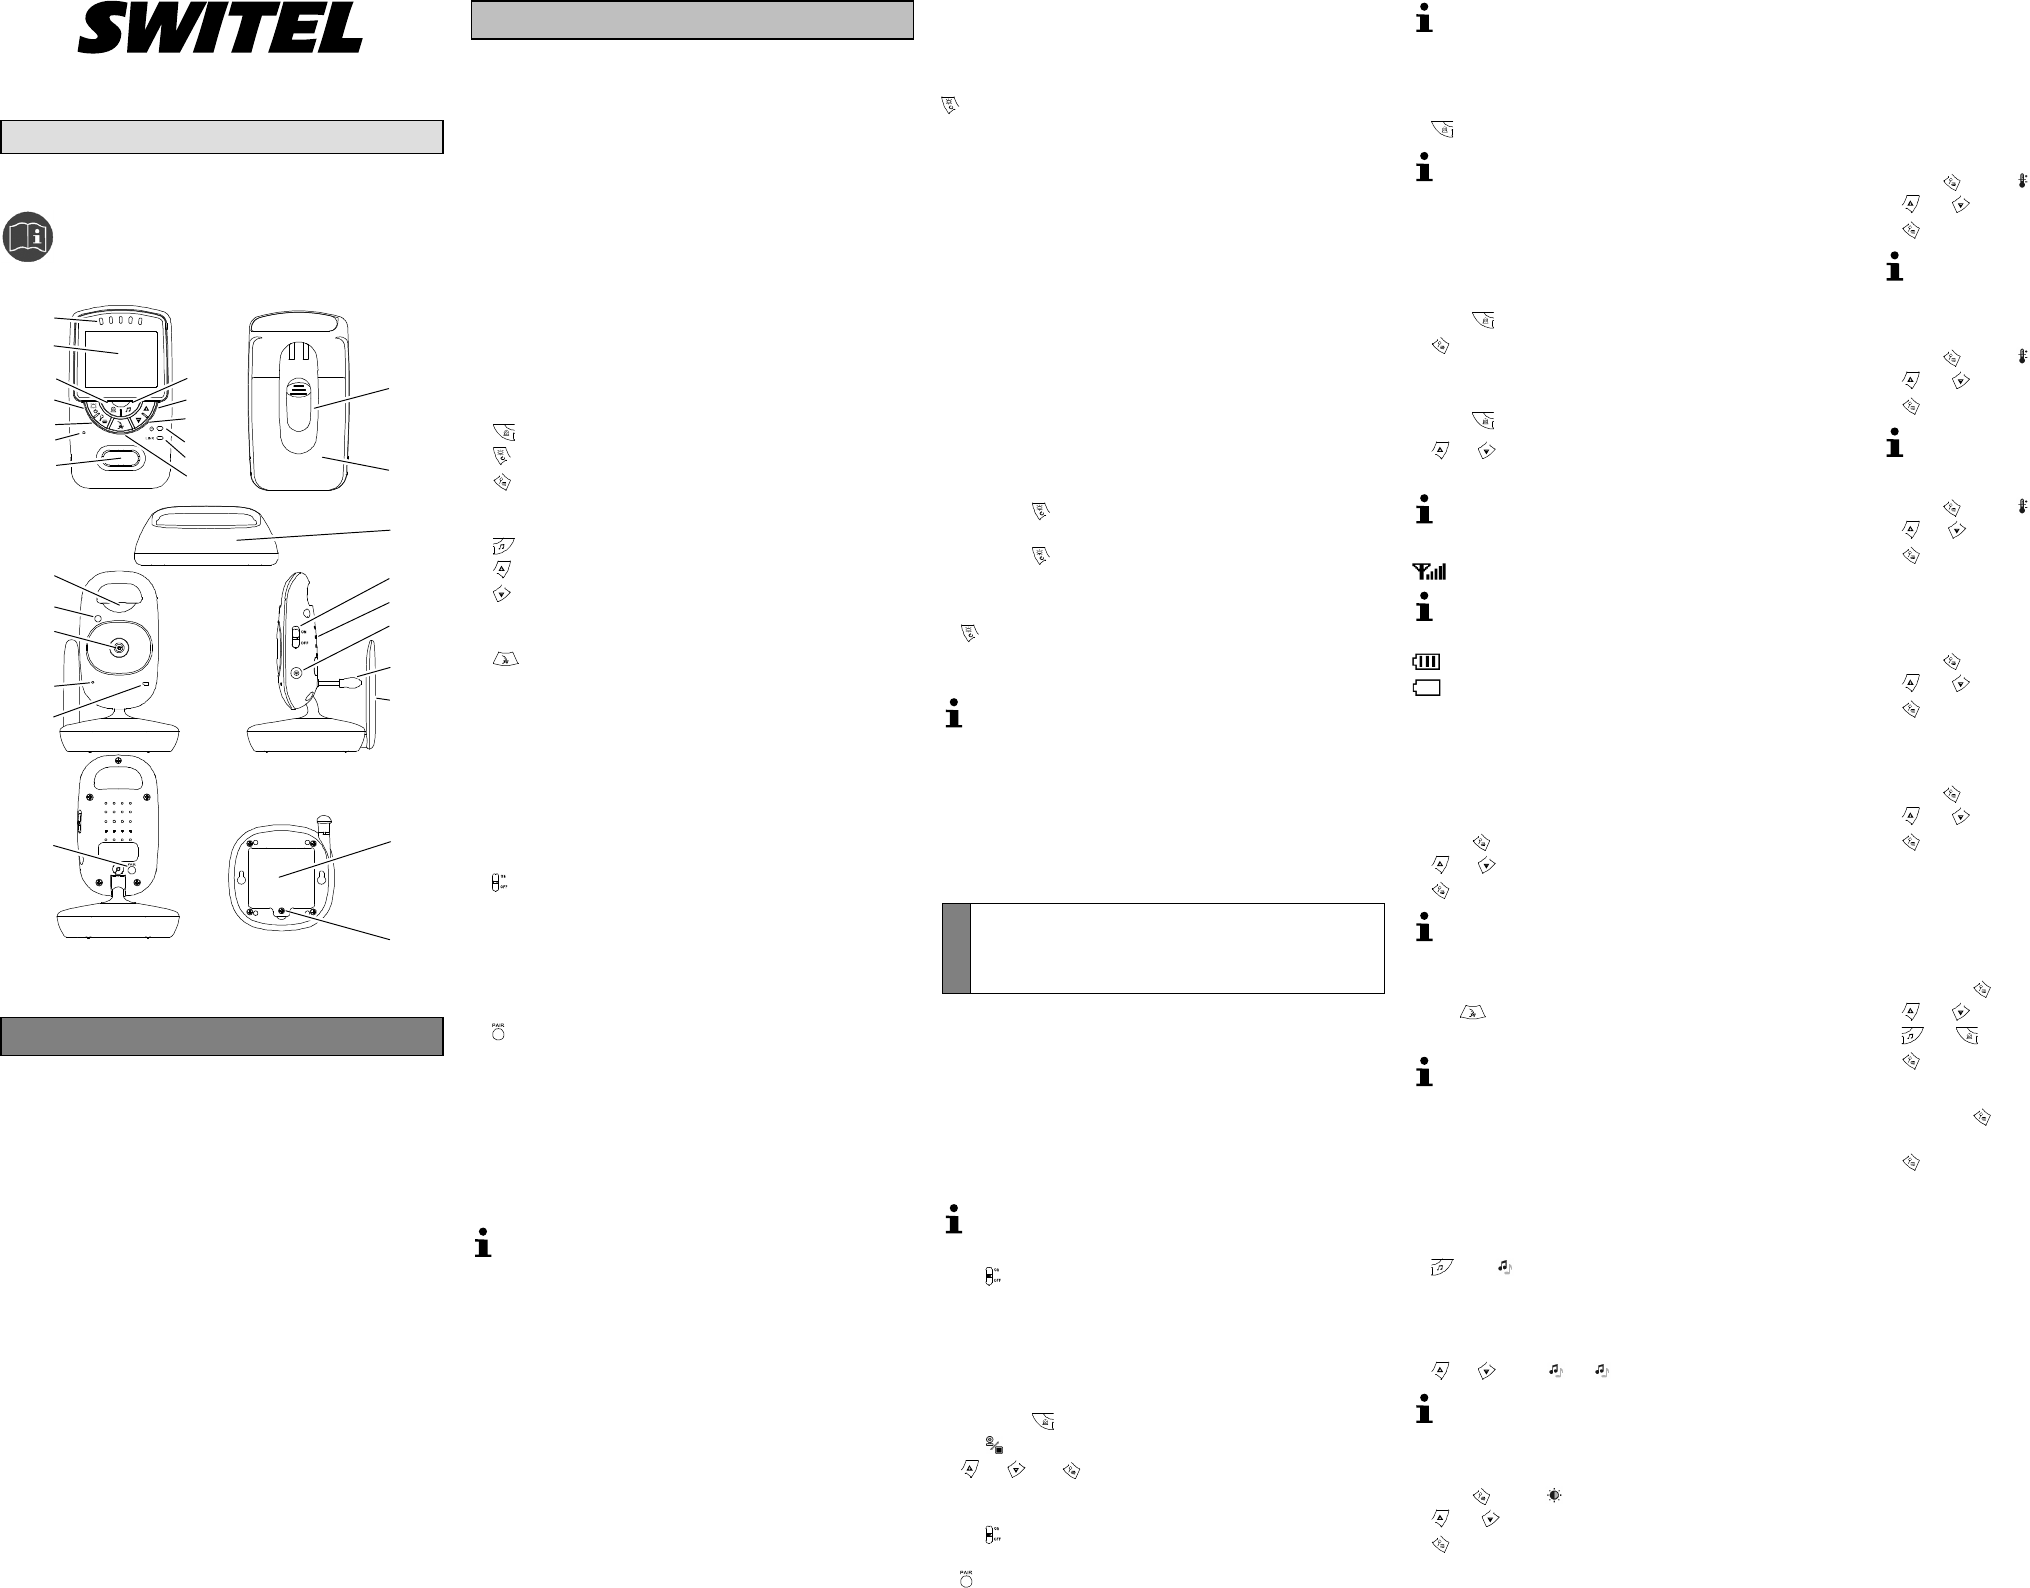
Operating elements
Receiver unit
1 Noise level indicator
2 Display
3
button (change transmitter unit)
4
button (switch receiver unit on/off)
5
(menu, zoom)
6 Microphone
7 Loudspeaker
8
button (play lullaby)
9
button (raise volume, change setting)
10
button (lower volume, change setting)
11 Operating indicator
12 Connection quality indicator
13
button (talk function)
14 Belt clip
15 Battery compartment cover
16 Charger
Transmitter unit
17 Night light
18 Light sensor
19 Camera
20 Microphone
21 Operating indicator
22 switch (transmitter unit on/off)
23 Loudspeaker
24 Power adapter socket
25 Temperature sensor
26 Antenna
27 Battery compartment cover
28 Screw for battery compartment cover
29
button (register device)
Intended use
The baby monitor serves to monitor a baby/child in a room. The
transmitter unit, located near the child, transmits noises and images
from its immediate vicinity to the receiver unit. Any other use is con
sidered unintended use. Unauthorised modification or reconstruction
is not permitted. Under no circumstances open the devices or com
plete any repair work yourself.
The devices are not intended for medical purposes. Warning
and signal tones from respiratory or heartbeat monitoring equip
ment are not transmitted.
Use only in suitable environments
Observe all local directives and regulations.
Prevent excessive exposure to smoke, dust, vibration, chemicals,
moisture, heat and direct sunlight.
Package contents
- Receiver unit
- Transmitter unit
- Charger for receiver unit
- Battery pack for receiver unit
- 2 power adapter plugs
- Operating manual
Display and explanation of operations
Æ Action to take
Result of action
[2] Reference in the graphics
Press the button
Press and hold the button
5 sec. Keep the button pressed for 5 seconds
Starting up the receiver unit
The receiver unit is powered by the battery pack.
Inserting the battery pack in the receiver unit
Slide the battery compartment cover [15] on the rear downwards
and remove it.
Plug the connection plug on the battery pack in the power socket
and then insert the battery pack in the battery compartment.
Close the battery compartment cover.
Charging the battery pack
Connect the power adapter to the power socket and a properly
installed mains power outlet and place the receiver unit in the char
ger.
Switching the receiver unit on/off
2 sec. [4] Receiver unit is switched on, start screen
appears in the display.
2 sec. [4] Receiver unit is switched off, the display
goes out.
Switching the display on/off
[4] Display is switched off, only sound is played.
Press any button Display is switched on, image and sound are
played.
The display switches on when signals are received according to
the sensitivity of the VOX function setting. When the VOX func
tion is deactivated, the display remains switched off until you press
any button.
Starting up the transmitter unit
The transmitter unit is operated by power supplied via the power
adapter plug or 4 AAA batteries.
Inserting batteries in the transmitter unit (option)
WARNING!
• Risk of explosion!
Never charge the batteries.
Remove the screw holding the battery compartment cover [28]
using a suitable screwdriver, slide the battery compartment cov
er [27] downwards and remove it.
Insert the batteries in the battery compartment, paying attention to
correct polarity.
Replace the battery compartment cover [27] and tighten the
screw in the battery compartment cover [28] using a suitable screw
driver.
Switching the transmitter unit on/off
The transmitter unit continues to transmit even when the receiv
er unit is switched off. The signals can be received by other
devices.
Set
[22] to ON Transmitter unit is switched on, operating
indicator [21] lights up green.
Registering a transmitter unit
The transmitter unit supplied is registered on the receiver unit at the
factory. A maximum of 4 transmitter units can be registered on the
receiver unit. Proceed as follows to register another transmitter unit:
5 sec. [3] Receiver unit switches to Registration
mode,
appears in the display.
[9] / [10], [5] Select transmitter units C1 to C4 and
confirm them, connection quality indicator [12] flashes for
10 seconds.
Set
[22] to ON Transmitter unit is switched on, operating
indicator [21] lights up green.
[29] Register the transmitter unit on the receiver unit.
If the registration process fails, Out of Range appears in the
display. Repeat the process.
Selecting a transmitter unit
If several transmitter units are registered, a transmitter unit can be
selected manually. Transmitter unit 1 is selected as standard.
[3] several times Change transmitter units.
Individual settings can be defined for each transmitter unit.
Scan modus
If several transmitter units are registered, you can programme the
receiver unit to switch between the transmitter units registered at
10-second intervals. The signals from the selected transmitter units
are played in succession.
Press
[3] until Scan appears in the display.
[5] Confirm the setting, the registered transmitter units are
in Scan mode.
Selecting/Deselecting transmitter units for Scan mode
Press
[3] until the required transmitter unit is selected.
[9] / [10] A checkbox beside the camera icon is selected/
deselected.
If a transmitter unit is deselected, it is ignored for Scan mode.
Icons in the display
Signal strength
The equipment has a range of up to 300m. The range can be
reduced by obstructions, such as walls etc. Electronic equip
ment in the vicinity can also cause disturbance.
Battery pack fully charged.
Battery pack discharged.
VOX mode (sound activation)
Signals picked up by the transmitter unit are transmitted to the re
ceiver unit. You can adjust the sensitivity by which the transmitter
unit detects the acoustic signals.
Switching VOX mode on-off / Setting the sensitivity
Press [5] until VOX or OFF appears in the display.
[9] / [10] Select one of the 5 levels of sensitivity or OFF.
[5] Confirm the setting.
If the transmitter unit does not transmit an acoustic signal to the
receiver unit for a period of one minute, the receiver unit display
goes out.
Talk function
[13] Voice communication is possible from the receiv
er unit to the transmitter unit.
If you activate this function, playback of a lullaby is stopped.
Night vision function
If the brightness of the area monitored no longer suffices for normal
operation, the equipment automatically switches to night vision.
Lullabies
You can play lullabies on the transmitter unit.
Playing a lullaby
[8] appears in the display.
Selecting a lullaby
Switch between the 5 lullabies while the transmitter unit is playing a
lullaby.
[9]/ [10] 1 to 5 appears in the display.
You can only change the lullaby within 8 seconds. If you want to
change the lullaby at a later point, you must stop the function
and then restart it.
Brightness
Press [5] until appears in the display.
[9] / [10] Select one of the 5 brightness levels.
[5] Confirm the setting.
Temperature
The transmitter unit is equipped with a temperature sensor [25]. The
receiver unit displays the ambient temperature around the transmit
ter unit in °C or °F and alerts you if the temperature moves outside
the set range.
Setting the lower temperature limit
The lower temperature limit is 15 °C.
Press [5] until Lo appears in the display.
[9] / [10] Set the temperature.
[5] Confirm the setting.
If you select the OFF setting, the alert function of the receiver
unit regarding too low a temperature is switched off.
Setting the upper temperature limit
The upper temperature limit is 25 °C.
Press [5] until Hi appears in the display.
[9] / [10] Set the temperature.
[5] Confirm the setting.
If you select the OFF setting, the alert function of the receiver
unit regarding too high a temperature is switched off.
Setting the Unit of Measurement
Press
[5] until appears in the display.
[9] / [10] Select °C or °F.
[5] Confirm the setting.
Night light
The transmitter unit is equipped with an built-in night light [17]. You
can switch the night light on and off via the receiver unit.
Press
[5] until the moon icon appears in the display.
[9] / [10] Select ON or OFF.
[5] Confirm the setting.
Vibration alarm
The receiver unit can alert you by means of vibration.
Press
[5] until the vibration alarm icon appears in the display.
[9] / [10] Select ON or OFF.
[5] Confirm the setting.
Zoom
You can switch between two zoom factors in order to enlarge or
reduce the image section monitored by the transmitter unit. If you
select the double zoom, 4 direction arrows appear in order to select
one of the four image sections.
2 sec. [5] Select x2.
[9] / [10] Select the upper or lower image section.
[8] / [3] Select the right or left image section.
[5] Confirm the setting.
Proceed as follows to restore the 1st zoom factor:
2 sec. [5] Enlarges the image section by the 1st zoom
factor.
[5] Confirm the setting.
Power adapter plug, receiver unit
Using the energy-efficient power adapter plug (input 100-240V
AC
,
output 6V
DC
, 600mA) the zero load is approx. 0.17W. The average
efficiency is approx. 72.5%. The maximum power consumption is
approx. 3.9 W.
Power adapter plug, transmitter unit
Using the energy-efficient power adapter plug (input 100-240V
AC
,
output 6V
DC
, 600mA) the zero load is approx. 0.17 W. The average
efficiency is approx. 72.2 %. The maximum power consumption is
approx. 2 W.
Service hotline
In the case of technical problems, contact our Service hotline.
Switzerland: Tel. 0900 00 1675 (national charges, Swisscom at time
of going to print: CHF 2.60/min).
In the case of claims under the terms of guarantee, contact your
sales outlet.