You will receive readings only if data has been programmed into the Tanita Remote Display.
2010TANITA CorporationAll Rights Reserved.
For questions or help with product: Call Customer Service (847) 640 - 9241 (US & Canada Only)
Do not use the body fat reading feature of this product if you have a pacemaker or other electronic
implanted medical device. The body fat monitor function is not intended for pregnant women,
professional athlete or bodybuilders.
WARNING
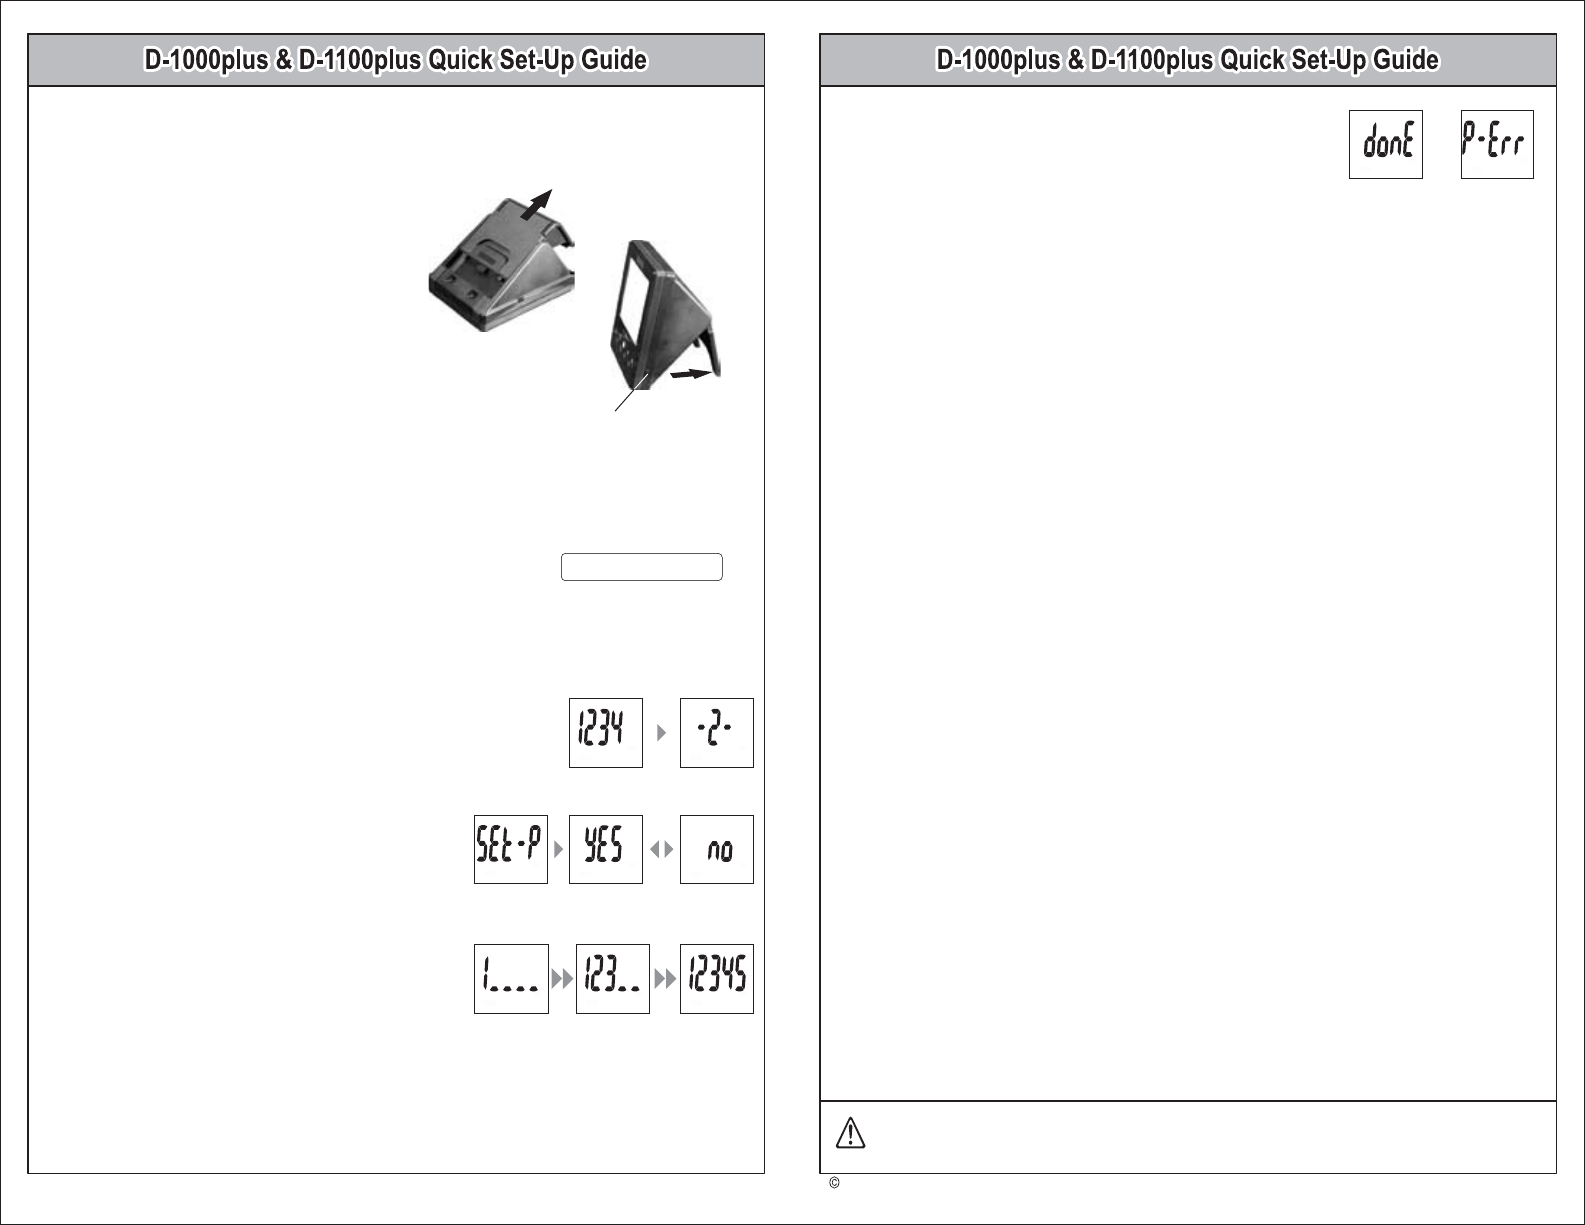
1) Before proceeding, a) Install the batteries in the platform.
b) Install the batteries and set the clock in the remote display.
c) The platform and the remote display are within 17 feet (5 m) of each other.
2. Pairing the remote display and Tanita wireless platform (”platform”)
The platform needs to pair with the applicable remote display before measurements are attempted.
2) Press and hold the OFF button for 2 seconds on the remote display.
The remote display will show “ 1234 ” for selecting a personal number.
Select the preferred personal number which will be paired with the platform
using ▲/▼buttons and press the SET button to confirm.
3) The remote display will show “ SEt-P ”. Select “ YES ” or “ no ”
using ▲/▼ buttons, and press the SET button to confirm,
4) Input the 5 digit serial number found on the bottom of the
platform using ▲/▼buttons and press the SET button to
confirm.
Note: ・ “ 00000 ”, “ 000001 ” and more than “ 65535 ”.
These serial numbers are not allowed. Please input the correct serial number.
・ The serial number is located on the bottom of the platform.
Cancellation-1: Press the OFF button to cancel during the pairing process and then the clock will be displayed.
Cancellation-2: The pairing process will be cancelled if inactive for 1 minute and then the clock will be displayed.
1) Set Hour
Press ▲/▼buttons to set hour and then press SET.
The unit will beep once to confirm.
2) Set Minute
Press ▲/▼buttons to set minute and then press SET.
The unit will beep twice to confirm the programming.
• Resetting Clock
Press the clock button on the bottom of the remote display.
Then follow the clock setting procedure 1) and 2).
1. Initial Setting (Clock Setting)
Insert batteries into the remote display and then press
any front panel button to set the clock.
a) “ YES ”: The pairing process will continue to the next step.
b) “ no ”: The pairing process will be cancelled and then
the clock will be displayed.
Note:
To confirm the paired serial number on each personal number after completion the
pairing process:
Press and hold the SET button for 2 seconds on the remote display. The remote display will show “ -1- ”.
Select the personal number using ▲/▼buttons, and press the SET button to confirm. The display shows
the paired serial number for 3 seconds.
“- - - - -” is shown if there is no serial number stored for the selected personal number.
5) Once the pairing process is completed with the platform, the remote
display shows “ donE ” and then the clock will be displayed. If the remote
display shows “ P-Err ”, please try the pairing process again.
1) Selal Data Number
Use the SET button to activate the unit. Use ▲/▼buttons to select a personal data number.
Press the SET button.
You will receive readings only if data has been programmed into the Tanita remote display.
2) Set Age (Applicable Age: Refer to the platform manual)
Use ▲/▼buttons to select age. Press the SET button.
3) Select Female or Male (Athlete mode: Refer to the platform manual)
Use ▲/▼buttons to select Female / Male / Athlete Female / Athlete Male. Press the SET button.
4) Specify Height
Use ▲/▼buttons to select height. Press the SET button to confirm.
3. Setting and storing personal data in the remote display
The remote display will beep twice and the display will flash all data three times to confirm the programming.
The power will then shut down automatically.
To use the DCI (Daily Calorie Intake) feature properly, you need to set the Activity Level.
Level 1 = Inactive lifestyles (little or no exercise)
Level 2 = Moderately active lifestyles (occasional, low intensity exercise)
Level 3 = Adult involved in intense physical activity
Note: If you select the Athlete Mode, it will automatically set the Activity Level to Level 3.
Use the ▲/▼ buttons to specify Activity Level. Press the SET button to confirm.
5) Select Activity Level
Please review the Tanita wireless platform instruction manual for remote display operations, warnings, and other
important information. The instruction manual of each platform also includes the following procedures.
- Taking body composition readings
- Programming The Guest Mode- Taking Weight Measurement Only
- Recall Function
Battery Cover
Backlight Button
Upright Position
Note: If there is no serial number on the bottom of the
platform, the pairing process is not required and
you can skip to the section 3, settting and storing
personal data in the remote display.
Note: D-1000plus only, but it also depends on the platform specification, refer to platform manual.
Serial Number Sticker
Serial No.
X X X X X
Brauchen Sie Hilfe? Stellen Sie Ihre Frage.
Missbrauch melden von Frage und/oder Antwort
Libble nimmt den Missbrauch seiner Dienste sehr ernst. Wir setzen uns dafür ein, derartige Missbrauchsfälle gemäß den Gesetzen Ihres Heimatlandes zu behandeln. Wenn Sie eine Meldung übermitteln, überprüfen wir Ihre Informationen und ergreifen entsprechende Maßnahmen. Wir melden uns nur dann wieder bei Ihnen, wenn wir weitere Einzelheiten wissen müssen oder weitere Informationen für Sie haben.
Art des Missbrauchs:
Forenregeln
Um zu sinnvolle Fragen zu kommen halten Sie sich bitte an folgende Spielregeln:
Lesen Sie zuerst die Anleitung;
Schauen Sie nach, ob die Frage bereits gestellt wurde;
Stellen Sie die Frage so deutlich wie nur einigermaßen möglich;
Erwähnen Sie was Sie bereits versucht haben um das Problem zu lösen;
Ist Ihr Problem von einem Besucher gelöst dann lassen Sie ihn / sie wissen in diesem Forum;
Falls Sie reagieren möchten, so verwenden Sie bitte das Antworten- Formular;
Da ihre Frage für alle Besucher sichtbar ist, sollten Sie lieber keine persönliche Daten erwähnen.
Neu registrieren
Registrieren auf E - Mails für Tanita D-1000plus wenn:
neue Frage gestellt werden
neue Handbücher vorhanden sind
Sie erhalten eine E-Mail, um sich für eine oder beide Optionen anzumelden.
Das Handbuch wird per E-Mail gesendet. Überprüfen Sie ihre E-Mail.
Wenn Sie innerhalb von 15 Minuten keine E-Mail mit dem Handbuch erhalten haben, kann es sein, dass Sie eine falsche E-Mail-Adresse eingegeben haben oder dass Ihr ISP eine maximale Größe eingestellt hat, um E-Mails zu erhalten, die kleiner als die Größe des Handbuchs sind.
Ihre Frage wurde zu diesem Forum hinzugefügt
Möchten Sie eine E-Mail erhalten, wenn neue Antworten und Fragen veröffentlicht werden? Geben Sie bitte Ihre Email-Adresse ein.